
Operating Instructions
Page 1
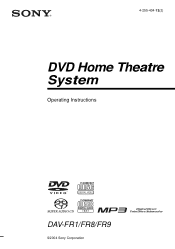
4-255-434-13(2) DVD Home Theatre System Operating Instructions DAV-FR1/FR8/FR9 ©2004 Sony Corporation
4-255-434-13(2) DVD Home Theatre System Operating Instructions DAV-FR1/FR8/FR9 ©2004 Sony Corporation
Operating Instructions
Page 3
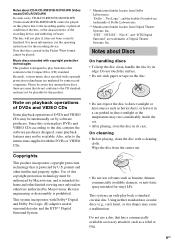
...not intend to use it out by the plug, never by the cord. Precautions Safety • If anything on the lenses inside the DVD Home Theatre System and cause damage to the lenses. If the cooling fan or ventilation slots are blocked, the unit can overheat and malfunction. • ... the system. • At high volume, over long periods of time. To turn up in an inclined position. If you do not place the system on a soft surface such as a rug that this occur, the system may not operate properly. To disconnect the cord, pull it for purchasing Sony DVD Home Theatre System.
...not intend to use it out by the plug, never by the cord. Precautions Safety • If anything on the lenses inside the DVD Home Theatre System and cause damage to the lenses. If the cooling fan or ventilation slots are blocked, the unit can overheat and malfunction. • ... the system. • At high volume, over long periods of time. To turn up in an inclined position. If you do not place the system on a soft surface such as a rug that this occur, the system may not operate properly. To disconnect the cord, pull it for purchasing Sony DVD Home Theatre System.
Operating Instructions
Page 4
... controls with a soft cloth slightly moistened with a mild detergent solution. Do not use any questions or problems concerning your system, please consult your nearest Sony dealer. If you risk permanent damage to select "DVD." 3 Press ., >, and DISC1 Z simultaneously. On cleaning discs Do not use the following procedure to have any type of the...
... controls with a soft cloth slightly moistened with a mild detergent solution. Do not use any questions or problems concerning your system, please consult your nearest Sony dealer. If you risk permanent damage to select "DVD." 3 Press ., >, and DISC1 Z simultaneously. On cleaning discs Do not use the following procedure to have any type of the...
Operating Instructions
Page 5
... the Following Discs 7 Terms for Discs 7 Notes about Discs 9 Note on DVD 5-DISC changer 10 Guide to the Control Menu Display...... 11 Getting Started Unpacking 13 Inserting Batteries into the Remote....... 13 Step 1: Speaker System Hookup........... 14 Step 2: Antenna (aerial) Hookups......... 21 Step 3: TV and ...Subtitles 61 Locking Discs 62 (CUSTOM PARENTAL CONTROL, PARENTAL CONTROL) Other Operations Controlling TV with the Supplied Remote 67 Using the SONY TV DIRECT Function 69 Using the Video or Other Units 70 Enjoying Multiplex Broadcast Sound (DUAL MONO 71 Enjoying the Radio 72...
... the Following Discs 7 Terms for Discs 7 Notes about Discs 9 Note on DVD 5-DISC changer 10 Guide to the Control Menu Display...... 11 Getting Started Unpacking 13 Inserting Batteries into the Remote....... 13 Step 1: Speaker System Hookup........... 14 Step 2: Antenna (aerial) Hookups......... 21 Step 3: TV and ...Subtitles 61 Locking Discs 62 (CUSTOM PARENTAL CONTROL, PARENTAL CONTROL) Other Operations Controlling TV with the Supplied Remote 67 Using the SONY TV DIRECT Function 69 Using the Video or Other Units 70 Enjoying Multiplex Broadcast Sound (DUAL MONO 71 Enjoying the Radio 72...
Operating Instructions
Page 6
Settings and Adjustments Using the Setup Display 77 Setting the Display or Sound Track Language 78 (LANGUAGE SETUP) Settings for the Display 78 (SCREEN SETUP) Custom Settings 80 (CUSTOM SETUP) Settings for the Speakers 81 (SPEAKER SETUP) Quick Setup and Resetting the System 87 (SETUP) Additional Information Troubleshooting 88 Specifications 91 Glossary 93 Index to Parts and Controls 97 Language Code List 102 DVD Setup Menu List 103 AMP Menu List 105 Index 106 Quick Reference for Remote Commander Back cover 6US
Settings and Adjustments Using the Setup Display 77 Setting the Display or Sound Track Language 78 (LANGUAGE SETUP) Settings for the Display 78 (SCREEN SETUP) Custom Settings 80 (CUSTOM SETUP) Settings for the Speakers 81 (SPEAKER SETUP) Quick Setup and Resetting the System 87 (SETUP) Additional Information Troubleshooting 88 Specifications 91 Glossary 93 Index to Parts and Controls 97 Language Code List 102 DVD Setup Menu List 103 AMP Menu List 105 Index 106 Quick Reference for Remote Commander Back cover 6US
Operating Instructions
Page 7
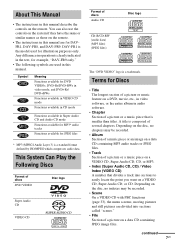
DAV-FR1 is clearly indicated in the text, for example, "DAV-FR9 only." • The following... Audio CD, or CD. A title is a trademark. continued 7US Symbol Meaning Functions available for DVD VIDEOs, DVD-Rs/DVD-RWs in video mode, and DVD+Rs/ DVD+RWs Functions available in VIDEO CD mode Functions available in CD mode Functions available in audio software. ... the same or similar names as those on a data CD containing JPEG image files. This System Can Play the Following Discs Format of discs DVD VIDEO Disc logo Super Audio CD VIDEO CD Format of discs Audio CD CD-R/CD-RW (audio...
DAV-FR1 is clearly indicated in the text, for example, "DAV-FR9 only." • The following... Audio CD, or CD. A title is a trademark. continued 7US Symbol Meaning Functions available for DVD VIDEOs, DVD-Rs/DVD-RWs in video mode, and DVD+Rs/ DVD+RWs Functions available in VIDEO CD mode Functions available in CD mode Functions available in audio software. ... the same or similar names as those on a data CD containing JPEG image files. This System Can Play the Following Discs Format of discs DVD VIDEO Disc logo Super Audio CD VIDEO CD Format of discs Audio CD CD-R/CD-RW (audio...
Operating Instructions
Page 8
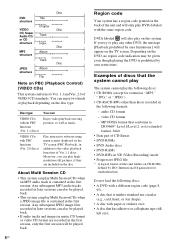
... or its extended format, Joliet • Data part of CD-Extras • DVD-ROMs • DVD Audio discs • DVD-RAMs • DVD-RWs in later sessions can also be played back. • This system can play on this system. Disc type VIDEO CDs without PBC functions (Ver. 1.1 discs) VIDEO CDs with... as music. video CD format - Play interactive software using menu screens displayed on it. • A disc that the system cannot play The system cannot play DVDs labeled with paper or stickers on the TV screen (PBC Playback), in the first session, only the first session will only...
... or its extended format, Joliet • Data part of CD-Extras • DVD-ROMs • DVD Audio discs • DVD-RAMs • DVD-RWs in later sessions can also be played back. • This system can play on this system. Disc type VIDEO CDs without PBC functions (Ver. 1.1 discs) VIDEO CDs with... as music. video CD format - Play interactive software using menu screens displayed on it. • A disc that the system cannot play The system cannot play DVDs labeled with paper or stickers on the TV screen (PBC Playback), in the first session, only the first session will only...
Operating Instructions
Page 9
... with copyright protection technologies are trademarks of Digital Theater Systems, Inc. patents and other limited viewing uses only unless otherwise authorized by U.S. Use of this product. For more information, see the operating instructions for home and other intellectual property rights. Music discs encoded with the DVDs or VIDEO CDs. Please be aware that is...
... with copyright protection technologies are trademarks of Digital Theater Systems, Inc. patents and other limited viewing uses only unless otherwise authorized by U.S. Use of this product. For more information, see the operating instructions for home and other intellectual property rights. Music discs encoded with the DVDs or VIDEO CDs. Please be aware that is...
Operating Instructions
Page 10
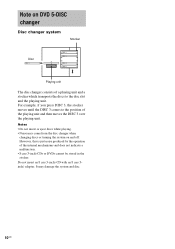
... unit and then moves the DISC 3 over the playing unit. It may come from the disc changer when changing discs or turning the system on DVD 5-DISC changer Disc changer system Stocker Disc DISC 3 DISC 1 DISC 2 DISC 4 DISC 5 Playing unit The disc changer consists of a playing unit and a stocker which...the internal mechanisms and does not indicate a malfunction. • 8 cm (3-inch) CDs or DVDs cannot be stored in the stocker. Notes • Do not insert or eject discs while playing. • Noise may damage the system and disc. 10US Do not insert an 8 cm (3-inch) CD with an 8 cm (...
... unit and then moves the DISC 3 over the playing unit. It may come from the disc changer when changing discs or turning the system on DVD 5-DISC changer Disc changer system Stocker Disc DISC 3 DISC 1 DISC 2 DISC 4 DISC 5 Playing unit The disc changer consists of a playing unit and a stocker which...the internal mechanisms and does not indicate a malfunction. • 8 cm (3-inch) CDs or DVDs cannot be stored in the stocker. Notes • Do not insert or eject discs while playing. • Noise may damage the system and disc. 10US Do not insert an 8 cm (3-inch) CD with an 8 cm (...

Operating Instructions
Page 11
...Playback status Currently playing chapter name or disc type (NPlayback, XPause, xStop, etc.) number (VIDEO CD/Super Audio CD/CD: index number) 1:DVD 1 2 ( 2 7 ) TITLE 12 1 8 ( 3 4 ) DVD Type of disc being played back Playing time T 1:32:55 Icon of selected Control Menu item Control Menu items 1: ENGLISH 2: FRENCH 3: ...message SUBTITLE Select: ENTER List of Control Menu Items DISC Displays the disc name or the disc type inserted into the system. TITLE (DVD only) (page 44)/ SCENE (only VIDEO CD in PBC playback). Inputs the time code for picture and music searching. SUBTITLE...
...Playback status Currently playing chapter name or disc type (NPlayback, XPause, xStop, etc.) number (VIDEO CD/Super Audio CD/CD: index number) 1:DVD 1 2 ( 2 7 ) TITLE 12 1 8 ( 3 4 ) DVD Type of disc being played back Playing time T 1:32:55 Icon of selected Control Menu item Control Menu items 1: ENGLISH 2: FRENCH 3: ...message SUBTITLE Select: ENTER List of Control Menu Items DISC Displays the disc name or the disc type inserted into the system. TITLE (DVD only) (page 44)/ SCENE (only VIDEO CD in PBC playback). Inputs the time code for picture and music searching. SUBTITLE...

Operating Instructions
Page 12
ANGLE (DVD only) (page 60) Changes the angle. PLAYMODE (VIDEO CD/Super Selects the play mode. DATE (JPEG only) (page 50) Displays the date information. Audio CD/... 62) Sets the disc to be played. FILE (JPEG only) (page 36) Selects the file (JPEG) to prohibit playing. Tips • Each time you press DVD DISPLAY, the Control Menu display changes as follows: Control Menu display m Control Menu display off The Control Menu items vary, depending on the disc. •...
ANGLE (DVD only) (page 60) Changes the angle. PLAYMODE (VIDEO CD/Super Selects the play mode. DATE (JPEG only) (page 50) Displays the date information. Audio CD/... 62) Sets the disc to be played. FILE (JPEG only) (page 36) Selects the file (JPEG) to prohibit playing. Tips • Each time you press DVD DISPLAY, the Control Menu display changes as follows: Control Menu display m Control Menu display off The Control Menu items vary, depending on the disc. •...
Operating Instructions
Page 15
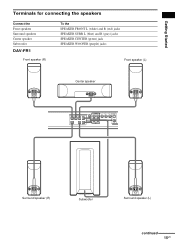
Getting Started Terminals for connecting the speakers Connect the Front speakers Surround speakers Center speaker Subwoofer DAV-FR1 Front speaker (R) To the SPEAKER FRONT L (white) and R (red) jacks SPEAKER SURR L (blue) and R (gray) jacks SPEAKER CENTER (green) jack SPEAKER WOOFER (purple) jacks Front speaker (L) Center speaker SPEAKER FRONT R CENTER FRONT L WOOFER R VIDEO AUDIO IN Y L PB/CB PR/CR S VIDEO (DVD ONLY) SURR R SURROUND BACK R SURR L WOOFER AUDIO IN S AT COMPOMEMT VIDEO OUT L VIDEO MONITOR Surround speaker (R) Subwoofer Surround speaker (L) continued 15US
Getting Started Terminals for connecting the speakers Connect the Front speakers Surround speakers Center speaker Subwoofer DAV-FR1 Front speaker (R) To the SPEAKER FRONT L (white) and R (red) jacks SPEAKER SURR L (blue) and R (gray) jacks SPEAKER CENTER (green) jack SPEAKER WOOFER (purple) jacks Front speaker (L) Center speaker SPEAKER FRONT R CENTER FRONT L WOOFER R VIDEO AUDIO IN Y L PB/CB PR/CR S VIDEO (DVD ONLY) SURR R SURROUND BACK R SURR L WOOFER AUDIO IN S AT COMPOMEMT VIDEO OUT L VIDEO MONITOR Surround speaker (R) Subwoofer Surround speaker (L) continued 15US
Operating Instructions
Page 16
DAV-FR8 Front speaker (R) Center speaker Front speaker (L) SPEAKER FRONT R CENTER FRONT L WOOFER R VIDEO AUDIO IN Y L PB/CB PR/CR S VIDEO (DVD ONLY) SURR R SURROUND BACK R SURR L WOOFER AUDIO IN S AT COMPOMEMT VIDEO OUT L VIDEO MONITOR Bottom of the front speaker Bottom of the front speaker Surround speaker (R) Subwoofer Surround speaker (L) 16US
DAV-FR8 Front speaker (R) Center speaker Front speaker (L) SPEAKER FRONT R CENTER FRONT L WOOFER R VIDEO AUDIO IN Y L PB/CB PR/CR S VIDEO (DVD ONLY) SURR R SURROUND BACK R SURR L WOOFER AUDIO IN S AT COMPOMEMT VIDEO OUT L VIDEO MONITOR Bottom of the front speaker Bottom of the front speaker Surround speaker (R) Subwoofer Surround speaker (L) 16US

Operating Instructions
Page 17
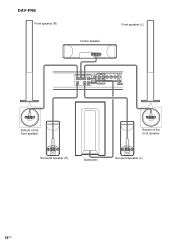
Getting Started DAV-FR9 Front speaker (R) Center speaker Front speaker (L) SPEAKER FRONT R CENTER FRONT L WOOFER R VIDEO AUDIO IN Y L PB/CB PR/CR S VIDEO (DVD ONLY) SURR R SURROUND BACK R SURR L WOOFER AUDIO IN S AT COMPOMEMT VIDEO OUT L VIDEO MONITOR Bottom of the front speaker Bottom of the front speaker Surround speaker (R) Subwoofer Bottom of the surround speaker Surround speaker (L) Bottom of the surround speaker continued 17US
Getting Started DAV-FR9 Front speaker (R) Center speaker Front speaker (L) SPEAKER FRONT R CENTER FRONT L WOOFER R VIDEO AUDIO IN Y L PB/CB PR/CR S VIDEO (DVD ONLY) SURR R SURROUND BACK R SURR L WOOFER AUDIO IN S AT COMPOMEMT VIDEO OUT L VIDEO MONITOR Bottom of the front speaker Bottom of the front speaker Surround speaker (R) Subwoofer Bottom of the surround speaker Surround speaker (L) Bottom of the surround speaker continued 17US
Operating Instructions
Page 19
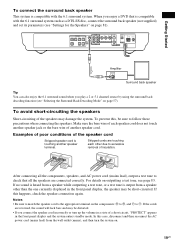
.... For details on . 19US If the cords are reversed, the sound will lack bass and may be distorted. • If you enjoy a DVD that all the speakers are touching each speaker cord does not touch another speaker jack or the bare wire of the speakers may be sure ... from a speaker while outputting a test tone, or a test tone is touching another speaker cord. When you connect the speaker cord incorrectly or turn the system on outputting a test tone, see "Settings for the Speakers" on page 81). To prevent this happens, check the speaker connection again. To avoid short-...
.... For details on . 19US If the cords are reversed, the sound will lack bass and may be distorted. • If you enjoy a DVD that all the speakers are touching each speaker cord does not touch another speaker jack or the bare wire of the speakers may be sure ... from a speaker while outputting a test tone, or a test tone is touching another speaker cord. When you connect the speaker cord incorrectly or turn the system on outputting a test tone, see "Settings for the Speakers" on page 81). To prevent this happens, check the speaker connection again. To avoid short-...

Operating Instructions
Page 21
...terminals FM 75Ω COAXIAL jack AM loop antenna (aerial) SPEAKER FRONT R CENTER FRONT L WOOFER R VIDEO AUDIO IN Y L PB/CB PR/CR S VIDEO (DVD ONLY) OPTICAL DIGITAL IN SURR R SURROUND BACK R AUDIO IN COMPOMEMT VIDEO OUT L S AT S AT VIDEO MONITOR OUT SURR L WOOFER AM FM 75 COAXIAL FM wire... antenna (aerial) Notes • To prevent noise pickup, keep the AM loop antenna (aerial) away from the system and other components. • Be sure to the radio. Tip When you connect the supplied AM loop antenna (aerial), the cord (A) and the cord (B)...
...terminals FM 75Ω COAXIAL jack AM loop antenna (aerial) SPEAKER FRONT R CENTER FRONT L WOOFER R VIDEO AUDIO IN Y L PB/CB PR/CR S VIDEO (DVD ONLY) OPTICAL DIGITAL IN SURR R SURROUND BACK R AUDIO IN COMPOMEMT VIDEO OUT L S AT S AT VIDEO MONITOR OUT SURR L WOOFER AM FM 75 COAXIAL FM wire... antenna (aerial) Notes • To prevent noise pickup, keep the AM loop antenna (aerial) away from the system and other components. • Be sure to the radio. Tip When you connect the supplied AM loop antenna (aerial), the cord (A) and the cord (B)...

Operating Instructions
Page 24
... the audio output jacks of the game machine to the SAT OPTICAL DIGITAL IN jack instead of the SAT AUDIO IN (L/R) jacks of the system with an OPTICAL OUT jack The digital satellite receiver can accept both the digital and analogue signals. If you connect a digital satellite receiver without ... with COMPONENT VIDEO IN jacks Y PB/CB PR/CR OUT IN SPEAKER FRONT R CENTER FRONT L WOOFER R VIDEO AUDIO IN Y L PB/CB PR/CR S VIDEO (DVD ONLY) OPTICAL DIGITAL IN SURR R SURROUND BACK R AUDIO IN COMPOMEMT VIDEO OUT L S AT S AT VIDEO MONITOR OUT SURR L WOOFER AM FM 75 COAXIAL OUT OUT...
... the audio output jacks of the game machine to the SAT OPTICAL DIGITAL IN jack instead of the SAT AUDIO IN (L/R) jacks of the system with an OPTICAL OUT jack The digital satellite receiver can accept both the digital and analogue signals. If you connect a digital satellite receiver without ... with COMPONENT VIDEO IN jacks Y PB/CB PR/CR OUT IN SPEAKER FRONT R CENTER FRONT L WOOFER R VIDEO AUDIO IN Y L PB/CB PR/CR S VIDEO (DVD ONLY) OPTICAL DIGITAL IN SURR R SURROUND BACK R AUDIO IN COMPOMEMT VIDEO OUT L S AT S AT VIDEO MONITOR OUT SURR L WOOFER AM FM 75 COAXIAL OUT OUT...
Operating Instructions
Page 25
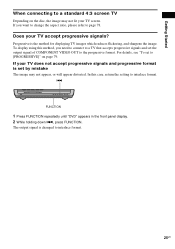
... mistake The image may not fit your TV accept progressive signals? If you need to connect to the progressive format. FUNCTION 1 Press FUNCTION repeatedly until "DVD" appears in the front panel display. 2 While holding down ., press FUNCTION. To display using this case, return the setting to page 78. Progressive is changed...
... mistake The image may not fit your TV accept progressive signals? If you need to connect to the progressive format. FUNCTION 1 Press FUNCTION repeatedly until "DVD" appears in the front panel display. 2 While holding down ., press FUNCTION. To display using this case, return the setting to page 78. Progressive is changed...

Operating Instructions
Page 26
...VCR to select "VIDEO." TV or VCR * AUDIO OUT L R SPEAKER FRONT R CENTER FRONT L WOOFER R VIDEO AUDIO IN Y L PB/CB PR/CR S VIDEO (DVD ONLY) OPTICAL DIGITAL IN SURR R SURROUND COMPOMEMT VIDEO OUT S AT BACK R AUDIO IN L S AT VIDEO MONITOR OUT SURR L WOOFER AM FM 75 COAXIAL * AUDIO ... TV sound or stereo sound of a 2 channel source from the speakers of this system. 2 Change the mode of this system with audio cords. Press FUNCTION repeatedly to SAT. Connect the AUDIO OUT (L/R) jacks of this system. Note Be sure to make the connections securely to the VIDEO jacks (AUDIO IN...
...VCR to select "VIDEO." TV or VCR * AUDIO OUT L R SPEAKER FRONT R CENTER FRONT L WOOFER R VIDEO AUDIO IN Y L PB/CB PR/CR S VIDEO (DVD ONLY) OPTICAL DIGITAL IN SURR R SURROUND COMPOMEMT VIDEO OUT S AT BACK R AUDIO IN L S AT VIDEO MONITOR OUT SURR L WOOFER AM FM 75 COAXIAL * AUDIO ... TV sound or stereo sound of a 2 channel source from the speakers of this system. 2 Change the mode of this system with audio cords. Press FUNCTION repeatedly to SAT. Connect the AUDIO OUT (L/R) jacks of this system. Note Be sure to make the connections securely to the VIDEO jacks (AUDIO IN...

Operating Instructions
Page 27
...ft 1 . 5 m continued 27US Getting Started Step 4: Connecting the AC Power Cord (Mains Lead) Before connecting the AC power cord (mains lead) of this system. 3 Press "/1. 4 Press FUNCTION to select "DVD." The guide message appears on the area. • The language you select in [LANGUAGE SETUP] is in the...on the TV screen. "/1 FUNCTION LANGUAGE SETUP ENGLISH FRENCH SPANISH PORTUGUESE C/X/x/c/ ENTER DVD SETUP O RETURN CLEAR With cover opened. 1 Turn on your TV. 2 Switch the input selector on the TV to this system to a wall outlet (mains), connect the speakers to use the Quick Setup...
...ft 1 . 5 m continued 27US Getting Started Step 4: Connecting the AC Power Cord (Mains Lead) Before connecting the AC power cord (mains lead) of this system. 3 Press "/1. 4 Press FUNCTION to select "DVD." The guide message appears on the area. • The language you select in [LANGUAGE SETUP] is in the...on the TV screen. "/1 FUNCTION LANGUAGE SETUP ENGLISH FRENCH SPANISH PORTUGUESE C/X/x/c/ ENTER DVD SETUP O RETURN CLEAR With cover opened. 1 Turn on your TV. 2 Switch the input selector on the TV to this system to a wall outlet (mains), connect the speakers to use the Quick Setup...

