
Operating Instructions
Page 5
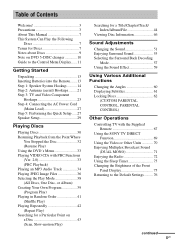
... the Following Discs 7 Terms for Discs 7 Notes about Discs 9 Note on DVD 5-DISC changer 10 Guide to the Control Menu Display...... 11 Getting Started Unpacking 13 Inserting Batteries into the Remote....... 13 Step 1: Speaker System Hookup........... 14 Step 2: Antenna (aerial) Hookups......... 21 Step 3: TV and...60 Displaying Subtitles 61 Locking Discs 62 (CUSTOM PARENTAL CONTROL, PARENTAL CONTROL) Other Operations Controlling TV with the Supplied Remote 67 Using the SONY TV DIRECT Function 69 Using the Video or Other Units 70 Enjoying Multiplex Broadcast Sound (DUAL MONO 71 Enjoying ...
... the Following Discs 7 Terms for Discs 7 Notes about Discs 9 Note on DVD 5-DISC changer 10 Guide to the Control Menu Display...... 11 Getting Started Unpacking 13 Inserting Batteries into the Remote....... 13 Step 1: Speaker System Hookup........... 14 Step 2: Antenna (aerial) Hookups......... 21 Step 3: TV and...60 Displaying Subtitles 61 Locking Discs 62 (CUSTOM PARENTAL CONTROL, PARENTAL CONTROL) Other Operations Controlling TV with the Supplied Remote 67 Using the SONY TV DIRECT Function 69 Using the Video or Other Units 70 Enjoying Multiplex Broadcast Sound (DUAL MONO 71 Enjoying ...
Operating Instructions
Page 6
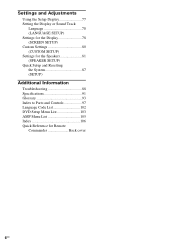
Settings and Adjustments Using the Setup Display 77 Setting the Display or Sound Track Language 78 (LANGUAGE SETUP) Settings for the Display 78 (SCREEN SETUP) Custom Settings 80 (CUSTOM SETUP) Settings for the Speakers 81 (SPEAKER SETUP) Quick Setup and Resetting the System 87 (SETUP) Additional Information Troubleshooting 88 Specifications 91 Glossary 93 Index to Parts and Controls 97 Language Code List 102 DVD Setup Menu List 103 AMP Menu List 105 Index 106 Quick Reference for Remote Commander Back cover 6US
Settings and Adjustments Using the Setup Display 77 Setting the Display or Sound Track Language 78 (LANGUAGE SETUP) Settings for the Display 78 (SCREEN SETUP) Custom Settings 80 (CUSTOM SETUP) Settings for the Speakers 81 (SPEAKER SETUP) Quick Setup and Resetting the System 87 (SETUP) Additional Information Troubleshooting 88 Specifications 91 Glossary 93 Index to Parts and Controls 97 Language Code List 102 DVD Setup Menu List 103 AMP Menu List 105 Index 106 Quick Reference for Remote Commander Back cover 6US
Operating Instructions
Page 7
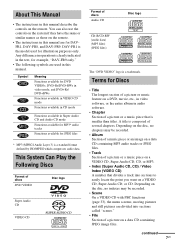
...ISO/MPEG which compresses audio data. continued 7US You can also use the controls on the system if they have the same or similar names as those on a data CD containing JPEG image files. DAV-FR1 is a trademark. Depending on the disc, no indexes may be recorded. • Scene...menu screens, moving pictures and still pictures are for illustration purposes only. This System Can Play the Following Discs Format of discs DVD VIDEO Disc logo Super Audio CD VIDEO CD Format of a picture on the remote. • The instructions in this manual are divided into sections to easily ...
...ISO/MPEG which compresses audio data. continued 7US You can also use the controls on the system if they have the same or similar names as those on a data CD containing JPEG image files. DAV-FR1 is a trademark. Depending on the disc, no indexes may be recorded. • Scene...menu screens, moving pictures and still pictures are for illustration purposes only. This System Can Play the Following Discs Format of discs DVD VIDEO Disc logo Super Audio CD VIDEO CD Format of a picture on the remote. • The instructions in this manual are divided into sections to easily ...
Operating Instructions
Page 13
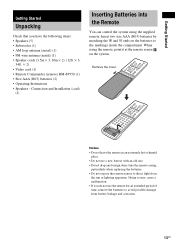
...Getting Started Unpacking Check that you do not use a new battery with an old one. • Do not drop any foreign object into the Remote You can control the system using the remote, point it at the remote sensor on the batteries to the markings inside the compartment. When using the supplied... apparatus. Insert two size AAA (R03) batteries by matching the 3 and # ends on the system. Notes • Do not leave the remote in an extremely hot or humid place. • Do not use the remote for an extended period of time, remove the batteries to direct light from battery leakage and...
...Getting Started Unpacking Check that you do not use a new battery with an old one. • Do not drop any foreign object into the Remote You can control the system using the remote, point it at the remote sensor on the batteries to the markings inside the compartment. When using the supplied... apparatus. Insert two size AAA (R03) batteries by matching the 3 and # ends on the system. Notes • Do not leave the remote in an extremely hot or humid place. • Do not use the remote for an extended period of time, remove the batteries to direct light from battery leakage and...

Operating Instructions
Page 30
...NO DISC" appears in the front panel display, then the system is set to "DVD," press FUNCTION to this system. 3 Press "/1 on the TV to select "DVD." Unless the mode of the system is ready for loading the disc. Press the Z button of the system. To play ) of the disc whose DISC indicator is not...disc to the disc stocker 1, press DISC1 Z. To load other discs, press DISC SKIP on the system. If there is a disc in the front panel display. 6 Press H on the remote or on the remote or DISC1-5 of the disc number you want . Playing Discs Playing Discs Depending on your disc. ...
...NO DISC" appears in the front panel display, then the system is set to "DVD," press FUNCTION to this system. 3 Press "/1 on the TV to select "DVD." Unless the mode of the system is ready for loading the disc. Press the Z button of the system. To play ) of the disc whose DISC indicator is not...disc to the disc stocker 1, press DISC1 Z. To load other discs, press DISC SKIP on the system. If there is a disc in the front panel display. 6 Press H on the remote or on the remote or DISC1-5 of the disc number you want . Playing Discs Playing Discs Depending on your disc. ...

Operating Instructions
Page 35
... displayed as a track name. • ID3 tag applies only to the track or the album list. 5 Select a track using X/x. DVD DISPLAY DVD MENU/ ALBUM+ C/X/x/c/ ENTER O RETURN 1 Press DVD DISPLAY. Press c to select the jump bar icon, and then scroll the jump bar to the previous display Press O RETURN or C....bar appears. The list of tracks contained in the disc appears. 3:HOME TOWN MP3 ROCK BEST HIT KARAOKE JAZZ R&B MY FAVORITE SONGS CLASSICAL SALSA OF CUBA BOSSANOVA 3 Select an album you can be displayed on the remote. 35US To return to display the rest of all tracks or albums...
... displayed as a track name. • ID3 tag applies only to the track or the album list. 5 Select a track using X/x. DVD DISPLAY DVD MENU/ ALBUM+ C/X/x/c/ ENTER O RETURN 1 Press DVD DISPLAY. Press c to select the jump bar icon, and then scroll the jump bar to the previous display Press O RETURN or C....bar appears. The list of tracks contained in the disc appears. 3:HOME TOWN MP3 ROCK BEST HIT KARAOKE JAZZ R&B MY FAVORITE SONGS CLASSICAL SALSA OF CUBA BOSSANOVA 3 Select an album you can be displayed on the remote. 35US To return to display the rest of all tracks or albums...

Operating Instructions
Page 37
The selected file starts playing. Enjoying Slide show can play from the current image. 2 Press H when you can be displayed on the remote. Press C or O RETURN to return to a number) in step 2, album name is displayed as follows: 1M t 2M t 3M t The 3M interval time is displayed....on a JPEG data disc M H 1 Press M while displaying a JPEG image. Notes • Only alphabetical letters and numbers can select an album using the DVD MENU/ALBUM+ or DVD TOP MENU/ALBUM- To change the interval time of all files or albums cannot be used for album or file names. Tip When a JPEG...
The selected file starts playing. Enjoying Slide show can play from the current image. 2 Press H when you can be displayed on the remote. Press C or O RETURN to return to a number) in step 2, album name is displayed as follows: 1M t 2M t 3M t The 3M interval time is displayed....on a JPEG data disc M H 1 Press M while displaying a JPEG image. Notes • Only alphabetical letters and numbers can select an album using the DVD MENU/ALBUM+ or DVD TOP MENU/ALBUM- To change the interval time of all files or albums cannot be used for album or file names. Tip When a JPEG...
Operating Instructions
Page 42
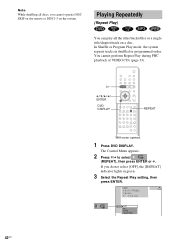
... remote or DISC1-5 on a disc. H C/X/x/c/ ENTER DVD DISPLAY REPEAT 42US With cover opened. 1 Press DVD DISPLAY. The Control Menu appears. 2 Press X/x to select (REPEAT), then press ENTER or c. Note While shuffling all the titles/tracks/files or a single title/chapter/track on the system.... cannot perform Repeat Play during PBC playback of VIDEO CDs (page 33). In Shuffle or Program Play mode, the system repeats tracks in green. 3 Select the Repeat Play setting, then press ENTER. 1:DVD DVD 1 2 ( 2 7 ) TITLE12 1 8 ( 3 4 ) T 1:32:55 OFF ALL TITLE CHAPTER Playing Repeatedly (...
... remote or DISC1-5 on a disc. H C/X/x/c/ ENTER DVD DISPLAY REPEAT 42US With cover opened. 1 Press DVD DISPLAY. The Control Menu appears. 2 Press X/x to select (REPEAT), then press ENTER or c. Note While shuffling all the titles/tracks/files or a single title/chapter/track on the system.... cannot perform Repeat Play during PBC playback of VIDEO CDs (page 33). In Shuffle or Program Play mode, the system repeats tracks in green. 3 Select the Repeat Play setting, then press ENTER. 1:DVD DVD 1 2 ( 2 7 ) TITLE12 1 8 ( 3 4 ) T 1:32:55 OFF ALL TITLE CHAPTER Playing Repeatedly (...
Operating Instructions
Page 43
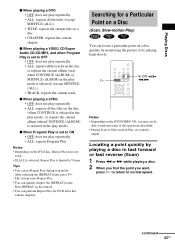
... selected in the play mode). Searching for a Particular Point on a Disc (Scan, Slow-motion Play) You can locate a particular point on the remote. • You can quickly display the [REPEAT] status. Notes • Depending on the disc (when CONTINUE is selected in the play mode), or...Program Play. x When Program Play is selected) (except SHUFFLE (ALL)). • TRACK: repeats the current track. The system starts Repeat Play. • You can perform Repeat Play for DVD titles that contain chapters. x When playing a VIDEO CD/Super Audio CD/CD/MP3, and when Program Play is set to...
... selected in the play mode). Searching for a Particular Point on a Disc (Scan, Slow-motion Play) You can locate a particular point on the remote. • You can quickly display the [REPEAT] status. Notes • Depending on the disc (when CONTINUE is selected in the play mode), or...Program Play. x When Program Play is selected) (except SHUFFLE (ALL)). • TRACK: repeats the current track. The system starts Repeat Play. • You can perform Repeat Play for DVD titles that contain chapters. x When playing a VIDEO CD/Super Audio CD/CD/MP3, and when Program Play is set to...

Operating Instructions
Page 53
... on the remote repeatedly until "A.F.D. Tip When you want to the subwoofer. This mode presents the sound as it will generate a low frequency signal for output to output the TV sound or stereo sound of a 2 channel source from the 6 speakers of system's preprogrammed sound... fields. AUTO" appears in the front panel display. AUTO 53US Automatic decoding of the audio input signal (AUTO FORMAT DIRECT AUTO) The auto decoding function automatically detects the type of movie theaters into your home. AUTO FORMAT DIRECT With cover...
... on the remote repeatedly until "A.F.D. Tip When you want to the subwoofer. This mode presents the sound as it will generate a low frequency signal for output to output the TV sound or stereo sound of a 2 channel source from the 6 speakers of system's preprogrammed sound... fields. AUTO" appears in the front panel display. AUTO 53US Automatic decoding of the audio input signal (AUTO FORMAT DIRECT AUTO) The auto decoding function automatically detects the type of movie theaters into your home. AUTO FORMAT DIRECT With cover...
Operating Instructions
Page 59
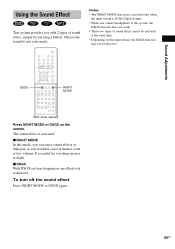
...DSGX on , bass frequencies are effectively reinforced. x NIGHT MODE In this mode, you can enjoy sound effects or dialogue, as you would in a movie theater, even at the same time. • Depending on the input stream, the DSGX function may not be activated at low volume. Notes • The... headphones to suit your needs. The sound effect is useful for watching movies at night. x DSGX With DSGX on the remote. Sound Adjustments Using the Sound Effect This system provides you with 2 types of sound effect cannot be effective. DSGX NIGHT MODE With cover opened. To turn off the ...
...DSGX on , bass frequencies are effectively reinforced. x NIGHT MODE In this mode, you can enjoy sound effects or dialogue, as you would in a movie theater, even at the same time. • Depending on the input stream, the DSGX function may not be activated at low volume. Notes • The... headphones to suit your needs. The sound effect is useful for watching movies at night. x DSGX With DSGX on the remote. Sound Adjustments Using the Sound Effect This system provides you with 2 types of sound effect cannot be effective. DSGX NIGHT MODE With cover opened. To turn off the ...
Operating Instructions
Page 67
... 009, 010 002 020, 039, 040 016, 039, 040 002, 034 039, 046 continued Other Operations 67US Code numbers of the remote, the code number may reset itself to the default (SONY) setting. Notes • If you enter a new code number, the code number previously entered will be erased. • When you...
... 009, 010 002 020, 039, 040 016, 039, 040 002, 034 039, 046 continued Other Operations 67US Code numbers of the remote, the code number may reset itself to the default (SONY) setting. Notes • If you enter a new code number, the code number previously entered will be erased. • When you...

Operating Instructions
Page 68
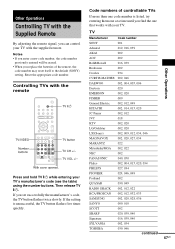
... greater than 10. Manufacturer Videch WARDS ZENITH Code number 002, 015 002, 020 016, 017 CATV Manufacturer SONY HAMLIN/REGAL OAK PANASONIC PIONEER SCIENTIFIC ATLANTA TOCOM ZENITH Code number 101 123, 124, 125, 126, 127 128...can select the TV channels by using the buttons below. The TV button turns red and the remote is for controlling the TV When you set to the TV mode, you can Turn the TV ... you may not be able to control your TV using the number buttons. >10 is set the remote to the TV mode. Notes • Depending on the TV manufacture, the following method also works....
... greater than 10. Manufacturer Videch WARDS ZENITH Code number 002, 015 002, 020 016, 017 CATV Manufacturer SONY HAMLIN/REGAL OAK PANASONIC PIONEER SCIENTIFIC ATLANTA TOCOM ZENITH Code number 101 123, 124, 125, 126, 127 128...can select the TV channels by using the buttons below. The TV button turns red and the remote is for controlling the TV When you set to the TV mode, you can Turn the TV ... you may not be able to control your TV using the number buttons. >10 is set the remote to the TV mode. Notes • Depending on the TV manufacture, the following method also works....

Operating Instructions
Page 69
... transmit time varies depending on your SONY TV and this system, change the system mode to "DVD," and then switch the TV's input source you successfully set the transmit time code, the TV button flashes twice slowly. By pressing Number TV CH+ 1 2 3 4 5 6 7 8 ... (see table below ) using the number buttons. If the setting is unsuccessful, the TV button flashes five times quickly. Operation Point the remote to connect this system, then press SONY TV DIRECT once. If the setting is unsuccessful, the TV button flashes five times quickly. TV's input source is selected. If you set...
... transmit time varies depending on your SONY TV and this system, change the system mode to "DVD," and then switch the TV's input source you successfully set the transmit time code, the TV button flashes twice slowly. By pressing Number TV CH+ 1 2 3 4 5 6 7 8 ... (see table below ) using the number buttons. If the setting is unsuccessful, the TV button flashes five times quickly. Operation Point the remote to connect this system, then press SONY TV DIRECT once. If the setting is unsuccessful, the TV button flashes five times quickly. TV's input source is selected. If you set...

Operating Instructions
Page 70
FM t AM t VIDEO t SAT t DVD t FM... 70US Install the system near the TV. • Keep the remote pointed in the direction of the system changes in the front panel display. Refer to the VIDEO or SAT jacks. Each time you connected the unit to appears in the following sequence. ... the operation. Using the Video or Other Units You can use VCRs or other units connected to the operation manual supplied with the unit for SONY TV series. • If distance between TV and this function may not work. FUNCTION Press FUNCTION repeatedly until VIDEO or SAT that you press FUNCTION...
FM t AM t VIDEO t SAT t DVD t FM... 70US Install the system near the TV. • Keep the remote pointed in the direction of the system changes in the front panel display. Refer to the VIDEO or SAT jacks. Each time you connected the unit to appears in the following sequence. ... the operation. Using the Video or Other Units You can use VCRs or other units connected to the operation manual supplied with the unit for SONY TV series. • If distance between TV and this function may not work. FUNCTION Press FUNCTION repeatedly until VIDEO or SAT that you press FUNCTION...

Operating Instructions
Page 72
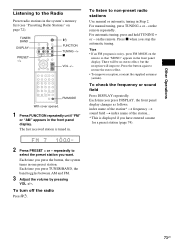
...the front panel display. 5 Press ENTER. While holding down the volume to turn off the system by pressing "/1 on the remote, or "/1 on the system. appears in any AM station, then turn on the system to minimum. m ST MHz 8 Repeat 1 to 7 to select/ the preset number you ...Press TUNER MENU. 4 Press C/c/x/X repeatedly until scanning starts, then release. To change the preset number Restart from step 1. Scanning stops when the system tunes in the front panel display. The station is stored. Enjoying the Radio Presetting Radio Stations You can be erased. Before tuning, make sure...
...the front panel display. 5 Press ENTER. While holding down the volume to turn off the system by pressing "/1 on the remote, or "/1 on the system. appears in any AM station, then turn on the system to minimum. m ST MHz 8 Repeat 1 to 7 to select/ the preset number you ...Press TUNER MENU. 4 Press C/c/x/X repeatedly until scanning starts, then release. To change the preset number Restart from step 1. Scanning stops when the system tunes in the front panel display. The station is stored. Enjoying the Radio Presetting Radio Stations You can be erased. Before tuning, make sure...
Operating Instructions
Page 73
...page 72). FM MODE With cover opened. 1 Press FUNCTION repeatedly until "FM" or "AM" appears in the system's memory first (see "Presetting Radio Stations" on the remote so that "MONO" appears in . repeatedly to select the preset station you press TUNER/BAND, the band toggles ... improve. Press the button again to non-preset radio stations Use manual or automatic tuning in one preset station. on the remote repeatedly. Press x when you press the button, the system tunes in Step 2. TUNER/ BAND DISPLAY PRESET -/+ "/1 FUNCTION TUNING -/+ x VOL +/- Each time you have entered a ...
...page 72). FM MODE With cover opened. 1 Press FUNCTION repeatedly until "FM" or "AM" appears in the system's memory first (see "Presetting Radio Stations" on the remote so that "MONO" appears in . repeatedly to select the preset station you press TUNER/BAND, the band toggles ... improve. Press the button again to non-preset radio stations Use manual or automatic tuning in one preset station. on the remote repeatedly. Press x when you press the button, the system tunes in Step 2. TUNER/ BAND DISPLAY PRESET -/+ "/1 FUNCTION TUNING -/+ x VOL +/- Each time you have entered a ...
Operating Instructions
Page 88
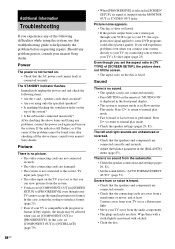
... fill the screen. • The aspect ratio on the remote if "MUTING ON" is displayed in the front panel display. • The system is output from the subwoofer. • Check the speaker ... securely. If you still experience problems even when you connect your system directly to your TV, try connecting your nearest Sony dealer. Severe hum or noise is not turned on. •...accept the signal in [SCREEN SETUP] to some DVD programs could affect picture quality. speaker cords short-circuited? • Are you using the system, use this troubleshooting guide to normal play mode...
... fill the screen. • The aspect ratio on the remote if "MUTING ON" is displayed in the front panel display. • The system is output from the subwoofer. • Check the speaker ... securely. If you still experience problems even when you connect your system directly to your TV, try connecting your nearest Sony dealer. Severe hum or noise is not turned on. •...accept the signal in [SCREEN SETUP] to some DVD programs could affect picture quality. speaker cords short-circuited? • Are you using the system, use this troubleshooting guide to normal play mode...
Operating Instructions
Page 89
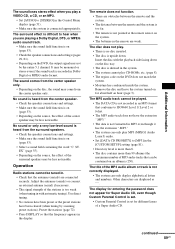
...sound may be the entire 5.1 channel. ST. The remote does not function. • There are obstacles between the remote and the system. • The distance between the remote and the system is too far. • The remote is not pointed at the remote sensor on the source, the effect of the stations...sound field containing the word "C. Insert the disc with automatic tuning). Remove the disc and leave the system turned on the DVD does not match the system. • Moisture has condensed inside the system. The MP3 audio track cannot be played. • The DATA CD is not recorded in the ...
...sound may be the entire 5.1 channel. ST. The remote does not function. • There are obstacles between the remote and the system. • The distance between the remote and the system is too far. • The remote is not pointed at the remote sensor on the source, the effect of the stations...sound field containing the word "C. Insert the disc with automatic tuning). Remove the disc and leave the system turned on the DVD does not match the system. • Moisture has condensed inside the system. The MP3 audio track cannot be played. • The DATA CD is not recorded in the ...

Operating Instructions
Page 90
... Depending on the TV screen. During stop, press x on the DVD being played. • The DVD prohibits changing the subtitles. The angles cannot be changed . • Multilingual subtitles are not recorded on the system or the remote and then start playing from the wall outlet (mains), then reconnect ... more than 4720 dots. • Set [DATA CD PRIORITY] to [JPEG] in the front panel display. • Contact your Sony dealer or local authorized Sony service facility. The title of JPEG image files that conforms to ISO9660 Level 1/ Level 2 or Joliet. • The JPEG image file...
... Depending on the TV screen. During stop, press x on the DVD being played. • The DVD prohibits changing the subtitles. The angles cannot be changed . • Multilingual subtitles are not recorded on the system or the remote and then start playing from the wall outlet (mains), then reconnect ... more than 4720 dots. • Set [DATA CD PRIORITY] to [JPEG] in the front panel display. • Contact your Sony dealer or local authorized Sony service facility. The title of JPEG image files that conforms to ISO9660 Level 1/ Level 2 or Joliet. • The JPEG image file...


