Operating Instructions
Page 4
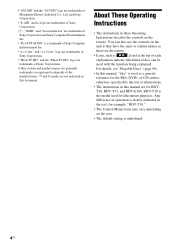
...disc can be used with the function being explained. You can also use the controls on the unit if they have the same or similar names as those on the remote. • Icons, such as a general reference for the BDs, DVDs...underlined. 4US T10, BDV-T11, and BDV-E300. Any difference in operation is used for illustration purposes. • "AVCHD" and... Sony Corporation. • "S-AIR" and its logo are trademarks of Sony Corporation. • , "XMB," and "xross media bar" are trademarks of Sony Corporation and Sony Computer Entertainment Inc. • "PLAYSTATION" is a trademark of Sony ...
...disc can be used with the function being explained. You can also use the controls on the unit if they have the same or similar names as those on the remote. • Icons, such as a general reference for the BDs, DVDs...underlined. 4US T10, BDV-T11, and BDV-E300. Any difference in operation is used for illustration purposes. • "AVCHD" and... Sony Corporation. • "S-AIR" and its logo are trademarks of Sony Corporation. • , "XMB," and "xross media bar" are trademarks of Sony Corporation and Sony Computer Entertainment Inc. • "PLAYSTATION" is a trademark of Sony ...
Operating Instructions
Page 6
... Appropriate Settings Automatically 66 Setting the Speakers 67 Controlling Your TV with the Supplied Remote 69 Using the Sleep Timer 71 Changing the Brightness of the Front Panel Display ...the Setup Display 74 [Network Update 75 [Video Settings 76 [Audio Settings 78 [BD/DVD Viewing Settings 80 [Photo Settings 82 [HDMI Settings 82 [System Settings 83 [Network ...85 [Resetting 86 Additional Information Precautions 87 Notes about the Discs 88 Troubleshooting 89 Self-diagnosis Function 95 Playable Discs 96 Supported Audio Formats 98 Video Output Resolution 99 Specifications ...
... Appropriate Settings Automatically 66 Setting the Speakers 67 Controlling Your TV with the Supplied Remote 69 Using the Sleep Timer 71 Changing the Brightness of the Front Panel Display ...the Setup Display 74 [Network Update 75 [Video Settings 76 [Audio Settings 78 [BD/DVD Viewing Settings 80 [Photo Settings 82 [HDMI Settings 82 [System Settings 83 [Network ...85 [Resetting 86 Additional Information Precautions 87 Notes about the Discs 88 Troubleshooting 89 Self-diagnosis Function 95 Playable Discs 96 Supported Audio Formats 98 Video Output Resolution 99 Specifications ...
Operating Instructions
Page 7
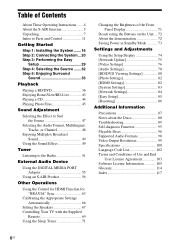
...; Speaker cords (5, white/red/ blue/gray/green) • Operating Instructions • Speaker and TV Connections guide • Setup Disc (DVD) • DIGITAL MEDIA PORT adapter (TDM-iP20) (1) • Video cord (1) • Subwoofer (1) • Remote commander (remote) (1) • Operating Instructions for the DIGITAL MEDIA PORT adapter (TDM-iP20) • R6 (size AA) batteries (2) • AM...
...; Speaker cords (5, white/red/ blue/gray/green) • Operating Instructions • Speaker and TV Connections guide • Setup Disc (DVD) • DIGITAL MEDIA PORT adapter (TDM-iP20) (1) • Video cord (1) • Subwoofer (1) • Remote commander (remote) (1) • Operating Instructions for the DIGITAL MEDIA PORT adapter (TDM-iP20) • R6 (size AA) batteries (2) • AM...
Operating Instructions
Page 8
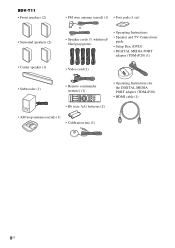
...; Speaker cords (5, white/red/ blue/gray/green) • Operating Instructions • Speaker and TV Connections guide • Setup Disc (DVD) • DIGITAL MEDIA PORT adapter (TDM-iP20) (1) • Video cord (1) • Subwoofer (1) • Remote commander (remote) (1) • R6 (size AA) batteries (2) • Operating Instructions for the DIGITAL MEDIA PORT adapter (TDM-iP20) • HDMI...
...; Speaker cords (5, white/red/ blue/gray/green) • Operating Instructions • Speaker and TV Connections guide • Setup Disc (DVD) • DIGITAL MEDIA PORT adapter (TDM-iP20) (1) • Video cord (1) • Subwoofer (1) • Remote commander (remote) (1) • R6 (size AA) batteries (2) • Operating Instructions for the DIGITAL MEDIA PORT adapter (TDM-iP20) • HDMI...
Operating Instructions
Page 9
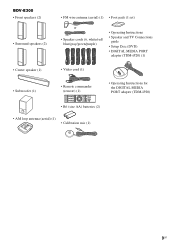
...E300 • Front speakers (2) • Surround speakers (2) • Center speaker (1) • Subwoofer (1) • FM wire antenna (aerial) (1) • Foot pads (1 set) or • Speaker cords (6, white/red/ blue/gray/green/purple) • Operating Instructions • Speaker and TV Connections guide • Setup Disc (DVD...) • DIGITAL MEDIA PORT adapter (TDM-iP20) (1) • Video cord (1) • Remote commander (remote) (1) • Operating Instructions for the DIGITAL MEDIA PORT adapter...
...E300 • Front speakers (2) • Surround speakers (2) • Center speaker (1) • Subwoofer (1) • FM wire antenna (aerial) (1) • Foot pads (1 set) or • Speaker cords (6, white/red/ blue/gray/green/purple) • Operating Instructions • Speaker and TV Connections guide • Setup Disc (DVD...) • DIGITAL MEDIA PORT adapter (TDM-iP20) (1) • Video cord (1) • Remote commander (remote) (1) • Operating Instructions for the DIGITAL MEDIA PORT adapter...

Operating Instructions
Page 10
... remove the batteries to avoid possible damage from the protective cover. 10US Using the remote Inserting batteries into the remote casing, particularly when replacing the batteries. • If you do not intend to use the remote for an extended period of the subwoofer to stabilize the subwoofer and prevent it from... slipping. , Remove the foot pads from battery leakage and corrosion. Note • Do not leave the remote in an extremely hot or humid place. • Do not use a new battery with an old one. • Do not drop any foreign ...
... remove the batteries to avoid possible damage from the protective cover. 10US Using the remote Inserting batteries into the remote casing, particularly when replacing the batteries. • If you do not intend to use the remote for an extended period of the subwoofer to stabilize the subwoofer and prevent it from... slipping. , Remove the foot pads from battery leakage and corrosion. Note • Do not leave the remote in an extremely hot or humid place. • Do not use a new battery with an old one. • Do not drop any foreign ...
Operating Instructions
Page 11
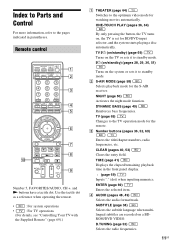
...: For TV operations (For details, see "Controlling Your TV with the Supplied Remote" (page 69).) A THEATER (page 64) Switches to the optimum video mode for the S-AIR receiver. TV "/1 (on/standby) (page 69) Turns on a BDROM/DVD VIDEO. C Number buttons (pages 36, 52, 69) Enters the title/chapter ... TV (page 69) Changes to the TV operation mode for BD/DVD input selector, and the system starts playing a disc automatically. "/1 (on/standby) (pages 28, 29, 36, 51) Turns on , the TV is set for the remote. TIME (page 41) Displays the elapsed/remaining playback time in parentheses...
...: For TV operations (For details, see "Controlling Your TV with the Supplied Remote" (page 69).) A THEATER (page 64) Switches to the optimum video mode for the S-AIR receiver. TV "/1 (on/standby) (page 69) Turns on a BDROM/DVD VIDEO. C Number buttons (pages 36, 52, 69) Enters the title/chapter ... TV (page 69) Changes to the TV operation mode for BD/DVD input selector, and the system starts playing a disc automatically. "/1 (on/standby) (pages 28, 29, 36, 51) Turns on , the TV is set for the remote. TIME (page 41) Displays the elapsed/remaining playback time in parentheses...
Operating Instructions
Page 13
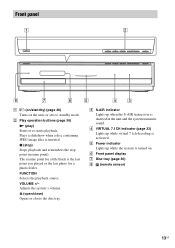
... Lights up while the system is activated. FUNCTION Selects the playback source. VOLUME +/- Adjusts the system's volume. F Front panel display G Disc tray (page 36) H (remote sensor) 13US B Play operation buttons (page 36) N (play) Starts or re-starts playback. Z (open/close) Opens or closes the... disc tray. The resume point for a title/track is inserted. C S-AIR indicator Lights up while virtual 7.1ch decoding is turned ...
... Lights up while the system is activated. FUNCTION Selects the playback source. VOLUME +/- Adjusts the system's volume. F Front panel display G Disc tray (page 36) H (remote sensor) 13US B Play operation buttons (page 36) N (play) Starts or re-starts playback. Z (open/close) Opens or closes the... disc tray. The resume point for a title/track is inserted. C S-AIR indicator Lights up while virtual 7.1ch decoding is turned ...
Operating Instructions
Page 28
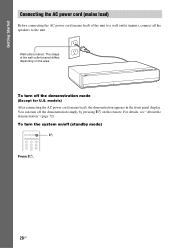
... Started Connecting the AC power cord (mains lead) Before connecting the AC power cord (mains lead) of the wall outlet (mains) differs depending on the remote. models) After connecting the AC power cord (mains lead), the demonstration appears in the front panel display. To turn the system on/off the demonstration...
... Started Connecting the AC power cord (mains lead) Before connecting the AC power cord (mains lead) of the wall outlet (mains) differs depending on the remote. models) After connecting the AC power cord (mains lead), the demonstration appears in the front panel display. To turn the system on/off the demonstration...
Operating Instructions
Page 52
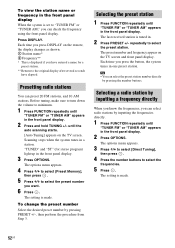
... have elapsed. repeatedly to select the frequencies. 5 Press . Each time you press DISPLAY on the remote, the display changes as shown. 1 Station name* 2 Frequency** * This is tuned in the front panel display. 3 Press OPTIONS. The last received station is displayed if you want. 6 Press . until "TUNER FM" or "TUNER AM" appears in...
... have elapsed. repeatedly to select the frequencies. 5 Press . Each time you press DISPLAY on the remote, the display changes as shown. 1 Station name* 2 Frequency** * This is tuned in the front panel display. 3 Press OPTIONS. The last received station is displayed if you want. 6 Press . until "TUNER FM" or "TUNER AM" appears in...
Operating Instructions
Page 55
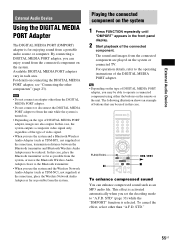
...the front panel display. 2 Start playback of DIGITAL MEDIA PORT adapter, images are played on the type of the connected component. Tip • Depending on the remote or the unit. The following illustration shows an example of DIGITAL MEDIA PORT adapter, you may be reduced. This effect is... activated automatically when you can enjoy sound from the connected component on connecting the DIGITAL MEDIA PORT adapter, see "Connecting the...
...the front panel display. 2 Start playback of DIGITAL MEDIA PORT adapter, images are played on the type of the connected component. Tip • Depending on the remote or the unit. The following illustration shows an example of DIGITAL MEDIA PORT adapter, you may be reduced. This effect is... activated automatically when you can enjoy sound from the connected component on connecting the DIGITAL MEDIA PORT adapter, see "Connecting the...
Operating Instructions
Page 59
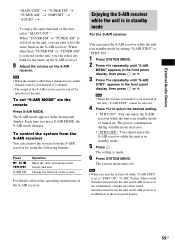
... the volume on . The system menu turns off while "S-AIR STBY" is set "S-AIR MODE" via the remote Press S-AIR MODE. Note • When you can enjoy the S-AIR receiver while the unit is established) in the front panel display, then press or c. Press N, X, x, ./> S-AIR CH Operation Share...desired setting. • "STBY ON": You can only select the same band on the remote and unit. For details, refer to "STBY ON," "S-AIR" flashes (when sound transmission between the unit and S-AIR receiver is not established), or lights up (when sound transmission between the unit and S-AIR...
... the volume on . The system menu turns off while "S-AIR STBY" is set "S-AIR MODE" via the remote Press S-AIR MODE. Note • When you can enjoy the S-AIR receiver while the unit is established) in the front panel display, then press or c. Press N, X, x, ./> S-AIR CH Operation Share...desired setting. • "STBY ON": You can only select the same band on the remote and unit. For details, refer to "STBY ON," "S-AIR" flashes (when sound transmission between the unit and S-AIR receiver is not established), or lights up (when sound transmission between the unit and S-AIR...
Operating Instructions
Page 63
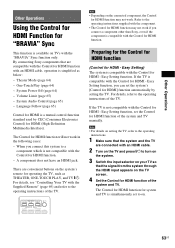
...Follow (page 65) Control for HDMI is a mutual control function standard used by setting the TV. There are convenient buttons on the system's remote for operating the TV, such as below: - For details, refer to turn on the system. 3 Switch the input selector on your TV ... with the Control for HDMI - Volume Limit (page 65) - System Power Off (page 64) - Easy Setting function, you connect a component other than Sony, even if the component is compatible with an HDMI cable, operation is simplified as THEATER, ONE-TOUCH PLAY, and TV "/1. System Audio Control (page 65) - ...
...Follow (page 65) Control for HDMI is a mutual control function standard used by setting the TV. There are convenient buttons on the system's remote for operating the TV, such as below: - For details, refer to turn on the system. 3 Switch the input selector on your TV ... with the Control for HDMI - Volume Limit (page 65) - System Power Off (page 64) - Easy Setting function, you connect a component other than Sony, even if the component is compatible with an HDMI cable, operation is simplified as THEATER, ONE-TOUCH PLAY, and TV "/1. System Audio Control (page 65) - ...
Operating Instructions
Page 64
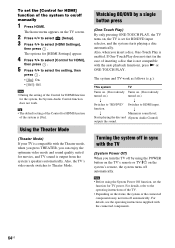
Watching BD/DVD by using the System Power Off function, set the function for TV power. If One-Touch Play does not start (in sync with the connected components. 64US For details, refer to select the setting, then press . • [On]: On. • [Off]: Off. Using the Theater ... turned on.) turned on the TV screen. 2 Press C/c to select [Setup]. 3 Press X/x to on the system's remote, the system turns off manually 1 Press HOME. Starts playing the disc and (System Audio Control) outputs the sound. Also, the TV's video mode switches to HDMI input. The system and TV...
Watching BD/DVD by using the System Power Off function, set the function for TV power. If One-Touch Play does not start (in sync with the connected components. 64US For details, refer to select the setting, then press . • [On]: On. • [Off]: Off. Using the Theater ... turned on.) turned on the TV screen. 2 Press C/c to select [Setup]. 3 Press X/x to on the system's remote, the system turns off manually 1 Press HOME. Starts playing the disc and (System Audio Control) outputs the sound. Also, the TV's video mode switches to HDMI input. The system and TV...

Operating Instructions
Page 65
... the speakers of the system. • When TV sound is also changed after turning the system off the sound of the system using the TV remote. To use the System Audio Control function as follows: • You can enjoy TV sound from the speakers of the system by means of the...
... the speakers of the system. • When TV sound is also changed after turning the system off the sound of the system using the TV remote. To use the System Audio Control function as follows: • You can enjoy TV sound from the speakers of the system by means of the...
Operating Instructions
Page 69
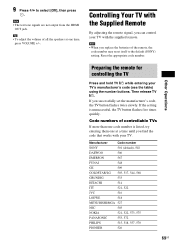
... one time, press VOLUME +/-. 9 Press X/x to the default (SONY) setting. Note • When you replace the batteries of all the speakers at one at a time until you find the code that works with the supplied remote. Code numbers of controllable TVs If more than one code number is... unsuccessful, the TV button flashes five times quickly. Note • The test tone signals are not output from the HDMI OUT jack. Manufacturer Code number SONY 501 (default), 502 DAEWOO...
... one time, press VOLUME +/-. 9 Press X/x to the default (SONY) setting. Note • When you replace the batteries of all the speakers at one at a time until you find the code that works with the supplied remote. Code numbers of controllable TVs If more than one code number is... unsuccessful, the TV button flashes five times quickly. Note • The test tone signals are not output from the HDMI OUT jack. Manufacturer Code number SONY 501 (default), 502 DAEWOO...

Operating Instructions
Page 70
... menu for the current display. Note • While in the TV mode, TV flashes four times and the remote exits the TV mode automatically, and the system is operated as the remote buttons of the SONY TV. Switch the TV's input source between the TV and other than THEATER, TV [/1, TV INPUT), set... the remote to the previous channel or layer on the menu. Turn off . CC Display closed captioning. GUIDE Display ...
... menu for the current display. Note • While in the TV mode, TV flashes four times and the remote exits the TV mode automatically, and the system is operated as the remote buttons of the SONY TV. Switch the TV's input source between the TV and other than THEATER, TV [/1, TV INPUT), set... the remote to the previous channel or layer on the menu. Turn off . CC Display closed captioning. GUIDE Display ...
Operating Instructions
Page 72
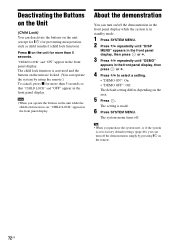
... the unit for preventing misoperation, such as child mischief (child lock function). About the demonstration You can turn off the demonstration simply by using the remote.) To cancel, press x for more than 5 seconds so that "CHILD LOCK" and "OFF" appear in the front panel display. The setting ...unit while the child lock function is activated and the buttons on the unit are locked. (You can operate the system by pressing [/1 on the remote. 72US The default setting differs depending on the area. 5 Press . Note • When you purchase the system new, or if the system is...
... the unit for preventing misoperation, such as child mischief (child lock function). About the demonstration You can turn off the demonstration simply by using the remote.) To cancel, press x for more than 5 seconds so that "CHILD LOCK" and "OFF" appear in the front panel display. The setting ...unit while the child lock function is activated and the buttons on the unit are locked. (You can operate the system by pressing [/1 on the remote. 72US The default setting differs depending on the area. 5 Press . Note • When you purchase the system new, or if the system is...
Operating Instructions
Page 90
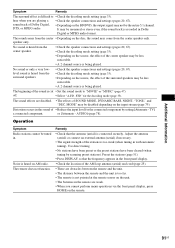
...off and on the TV screen. • If the speakers are used with alcohol. • Clean the disc. • Select stereo sound by pressing AUDIO (page 48). • Make sure the unit is performed...or a fluorescent light. • Move your TV set the aspect • The aspect ratio on the remote if "MUTING ON" is displayed in the front panel display. • The system is connected to ... Turn the system off and on again. 2 Turn the connected component off the TV set once, then turn it on after 15 to some BD/DVD programs could affect picture quality. Press N to return to normal play...
...off and on the TV screen. • If the speakers are used with alcohol. • Clean the disc. • Select stereo sound by pressing AUDIO (page 48). • Make sure the unit is performed...or a fluorescent light. • Move your TV set the aspect • The aspect ratio on the remote if "MUTING ON" is displayed in the front panel display. • The system is connected to ... Turn the system off and on again. 2 Turn the connected component off the TV set once, then turn it on after 15 to some BD/DVD programs could affect picture quality. Press N to return to normal play...
Operating Instructions
Page 91
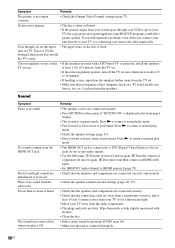
...47). off. • Select "A.F.D. STD" for the connected component by scanning preset stations). No sound is heard on the disc, the sound may come from the center speaker. • ...Check the speaker connections and settings (pages 20, 67). • Check the decoding mode setting (page 33). • Depending on the BD/DVD... in Dolby Digital or MPEG audio format. Additional Information 91US Distortion occurs in the remote are playing a • Check the speaker connections and settings (pages 20, 67...
...47). off. • Select "A.F.D. STD" for the connected component by scanning preset stations). No sound is heard on the disc, the sound may come from the center speaker. • ...Check the speaker connections and settings (pages 20, 67). • Check the decoding mode setting (page 33). • Depending on the BD/DVD... in Dolby Digital or MPEG audio format. Additional Information 91US Distortion occurs in the remote are playing a • Check the speaker connections and settings (pages 20, 67...


