Operating Instructions
Page 2
...GDM-500PS only) ʢV C C I B (GDM-500PS only) 2 WARNING To prevent fire or shock hazard, do not expose the unit to which can radiate radio frequency energy and, if not installed and used with a computer equipped with VESA Display Power Management Signaling (DPMS). (GDM-400PS only) This monitor...pieds Tension Minimum 7 A, 125 V As an ENERGY STAR Partner, Sony Corporation has determined that any changes or modifications not expressly approved in...circuit different from that interference will not occur in this manual could void your authority to these numbers whenever you call ...
...GDM-500PS only) ʢV C C I B (GDM-500PS only) 2 WARNING To prevent fire or shock hazard, do not expose the unit to which can radiate radio frequency energy and, if not installed and used with a computer equipped with VESA Display Power Management Signaling (DPMS). (GDM-400PS only) This monitor...pieds Tension Minimum 7 A, 125 V As an ENERGY STAR Partner, Sony Corporation has determined that any changes or modifications not expressly approved in...circuit different from that interference will not occur in this manual could void your authority to these numbers whenever you call ...
Operating Instructions
Page 3
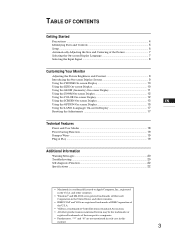
... 7 Selecting the On-screen Display Language 7 Selecting the Input Signal 8 Customizing Your Monitor Adjusting the Picture Brightness and Contrast 9 Introducing the On-screen Display System 9 Using the CENTER On-screen Display 10 Using the SIZE On-screen Display 10 Using the GEOM (Geometry) On-screen Display 11 Using the ZOOM On-screen Display 12 Using the COLOR...
... 7 Selecting the On-screen Display Language 7 Selecting the Input Signal 8 Customizing Your Monitor Adjusting the Picture Brightness and Contrast 9 Introducing the On-screen Display System 9 Using the CENTER On-screen Display 10 Using the SIZE On-screen Display 10 Using the GEOM (Geometry) On-screen Display 11 Using the ZOOM On-screen Display 12 Using the COLOR...
Operating Instructions
Page 5
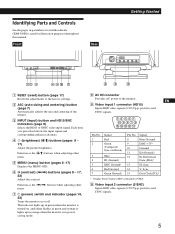
...other items. 5 MENU (menu) button (pages 8 -17) Displays the MENU OSD. 6 > (contrast) (?//) buttons (pages 8 - 17, 22) Adjust the contrast. Sync V. Each time you press this manual. Identifying Parts and Controls See the pages in green when the monitor is turned on Green) 3 Blue 4 ID (Ground) 5 DDC...) Bi-Directional Data (SDA)* H. Sync Data Clock(SCL)* * Display Data Channel (DDC) Standard of the images. 3 INPUT (input) button and HD15/BNC indicators (page 8) Selects the HD15 or 5BNC video input signal. GDM-500PS is in power saving mode. 8 AC IN connector Provides AC power...
...other items. 5 MENU (menu) button (pages 8 -17) Displays the MENU OSD. 6 > (contrast) (?//) buttons (pages 8 - 17, 22) Adjust the contrast. Sync V. Each time you press this manual. Identifying Parts and Controls See the pages in green when the monitor is turned on Green) 3 Blue 4 ID (Ground) 5 DDC...) Bi-Directional Data (SDA)* H. Sync Data Clock(SCL)* * Display Data Channel (DDC) Standard of the images. 3 INPUT (input) button and HD15/BNC indicators (page 8) Selects the HD15 or 5BNC video input signal. GDM-500PS is in power saving mode. 8 AC IN connector Provides AC power...
Operating Instructions
Page 7
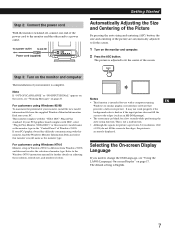
...software that provides a full-screen picture. Refer to the Windows NT4.0 instruction manual for picture aspect ratio 5:4 (resolution: 1280 C × 1024) do not fill the screen to a power outlet. If your monitor is complete. The default setting is not a malfunction. • Although ... difficulty communicating with this monitor, load the Windows Monitor Information Disk and select this monitor's model name as the monitor type in Windows NT4.0 is accurately displayed. The picture is adjusted to fit the center of the power cord to the monitor and the other end to...
...software that provides a full-screen picture. Refer to the Windows NT4.0 instruction manual for picture aspect ratio 5:4 (resolution: 1280 C × 1024) do not fill the screen to a power outlet. If your monitor is complete. The default setting is not a malfunction. • Although ... difficulty communicating with this monitor, load the Windows Monitor Information Disk and select this monitor's model name as the monitor type in Windows NT4.0 is accurately displayed. The picture is adjusted to fit the center of the power cord to the monitor and the other end to...
Operating Instructions
Page 8
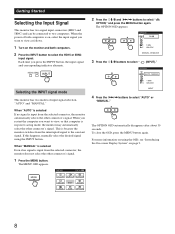
...)." The OPTION OSD automatically disappears after about 30 seconds. If this happens, manually select the desired signal using the OSD, see "Introducing the On-screen Display System" on the monitor and both computers is input from the selected connector, the monitor automatically selects the other connector's signal. The MENU OSD appears. For more information...
...)." The OPTION OSD automatically disappears after about 30 seconds. If this happens, manually select the desired signal using the OSD, see "Introducing the On-screen Display System" on the monitor and both computers is input from the selected connector, the monitor automatically selects the other connector's signal. The MENU OSD appears. For more information...
Operating Instructions
Page 15
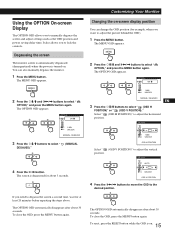
... 3 Press the ¨./> buttons to select " OPTION," and press the MENU button again. GCeuttsitnogmSiztianrgteYdour Monitor Changing the on-screen display position You can also manually degauss the monitor. 1 Press the MENU button. The OPTION OSD appears. The OPTION OSD appears. ES OPTION C ZZ... 1 MIN UNLOCK OSD...buttons to move the OSD to the desired position. Degaussing the screen The monitor screen is automatically degaussed (demagnetized) when the power is on . It also allows you to manually degauss the screen and adjust settings such as the OSD position and power ...
... 3 Press the ¨./> buttons to select " OPTION," and press the MENU button again. GCeuttsitnogmSiztianrgteYdour Monitor Changing the on-screen display position You can also manually degauss the monitor. 1 Press the MENU button. The OPTION OSD appears. The OPTION OSD appears. ES OPTION C ZZ... 1 MIN UNLOCK OSD...buttons to move the OSD to the desired position. Degaussing the screen The monitor screen is automatically degaussed (demagnetized) when the power is on . It also allows you to manually degauss the screen and adjust settings such as the OSD position and power ...
Operating Instructions
Page 16
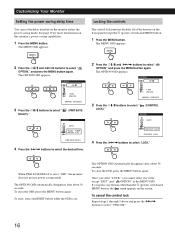
...30 seconds. To close the OSD, press the MENU button again. Locking the controls The control lock function disables all of the buttons on this monitor's power saving capabilities. 1 Press the MENU button. UNLOCK LOCK CONTROL LOCK 4 Press the >?// buttons to select " OPTION," and press the MENU... for more information on the front panel except the u (power) switch and MENU button. 1 Press the MENU button. OPTION ON ZZ... 1 MIN UNLOCK MANUAL DEGAUSS 3 Press the ¨./> buttons to select "UNLOCK." 16 Once you select "LOCK," you press any items except "EXIT" and " OPTION" in...
...30 seconds. To close the OSD, press the MENU button again. Locking the controls The control lock function disables all of the buttons on this monitor's power saving capabilities. 1 Press the MENU button. UNLOCK LOCK CONTROL LOCK 4 Press the >?// buttons to select " OPTION," and press the MENU... for more information on the front panel except the u (power) switch and MENU button. 1 Press the MENU button. OPTION ON ZZ... 1 MIN UNLOCK MANUAL DEGAUSS 3 Press the ¨./> buttons to select "UNLOCK." 16 Once you select "LOCK," you press any items except "EXIT" and " OPTION" in...
Operating Instructions
Page 18
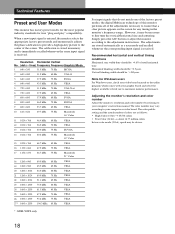
...number may vary according to your computer's instruction manual. Horizontal blanking width should be slower. 18 Adjusting the monitor's resolution and color number Adjust the monitor's resolution and color number by referring to ... 68.7 kHz 75 Hz Macintosh 21" Color 18 1280 × 960 60.0 kHz 60 Hz VESA 19 1280 × 960 20 1280 × 1024 21 1280 × 1024 85.9 kHz...1200 106.3 kHz 85 Hz VESA * GDM-500PS only For input signals that do not match one of the factory preset modes, the digital Multiscan technology of this monitor performs all of colors are stored automatically...
...number may vary according to your computer's instruction manual. Horizontal blanking width should be slower. 18 Adjusting the monitor's resolution and color number Adjust the monitor's resolution and color number by referring to ... 68.7 kHz 75 Hz Macintosh 21" Color 18 1280 × 960 60.0 kHz 60 Hz VESA 19 1280 × 960 20 1280 × 1024 21 1280 × 1024 85.9 kHz...1200 106.3 kHz 85 Hz VESA * GDM-500PS only For input signals that do not match one of the factory preset modes, the digital Multiscan technology of this monitor performs all of colors are stored automatically...
Operating Instructions
Page 20
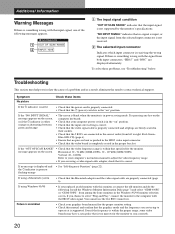
...properly connected (page 6). If you replaced an old monitor with this manual and confirm that the Macintosh adapter and the video ...the correct order (from among the Sony monitors in the "on the screen Horizontal: 30 - 94 kHz (GDM-400PS), 30 - 107 kHz (GDM-500PS) Vertical: 48 - 160 Hz ...Refer to contact technical support. To solve these items If the u indicator is not lit • Check that the power cord is properly connected. • Check that no message is displayed and the u indicator is not supported by the monitor...
...properly connected (page 6). If you replaced an old monitor with this manual and confirm that the Macintosh adapter and the video ...the correct order (from among the Sony monitors in the "on the screen Horizontal: 30 - 94 kHz (GDM-400PS), 30 - 107 kHz (GDM-500PS) Vertical: 48 - 160 Hz ...Refer to contact technical support. To solve these items If the u indicator is not lit • Check that the power cord is properly connected. • Check that no message is displayed and the u indicator is not supported by the monitor...

Operating Instructions
Page 21
... landing (pages 13 - 14). If a second degauss cycle is not a malfunction. 21 This is needed , allow a minimum interval of the CRT to the computer's manual. If you place equipment which generates a magnetic field, such as a loudspeaker, near the F monitor, or you have another monitor close to obtain a neutral field for uniform color reproduction. Screen image...
... landing (pages 13 - 14). If a second degauss cycle is not a malfunction. 21 This is needed , allow a minimum interval of the CRT to the computer's manual. If you place equipment which generates a magnetic field, such as a loudspeaker, near the F monitor, or you have another monitor close to obtain a neutral field for uniform color reproduction. Screen image...


