Operating Instructions
Page 1
Refer to us at: Customer Information Service 115 Gordon Baker Road, Toronto, Ontario, M2H 3R6 DVP-NC800H © 2008 Sony Corporation 3-283-152-12(1) CD/DVD Player Operating Instructions US Manual de instrucciones ES For customers in the space provided below. Model No. For ... contact our Customer Information Service Centre at the rear of Mind Warranty Replacement service. DVP-NC800H Serial No For Customers in Canada If this product is not working properly, please call upon your Sony dealer regarding this product. Record the serial number in the U.S.A Owner's Record The...
Refer to us at: Customer Information Service 115 Gordon Baker Road, Toronto, Ontario, M2H 3R6 DVP-NC800H © 2008 Sony Corporation 3-283-152-12(1) CD/DVD Player Operating Instructions US Manual de instrucciones ES For customers in the space provided below. Model No. For ... contact our Customer Information Service Centre at the rear of Mind Warranty Replacement service. DVP-NC800H Serial No For Customers in Canada If this product is not working properly, please call upon your Sony dealer regarding this product. Record the serial number in the U.S.A Owner's Record The...
Operating Instructions
Page 7
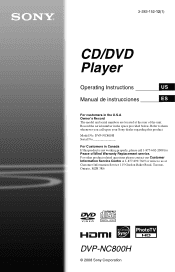
... playable by this product. • For player that cannot play if it has not been correctly finalized. Note that protects the copyright of DVDs and VIDEO CDs may not work with some record companies. Copyrights This product incorporates copyright protection technology that among those discs, there are marketed by Macrovision, and is not...
... playable by this product. • For player that cannot play if it has not been correctly finalized. Note that protects the copyright of DVDs and VIDEO CDs may not work with some record companies. Copyrights This product incorporates copyright protection technology that among those discs, there are marketed by Macrovision, and is not...

Operating Instructions
Page 17
... operating instructions supplied with the TV. To prepare for HDMI connections only) By connecting to "ON" in "HDMI SETUP" (page 62). Note Depending on the connected component, the CONTROL FOR HDMI function may not work. Refer to the operating instructions supplied with the component.... 17US Hookups About the CONTROL FOR HDMI functions for 'BRAVIA Sync' (for the 'BRAVIA Sync' features Set "CONTROL FOR HDMI" to Sony components that are compatible with the CONTROL FOR HDMI function with an HDMI...
... operating instructions supplied with the TV. To prepare for HDMI connections only) By connecting to "ON" in "HDMI SETUP" (page 62). Note Depending on the connected component, the CONTROL FOR HDMI function may not work. Refer to the operating instructions supplied with the component.... 17US Hookups About the CONTROL FOR HDMI functions for 'BRAVIA Sync' (for the 'BRAVIA Sync' features Set "CONTROL FOR HDMI" to Sony components that are compatible with the CONTROL FOR HDMI function with an HDMI...
Operating Instructions
Page 21
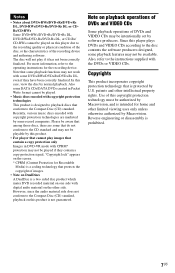
...your TV is listed, try entering them one that works with your TV using the buttons below ). 2 Release TV [/1. You can control your TV using all or some of the buttons on the supplied remote. 21US By pressing TV [/1 VOL +/- Manufacturer Code number Sony 01 (default) Daewoo 04, 22 Hitachi 02,... the Supplied Remote You can control the sound level, input source, and power switch of your Sony TV with the remote You can control the sound level, input source, and power switch of non-Sony TVs as well. Set the appropriate code number again. • Depending on the connected unit,...
...your TV is listed, try entering them one that works with your TV using the buttons below ). 2 Release TV [/1. You can control your TV using all or some of the buttons on the supplied remote. 21US By pressing TV [/1 VOL +/- Manufacturer Code number Sony 01 (default) Daewoo 04, 22 Hitachi 02,... the Supplied Remote You can control the sound level, input source, and power switch of your Sony TV with the remote You can control the sound level, input source, and power switch of non-Sony TVs as well. Set the appropriate code number again. • Depending on the connected unit,...
Operating Instructions
Page 25
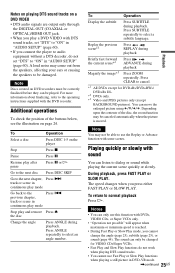
... or sound (page 44). Note Discs created on a DVD VIDEO • DTS audio signals are output only through the DIGITAL OUT (COAXIAL or OPTICAL)/HDMI OUT jack. • When you play and remove Press ... angle number. Press ANGLE repeatedly to normal playback Press H. Press CLEAR to cancel. *1 All DVDs except for VIDEO CDs/Super VCDs. • Fast Play and Slow Play functions do not set "DTS" to "...ON" in continuous play mode Go back to audio equipment without a DTS decoder, do not work when playing ...
... or sound (page 44). Note Discs created on a DVD VIDEO • DTS audio signals are output only through the DIGITAL OUT (COAXIAL or OPTICAL)/HDMI OUT jack. • When you play and remove Press ... angle number. Press ANGLE repeatedly to normal playback Press H. Press CLEAR to cancel. *1 All DVDs except for VIDEO CDs/Super VCDs. • Fast Play and Slow Play functions do not set "DTS" to "...ON" in continuous play mode Go back to audio equipment without a DTS decoder, do not work when playing ...

Operating Instructions
Page 26
... you stopped the disc for the first disc is in standby mode, press O RETURN, ENTER, and then [/1 on the player or the remote does not work while the Child Lock is in the compartments with new ones. 3 Press DISC SKIP. z Hint While the disc tray is open the disc tray while...
... you stopped the disc for the first disc is in standby mode, press O RETURN, ENTER, and then [/1 on the player or the remote does not work while the Child Lock is in the compartments with new ones. 3 Press DISC SKIP. z Hint While the disc tray is open the disc tray while...

Operating Instructions
Page 27
...Setup Display. • For DVD-VR mode, CDs, DATA CDs, and DATA DVDs, the player remembers the resume playback point for interactive operations (press H when "Press SELECT" appears). the player enters standby mode (DATA CD/ DATA DVD only). • Resume Play does not work during Shuffle Play and Program Play.... • This function may not work (page 58). • The point where you stopped playing is stopped to the...
...Setup Display. • For DVD-VR mode, CDs, DATA CDs, and DATA DVDs, the player remembers the resume playback point for interactive operations (press H when "Press SELECT" appears). the player enters standby mode (DATA CD/ DATA DVD only). • Resume Play does not work during Shuffle Play and Program Play.... • This function may not work (page 58). • The point where you stopped playing is stopped to the...
Operating Instructions
Page 33
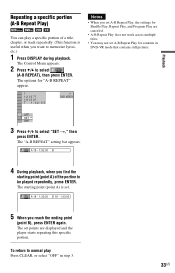
...again. The "A-B REPEAT" setting bar appears. Playback Repeating a specific portion (A-B Repeat Play) You can play Press CLEAR, or select "OFF" in DVD-VR mode that contains still pictures. The starting point (point A) of a title, chapter, or track repeatedly. (This function is set. To return ...step 3. 33US The set A-B Repeat Play for Shuffle Play, Repeat Play, and Program Play are canceled. • A-B Repeat Play does not work across multiple titles. • You may not set points are displayed and the player starts repeating this specific portion. The Control Menu appears. ...
...again. The "A-B REPEAT" setting bar appears. Playback Repeating a specific portion (A-B Repeat Play) You can play Press CLEAR, or select "OFF" in DVD-VR mode that contains still pictures. The starting point (point A) of a title, chapter, or track repeatedly. (This function is set. To return ...step 3. 33US The set A-B Repeat Play for Shuffle Play, Repeat Play, and Program Play are canceled. • A-B Repeat Play does not work across multiple titles. • You may not set points are displayed and the player starts repeating this specific portion. The Control Menu appears. ...
Operating Instructions
Page 35
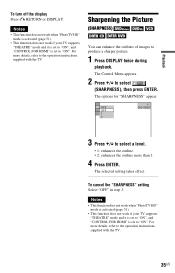
... for "SHARPNESS" appear. Notes • This function does not work when "PhotoTV HD" mode is activated (page 51). • This function does not work if your TV supports "THEATRE" mode and it is set to "ON", and "CONTROL FOR HDMI" is set to select (SHARPNESS), then press ENTER. Sharpening the..., refer to produce a sharper picture. 1 Press DISPLAY twice during playback. Playback To turn off the display Press O RETURN or DISPLAY. OFF DVD VIDEO OFF 1 2 3 Press X/x to the operation instructions supplied with the TV. 35US The Control Menu appears. 2 Press X/x to "ON".
... for "SHARPNESS" appear. Notes • This function does not work when "PhotoTV HD" mode is activated (page 51). • This function does not work if your TV supports "THEATRE" mode and it is set to "ON", and "CONTROL FOR HDMI" is set to select (SHARPNESS), then press ENTER. Sharpening the..., refer to produce a sharper picture. 1 Press DISPLAY twice during playback. Playback To turn off the display Press O RETURN or DISPLAY. OFF DVD VIDEO OFF 1 2 3 Press X/x to the operation instructions supplied with the TV. 35US The Control Menu appears. 2 Press X/x to "ON".
Operating Instructions
Page 46
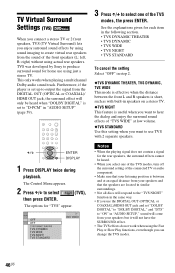
..., if the player is set up to output the signal from the DIGITAL OUT (OPTICAL or COAXIAL)/ HDMI OUT jack, the surround effect will only be heard. • When you select one of the TVS... 1 Press DISPLAY twice during playback. This only works when playing a multichannel Dolby audio sound track. OFF OFF TVS DYNAMIC THEATER TVS DYNAMIC TVS WIDE TVS NIGHT TVS STANDARD DVD VIDEO 3 Press X/x to create virtual rear speakers...TVS (TV Virtual Surround) lets you enjoy surround sound effects by Sony to "D-PCM" in "AUDIO SETUP" (page 59). See the explanations given for "TVS" appear.
..., if the player is set up to output the signal from the DIGITAL OUT (OPTICAL or COAXIAL)/ HDMI OUT jack, the surround effect will only be heard. • When you select one of the TVS... 1 Press DISPLAY twice during playback. This only works when playing a multichannel Dolby audio sound track. OFF OFF TVS DYNAMIC THEATER TVS DYNAMIC TVS WIDE TVS NIGHT TVS STANDARD DVD VIDEO 3 Press X/x to create virtual rear speakers...TVS (TV Virtual Surround) lets you enjoy surround sound effects by Sony to "D-PCM" in "AUDIO SETUP" (page 59). See the explanations given for "TVS" appear.
Operating Instructions
Page 50
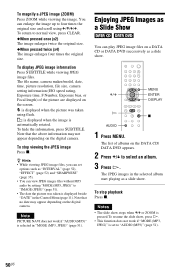
... size and scroll using flash. is displayed when the picture was taken is selected in "MODE (MP3, JPEG)" (page 51). Note PICTURE NAVI does not work if "MODE (MP3, JPEG)" is automatically rotated. Enjoying JPEG Images as "INTERVAL" (page 52), "EFFECT" (page 52) and "SHARPNESS" (page 35). &#... original size. ◆When pressed twice (x4) The image enlarges four times the original size. The list of the picture are displayed on the DATA CD/ DATA DVD appears. 2 Press X/x to "IMAGE (JPEG)" (page 51). • The date the picture was taken using C/X/x/c. To magnify a JPEG image (ZOOM) ...
... size and scroll using flash. is displayed when the picture was taken is selected in "MODE (MP3, JPEG)" (page 51). Note PICTURE NAVI does not work if "MODE (MP3, JPEG)" is automatically rotated. Enjoying JPEG Images as "INTERVAL" (page 52), "EFFECT" (page 52) and "SHARPNESS" (page 35). &#... original size. ◆When pressed twice (x4) The image enlarges four times the original size. The list of the picture are displayed on the DATA CD/ DATA DVD appears. 2 Press X/x to "IMAGE (JPEG)" (page 51). • The date the picture was taken using C/X/x/c. To magnify a JPEG image (ZOOM) ...

Operating Instructions
Page 53
... JPEG Images 3 Press X/x to right. • MODE 5: the image stretches out from the center of the screen. • OFF: turns off this setting does not work if the JPEG file has rotation information. • Depending on the "JPEG RESOLUTION" setting (page 61), some effect may not function. 53US Notes • Note...
... JPEG Images 3 Press X/x to right. • MODE 5: the image stretches out from the center of the screen. • OFF: turns off this setting does not work if the JPEG file has rotation information. • Depending on the "JPEG RESOLUTION" setting (page 61), some effect may not function. 53US Notes • Note...

Operating Instructions
Page 54
... SETUP," "SCREEN SETUP," "CUSTOM SETUP," "AUDIO SETUP," or "HDMI SETUP." LANGUAGE SETUP OSD: MENU: AUDIO: SUBTITLE: ENGLISH ENGLISH ORIGINAL...DVD VIDEO QUICK CUSTOM RESET QUICK SCREEN SETUP TV TYPE: 16:9 SCREEN SAVER: ON BACKGROUND: JACKET PICTURE BLACK LEVEL: ON BLACK LEVEL (COMPONENT OUT): OFF PROGRESSIVE (COMPONENT OUT ONLY): OFF MODE : (PROGRESSIVE...work. Example: "TV TYPE" SCREEN SETUP TV TYPE: 16:9 SCREEN SAVER: 16:9 BACKGROUND: 4:3 LETTER BOX BLACK LEVEL: 4:3 PAN SCAN BLACK LEVEL (COMPONENT OUT): OFF PROGRESSIVE (COMPONENT OUT ONLY): OFF MODE : (PROGRESSIVE...
... SETUP," "SCREEN SETUP," "CUSTOM SETUP," "AUDIO SETUP," or "HDMI SETUP." LANGUAGE SETUP OSD: MENU: AUDIO: SUBTITLE: ENGLISH ENGLISH ORIGINAL...DVD VIDEO QUICK CUSTOM RESET QUICK SCREEN SETUP TV TYPE: 16:9 SCREEN SAVER: ON BACKGROUND: JACKET PICTURE BLACK LEVEL: ON BLACK LEVEL (COMPONENT OUT): OFF PROGRESSIVE (COMPONENT OUT ONLY): OFF MODE : (PROGRESSIVE...work. Example: "TV TYPE" SCREEN SETUP TV TYPE: 16:9 SCREEN SAVER: 16:9 BACKGROUND: 4:3 LETTER BOX BLACK LEVEL: 4:3 PAN SCAN BLACK LEVEL (COMPONENT OUT): OFF PROGRESSIVE (COMPONENT OUT ONLY): OFF MODE : (PROGRESSIVE...
Operating Instructions
Page 66
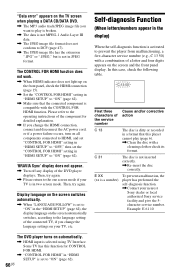
..., the player has performed the self-diagnosis function. , Contact your nearest Sony dealer or local authorized Sony service facility and give the 5character service number. "Data error" appears on the TV screen when playing a DATA CD/DATA DVD. , The MP3 audio track/JPEG image file you want to play (page...the one screen mode if your TV is in two screen mode. The CONTROL FOR HDMI function does not work. , When HDMI indicator does not light up on automatically. , HDMI input is compatible with the CONTROL FOR HDMI function. E XX (xx is not inserted correctly. , Re-insert the disc ...
..., the player has performed the self-diagnosis function. , Contact your nearest Sony dealer or local authorized Sony service facility and give the 5character service number. "Data error" appears on the TV screen when playing a DATA CD/DATA DVD. , The MP3 audio track/JPEG image file you want to play (page...the one screen mode if your TV is in two screen mode. The CONTROL FOR HDMI function does not work. , When HDMI indicator does not light up on automatically. , HDMI input is compatible with the CONTROL FOR HDMI function. E XX (xx is not inserted correctly. , Re-insert the disc ...


