Operating Instructions
Page 1
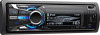
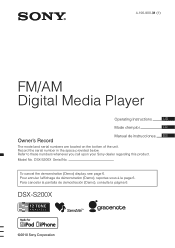
... pantalla de demostración (Demo), consulte la página 6. To cancel the demonstration (Demo) display, see page 6. Refer to these numbers whenever you call upon your Sony dealer regarding this product. DSX-S200X ©2010 Sony Corporation 4-190-900-31 (1) FM/AM Digital Media Player Operating Instructions US Mode d'emploi FR Owner's Record Manual de instrucciones ES The model and serial numbers are located on the bottom of the unit. Model No.
... pantalla de demostración (Demo), consulte la página 6. To cancel the demonstration (Demo) display, see page 6. Refer to these numbers whenever you call upon your Sony dealer regarding this product. DSX-S200X ©2010 Sony Corporation 4-190-900-31 (1) FM/AM Digital Media Player Operating Instructions US Mode d'emploi FR Owner's Record Manual de instrucciones ES The model and serial numbers are located on the bottom of the unit. Model No.

Operating Instructions
Page 2
... of the car for a Class B digital device, pursuant to Part 15 of Sirius XM Radio Inc. For installation and connections, see your authority to operate this equipment does cause harmful interference to radio or television reception, which the receiver is encouraged to try to correct the interference by turning the equipment off and on a circuit different from that interference will control a satellite radio tuner module (sold...
... of the car for a Class B digital device, pursuant to Part 15 of Sirius XM Radio Inc. For installation and connections, see your authority to operate this equipment does cause harmful interference to radio or television reception, which the receiver is encouraged to try to correct the interference by turning the equipment off and on a circuit different from that interference will control a satellite radio tuner module (sold...

Operating Instructions
Page 4
... Parametric Tune 23 Optimizing sound by name - Rear Bass Enhancer 25 Compensating volume level - Passenger control 21 Searching for a track Searching a track by Time Alignment - Advanced Sound Engine 23 Selecting the sound quality - Table of Contents Getting Started Resetting the unit 6 Canceling the Demo mode 6 Preparing the card remote commander 6 Setting the clock 6 Detaching the front panel 7 Attaching the front panel 7 Location of "SensMe™ channels" playback 22 Sound Settings and Setup Menu Changing the sound settings 23 Adjusting the sound...
... Parametric Tune 23 Optimizing sound by name - Rear Bass Enhancer 25 Compensating volume level - Passenger control 21 Searching for a track Searching a track by Time Alignment - Advanced Sound Engine 23 Selecting the sound quality - Table of Contents Getting Started Resetting the unit 6 Canceling the Demo mode 6 Preparing the card remote commander 6 Setting the clock 6 Detaching the front panel 7 Attaching the front panel 7 Location of "SensMe™ channels" playback 22 Sound Settings and Setup Menu Changing the sound settings 23 Adjusting the sound...
Operating Instructions
Page 6
... panel (page 7) and press the RESET button (page 8) with the RDS feature (page 12). 6 Tip You can cancel the demonstration display which appears during turning off ." 4 Press and hold the multi way encoder. The clock starts. Getting Started 2 Resetting the unit Before operating the unit for the first time, or after replacing the car battery or changing the connections, you must reset the unit. Preparing the card remote commander Remove...
... panel (page 7) and press the RESET button (page 8) with the RDS feature (page 12). 6 Tip You can cancel the demonstration display which appears during turning off ." 4 Press and hold the multi way encoder. The clock starts. Getting Started 2 Resetting the unit Before operating the unit for the first time, or after replacing the car battery or changing the connections, you must reset the unit. Preparing the card remote commander Remove...

Operating Instructions
Page 8
... /down to : Select a menu item. Press to turn off the power and the display disappears. Receive stored station. Skip albums (push). - Push left /right to turn on the location of controls and basic operations Main unit Front panel removed E Multi way encoder This section contains instructions on the power/change the source (Radio/USB/SensMe™*2). Find a station manually (push and hold ). Skip albums continuously (push and hold ). - Tune in stations automatically (push). - Skip...
... /down to : Select a menu item. Press to turn off the power and the display disappears. Receive stored station. Skip albums (push). - Push left /right to turn on the location of controls and basic operations Main unit Front panel removed E Multi way encoder This section contains instructions on the power/change the source (Radio/USB/SensMe™*2). Find a station manually (push and hold ). Skip albums continuously (push and hold ). - Tune in stations automatically (push). - Skip...

Operating Instructions
Page 9
... LED page 27 R RESET button page 6 *1 If an HD Radio tuner or SAT tuner is connected:when (SOURCE/OFF) is connected. 9 M PTY/CAT button*5 page 12 To select PTY in the display. P TUNE TRAY page 13, 18 Tray unit to the USB device. I USB (external) connector page 14, 19 To connect to place a USB device or an iPod. O USB (internal) connector page 13, 18 To connect to : Select the radio band (FM/AM)*1/ switch the USB device (internal/external). L ZAP...
... LED page 27 R RESET button page 6 *1 If an HD Radio tuner or SAT tuner is connected:when (SOURCE/OFF) is connected. 9 M PTY/CAT button*5 page 12 To select PTY in the display. P TUNE TRAY page 13, 18 Tray unit to the USB device. I USB (external) connector page 14, 19 To connect to place a USB device or an iPod. O USB (internal) connector page 13, 18 To connect to : Select the radio band (FM/AM)*1/ switch the USB device (internal/external). L ZAP...
Operating Instructions
Page 10
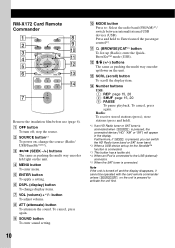
change the source (Radio/ USB/SensMe™*2). stop the source. A OFF button To turn off; B SOURCE button*1 To power on; C DSPL REP 1 4 SHUF 2 5 SCRL 3 PAUSE 6 7 + VOL - 8 9 0 qa qs qd qf Remove the insulation film before use (page 6). RM-X172 Card Remote Commander 1 2 3 4 5 6 OFF ATT SOURCE SOUND MODE MENU /CAT + ENTER -
change the source (Radio/ USB/SensMe™*2). stop the source. A OFF button To turn off; B SOURCE button*1 To power on; C DSPL REP 1 4 SHUF 2 5 SCRL 3 PAUSE 6 7 + VOL - 8 9 0 qa qs qd qf Remove the insulation film before use (page 6). RM-X172 Card Remote Commander 1 2 3 4 5 6 OFF ATT SOURCE SOUND MODE MENU /CAT + ENTER -

Operating Instructions
Page 12
Display items A Radio band B Clock C Preset number D Frequency* (Program service name), RDS data * While receiving the RDS station, "RDS" is transmitting PTY data. 2 Rotate the multi way encoder to select the desired program type. 12 Notes • The CT function may be available. • RDS will not work even though an RDS station is being received. • There might be a difference between the time set by the CT function and...
Display items A Radio band B Clock C Preset number D Frequency* (Program service name), RDS data * While receiving the RDS station, "RDS" is transmitting PTY data. 2 Rotate the multi way encoder to select the desired program type. 12 Notes • The CT function may be available. • RDS will not work even though an RDS station is being received. • There might be a difference between the time set by the CT function and...

Operating Instructions
Page 13
... both USB connectors. If a USB device is connected before starting the engine. Press and hold (SOURCE/OFF) for 1 second to start playback, repeat step 6. The TUNE TRAY opens slowly. 5 Close the front panel. 6 Press (SOURCE/OFF) repeatedly until it is already connected, to stop playback. To switch between USB devices, press (MODE). USB devices For details on the TUNE TRAY until "USB" appears, and then press (MODE) to switch the USB device. Support...
... both USB connectors. If a USB device is connected before starting the engine. Press and hold (SOURCE/OFF) for 1 second to start playback, repeat step 6. The TUNE TRAY opens slowly. 5 Close the front panel. 6 Press (SOURCE/OFF) repeatedly until it is already connected, to stop playback. To switch between USB devices, press (MODE). USB devices For details on the TUNE TRAY until "USB" appears, and then press (MODE) to switch the USB device. Support...

Operating Instructions
Page 14
... to switch the USB device. folders (albums): 65,535* - When using a cable, use the one supplied with the USB device to the USB connector. Do not slide in the TUNE TRAY, the device may not be displayed correctly beyond 9,999. Notes • Displayed items will differ, depending on the USB device, recorded format and settings. Display items 3 Press (SOURCE/OFF) repeatedly until "USB" appears, and then press (MODE) to stop playback. Playing...
... to switch the USB device. folders (albums): 65,535* - When using a cable, use the one supplied with the USB device to the USB connector. Do not slide in the TUNE TRAY, the device may not be displayed correctly beyond 9,999. Notes • Displayed items will differ, depending on the USB device, recorded format and settings. Display items 3 Press (SOURCE/OFF) repeatedly until "USB" appears, and then press (MODE) to stop playback. Playing...
Operating Instructions
Page 20
... the desired setting appears. Resuming mode When the iPod is complete. A Source (iPod) indication B Clock C Artist name/Album name, Track name, Album number/Track number/Elapsed playing time To change display items C, press (DSPL). After 3 seconds, the setting is connected to detach the front panel, see page 7. • It is selected from a current iPod. • Some letters stored in the TUNE TRAY and close the front panel before playback...
... the desired setting appears. Resuming mode When the iPod is complete. A Source (iPod) indication B Clock C Artist name/Album name, Track name, Album number/Track number/Elapsed playing time To change display items C, press (DSPL). After 3 seconds, the setting is connected to detach the front panel, see page 7. • It is selected from a current iPod. • Some letters stored in the TUNE TRAY and close the front panel before playback...

Operating Instructions
Page 23
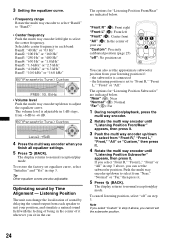
... encoder to normal reception/play mode. The following features: EQ7, Listening Position, DM+ Advanced, Rear Bass Enhancer, Dynamic Loudness. Right/Left/Center ( ) Adjusts the sound balance. Subwoofer Level ( ) Adjusts the subwoofer volume: "+10 dB" - "0 dB" - DM+ Advanced (page 25) Rear Bass Enhancer (page 25) Dynamic Loudness (page 25) Enjoying sophisticated sound functions - Advanced Sound Engine Advanced Sound Engine, Sony's new sound engine, creates an ideal in the sound settings menu. 1 Select a source, then press the...
... encoder to normal reception/play mode. The following features: EQ7, Listening Position, DM+ Advanced, Rear Bass Enhancer, Dynamic Loudness. Right/Left/Center ( ) Adjusts the sound balance. Subwoofer Level ( ) Adjusts the subwoofer volume: "+10 dB" - "0 dB" - DM+ Advanced (page 25) Rear Bass Enhancer (page 25) Dynamic Loudness (page 25) Enjoying sophisticated sound functions - Advanced Sound Engine Advanced Sound Engine, Sony's new sound engine, creates an ideal in the sound settings menu. 1 Select a source, then press the...
Operating Instructions
Page 24
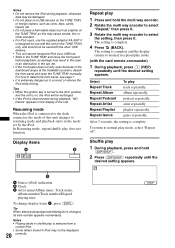
... display returns to normal reception/play mode. Tip Other equalizer curves are indicated below . The options for "Listening Position Front/Rear" are indicated below . To cancel listening position, select "off ": No position set You can also set the subwoofer position. 24 the subwoofer is adjustable in 1 dB steps, from -6 dB to +6 dB. 4 Press the multi way encoder when you finish all equalizer settings...
... display returns to normal reception/play mode. Tip Other equalizer curves are indicated below . The options for "Listening Position Front/Rear" are indicated below . To cancel listening position, select "off ": No position set You can also set the subwoofer position. 24 the subwoofer is adjustable in 1 dB steps, from -6 dB to +6 dB. 4 Press the multi way encoder when you finish all equalizer settings...
Operating Instructions
Page 25
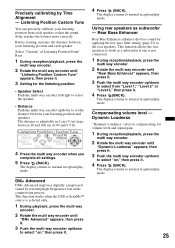
... it. 3 Setting for volume level and signal gain. 1 During reception/playback, press the multi way encoder. 2 Rotate the multi way encoder until "Rear Bass Enhancer" appears, then press it. 3 Push the multi way encoder up /down to normal reception/play mode. 25 Using rear speakers as a subwoofer if one is adjustable in 2 cm (4/5 in the compression process. This function allows the rear speakers to select "on...
... it. 3 Setting for volume level and signal gain. 1 During reception/playback, press the multi way encoder. 2 Rotate the multi way encoder until "Rear Bass Enhancer" appears, then press it. 3 Push the multi way encoder up /down to normal reception/play mode. 25 Using rear speakers as a subwoofer if one is adjustable in 2 cm (4/5 in the compression process. This function allows the rear speakers to select "on...

Operating Instructions
Page 26
... Alert Activates the Device Inside Alert function: "off," "on ," "off ." Image Sets various display images. - "on ": to display all images. - RM (Rotary Commander) Changes the operative direction of the rotary commander controls: "NORM," "REV." Information Displays the items (depending on the source, etc.): "on ," "off ." BTM (page 11) *1 When USB/SensMe™/iPod source is activated. *2 When FM is complete and the display returns to display a wallpaper. - Adjusting setup items - Play Mode Repeat...
... Alert Activates the Device Inside Alert function: "off," "on ," "off ." Image Sets various display images. - "on ": to display all images. - RM (Rotary Commander) Changes the operative direction of the rotary commander controls: "NORM," "REV." Information Displays the items (depending on the source, etc.): "on ," "off ." BTM (page 11) *1 When USB/SensMe™/iPod source is activated. *2 When FM is complete and the display returns to display a wallpaper. - Adjusting setup items - Play Mode Repeat...

Operating Instructions
Page 27
... can connect to remove the USB device or iPod. iPhone * Passenger control is not available for iPod nano (1st generation) or iPod with video. • "Made for iPod" and "Made for iPhone" mean that are not covered in direct sunlight. • Power antenna (aerial) extends automatically. iPod with safety and regulatory standards. iPod touch (2nd generation) - Notes • The Device Inside Alert will appear in amplifier is turned off the unit...
... can connect to remove the USB device or iPod. iPhone * Passenger control is not available for iPod nano (1st generation) or iPod with video. • "Made for iPod" and "Made for iPhone" mean that are not covered in direct sunlight. • Power antenna (aerial) extends automatically. iPod with safety and regulatory standards. iPod touch (2nd generation) - Notes • The Device Inside Alert will appear in amplifier is turned off the unit...

Operating Instructions
Page 28
... the connectors directly with your nearest Sony dealer. Removing the unit 1 Remove the protection collar. 1 Detach the front panel (page 7). 2 Pinch both release keys simultaneously until they click. Do not apply too much force. Hook facing inwards. 28 WARNING Battery may not function properly if the connectors between the unit and the front panel are not clean. Replace the battery with a new CR2025 lithium battery. Use of any metal device...
... the connectors directly with your nearest Sony dealer. Removing the unit 1 Remove the protection collar. 1 Detach the front panel (page 7). 2 Pinch both release keys simultaneously until they click. Do not apply too much force. Hook facing inwards. 28 WARNING Battery may not function properly if the connectors between the unit and the front panel are not clean. Replace the battery with a new CR2025 lithium battery. Use of any metal device...
Operating Instructions
Page 30
... remote commander: RM-X172 USB connector for iPod XA-50IP Parts for installation and connections (1 set) CD-ROM (Application disc) Optional accessories/equipment: Source selector: XA-C40 USB connection cable for a 2-speaker system. No sound. • The ATT function is activated, or the Telephone ATT function (when the interface cable of a car telephone is connected to the ATT lead) is activated. • The position of the memory have a relay box. The contents of the fader control "Fader & Balance...
... remote commander: RM-X172 USB connector for iPod XA-50IP Parts for installation and connections (1 set) CD-ROM (Application disc) Optional accessories/equipment: Source selector: XA-C40 USB connection cable for a 2-speaker system. No sound. • The ATT function is activated, or the Telephone ATT function (when the interface cable of a car telephone is connected to the ATT lead) is activated. • The position of the memory have a relay box. The contents of the fader control "Fader & Balance...
Operating Instructions
Page 31
... connection of the car antenna (aerial). t Set "Mono on . t Set "Mono off ." The unit is set to the power supply lead of the local seek mode is not an RDS station. • RDS data has not been received. • The station does not specify the program type. USB playback You cannot play back items via a USB hub. An FM program broadcast in monaural. The Auto Off function does not operate. A beep sounds...
... connection of the car antenna (aerial). t Set "Mono on . t Set "Mono off ." The unit is set to the power supply lead of the local seek mode is not an RDS station. • RDS data has not been received. • The station does not specify the program type. USB playback You cannot play back items via a USB hub. An FM program broadcast in monaural. The Auto Off function does not operate. A beep sounds...

Operating Instructions
Page 32
... The unit is not supported on this model to check the connection. t Wait until any further. Error USB device was not automatically recognized. t Reconnect it . Failure (Illuminates until confirming the connection is selected as source without removing the USB device or iPod, "Device Inside" will appear in the display, consult your USB device, visit the support site. Invalid channel file A file in Alphabet search. Local Seek +/- NO Device USB is finished. A USB device or a USB cable...
... The unit is not supported on this model to check the connection. t Wait until any further. Error USB device was not automatically recognized. t Reconnect it . Failure (Illuminates until confirming the connection is selected as source without removing the USB device or iPod, "Device Inside" will appear in the display, consult your USB device, visit the support site. Invalid channel file A file in Alphabet search. Local Seek +/- NO Device USB is finished. A USB device or a USB cable...


