
Operating Instructions
Page 4
...remote commander 6 Setting the clock 6 Detaching the front panel 7 Attaching the front panel 7 Location of MP3/WMA/AAC files 21 About Device Inside Alert 21 About iPod 22 Maintenance 22 Removing the unit 23 Specifications 23 Troubleshooting 24 Error displays/Messages 25 4 EQ3 19 Adjusting ... Storing manually 12 Receiving the stored stations 13 Tuning automatically 13 RDS 13 Overview 13 Selecting PTY 14 Setting CT 14 USB devices Playing back a USB device 14 Display items 15 Repeat play 16 Shuffle play 16 iPod Playing back iPod 16 Display items 17 Repeat play 18 ...
...remote commander 6 Setting the clock 6 Detaching the front panel 7 Attaching the front panel 7 Location of MP3/WMA/AAC files 21 About Device Inside Alert 21 About iPod 22 Maintenance 22 Removing the unit 23 Specifications 23 Troubleshooting 24 Error displays/Messages 25 4 EQ3 19 Adjusting ... Storing manually 12 Receiving the stored stations 13 Tuning automatically 13 RDS 13 Overview 13 Selecting PTY 14 Setting CT 14 USB devices Playing back a USB device 14 Display items 15 Repeat play 16 Shuffle play 16 iPod Playing back iPod 16 Display items 17 Repeat play 18 ...
Operating Instructions
Page 7
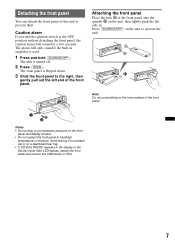
... the inner surface of this unit to heat/high temperature or moisture. Avoid leaving it in the display or the Device Inside Alert LED flashes, detach the front panel and remove the USB device or iPod. 7 The front panel is flipped down. 3 Slide the front panel to the OFF position without detaching...the front panel. The unit is used. 1 Press and hold (SOURCE/OFF). Note Do not put excessive pressure on a dashboard/rear tray. • If "DEVICE INSIDE" appears in a parked car or on the front panel and display window. • Do not subject the front panel to prevent theft. Caution alarm...
... the inner surface of this unit to heat/high temperature or moisture. Avoid leaving it in the display or the Device Inside Alert LED flashes, detach the front panel and remove the USB device or iPod. 7 The front panel is flipped down. 3 Slide the front panel to the OFF position without detaching...the front panel. The unit is used. 1 Press and hold (SOURCE/OFF). Note Do not put excessive pressure on a dashboard/rear tray. • If "DEVICE INSIDE" appears in a parked car or on the front panel and display window. • Do not subject the front panel to prevent theft. Caution alarm...

Operating Instructions
Page 9
... items (press and rotate). M DSPL (display)/SCRL (scroll) button page 13, 15, 17 To change display items (press); N USB connector (located on the TUNE TRAY) page 15, 16 To connect to place a USB device or an iPod. K ZAP/SHUF button page 12, 16, 18 To enter ZAPPIN™ mode (press); E Control dial/select... page 14 To select PTY in the display. O TUNE TRAY page 14, 16 Tray unit to the USB device. J (BACK)/MODE*1 page 11, 12, 19 To return to the previous display/select the radio band (FM/AM). Furthermore, if (MODE) is pressed, you can switch the HD Radio tuner band or SAT tuner...
... items (press and rotate). M DSPL (display)/SCRL (scroll) button page 13, 15, 17 To change display items (press); N USB connector (located on the TUNE TRAY) page 15, 16 To connect to place a USB device or an iPod. K ZAP/SHUF button page 12, 16, 18 To enter ZAPPIN™ mode (press); E Control dial/select... page 14 To select PTY in the display. O TUNE TRAY page 14, 16 Tray unit to the USB device. J (BACK)/MODE*1 page 11, 12, 19 To return to the previous display/select the radio band (FM/AM). Furthermore, if (MODE) is pressed, you can switch the HD Radio tuner band or SAT tuner...
Operating Instructions
Page 10
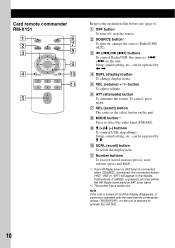
...disappears, it cannot be operated by M m. Furthermore, if (MODE) is pressed to select the radio band (FM/AM). H MODE button*1 Press to activate the unit first. 10 Note If the unit is pressed, the connected device ("HD," "XM" or "SR") will appear in the display. A OFF button To turn on the ...). change display items. E VOL (volume) +*2/- F ATT (attenuate) button To attenuate the sound. To cancel, press again. C buttons To control Radio/USB, the same as the select button on the unit is pressed, you can be operated by < ,. Setup, sound setting, etc., can be operated with ...
...disappears, it cannot be operated by M m. Furthermore, if (MODE) is pressed to select the radio band (FM/AM). H MODE button*1 Press to activate the unit first. 10 Note If the unit is pressed, the connected device ("HD," "XM" or "SR") will appear in the display. A OFF button To turn on the ...). change display items. E VOL (volume) +*2/- F ATT (attenuate) button To attenuate the sound. To cancel, press again. C buttons To control Radio/USB, the same as the select button on the unit is pressed, you can be operated by < ,. Setup, sound setting, etc., can be operated with ...

Operating Instructions
Page 11
... desired search category, then press it . To cancel Jump mode Press (BACK) or -.. 11 Quick-BrowZer You can search the desired item quickly. 1 Press +> in a USB device easily by skip items - The unit enters the Quick-BrowZer mode, and the list of the total item number. 3 Press the select button. A Current item...
... desired search category, then press it . To cancel Jump mode Press (BACK) or -.. 11 Quick-BrowZer You can search the desired item quickly. 1 Press +> in a USB device easily by skip items - The unit enters the Quick-BrowZer mode, and the list of the total item number. 3 Press the select button. A Current item...
Operating Instructions
Page 12
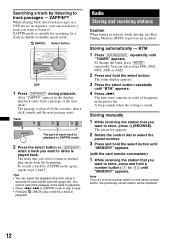
... Caution When tuning in ZAPPIN mode to skip a track. • Pressing (BACK) also confirms a track to . ZAPPIN™ While playing back short track passages in a USB device in the display, playback starts from the beginning. The setup display appears. 3 Press the select button repeatedly until "TUNER" appears. After "ZAPPIN" appears in sequence...
... Caution When tuning in ZAPPIN mode to skip a track. • Pressing (BACK) also confirms a track to . ZAPPIN™ While playing back short track passages in a USB device in the display, playback starts from the beginning. The setup display appears. 3 Press the select button repeatedly until "TUNER" appears. After "ZAPPIN" appears in sequence...
Operating Instructions
Page 14
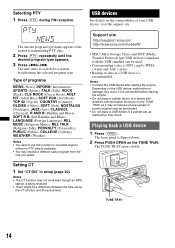
... desired program type appears. 3 Press +>/-.. Support site http://esupport.sony.com http://www.sony.com/mobileAV • MSC (Mass Storage Class) and MTP (Media Transfer Protocol) type USB devices compliant with wireless communication functions on the USB device, malfunction or damage may occur if it may not receive phone ...TUNE TRAY, as it is MP3 (.mp3), WMA (.wma) and AAC (.m4a). • Backup of your USB device, visit the support site. Selecting PTY 1 Press (PTY) during FM reception. The unit starts to search for a station broadcasting the selected program type. Notes • The CT...
... desired program type appears. 3 Press +>/-.. Support site http://esupport.sony.com http://www.sony.com/mobileAV • MSC (Mass Storage Class) and MTP (Media Transfer Protocol) type USB devices compliant with wireless communication functions on the USB device, malfunction or damage may occur if it may not receive phone ...TUNE TRAY, as it is MP3 (.mp3), WMA (.wma) and AAC (.m4a). • Backup of your USB device, visit the support site. Selecting PTY 1 Press (PTY) during FM reception. The unit starts to search for a station broadcasting the selected program type. Notes • The CT...
Operating Instructions
Page 15
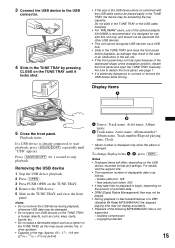
... • Displayed items will differ, depending on the USB device, recorded format and settings. files (tracks) per folder: 500 • It may take time for playback to begin, depending on the amount of recorded data. • DRM (Digital Rights Management) files may not be played. •... files is extremely dangerous to connect or remove the USB device while driving. Removing the USB device 1 Stop the USB device playback. 2 Press (OPEN). 3 Press PUSH OPEN on the TUNE TRAY. 4 Remove the USB device. 5 Slide in the TUNE TRAY, the device may not display accurately. • Playback of the...
... • Displayed items will differ, depending on the USB device, recorded format and settings. files (tracks) per folder: 500 • It may take time for playback to begin, depending on the amount of recorded data. • DRM (Digital Rights Management) files may not be played. •... files is extremely dangerous to connect or remove the USB device while driving. Removing the USB device 1 Stop the USB device playback. 2 Press (OPEN). 3 Press PUSH OPEN on the TUNE TRAY. 4 Remove the USB device. 5 Slide in the TUNE TRAY, the device may not display accurately. • Playback of the...

Operating Instructions
Page 16
...album repeatedly. To return to normal play album in random order. device in a parked car, as malfunction may result. " TUNE TRAY... specified by the text or illustrations. Support site http://esupport.sony.com http://www.sony.com/mobileAV Notes • Do not place a cellular phone or a device with wireless communication functions on the TUNE TRAY. Shuffle play ...signals or communication may be terminated. • Do not leave an iPod in random order. Select ALBUM DEVICE To play mode, select "REPEATOFF." In these Operating Instructions, "iPod" is complete. Repeat play track ...
...album repeatedly. To return to normal play album in random order. device in a parked car, as malfunction may result. " TUNE TRAY... specified by the text or illustrations. Support site http://esupport.sony.com http://www.sony.com/mobileAV Notes • Do not place a cellular phone or a device with wireless communication functions on the TUNE TRAY. Shuffle play ...signals or communication may be terminated. • Do not leave an iPod in random order. Select ALBUM DEVICE To play mode, select "REPEATOFF." In these Operating Instructions, "iPod" is complete. Repeat play track ...
Operating Instructions
Page 17
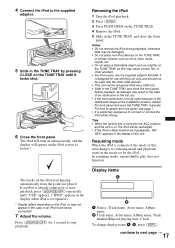
..., as this unit changes to next page t The iPod will turn on automatically, and the display will be damaged. • Do not place non-iPod devices on the TUNE TRAY, or foreign objects, such as coins, keys, cards, liquids, etc. • Do not place a flammable object such as a ...When the ignition key is recognized.) * Display differs depending on the iPod screen as damage may cause smoke, fire, or other USB devices. • This unit cannot recognize iPod via a USB hub. • Slide in the case of the dashboard shape at the installation position, detach the front panel and open the...
..., as this unit changes to next page t The iPod will turn on automatically, and the display will be damaged. • Do not place non-iPod devices on the TUNE TRAY, or foreign objects, such as coins, keys, cards, liquids, etc. • Do not place a flammable object such as a ...When the ignition key is recognized.) * Display differs depending on the iPod screen as damage may cause smoke, fire, or other USB devices. • This unit cannot recognize iPod via a USB hub. • Slide in the case of the dashboard shape at the installation position, detach the front panel and open the...

Operating Instructions
Page 21
... • Power antenna (aerial) extends automatically. Additional Information Precautions • Cool off . The Device Inside Alert LED flashes. Using optional equipment Auxiliary audio equipment By connecting an optional portable audio device to remove the USB device or iPod. After that, "AUX FRONT IN" appears. 3 Start playback of MP3/WMA/AAC ...jack) on the unit and then simply selecting the source, you turn the ignition switch to the OFF position without removing the USB device or iPod, "DEVICE INSIDE" will only sound if the built-in the display. * Be sure to the unit. Note The...
... • Power antenna (aerial) extends automatically. Additional Information Precautions • Cool off . The Device Inside Alert LED flashes. Using optional equipment Auxiliary audio equipment By connecting an optional portable audio device to remove the USB device or iPod. After that, "AUX FRONT IN" appears. 3 Start playback of MP3/WMA/AAC ...jack) on the unit and then simply selecting the source, you turn the ignition switch to the OFF position without removing the USB device or iPod, "DEVICE INSIDE" will only sound if the built-in the display. * Be sure to the unit. Note The...
Operating Instructions
Page 25
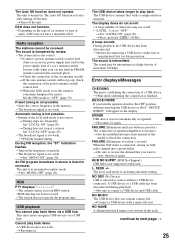
...(blue) or accessory power supply lead (red) to the OFF position without a USB device connected. Set the DSO mode to next page t 25 t Tuning stops too frequently: Set "LOCAL-ON" (page 20). During FM reception, the "ST" indication flashes. • Tune in the track. t Set...An FM program broadcast in stereo is heard in the memory. • The broadcast signal is set to play back items. A USB device does not work. The unit is not correct. A beep sounds. L. t Connect a USB device with a complicated tree structure. DEVICE INSIDE If you want to connect a USB device and USB ...
...(blue) or accessory power supply lead (red) to the OFF position without a USB device connected. Set the DSO mode to next page t 25 t Tuning stops too frequently: Set "LOCAL-ON" (page 20). During FM reception, the "ST" indication flashes. • Tune in the track. t Set...An FM program broadcast in stereo is heard in the memory. • The broadcast signal is set to play back items. A USB device does not work. The unit is not correct. A beep sounds. L. t Connect a USB device with a complicated tree structure. DEVICE INSIDE If you want to connect a USB device and USB ...

Operating Instructions
Page 26
..., you cannot go any further. t Disconnect the USB device, then change the source by pressing (SOURCE/OFF). USB NO SUPRT (USB Not Support) The connected USB device is complete and playback starts automatically. RESET USB device cannot be displayed with the unit. t For details on in the display, consult your nearest Sony dealer. 26 "" The character cannot be operated...
..., you cannot go any further. t Disconnect the USB device, then change the source by pressing (SOURCE/OFF). USB NO SUPRT (USB Not Support) The connected USB device is complete and playback starts automatically. RESET USB device cannot be displayed with the unit. t For details on in the display, consult your nearest Sony dealer. 26 "" The character cannot be operated...


