
Operating Instructions
Page 2
... electricity or electromagnetism causes data transfer to qualified personnel only. You can capture life's precious moments with Part 15 of rechargeable batteries, call : Sony Customer Information Center 1-800-222SONY (7669) The number below is intended to alert the user to the presence of uninsulated ... cabinet. WARNING To prevent fire or shock hazard, do not attempt to the presence of Conformity Trade Name: SONY Model No.: DSR-PDX10 Responsible Party: Sony Electronics Inc. This symbol is loaded with this device must accept any questions about this Handycam is very easy...
... electricity or electromagnetism causes data transfer to qualified personnel only. You can capture life's precious moments with Part 15 of rechargeable batteries, call : Sony Customer Information Center 1-800-222SONY (7669) The number below is intended to alert the user to the presence of uninsulated ... cabinet. WARNING To prevent fire or shock hazard, do not attempt to the presence of Conformity Trade Name: SONY Model No.: DSR-PDX10 Responsible Party: Sony Electronics Inc. This symbol is loaded with this device must accept any questions about this Handycam is very easy...

Operating Instructions
Page 6
... images on a "Memory Stick" ...... 10 Getting Started Using this manual 12 Checking supplied accessories 14 Step 1 Preparing the power supply ... 15 Installing the battery pack 15 Charging the battery pack 16 Connecting to a wall outlet 19 Step 2 Setting the date and time ........ 20 Step 3 Inserting a cassette 22 Step 4 Using the touch panel...
... images on a "Memory Stick" ...... 10 Getting Started Using this manual 12 Checking supplied accessories 14 Step 1 Preparing the power supply ... 15 Installing the battery pack 15 Charging the battery pack 16 Connecting to a wall outlet 19 Step 2 Setting the date and time ........ 20 Step 3 Inserting a cassette 22 Step 4 Using the touch panel...

Operating Instructions
Page 7
... Windows users 201 Viewing images recorded on a "Memory Stick" on a "Memory Stick" - Table of DVCAM and DV formats 234 Usable cassettes 236 About the "InfoLITHIUM" battery pack 239 About i.LINK 241 Using your computer using the USB cable - Introduction 135 Recording still images on your computer - Introduction 190 Connecting your camcorder...
... Windows users 201 Viewing images recorded on a "Memory Stick" on a "Memory Stick" - Table of DVCAM and DV formats 234 Usable cassettes 236 About the "InfoLITHIUM" battery pack 239 About i.LINK 241 Using your computer using the USB cable - Introduction 135 Recording still images on your computer - Introduction 190 Connecting your camcorder...

Operating Instructions
Page 8
... facing upward. After the cassette compartment goes down completely, close the lid until it clicks. Quick Start Guide - Connecting the power cord (p. 19) Use the battery pack when using your camcorder. Open the DC IN jack cover.
... facing upward. After the cassette compartment goes down completely, close the lid until it clicks. Quick Start Guide - Connecting the power cord (p. 19) Use the battery pack when using your camcorder. Open the DC IN jack cover.

Operating Instructions
Page 9
... MEMORY CAMERA 3 Press N to your camcorder, the clock setting is closed, use the viewfinder with your camcorder by holding the viewfinder, the LCD panel, the battery pack or the microphone. 9 Adjust the viewfinder lens to start playback. The picture appears on the LCD screen (p. 41) 1 Set the POWER switch VCR POWER...
... MEMORY CAMERA 3 Press N to your camcorder, the clock setting is closed, use the viewfinder with your camcorder by holding the viewfinder, the LCD panel, the battery pack or the microphone. 9 Adjust the viewfinder lens to start playback. The picture appears on the LCD screen (p. 41) 1 Set the POWER switch VCR POWER...

Operating Instructions
Page 10
Connecting the power cord (p. 19) Use the battery pack when using your camcorder. Open the DC IN jack cover. "Memory Stick" slot 10 MEMORY EJECT Press the MEMORY EJECT once lightly to record ...
Connecting the power cord (p. 19) Use the battery pack when using your camcorder. Open the DC IN jack cover. "Memory Stick" slot 10 MEMORY EJECT Press the MEMORY EJECT once lightly to record ...

Operating Instructions
Page 11
... when the pressing the small green button button deeply is closed, use the viewfinder with your camcorder by holding the viewfinder, the LCD panel, the battery pack or the microphone. 2 Press PLAY or PB. Viewfinder When the LCD panel is on the screen stops recorded on a "Memory Stick" (p. 144) 3 Press OPEN...
... when the pressing the small green button button deeply is closed, use the viewfinder with your camcorder by holding the viewfinder, the LCD panel, the battery pack or the microphone. 2 Press PLAY or PB. Viewfinder When the LCD panel is on the screen stops recorded on a "Memory Stick" (p. 144) 3 Press OPEN...

Operating Instructions
Page 14
qa qs qd qf 1 AC-L10A/L10B/L10C AC power adaptor (1), power cord (1) (p. 16) 2 NP-FM50 battery pack (1) (p. 15, 16) 3 A/V connecting cable (1) (p. 47) 4 Wireless Remote Commander (1) (p. 258) 5 Size AA (R6) battery for Remote Commander (2) (p. 259) 6 Shoulder strap (1) 7 Lens cap (1) (p. 25) 8 "Memory Stick" (1) (p. 135) 9 USB cable (1) (p. 190) 0 CD-ROM (SPVD-008 USB Driver) (1) (p. 195...
qa qs qd qf 1 AC-L10A/L10B/L10C AC power adaptor (1), power cord (1) (p. 16) 2 NP-FM50 battery pack (1) (p. 15, 16) 3 A/V connecting cable (1) (p. 47) 4 Wireless Remote Commander (1) (p. 258) 5 Size AA (R6) battery for Remote Commander (2) (p. 259) 6 Shoulder strap (1) 7 Lens cap (1) (p. 25) 8 "Memory Stick" (1) (p. 135) 9 USB cable (1) (p. 190) 0 CD-ROM (SPVD-008 USB Driver) (1) (p. 195...

Operating Instructions
Page 15
Getting Started Step 1 Preparing the power supply Installing the battery pack (1) Lift up the viewfinder. (2) Slide the battery pack down until it clicks. 1 2 To remove the battery pack (1) Lift up the viewfinder. (2) Slide the battery pack out in the direction of the arrow while pressing BATT down. 1 2 2 BATT release button If you use the large capacity battery pack If you install the NP-FM70/QM71/FM90/FM91/QM91 battery pack on your camcorder, extend its viewfinder. 15
Getting Started Step 1 Preparing the power supply Installing the battery pack (1) Lift up the viewfinder. (2) Slide the battery pack down until it clicks. 1 2 To remove the battery pack (1) Lift up the viewfinder. (2) Slide the battery pack out in the direction of the arrow while pressing BATT down. 1 2 2 BATT release button If you use the large capacity battery pack If you install the NP-FM70/QM71/FM90/FM91/QM91 battery pack on your camcorder, extend its viewfinder. 15

Operating Instructions
Page 16
... display window. See page 239 for your camcorder. 16 When the remaining battery indicator changes to , normalchargeiscompleted.To fullychargethebattery (fullcharge),leavethebatterypackattachedforaboutonehour after charging it for details of "InfoLITHIUM" battery pack. (1) Open the DC IN jack cover and connect the AC power... adaptor supplied with your camcorder to the DC IN jack with the "InfoLITHIUM" battery pack (M series). Your camcorder operates only with the plug's v mark facing up. (2) Connect the power cord to the AC ...
... display window. See page 239 for your camcorder. 16 When the remaining battery indicator changes to , normalchargeiscompleted.To fullychargethebattery (fullcharge),leavethebatterypackattachedforaboutonehour after charging it for details of "InfoLITHIUM" battery pack. (1) Open the DC IN jack cover and connect the AC power... adaptor supplied with your camcorder to the DC IN jack with the "InfoLITHIUM" battery pack (M series). Your camcorder operates only with the plug's v mark facing up. (2) Connect the power cord to the AC ...

Operating Instructions
Page 17
...approximate recording time with the viewfinder. When you use the AC power adaptor Place the AC power adaptor near a wall outlet. The actual battery life may cause a short-circuit, damaging the AC power adaptor. Getting Started Step 1 Preparing the power supply Note Prevent metallic objects ... XLR adaptor is extremely high or low because of the AC power adaptor. Until your camcorder calculates the actual remaining battery time "---- Recording time Battery pack NP-FM50 (supplied) NP-FM70 NP-QM71 NP-FM90 NP-FM91/QM91 Recording with the viewfinder Continuous Typical* ...
...approximate recording time with the viewfinder. When you use the AC power adaptor Place the AC power adaptor near a wall outlet. The actual battery life may cause a short-circuit, damaging the AC power adaptor. Getting Started Step 1 Preparing the power supply Note Prevent metallic objects ... XLR adaptor is extremely high or low because of the AC power adaptor. Until your camcorder calculates the actual remaining battery time "---- Recording time Battery pack NP-FM50 (supplied) NP-FM70 NP-QM71 NP-FM90 NP-FM91/QM91 Recording with the viewfinder Continuous Typical* ...

Operating Instructions
Page 18
... LCD screen 110 230 270 355 410 Approximate minutes when you use a fully charged battery Note Approximate recording time and playing time at 25 shorter if you use your camcorder in an ambient temperature of Sony Corporation. 18 The "InfoLITHIUM" is a trademark of between 10 °C to30 &#...176;C(50 °Fto86 °F). Step 1 Preparing the power supply Playing time Battery pack NP-FM50 (supplied) NP-FM70 NP-QM71 NP-FM90 ...
... LCD screen 110 230 270 355 410 Approximate minutes when you use a fully charged battery Note Approximate recording time and playing time at 25 shorter if you use your camcorder in an ambient temperature of Sony Corporation. 18 The "InfoLITHIUM" is a trademark of between 10 °C to30 &#...176;C(50 °Fto86 °F). Step 1 Preparing the power supply Playing time Battery pack NP-FM50 (supplied) NP-FM70 NP-QM71 NP-FM90 ...

Operating Instructions
Page 19
... power cord is connected to the wall outlet, even if the set itself has been turned off. Using a car battery Use Sony Car Battery Adaptor (optional). Refer to the operating instructions of the Car Battery Adaptor for a long time, we recommend that you use your camcorder with the plug's v mark facing up. (2) Connect the...
... power cord is connected to the wall outlet, even if the set itself has been turned off. Using a car battery Use Sony Car Battery Adaptor (optional). Refer to the operating instructions of the Car Battery Adaptor for a long time, we recommend that you use your camcorder with the plug's v mark facing up. (2) Connect the...

Operating Instructions
Page 20
... time signal. If you do not use your camcorder for about four month,sthedateandtimemaybe cleared from memory (bars may appear) because the built-in rechargeable battery installed in that you set the POWER switch to CAMERA or MEMORY unless you set to CAMERA or MEMORY. (2) Turn the SEL/PUSH EXEC dial...
... time signal. If you do not use your camcorder for about four month,sthedateandtimemaybe cleared from memory (bars may appear) because the built-in rechargeable battery installed in that you set the POWER switch to CAMERA or MEMORY unless you set to CAMERA or MEMORY. (2) Turn the SEL/PUSH EXEC dial...
Operating Instructions
Page 26
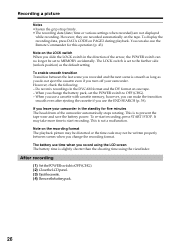
... data (date/time or various settings when recorded) are recorded automatically on PAGE2 during playback. When you record using the LCD screen The battery time is slightly shorter than the shooting time using the viewfinder. It may not be set to the further side (unlock position) as ...This is not a malfunction. If you leave your camcorder. This is to start recording, press START/STOP. To re-start recording. The battery use the Remote Commander for five minutes The head drum of the arrow, the POWER switch can make the transition smooth even after ejecting the...
... data (date/time or various settings when recorded) are recorded automatically on PAGE2 during playback. When you record using the LCD screen The battery time is slightly shorter than the shooting time using the viewfinder. It may not be set to the further side (unlock position) as ...This is not a malfunction. If you leave your camcorder. This is to start recording, press START/STOP. To re-start recording. The battery use the Remote Commander for five minutes The head drum of the arrow, the POWER switch can make the transition smooth even after ejecting the...

Operating Instructions
Page 29
... closed, check the picture with the viewfinder. Adjust the viewfinder lens to your eyesight so that the images in the menu settings when using the battery pack (p. 216).
... closed, check the picture with the viewfinder. Adjust the viewfinder lens to your eyesight so that the images in the menu settings when using the battery pack (p. 216).

Operating Instructions
Page 35
...minute for this button to display operation buttons on PAGE2 during recording (p. 121). You can also use the Remote Commander for the correct remaining battery time in minutes to ON in which you insert a cassette and record or play back for a while. You can select the drop ...frame or non-drop frame system using a cassette with the date and time, you record with cassette memory. Remaining battery time indicator during shooting, set DATE REC to be correct, depending on the tape. The time code can display the user bits, pressing TC/U-...
...minute for this button to display operation buttons on PAGE2 during recording (p. 121). You can also use the Remote Commander for the correct remaining battery time in minutes to ON in which you insert a cassette and record or play back for a while. You can select the drop ...frame or non-drop frame system using a cassette with the date and time, you record with cassette memory. Remaining battery time indicator during shooting, set DATE REC to be correct, depending on the tape. The time code can display the user bits, pressing TC/U-...

Operating Instructions
Page 44
Thetapewasrecordedbyacamcorderwithoutthedateandtimeset. Remaining battery time indicator during playback The indicator indicates the approximate continuous playback time. In the recording, the various settings will not be displayed. 44 Thetapeisunreadableduetotapedamageornoise. - Data ... back. The display changes as follows when you close the LCD panel and open it again, it takes about one minute for the correct remaining battery time to DATE in the playback. The display changes as follows when you use the data code, bars (-- -- --) appear if: -
Thetapewasrecordedbyacamcorderwithoutthedateandtimeset. Remaining battery time indicator during playback The indicator indicates the approximate continuous playback time. In the recording, the various settings will not be displayed. 44 Thetapeisunreadableduetotapedamageornoise. - Data ... back. The display changes as follows when you close the LCD panel and open it again, it takes about one minute for the correct remaining battery time to DATE in the playback. The display changes as follows when you use the data code, bars (-- -- --) appear if: -

Operating Instructions
Page 72
The white balance indicator disappears. Use the automatic mode for replacement. - You detach the battery for recording. You bring your camcorder at a white subject for about 10 seconds after removing the power supply. The setting will be maintained even after ...
The white balance indicator disappears. Use the automatic mode for replacement. - You detach the battery for recording. You bring your camcorder at a white subject for about 10 seconds after removing the power supply. The setting will be maintained even after ...

Operating Instructions
Page 216
... SET CH SELECT Mode z CH1, CH2 AUDIO MIX CH1 CH2 -- Displays the guide frame (p. 63). CAMERA MEMORY Notes on VF B.L. • When you select BRIGHT, battery life is reduced by about 10 percent during recording. • When you use power supplies other than the...
... SET CH SELECT Mode z CH1, CH2 AUDIO MIX CH1 CH2 -- Displays the guide frame (p. 63). CAMERA MEMORY Notes on VF B.L. • When you select BRIGHT, battery life is reduced by about 10 percent during recording. • When you use power supplies other than the...


