
Operating Instructions
Page 4
... Features 7 (GB) Location and Function of Parts 8 (GB) Front Panel 8 (GB) Rear Panel 11 (GB) Supplied Remote Commander 13 (GB) Notes on Video Cassettes 15 (GB) Preparations 17 (GB) Power Preparations 17 (GB) Inserting/Ejecting Cassettes 17 (GB) Notes on Recording/Playback 19 (GB) Playback 20 (GB) Connections for Playback 20 (GB) Settings for...
... Features 7 (GB) Location and Function of Parts 8 (GB) Front Panel 8 (GB) Rear Panel 11 (GB) Supplied Remote Commander 13 (GB) Notes on Video Cassettes 15 (GB) Preparations 17 (GB) Power Preparations 17 (GB) Inserting/Ejecting Cassettes 17 (GB) Notes on Recording/Playback 19 (GB) Playback 20 (GB) Connections for Playback 20 (GB) Settings for...
Operating Instructions
Page 7
...+1/3time speed and -1/3-time speed. Digital slow playback The unit has a frame memory function that allows you use an editing controller or the optional remote control unit (DSRM-20), the unit has a picture search function that allows smooth, slow playback. This is available ...position of the reel drive plate changes automatically. • The maximum recording/playback times are trademarks of two cassette sizes The unit can be monitored at various playback speeds when in analog video signals. Choice of Sony 7 Chapter 1 Overview (GB) Easy maintenance functions • Self-...
...+1/3time speed and -1/3-time speed. Digital slow playback The unit has a frame memory function that allows you use an editing controller or the optional remote control unit (DSRM-20), the unit has a picture search function that allows smooth, slow playback. This is available ...position of the reel drive plate changes automatically. • The maximum recording/playback times are trademarks of two cassette sizes The unit can be monitored at various playback speeds when in analog video signals. Choice of Sony 7 Chapter 1 Overview (GB) Easy maintenance functions • Self-...

Operating Instructions
Page 8
... to the picture and sound and that portion will not be recorded properly. 4 Remote sensor 5 ON/STANDBY switch 8 (GB) Chapter 1 Overview DV: Signal input from the DV IN/OUT connector S VIDEO: Signal input from the S VIDEO connector on INPUT jacks VIDEO: Signal input from the VIDEO jack on the rear panel. CONTROL S: The unit is operated...
... to the picture and sound and that portion will not be recorded properly. 4 Remote sensor 5 ON/STANDBY switch 8 (GB) Chapter 1 Overview DV: Signal input from the DV IN/OUT connector S VIDEO: Signal input from the S VIDEO connector on INPUT jacks VIDEO: Signal input from the VIDEO jack on the rear panel. CONTROL S: The unit is operated...

Operating Instructions
Page 9
.... 5 PLAY button When you press this EE mode, the video and audio signals that are input to the VCR's recording circuitry do not pass through any magnetic conversion circuits but instead... button 4 F FWD button 5 PLAY button 6 REW button 7 STOP button 1 Tape transport indicators 2 REC (record) button When you press the PLAY button while holding down this button while holding down the REW button during stop ...indicator lights when the unit is available. • To set the unit to recording pause mode with the remote control unit (DSRM-20, not supplied), press the PAUSE button while holding ...
.... 5 PLAY button When you press this EE mode, the video and audio signals that are input to the VCR's recording circuitry do not pass through any magnetic conversion circuits but instead... button 4 F FWD button 5 PLAY button 6 REW button 7 STOP button 1 Tape transport indicators 2 REC (record) button When you press the PLAY button while holding down this button while holding down the REW button during stop ...indicator lights when the unit is available. • To set the unit to recording pause mode with the remote control unit (DSRM-20, not supplied), press the PAUSE button while holding ...

Operating Instructions
Page 12
... S VIDEO connector on page 26 (GB). For details on the CM SET menu, see "Displaying data recorded on a tape" on page 25 (GB) and "Displaying various data" on the OUTPUT jacks. The unit detects the color system of the signals automatically. • When the switch is not possible) Therefore, to a remote control... from the DV IN/OUT connector, the time code generated by the unit while recording in the drop frame mode, set the REMOTE CONTROL switch on the unit. The color of the TC FORMAT setting on the Remote Commander to the color system of the playback. • If you want to ...
... S VIDEO connector on page 26 (GB). For details on the CM SET menu, see "Displaying data recorded on a tape" on page 25 (GB) and "Displaying various data" on the OUTPUT jacks. The unit detects the color system of the signals automatically. • When the switch is not possible) Therefore, to a remote control... from the DV IN/OUT connector, the time code generated by the unit while recording in the drop frame mode, set the REMOTE CONTROL switch on the unit. The color of the TC FORMAT setting on the Remote Commander to the color system of the playback. • If you want to ...

Operating Instructions
Page 13
...various speeds You can play back a tape at normal speed or at a speed other Sony device is set to 00:00:00:00 during recording or in the recording pause mode. Chapter 1 Overview Supplied Remote Commander 1 TC RESET button 2 SEARCH SELECT buttons 3 Buttons for playing at various speeds... 1 Overview (GB) if you press this button while pointing the Remote Commander toward this unit, the HMS counter on a Sony remote commander while pointing it toward a Sony device other than this unit during recording or in the recording pause mode, the time code will be reset to zero. •...
...various speeds You can play back a tape at normal speed or at a speed other Sony device is set to 00:00:00:00 during recording or in the recording pause mode. Chapter 1 Overview Supplied Remote Commander 1 TC RESET button 2 SEARCH SELECT buttons 3 Buttons for playing at various speeds... 1 Overview (GB) if you press this button while pointing the Remote Commander toward this unit, the HMS counter on a Sony remote commander while pointing it toward a Sony device other than this unit during recording or in the recording pause mode, the time code will be reset to zero. •...

Operating Instructions
Page 14
...time, camera data) on the monitor screen. qa REC buttons When you will not use the Remote Commander for menu operation Press these buttons at the same time, the REC and PLAY indicators light and recording begins. Battery installation 1 Push and slide the lid to open. 2 Install the two size... AA (R6) batteries (supplied) with the Remote Commander. Be sure to install the battery from battery leakage. Chapter 1 Overview ...
...time, camera data) on the monitor screen. qa REC buttons When you will not use the Remote Commander for menu operation Press these buttons at the same time, the REC and PLAY indicators light and recording begins. Battery installation 1 Push and slide the lid to open. 2 Install the two size... AA (R6) batteries (supplied) with the Remote Commander. Be sure to install the battery from battery leakage. Chapter 1 Overview ...
Operating Instructions
Page 21
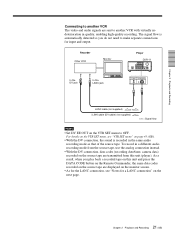
...page. 21 Chapter 2 Playback and Recording (GB) The signal flow is recorded in quality, enabling high-quality recording. To record in a different audio recording mode from this unit and press the DATA CODE button on the Remote Commander, the same data codes recorded on the source tape are transmitted ... VCR Monitor Player DSR-11 to the DV jack to the LANC jack LANC cable (not supplied) i.LINK cable (DV cable) (not supplied) l: Signal flow Notes • Set DV EE OUT on this unit (player). Chapter 2 Playback and Recording Connecting to another VCR The video and audio ...
...page. 21 Chapter 2 Playback and Recording (GB) The signal flow is recorded in quality, enabling high-quality recording. To record in a different audio recording mode from this unit and press the DATA CODE button on the Remote Commander, the same data codes recorded on the source tape are transmitted ... VCR Monitor Player DSR-11 to the DV jack to the LANC jack LANC cable (not supplied) i.LINK cable (DV cable) (not supplied) l: Signal flow Notes • Set DV EE OUT on this unit (player). Chapter 2 Playback and Recording Connecting to another VCR The video and audio ...
Operating Instructions
Page 22
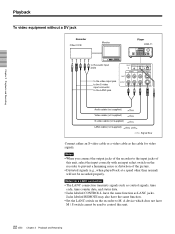
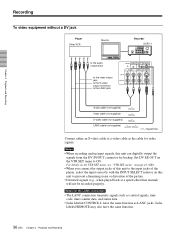
... flow Connect either an S-video cable or a video cable as LANC jacks. Jacks labeled REMOTE may also have the same function as the cable for video signals. Chapter 2 Playback and Recording Playback To video equipment without a DV jack Recorder Other VCR Monitor Player DSR-11 to the audio input jacks to the video input jack to the S-video input connector to M. Notes...
... flow Connect either an S-video cable or a video cable as LANC jacks. Jacks labeled REMOTE may also have the same function as the cable for video signals. Chapter 2 Playback and Recording Playback To video equipment without a DV jack Recorder Other VCR Monitor Player DSR-11 to the audio input jacks to the video input jack to the S-video input connector to M. Notes...
Operating Instructions
Page 23
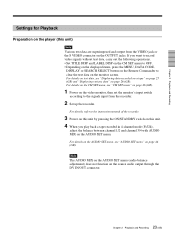
...'s input switch according to clear the text data on the monitor screen. Chapter 2 Playback and Recording Settings for Playback Preparation on the player (this unit. 4 When you want to record video signals without text data, carry out the following operations. • Set TITLE DISP and LABEL DISP... on the CM SET menu to OFF. • Depending on the displayed items, press the MENU, DATA CODE, DISPLAY or SEARCH SELECT button on the Remote...
...'s input switch according to clear the text data on the monitor screen. Chapter 2 Playback and Recording Settings for Playback Preparation on the player (this unit. 4 When you want to record video signals without text data, carry out the following operations. • Set TITLE DISP and LABEL DISP... on the CM SET menu to OFF. • Depending on the displayed items, press the MENU, DATA CODE, DISPLAY or SEARCH SELECT button on the Remote...

Operating Instructions
Page 25
... Shutter speed SteadyShot Program AE White balance Gain Iris (Continued) 25 Chapter 2 Playback and Recording (GB) Press the DATA CODE button on the Remote Commander during playback on the tape. Each time you record on a tape using a Sony digital camcorder (DSR-200/200P, 200A/200AP, PD100/PD100P, PD100A/PD100AP, PD150/PD150P, 250/ 250P, etc.), data...
... Shutter speed SteadyShot Program AE White balance Gain Iris (Continued) 25 Chapter 2 Playback and Recording (GB) Press the DATA CODE button on the Remote Commander during playback on the tape. Each time you record on a tape using a Sony digital camcorder (DSR-200/200P, 200A/200AP, PD100/PD100P, PD100A/PD100AP, PD150/PD150P, 250/ 250P, etc.), data...

Operating Instructions
Page 26
... displayed on page 45 (GB). • Camera data items show the settings of a tape recorded by pressing the DISPLAY button again. 1 Cassette memory indicator* This is displayed when you press the DISPLAY button on the Remote Commander. You can change the displayed item in the same way as the time code..., tape remaining time, etc. These data items are different from those shown by the digital camcorder. You can hide the item by a digital camcorder (DSR-200/200P, 200A/200AP, ...
... displayed on page 45 (GB). • Camera data items show the settings of a tape recorded by pressing the DISPLAY button again. 1 Cassette memory indicator* This is displayed when you press the DISPLAY button on the Remote Commander. You can change the displayed item in the same way as the time code..., tape remaining time, etc. These data items are different from those shown by the digital camcorder. You can hide the item by a digital camcorder (DSR-200/200P, 200A/200AP, ...

Operating Instructions
Page 27
In the drop frame mode (only for scenes with the Remote Commander or the DSRM-20 (not supplied). For details on cautions, see "Alarm Messages" on page 55 (GB). 27 Chapter 2 Playback and Recording (GB) For details on the search function, see "Compatibility of signals input from the DV ... connector. 0 Input signal indicator* Displays the INPUT SELECT selector setting. When inputting signals from the DV IN/OUT connector. Chapter 2 Playback and Recording 3 Time code indicator* • Displays the time code. Note If the tape has been rewound to the beginning, this is shown when the...
In the drop frame mode (only for scenes with the Remote Commander or the DSRM-20 (not supplied). For details on cautions, see "Alarm Messages" on page 55 (GB). 27 Chapter 2 Playback and Recording (GB) For details on the search function, see "Compatibility of signals input from the DV ... connector. 0 Input signal indicator* Displays the INPUT SELECT selector setting. When inputting signals from the DV IN/OUT connector. Chapter 2 Playback and Recording 3 Time code indicator* • Displays the time code. Note If the tape has been rewound to the beginning, this is shown when the...

Operating Instructions
Page 28
... playback speed will turn to ON. Note When the command mode of a Sony device / remote commander is set JOG AUDIO on the AUDIO SET menu to 1/5 of normal speed. 28 (GB) Chapter 2 Playback and Recording To change playback direction Press the FRAME c/C buttons during playback. To play ...frame. If you want to hear the sound when playing at various speeds You can enjoy playback functions using the Remote Commander. Press × 1 during playback. Chapter 2 Playback and Recording Playback Playing at various speeds, set to VTR 4; • if you press the ×1/3 button while ...
... playback speed will turn to ON. Note When the command mode of a Sony device / remote commander is set JOG AUDIO on the AUDIO SET menu to 1/5 of normal speed. 28 (GB) Chapter 2 Playback and Recording To change playback direction Press the FRAME c/C buttons during playback. To play ...frame. If you want to hear the sound when playing at various speeds You can enjoy playback functions using the Remote Commander. Press × 1 during playback. Chapter 2 Playback and Recording Playback Playing at various speeds, set to VTR 4; • if you press the ×1/3 button while ...

Operating Instructions
Page 29
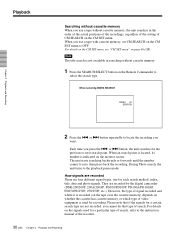
... DATE DISP and TIME DISP on the CM SET menu to select the search type: INDEX, TITLE, DATE or PHOTO SEARCH. Searching for scenes recorded in the photo mode with a digital camcorder: Photo search *:A function available only on a cassette with cassette memory Searching with the cassette memory If... you cannot search for a point on the Remote Commander to ON and the tape has cassette memory, the recordings are four kinds of "CH." A chronological list appears on page 45 (GB). 2 Press the . or > button to...
... DATE DISP and TIME DISP on the CM SET menu to select the search type: INDEX, TITLE, DATE or PHOTO SEARCH. Searching for scenes recorded in the photo mode with a digital camcorder: Photo search *:A function available only on a cassette with cassette memory Searching with the cassette memory If... you cannot search for a point on the Remote Commander to ON and the tape has cassette memory, the recordings are four kinds of "CH." A chronological list appears on page 45 (GB). 2 Press the . or > button to...
Operating Instructions
Page 30
...or which type of video equipment is used for each search method; or > button, the unit searches for a certain search type are not recorded, you cannot do that type of CM SEARCH on the Remote Commander to the instruction manual of the recorder. 30 (GB) Chapter 2 Playback and Recording or > button ... want. The unit starts searching backwards or forwards until the number comes to OFF. How signals are recorded There are recorded by the digital camcorder (DSR-200/200P, 200A/200AP, PD100/PD100P, PD100A/PD100AP, PD150/PD150P, 250/250P, etc.). index, title, date and photo signals. When an ...
...or which type of video equipment is used for each search method; or > button, the unit searches for a certain search type are not recorded, you cannot do that type of CM SEARCH on the Remote Commander to the instruction manual of the recorder. 30 (GB) Chapter 2 Playback and Recording or > button ... want. The unit starts searching backwards or forwards until the number comes to OFF. How signals are recorded There are recorded by the digital camcorder (DSR-200/200P, 200A/200AP, PD100/PD100P, PD100A/PD100AP, PD150/PD150P, 250/250P, etc.). index, title, date and photo signals. When an ...

Operating Instructions
Page 35
...Player Other VCR Monitor Recorder DSR-11 to the DV jack to the LANC jack LANC cable (not supplied) i.LINK cable (DV cable) (not supplied) l: Signal flow Notes • With the DV connection, the sound is automatically detected so you play back a recorded tape on this unit and press the DATA CODE button on the Remote... tape are transmitted from another VCR The video and audio signals are sent from the other VCR (player). Chapter 2 Playback and Recording Connecting to another VCR with virtually no deterioration in the same audio recording mode as that of the cassette memory are...
...Player Other VCR Monitor Recorder DSR-11 to the DV jack to the LANC jack LANC cable (not supplied) i.LINK cable (DV cable) (not supplied) l: Signal flow Notes • With the DV connection, the sound is automatically detected so you play back a recorded tape on this unit and press the DATA CODE button on the Remote... tape are transmitted from another VCR The video and audio signals are sent from the other VCR (player). Chapter 2 Playback and Recording Connecting to another VCR with virtually no deterioration in the same audio recording mode as that of the cassette memory are...
Operating Instructions
Page 36
... and Recording Jacks labeled REMOTE may also have the same function as the cable for video signals. Recording To video equipment without a DV jack Player Other VCR Monitor to the audio output jacks to the video output jack to the S-video output connector to the LANC jack Recorder DSR-11 Chapter 2 Playback and Recording Audio cable (not supplied) Video cable (not supplied) S-video cable...
... and Recording Jacks labeled REMOTE may also have the same function as the cable for video signals. Recording To video equipment without a DV jack Player Other VCR Monitor to the audio output jacks to the video output jack to the S-video output connector to the LANC jack Recorder DSR-11 Chapter 2 Playback and Recording Audio cable (not supplied) Video cable (not supplied) S-video cable...

Operating Instructions
Page 39
...) For details on the REC/SAVE switch and checking the tape for slack, see "Displaying various data" on the Remote Commander. The unit starts recording and the index is set to this unit. To stop . 2 Press the playback button on the unit. The cassette is facing upward, then ... the STOP button on page 15 (GB). To pause recording Press the PAUSE button on the player. The player starts playback. 3 Press the PLAY button while holding down the REC button. For details on displayed data, see "Notes on Video Cassettes" on the unit. To display useful data for slack and confirming ...
...) For details on the REC/SAVE switch and checking the tape for slack, see "Displaying various data" on the Remote Commander. The unit starts recording and the index is set to this unit. To stop . 2 Press the playback button on the unit. The cassette is facing upward, then ... the STOP button on page 15 (GB). To pause recording Press the PAUSE button on the player. The player starts playback. 3 Press the PLAY button while holding down the REC button. For details on displayed data, see "Notes on Video Cassettes" on the unit. To display useful data for slack and confirming ...

Operating Instructions
Page 41
...for clock setting, you start using the unit, set the internal clock in the menus. The internal backup battery is superimposed on the analog video output. To exit from the menu Press the MENU button again. 41 Chapter 3 Adjusting and Setting Through Menus (GB) To return to ...the M/m buttons, select RETURN, then press the SET button. Except for about 10 hours. Displaying the menu Press the MENU button on the Remote Commander. 3 Chapter Adjusting and Setting Through Menus Chapter 3 Adjusting and Setting Through Menus Operating the Menus The unit allows you to set various ...
...for clock setting, you start using the unit, set the internal clock in the menus. The internal backup battery is superimposed on the analog video output. To exit from the menu Press the MENU button again. 41 Chapter 3 Adjusting and Setting Through Menus (GB) To return to ...the M/m buttons, select RETURN, then press the SET button. Except for about 10 hours. Displaying the menu Press the MENU button on the Remote Commander. 3 Chapter Adjusting and Setting Through Menus Chapter 3 Adjusting and Setting Through Menus Operating the Menus The unit allows you to set various ...

