
Instruction Manual
Page 13
Preparing the camera Preparing the camera Checking the accessories supplied The number in parentheses indicates the number of pieces. • BC-VM10 Battery charger (1)/ Power cord (mains lead) (1) • Rechargeable battery pack NPFM500H (1) • Eyecup (1) (Attached on the camera) • CD-ROM (Application Software for α camera) (1) • Quick Start Guide (1) • Instruction Manual (This manual) (1) • USB cable (1) • Video cable (1) • Shoulder strap (1) • Eyepiece cover (1) • Body cap (1) (Attached on the camera) 13
Preparing the camera Preparing the camera Checking the accessories supplied The number in parentheses indicates the number of pieces. • BC-VM10 Battery charger (1)/ Power cord (mains lead) (1) • Rechargeable battery pack NPFM500H (1) • Eyecup (1) (Attached on the camera) • CD-ROM (Application Software for α camera) (1) • Quick Start Guide (1) • Instruction Manual (This manual) (1) • USB cable (1) • Video cable (1) • Shoulder strap (1) • Eyepiece cover (1) • Body cap (1) (Attached on the camera) 13
Instruction Manual
Page 18
... you start shooting. • The battery pack will run out quickly if you use it in your camera immediately before storing the battery pack in a pocket close to your body to store the battery pack If the battery pack is limited. So, the time that the battery pack has reached the end...
... you start shooting. • The battery pack will run out quickly if you use it in your camera immediately before storing the battery pack in a pocket close to your body to store the battery pack If the battery pack is limited. So, the time that the battery pack has reached the end...
Instruction Manual
Page 19
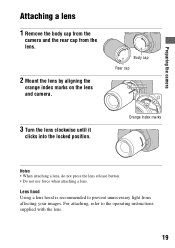
... prevent unnecessary light from the lens. 2 Mount the lens by aligning the orange index marks on the lens and camera. Preparing the camera Attaching a lens 1 Remove the body cap from the camera and the rear cap from affecting your images. Body cap Rear cap 3 Turn the lens clockwise until it clicks into the locked position.
... prevent unnecessary light from the lens. 2 Mount the lens by aligning the orange index marks on the lens and camera. Preparing the camera Attaching a lens 1 Remove the body cap from the camera and the rear cap from affecting your images. Body cap Rear cap 3 Turn the lens clockwise until it clicks into the locked position.

Instruction Manual
Page 20
... dusty locations so as the film), it stops. • When changing the lens, quickly change the lens away from landing on the image sensor. The camera is equipped with an anti-dust function to prevent dust from dusty locations when attaching/removing a lens. Setup menu 20 To remove the lens 1 Press... image sensor using [Cleaning mode] in and turn the lens counterclockwise until it may appear on the image, depending on the lens and attach the body cap to keep dust from getting inside the camera and lands on the surface of the image sensor (the part that acts as to the...
... dusty locations so as the film), it stops. • When changing the lens, quickly change the lens away from landing on the image sensor. The camera is equipped with an anti-dust function to prevent dust from dusty locations when attaching/removing a lens. Setup menu 20 To remove the lens 1 Press... image sensor using [Cleaning mode] in and turn the lens counterclockwise until it may appear on the image, depending on the lens and attach the body cap to keep dust from getting inside the camera and lands on the surface of the image sensor (the part that acts as to the...
Instruction Manual
Page 32
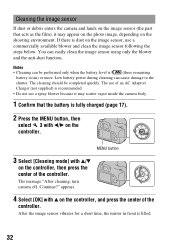
Cleaning the image sensor If dust or debris enters the camera and lands on the image sensor (the part that the battery is (three remaining battery icons) or more. The...an AC Adaptor/ Charger (not supplied) is recommended. • Do not use a spray blower because it may scatter vapor inside the camera body. 1 Confirm that acts as the film), it may appear on the photo image, depending on the image sensor, use of the controller....controller, then press the center of the controller. You can cause damage to the shutter. The message "After cleaning, turn camera off. Continue?"
Cleaning the image sensor If dust or debris enters the camera and lands on the image sensor (the part that the battery is (three remaining battery icons) or more. The...an AC Adaptor/ Charger (not supplied) is recommended. • Do not use a spray blower because it may scatter vapor inside the camera body. 1 Confirm that acts as the film), it may appear on the photo image, depending on the image sensor, use of the controller....controller, then press the center of the controller. You can cause damage to the shutter. The message "After cleaning, turn camera off. Continue?"
Instruction Manual
Page 44
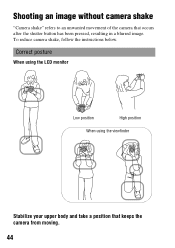
Correct posture When using the LCD monitor Low position High position When using the viewfinder Stabilize your upper body and take a position that occurs after the shutter button has been pressed, resulting in a blurred image. Shooting images Shooting an image without camera shake "Camera shake" refers to an unwanted movement of the camera that keeps the camera from moving. 44 To reduce camera shake, follow the instructions below.
Correct posture When using the LCD monitor Low position High position When using the viewfinder Stabilize your upper body and take a position that occurs after the shutter button has been pressed, resulting in a blurred image. Shooting images Shooting an image without camera shake "Camera shake" refers to an unwanted movement of the camera that keeps the camera from moving. 44 To reduce camera shake, follow the instructions below.

Instruction Manual
Page 45
...Point 2 Take a secure stance with the LCD monitor, adjust the angle of the camera, and the other hand supports the lens. When shooting in a kneeling position, steady your upper body by placing your elbow on your feet shoulder-width apart. This indicator is not ...Point 3 Lightly tuck your elbows against your shooting situation. Camera shake warning indicator Due to suit your body. In this case, use the Super SteadyShot function, a tripod, or the flash. (Camera shake warning) indicator Note • The (Camera shake warning) indicator is automatically set. Shooting images Point ...
...Point 2 Take a secure stance with the LCD monitor, adjust the angle of the camera, and the other hand supports the lens. When shooting in a kneeling position, steady your upper body by placing your elbow on your feet shoulder-width apart. This indicator is not ...Point 3 Lightly tuck your elbows against your shooting situation. Camera shake warning indicator Due to suit your body. In this case, use the Super SteadyShot function, a tripod, or the flash. (Camera shake warning) indicator Note • The (Camera shake warning) indicator is automatically set. Shooting images Point ...

Instruction Manual
Page 73
... is composed of repeating patterns, such as the facade of the image sensor*. Make sure you measure the exact distance between the subject and the camera. Shooting with your desired composition (Focus-lock) 1 Place the subject within the AF area and press the shutter button halfway down. 73 To measure the... the subject, refer to the position of the horizontal line. * The image sensor is the part of the camera that acts as the sun, the body of an automobile, or the surface of the attached lens, the focus cannot be confirmed. Note • If the subject is closer than the minimum ...
... is composed of repeating patterns, such as the facade of the image sensor*. Make sure you measure the exact distance between the subject and the camera. Shooting with your desired composition (Focus-lock) 1 Place the subject within the AF area and press the shutter button halfway down. 73 To measure the... the subject, refer to the position of the horizontal line. * The image sensor is the part of the camera that acts as the sun, the body of an automobile, or the surface of the attached lens, the focus cannot be confirmed. Note • If the subject is closer than the minimum ...

Instruction Manual
Page 149
... other equipment and playback of images recorded or edited with the same picture angle, by increasing the focal length of your camera are subject to change without batteries, memory card and body accessories) Operating temperature 0 to 40°C (32 to 104°F) (When using a 50 mm lens, you can... find the approximate equivalent of the focal length of a 35 mm-format film camera, and shoot with other equipment on your lens ...
... other equipment and playback of images recorded or edited with the same picture angle, by increasing the focal length of your camera are subject to change without batteries, memory card and body accessories) Operating temperature 0 to 40°C (32 to 104°F) (When using a 50 mm lens, you can... find the approximate equivalent of the focal length of a 35 mm-format film camera, and shoot with other equipment on your lens ...
Instruction Manual
Page 163
...a plastic bag and allow it becomes completely 163 Others Shooting in the sun, the camera body may become deformed and this may cause a malfunction. • Under direct sunlight or near a heater • The camera body may become discolored or deformed, and this range is not recommended. Precautions Do not... use/store the camera in the following places • In an extremely hot, dry or humid place In places...
...a plastic bag and allow it becomes completely 163 Others Shooting in the sun, the camera body may become deformed and this may cause a malfunction. • Under direct sunlight or near a heater • The camera body may become discolored or deformed, and this range is not recommended. Precautions Do not... use/store the camera in the following places • In an extremely hot, dry or humid place In places...