
Instruction Manual
Page 1
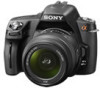
Printed using VOC (Volatile Organic Compound)-free vegetable oil based ink. Preparing the camera Before your operation Shooting images Using the shooting function Using the viewing function Changing your setup Viewing images on this product and answers to frequently asked questions can be found at our Customer Support Website. Additional information on a computer Printing images Digital Single Lens Reflex Camera Instruction Manual DSLR-A390 A-mount ®
Printed using VOC (Volatile Organic Compound)-free vegetable oil based ink. Preparing the camera Before your operation Shooting images Using the shooting function Using the viewing function Changing your setup Viewing images on this product and answers to frequently asked questions can be found at our Customer Support Website. Additional information on a computer Printing images Digital Single Lens Reflex Camera Instruction Manual DSLR-A390 A-mount ®
Instruction Manual
Page 9
... camera Before your operation Shooting images Notes on using your camera 7 Checking the accessories supplied 13 Preparing the battery pack 14 Attaching a lens 20 Inserting a memory card 22 Preparing the camera 25 Using the accessories supplied 27 Checking the number of recordable images 29 Cleaning 31 Identifying parts and screen indicators 34 Front side 34 Rear side 35 Sides/Bottom 36 LCD monitor 37 Selecting a function/setting 39 The functions selected by the Control button...
... camera Before your operation Shooting images Notes on using your camera 7 Checking the accessories supplied 13 Preparing the battery pack 14 Attaching a lens 20 Inserting a memory card 22 Preparing the camera 25 Using the accessories supplied 27 Checking the number of recordable images 29 Cleaning 31 Identifying parts and screen indicators 34 Front side 34 Rear side 35 Sides/Bottom 36 LCD monitor 37 Selecting a function/setting 39 The functions selected by the Control button...

Instruction Manual
Page 11
... (Exposure bracket 99 Shooting with the Remote Commander 101 Using the viewing Playing back images 102 function Checking the information of recorded images 106 Protecting images (Protect 109 Deleting images (Delete 110 Viewing images on a TV screen 112 Changing your setup Setting image size and image quality 116 Setting the method for recording on a memory card ..... 118 Changing the noise reduction setting 120 Changing the functions of the control dial 121 Changing other settings 122 Setting the LCD monitor 124 Confirming the version of the camera 126 Resetting to...
... (Exposure bracket 99 Shooting with the Remote Commander 101 Using the viewing Playing back images 102 function Checking the information of recorded images 106 Protecting images (Protect 109 Deleting images (Delete 110 Viewing images on a TV screen 112 Changing your setup Setting image size and image quality 116 Setting the method for recording on a memory card ..... 118 Changing the noise reduction setting 120 Changing the functions of the control dial 121 Changing other settings 122 Setting the LCD monitor 124 Confirming the version of the camera 126 Resetting to...
Instruction Manual
Page 56
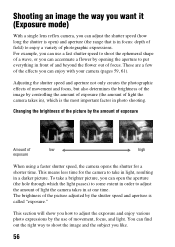
Shooting an image the way you want it (Exposure mode) With a single lens reflex camera, you can adjust the shutter speed (how long the shutter is open the aperture (the hole through which the light passes) to some extent in order to adjust the amount of light the camera takes in), which is called "exposure." For example, you can use of the picture adjusted by the use a fast shutter speed to shoot the ephemeral shape of a wave...
Shooting an image the way you want it (Exposure mode) With a single lens reflex camera, you can adjust the shutter speed (how long the shutter is open the aperture (the hole through which the light passes) to some extent in order to adjust the amount of light the camera takes in), which is called "exposure." For example, you can use of the picture adjusted by the use a fast shutter speed to shoot the ephemeral shape of a wave...
Instruction Manual
Page 58
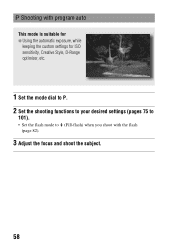
Shooting with program auto This mode is suitable for z Using the automatic exposure, while keeping the custom settings for ISO sensitivity, Creative Style, D-Range optimizer, etc. 1 Set the mode dial to P. 2 Set the shooting functions to your desired settings (pages 75 to 101). • Set the flash mode to (Fill-flash) when you shoot with the flash (page 82). 3 Adjust the focus and shoot the subject. 58
Shooting with program auto This mode is suitable for z Using the automatic exposure, while keeping the custom settings for ISO sensitivity, Creative Style, D-Range optimizer, etc. 1 Set the mode dial to P. 2 Set the shooting functions to your desired settings (pages 75 to 101). • Set the flash mode to (Fill-flash) when you shoot with the flash (page 82). 3 Adjust the focus and shoot the subject. 58
Instruction Manual
Page 64
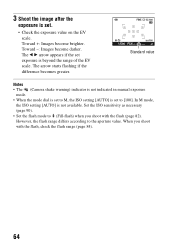
3 Shoot the image after the exposure is set to [100]. Standard value Notes • The (Camera shake warning) indicator is not indicated in manual exposure mode. • When the mode dial is set to M, the ISO setting [AUTO] is set . • Check the exposure value on the EV scale. However, the flash range differs according to (Fill-flash) when you shoot with the flash (page 82). The b B arrow appears if the set exposure is not available...
3 Shoot the image after the exposure is set to [100]. Standard value Notes • The (Camera shake warning) indicator is not indicated in manual exposure mode. • When the mode dial is set to M, the ISO setting [AUTO] is set . • Check the exposure value on the EV scale. However, the flash range differs according to (Fill-flash) when you shoot with the flash (page 82). The b B arrow appears if the set exposure is not available...
Instruction Manual
Page 78
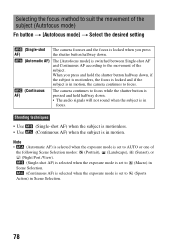
... . (Automatic AF) The [Autofocus mode] is in focus. When you press AF) the shutter button halfway down . • The audio signals will not sound when the subject is switched between Single-shot AF and Continuous AF according to the movement of the following Scene Selection modes: (Portrait), (Landscape), (Sunset), or (Night Port./View). (Single-shot AF) is selected when the exposure mode is set to (Macro) in...
... . (Automatic AF) The [Autofocus mode] is in focus. When you press AF) the shutter button halfway down . • The audio signals will not sound when the subject is switched between Single-shot AF and Continuous AF according to the movement of the following Scene Selection modes: (Portrait), (Landscape), (Sunset), or (Night Port./View). (Single-shot AF) is selected when the exposure mode is set to (Macro) in...
Instruction Manual
Page 81
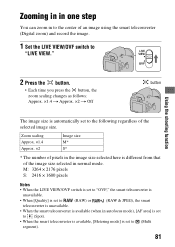
... number of pixels in the image size selected here is different from that of the selected image size. Zooming in in one step You can zoom in to the center of an image using the smart teleconverter (Digital zoom) and record the image. 1 Set the LIVE VIEW/OVF switch to the following regardless of the image size selected in normal mode. Using the shooting function 2 Press the button. • Each time you press the button, the zoom scaling changes...
... number of pixels in the image size selected here is different from that of the selected image size. Zooming in in one step You can zoom in to the center of an image using the smart teleconverter (Digital zoom) and record the image. 1 Set the LIVE VIEW/OVF switch to the following regardless of the image size selected in normal mode. Using the shooting function 2 Press the button. • Each time you press the button, the zoom scaling changes...
Instruction Manual
Page 99
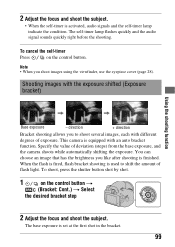
... you shoot images using the viewfinder, use the eyepiece cover (page 28). The base exposure is activated, audio signals and the self-timer lamp indicate the condition. Note • When you like after shooting is used to shoot several images, each with an auto bracket function. Specify the value of flash light. Shooting images with the exposure shifted (Exposure bracket) Using the shooting function Base exposure - 2 Adjust the focus and shoot the subject. • When the self-timer is set at the first shot in the bracket...
... you shoot images using the viewfinder, use the eyepiece cover (page 28). The base exposure is activated, audio signals and the self-timer lamp indicate the condition. Note • When you like after shooting is used to shoot several images, each with an auto bracket function. Specify the value of flash light. Shooting images with the exposure shifted (Exposure bracket) Using the shooting function Base exposure - 2 Adjust the focus and shoot the subject. • When the self-timer is set at the first shot in the bracket...
Instruction Manual
Page 121
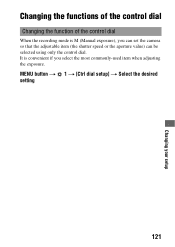
MENU button t 1 t [Ctrl dial setup] t Select the desired setting 121 Changing your setup Changing the functions of the control dial Changing the function of the control dial When the recording mode is convenient if you can set the camera so that the adjustable item (the shutter speed or the aperture value) can be selected using only the control dial. It is M (Manual exposure), you select the most commonly-used item when adjusting the exposure.
MENU button t 1 t [Ctrl dial setup] t Select the desired setting 121 Changing your setup Changing the functions of the control dial Changing the function of the control dial When the recording mode is convenient if you can set the camera so that the adjustable item (the shutter speed or the aperture value) can be selected using only the control dial. It is M (Manual exposure), you select the most commonly-used item when adjusting the exposure.

Instruction Manual
Page 122
...Selecting the background color of the screen display You can select the background color of the LCD monitor from the screen You can set different time intervals for the camera to switch to power save mode (Power save mode You can turn off Selects the sound produced when the shutter is locked, during self-timer countdown, etc. MENU button t 1 t [Power Save (LV)] or [Power Save (OVF)] t Select the desired time 122 MENU button t 1 t [Display Color] t Select the desired setting Removing the Help Guide from [Black], [White], [Brown], or [Pink]. Changing other settings Setting the sound on...
...Selecting the background color of the screen display You can select the background color of the LCD monitor from the screen You can set different time intervals for the camera to switch to power save mode (Power save mode You can turn off Selects the sound produced when the shutter is locked, during self-timer countdown, etc. MENU button t 1 t [Power Save (LV)] or [Power Save (OVF)] t Select the desired time 122 MENU button t 1 t [Display Color] t Select the desired setting Removing the Help Guide from [Black], [White], [Brown], or [Pink]. Changing other settings Setting the sound on...
Instruction Manual
Page 124
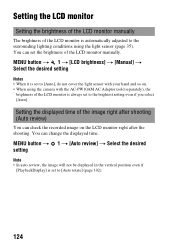
... brightest setting even if you select [Auto]. MENU button t 1 t [LCD brightness] t [Manual] t Select the desired setting Notes • When it is set to [Auto rotate] (page 102). 124 Setting the displayed time of the LCD monitor manually. You can set to [Auto], do not cover the light sensor with your hand and so on the LCD monitor right after shooting (Auto review) You can change the displayed time. MENU button t 1 t [Auto review] t Select the desired setting Note • In auto review, the image will...
... brightest setting even if you select [Auto]. MENU button t 1 t [LCD brightness] t [Manual] t Select the desired setting Notes • When it is set to [Auto rotate] (page 102). 124 Setting the displayed time of the LCD monitor manually. You can set to [Auto], do not cover the light sensor with your hand and so on the LCD monitor right after shooting (Auto review) You can change the displayed time. MENU button t 1 t [Auto review] t Select the desired setting Note • In auto review, the image will...
Instruction Manual
Page 127
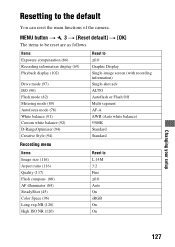
... (86) Recording information display (69) Playback display (102) Drive mode (97) ISO (90) Flash mode (82) Metering mode (89) Autofocus mode (78) White balance (91) Custom white balance (92) D-RangeOptimizer (94) Creative Style (94) Recording menu Reset to be reset are as follows. MENU button t 3 t [Reset default] t [OK] The items to ±0.0 Graphic Display Single-image screen (with recording information) Single-shot adv. Resetting to L:14M 3:2 Fine ±0.0 Auto On sRGB On On Changing your setup 127 AUTO Autoflash or Flash Off Multi segment AF-A AWB (Auto white balance) 5500K...
... (86) Recording information display (69) Playback display (102) Drive mode (97) ISO (90) Flash mode (82) Metering mode (89) Autofocus mode (78) White balance (91) Custom white balance (92) D-RangeOptimizer (94) Creative Style (94) Recording menu Reset to be reset are as follows. MENU button t 3 t [Reset default] t [OK] The items to ±0.0 Graphic Display Single-image screen (with recording information) Single-shot adv. Resetting to L:14M 3:2 Fine ±0.0 Auto On sRGB On On Changing your setup 127 AUTO Autoflash or Flash Off Multi segment AF-A AWB (Auto white balance) 5500K...

Instruction Manual
Page 129
... in a memory card to a computer connected using a USB interface that is compatible with Hi-Speed USB (USB 2.0 compliant). • When your computer resumes from a suspend or sleep mode, communication between your camera and your computer may not recover at the same time. 129 Viewing images on a computer x Windows OS (pre-installed): Windows XP*1 SP3/Windows Vista*2 SP2/Windows 7 • Operation is not supported. USB jack: Provided as standard x Macintosh OS (pre-installed): Mac OS...
... in a memory card to a computer connected using a USB interface that is compatible with Hi-Speed USB (USB 2.0 compliant). • When your computer resumes from a suspend or sleep mode, communication between your camera and your computer may not recover at the same time. 129 Viewing images on a computer x Windows OS (pre-installed): Windows XP*1 SP3/Windows Vista*2 SP2/Windows 7 • Operation is not supported. USB jack: Provided as standard x Macintosh OS (pre-installed): Mac OS...
Instruction Manual
Page 148
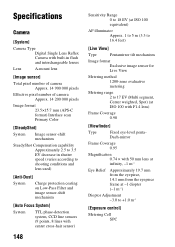
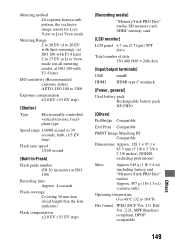
Others Specifications Camera [System] Camera Type Digital Single Lens Reflex Camera with built-in flash and interchangeable lenses Lens A-mount lens [Image sensor] Total pixel number of camera Approx. 14 900 000 pixels Effective pixel number of camera Approx. 14 200 000 pixels Image format 23.5×15.7 mm (APS-C format) Interlace scan Primary Color [SteadyShot] System Image sensor-shift mechanism SteadyShot Compensation capability Approximately 2.5 to 3.5 EV decrease in shutter speed (varies according to shooting conditions and lens used) [Anti-Dust...
Others Specifications Camera [System] Camera Type Digital Single Lens Reflex Camera with built-in flash and interchangeable lenses Lens A-mount lens [Image sensor] Total pixel number of camera Approx. 14 900 000 pixels Effective pixel number of camera Approx. 14 200 000 pixels Image format 23.5×15.7 mm (APS-C format) Interlace scan Primary Color [SteadyShot] System Image sensor-shift mechanism SteadyShot Compensation capability Approximately 2.5 to 3.5 EV decrease in shutter speed (varies according to shooting conditions and lens used) [Anti-Dust...
Instruction Manual
Page 149
... EV in Live View mode (on all metering modes, at ISO 100 with F1.4 lens) ISO sensitivity (Recommended exposure index) AUTO, ISO 100 to 3200 Exposure compensation ±2.0 EV (1/3 EV step) [Shutter] Type Electronically-controlled, vertical-traverse, focalplane type Speed range 1/4000 second to 30 seconds, bulb, (1/3 EV step) Flash sync speed 1/160 second [Built-In-Flash] Flash guide number GN 10 (in meters at ISO 100) Recycling time Approx. 4 seconds Flash coverage Covering 18 mm lens (focal...
... EV in Live View mode (on all metering modes, at ISO 100 with F1.4 lens) ISO sensitivity (Recommended exposure index) AUTO, ISO 100 to 3200 Exposure compensation ±2.0 EV (1/3 EV step) [Shutter] Type Electronically-controlled, vertical-traverse, focalplane type Speed range 1/4000 second to 30 seconds, bulb, (1/3 EV step) Flash sync speed 1/160 second [Built-In-Flash] Flash guide number GN 10 (in meters at ISO 100) Recycling time Approx. 4 seconds Flash coverage Covering 18 mm lens (focal...
Instruction Manual
Page 155
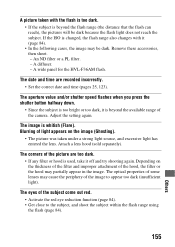
... the periphery of the subject come out red. • Activate the red eye reduction function (page 84). • Get close to appear too dark (insufficient light). Depending on the image (Ghosting). • The picture was taken under a strong light source, and excessive light has entered the lens. The aperture value and/or shutter speed flashes when you press the shutter button halfway down. • Since the subject...
... the periphery of the subject come out red. • Activate the red eye reduction function (page 84). • Get close to appear too dark (insufficient light). Depending on the image (Ghosting). • The picture was taken under a strong light source, and excessive light has entered the lens. The aperture value and/or shutter speed flashes when you press the shutter button halfway down. • Since the subject...
Instruction Manual
Page 162
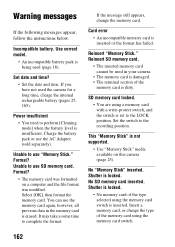
... [Cleaning mode] when the battery level is insufficient. This "Memory Stick" is dirty. Reinsert SD memory card. • The inserted memory card cannot be used in the memory card is set to the recording position. No SD memory card inserted. Warning messages If the following messages appear, follow the instructions below. Incompatible battery. Power insufficient • You tried to complete the format. Format? • The memory card was modified. Card error • An incompatible memory card is being used the camera for a long time, charge...
... [Cleaning mode] when the battery level is insufficient. This "Memory Stick" is dirty. Reinsert SD memory card. • The inserted memory card cannot be used in the memory card is set to the recording position. No SD memory card inserted. Warning messages If the following messages appear, follow the instructions below. Incompatible battery. Power insufficient • You tried to complete the format. Format? • The memory card was modified. Card error • An incompatible memory card is being used the camera for a long time, charge...
Instruction Manual
Page 163
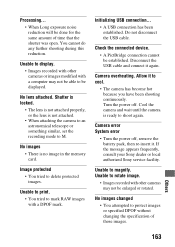
... M. Shutter is locked. • The lens is not attached properly, or the lens is no image in the memory card. Allow it again. Processing... • When Long exposure noise reduction will be established. No images • There is not attached. • When attaching the camera to an astronomical telescope or something similar, set the recording mode to protect images or specified DPOF without changing the specification of time that the shutter...
... M. Shutter is locked. • The lens is not attached properly, or the lens is no image in the memory card. Allow it again. Processing... • When Long exposure noise reduction will be established. No images • There is not attached. • When attaching the camera to an astronomical telescope or something similar, set the recording mode to protect images or specified DPOF without changing the specification of time that the shutter...
Quick Start Guide
Page 1
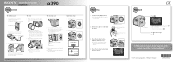
... shooting mode: To delete the image Press . Playback Press . To play back a previous or next image: press / on the photo image. When you want to the Instruction Manual. LIVE VIEW/OVF switch Hold the grip of the lens. To return to shoot. Date/time setup 1 Turn the camera on the LCD monitor. 3 Press the shutter button halfway down to focus. Pressing the shutter button halfway down and holding it may appear on the control button...
... shooting mode: To delete the image Press . Playback Press . To play back a previous or next image: press / on the photo image. When you want to the Instruction Manual. LIVE VIEW/OVF switch Hold the grip of the lens. To return to shoot. Date/time setup 1 Turn the camera on the LCD monitor. 3 Press the shutter button halfway down to focus. Pressing the shutter button halfway down and holding it may appear on the control button...


