Instruction Manual
Page 9
... your operation Shooting images Notes on using your camera 7 Checking the accessories supplied 13 Preparing the battery pack 14 Attaching a lens 20 Inserting a memory card 22 Preparing the camera 25 Using the accessories supplied 27 Checking the number of recordable images 29 Cleaning 31 Identifying parts and ...) button ... 41 The functions selected by the MENU button 41 Adjusting the angle of the LCD monitor 43 Shooting an image without camera shake 44 Correct posture 44 Using the SteadyShot function 45 Using a tripod 46 / Shooting with the automatic setting 47 Shooting with a...
... your operation Shooting images Notes on using your camera 7 Checking the accessories supplied 13 Preparing the battery pack 14 Attaching a lens 20 Inserting a memory card 22 Preparing the camera 25 Using the accessories supplied 27 Checking the number of recordable images 29 Cleaning 31 Identifying parts and ...) button ... 41 The functions selected by the MENU button 41 Adjusting the angle of the LCD monitor 43 Shooting an image without camera shake 44 Correct posture 44 Using the SteadyShot function 45 Using a tripod 46 / Shooting with the automatic setting 47 Shooting with a...
Instruction Manual
Page 13
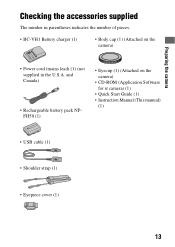
Preparing the camera Preparing the camera Checking the accessories supplied The number in the U.S.A. and Canada) • Rechargeable battery pack NPFH50 (1) • Eyecup (1) (Attached on the camera) • Power cord (mains lead) (1) (not supplied in parentheses indicates the number of pieces. • BC-VH1 Battery charger (1) • Body cap (1) (Attached on the camera) • CD-ROM...
Preparing the camera Preparing the camera Checking the accessories supplied The number in the U.S.A. and Canada) • Rechargeable battery pack NPFH50 (1) • Eyecup (1) (Attached on the camera) • Power cord (mains lead) (1) (not supplied in parentheses indicates the number of pieces. • BC-VH1 Battery charger (1) • Body cap (1) (Attached on the camera) • CD-ROM...
Instruction Manual
Page 27
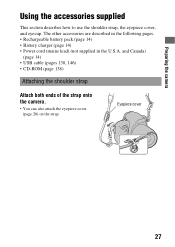
and Canada) (page 14) • USB cable (pages 130, 146) • CD-ROM (page 138) Attaching the shoulder strap Attach both ends of the strap onto the camera. • You can also attach the eyepiece cover (page 28) on the strap. Eyepiece cover 27 Preparing the camera Using the accessories supplied This section describes how to use the shoulder strap, the eyepiece cover, and eyecup. The other accessories are described in the following pages. • Rechargeable battery pack (page 14) • Battery charger (page 14) • Power cord (mains lead) (not supplied in the U.S.A.
and Canada) (page 14) • USB cable (pages 130, 146) • CD-ROM (page 138) Attaching the shoulder strap Attach both ends of the strap onto the camera. • You can also attach the eyepiece cover (page 28) on the strap. Eyepiece cover 27 Preparing the camera Using the accessories supplied This section describes how to use the shoulder strap, the eyepiece cover, and eyecup. The other accessories are described in the following pages. • Rechargeable battery pack (page 14) • Battery charger (page 14) • Power cord (mains lead) (not supplied in the U.S.A.

Instruction Manual
Page 35
Rear side Before your operation A Auto-lock Accessory Shoe (85) B Viewfinder* (67) C MENU button (41) D Eyepiece sensors (67, 125) E LCD monitor (37, 43, 102, 106) F Light sensor (124) G Diopter-adjustment dial (68) H LIVE ...
Rear side Before your operation A Auto-lock Accessory Shoe (85) B Viewfinder* (67) C MENU button (41) D Eyepiece sensors (67, 125) E LCD monitor (37, 43, 102, 106) F Light sensor (124) G Diopter-adjustment dial (68) H LIVE ...
Instruction Manual
Page 85
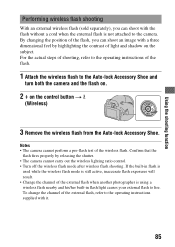
... fires properly by highlighting the contrast of the external flash when another photographer is not attached to the Auto-lock Accessory Shoe and turn both the camera and the flash on. 2 on the subject. Using the shooting function Performing wireless flash shooting With an external wireless... • Change the channel of light and shadow on the control button t (Wireless) 3 Remove the wireless flash from the Auto-lock Accessory Shoe. If the built-in flash light causes your external flash to the operating instructions supplied with a three dimensional feel by releasing the shutter...
... fires properly by highlighting the contrast of the external flash when another photographer is not attached to the Auto-lock Accessory Shoe and turn both the camera and the flash on. 2 on the subject. Using the shooting function Performing wireless flash shooting With an external wireless... • Change the channel of light and shadow on the control button t (Wireless) 3 Remove the wireless flash from the Auto-lock Accessory Shoe. If the built-in flash light causes your external flash to the operating instructions supplied with a three dimensional feel by releasing the shutter...
Instruction Manual
Page 155
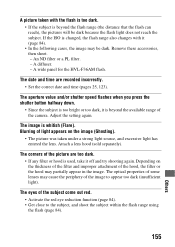
...come out red. • Activate the red eye reduction function (page 84). • Get close to appear too dark (insufficient light). Remove these accessories, then shoot. - The date and time are too dark. • If any filter or hood is whitish (Flare). Blurring of light appears on... the thickness of the filter and improper attachment of the camera. Depending on the image (Ghosting). • The picture was taken under a strong light source, and excessive light has entered the lens. A picture taken with it (page 84). • In the following cases, ...
...come out red. • Activate the red eye reduction function (page 84). • Get close to appear too dark (insufficient light). Remove these accessories, then shoot. - The date and time are too dark. • If any filter or hood is whitish (Flare). Blurring of light appears on... the thickness of the filter and improper attachment of the camera. Depending on the image (Ghosting). • The picture was taken under a strong light source, and excessive light has entered the lens. A picture taken with it (page 84). • In the following cases, ...
Instruction Manual
Page 166
... light emission. • Keep the camera, supplied accessories, etc., out of the reach of your camera. • Do not use the camera near a location that the camera is working correctly. • This camera is not charged, you can still use the camera as long as you charge the battery... a removed lens or the viewfinder. This may cause dirt on recording/playback • Before you record one-time events, make a trial recording to a wall outlet (wall socket) using the camera. In addition to malfunctions and an inability to your Sony dealer or local authorized Sony service facility....
... light emission. • Keep the camera, supplied accessories, etc., out of the reach of your camera. • Do not use the camera near a location that the camera is working correctly. • This camera is not charged, you can still use the camera as long as you charge the battery... a removed lens or the viewfinder. This may cause dirt on recording/playback • Before you record one-time events, make a trial recording to a wall outlet (wall socket) using the camera. In addition to malfunctions and an inability to your Sony dealer or local authorized Sony service facility....