
Instruction Manual
Page 1
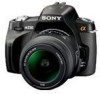
Digital Single Lens Reflex Camera Instruction Manual DSLR-A230 Preparing the camera Before your operation Shooting images Using the shooting function Using the viewing function Changing your setup Viewing images on this product and answers to frequently asked questions can be found at our Customer Support Website. Printed using VOC (Volatile Organic Compound)-free vegetable oil based ink. Additional information on a computer Printing images
Digital Single Lens Reflex Camera Instruction Manual DSLR-A230 Preparing the camera Before your operation Shooting images Using the shooting function Using the viewing function Changing your setup Viewing images on this product and answers to frequently asked questions can be found at our Customer Support Website. Printed using VOC (Volatile Organic Compound)-free vegetable oil based ink. Additional information on a computer Printing images

Instruction Manual
Page 2
... • Do not handle damaged or leaking lithium ion batteries. • Be sure to rain or moisture. 2 IMPORTANT SAFETY INSTRUCTIONS SAVE THESE INSTRUCTIONS. DSLR-A230 Serial No WARNING To reduce fire or shock hazard, do not allow metal objects to come into contact with the battery terminals. • Do.... • Do not disassemble. • Do not crush and do not expose the battery pack to these numbers whenever you call upon your Sony dealer regarding this product. Caution Battery pack If the battery pack is mishandled, the battery pack can charge the battery pack. Owner's Record The ...
... • Do not handle damaged or leaking lithium ion batteries. • Be sure to rain or moisture. 2 IMPORTANT SAFETY INSTRUCTIONS SAVE THESE INSTRUCTIONS. DSLR-A230 Serial No WARNING To reduce fire or shock hazard, do not allow metal objects to come into contact with the battery terminals. • Do.... • Do not disassemble. • Do not crush and do not expose the battery pack to these numbers whenever you call upon your Sony dealer regarding this product. Caution Battery pack If the battery pack is mishandled, the battery pack can charge the battery pack. Owner's Record The ...
Instruction Manual
Page 3
For more information regarding recycling of Conformity Trade Name: SONY Model No.: DSLR-A230 Responsible Party: Sony Electronics Inc. For Customers in the U.S.A. If you have any interference received, including interference that may not... cause harmful interference, and (2) this device must accept any questions about this equipment. 3 Telephone No.: 858-942-2230 This device complies with Canadian ICES-003. For Customers in the U.S.A. This Class B digital...
For more information regarding recycling of Conformity Trade Name: SONY Model No.: DSLR-A230 Responsible Party: Sony Electronics Inc. For Customers in the U.S.A. If you have any interference received, including interference that may not... cause harmful interference, and (2) this device must accept any questions about this equipment. 3 Telephone No.: 858-942-2230 This device complies with Canadian ICES-003. For Customers in the U.S.A. This Class B digital...
Instruction Manual
Page 4
...is Sony Deutschland GmbH, Hedelfinger Strasse 61, 70327 Stuttgart, Germany. The Authorized Representative for EMC and product safety is no guarantee that to which can radiate radio frequency energy and, if not installed and used with the equipment in order to comply with the limits for a digital device...by one or more of the FCC Rules. This product has been tested and found to comply with the limits for a Class B digital device, pursuant to the addresses given in separate service or guarantee documents. Notice If static electricity or electromagnetism causes data transfer to Subpart...
...is Sony Deutschland GmbH, Hedelfinger Strasse 61, 70327 Stuttgart, Germany. The Authorized Representative for EMC and product safety is no guarantee that to which can radiate radio frequency energy and, if not installed and used with the equipment in order to comply with the limits for a digital device...by one or more of the FCC Rules. This product has been tested and found to comply with the limits for a Class B digital device, pursuant to the addresses given in separate service or guarantee documents. Notice If static electricity or electromagnetism causes data transfer to Subpart...

Instruction Manual
Page 5
For more detailed information about recycling of electrical and electronic equipment. To ensure that this product or battery, please contact your local Civic Office, your household waste disposal service or the shop where you will help prevent potential negative consequences for the recycling of materials will help to conserve natural resources. This symbol on the battery or on the packaging indicates that for the recycling of this product shall not be replaced by qualified service staff only. Instead it shall be handed over to the applicable collection point for safety,...
For more detailed information about recycling of electrical and electronic equipment. To ensure that this product or battery, please contact your local Civic Office, your household waste disposal service or the shop where you will help prevent potential negative consequences for the recycling of materials will help to conserve natural resources. This symbol on the battery or on the packaging indicates that for the recycling of this product shall not be replaced by qualified service staff only. Instead it shall be handed over to the applicable collection point for safety,...

Instruction Manual
Page 6
... supplied one and approved by ASTA or BSI to BS 1362, (i.e., marked with this equipment has a detachable fuse cover, be used. Notice for your nearest Sony service station. 6
... supplied one and approved by ASTA or BSI to BS 1362, (i.e., marked with this equipment has a detachable fuse cover, be used. Notice for your nearest Sony service station. 6

Instruction Manual
Page 7
...materials may be copyrighted. The monitor may be compensated for effective use. If sunlight is not a malfunction. When the camera warms up ) data to a malfunction of your camera No compensation for contents of the recording The contents of data loss, always copy (back up , the monitor will ...; Images may cause a fire. This is focused on a nearby object, it may trail across on the LCD monitor in this camera. Notes on using your camera or a memory card, etc. On the data specifications described in this manual are reproduced images, and are normal in the manufacturing ...
...materials may be copyrighted. The monitor may be compensated for effective use. If sunlight is not a malfunction. When the camera warms up ) data to a malfunction of your camera No compensation for contents of the recording The contents of data loss, always copy (back up , the monitor will ...; Images may cause a fire. This is focused on a nearby object, it may trail across on the LCD monitor in this camera. Notes on using your camera or a memory card, etc. On the data specifications described in this manual are reproduced images, and are normal in the manufacturing ...
Instruction Manual
Page 8
... the accessories supplied 11 Preparing the battery pack 12 Attaching a lens 18 Inserting a memory card 20 Preparing the camera 23 Using the accessories supplied 25 Checking the number of recordable images 27 Cleaning 29 Identifying parts and screen indicators 32 Front side...the Control button 42 The functions selected by the Fn (Function) button ... 43 The functions selected by the MENU button 43 Shooting an image without camera shake 45 Correct posture 45 Using the SteadyShot function 46 Using a tripod 47 / Shooting with the automatic setting 48 Shooting with a suitable setting ...
... the accessories supplied 11 Preparing the battery pack 12 Attaching a lens 18 Inserting a memory card 20 Preparing the camera 23 Using the accessories supplied 25 Checking the number of recordable images 27 Cleaning 29 Identifying parts and screen indicators 32 Front side...the Control button 42 The functions selected by the Fn (Function) button ... 43 The functions selected by the MENU button 43 Shooting an image without camera shake 45 Correct posture 45 Using the SteadyShot function 46 Using a tripod 47 / Shooting with the automatic setting 48 Shooting with a suitable setting ...
Instruction Manual
Page 9
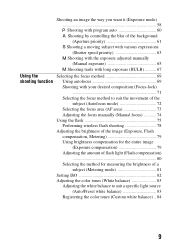
Shooting an image the way you want it (Exposure mode 58 Shooting with program auto 60 Shooting by controlling the blur of the background (Aperture priority 61 Shooting a moving subject with various expressions (Shutter speed priority 63 Shooting with the exposure adjusted manually (Manual exposure 65 Shooting trails with long exposure (BULB 67 Using the Selecting the focus method 69 shooting function Using autofocus 69 Shooting with your desired composition (Focus-lock) 71 Selecting the focus method to suit the movement of the subject (Autofocus mode 72 Selecting the ...
Shooting an image the way you want it (Exposure mode 58 Shooting with program auto 60 Shooting by controlling the blur of the background (Aperture priority 61 Shooting a moving subject with various expressions (Shutter speed priority 63 Shooting with the exposure adjusted manually (Manual exposure 65 Shooting trails with long exposure (BULB 67 Using the Selecting the focus method 69 shooting function Using autofocus 69 Shooting with your desired composition (Focus-lock) 71 Selecting the focus method to suit the movement of the subject (Autofocus mode 72 Selecting the ...
Instruction Manual
Page 10
... setting 112 Changing the functions of the control dial 113 Changing other settings 114 Setting the LCD monitor 116 Confirming the version of the camera 118 Resetting to the default 119 Viewing images Copying images to your computer 121 on a computer Viewing images on your computer 125 Using... the software 129 Printing images Specifying DPOF 135 Printing images by connecting the camera to a PictBridge compliant printer 137 Others Specifications 140 Troubleshooting 144 Warning messages 153 Precautions 156 Index 158 10
... setting 112 Changing the functions of the control dial 113 Changing other settings 114 Setting the LCD monitor 116 Confirming the version of the camera 118 Resetting to the default 119 Viewing images Copying images to your computer 121 on a computer Viewing images on your computer 125 Using... the software 129 Printing images Specifying DPOF 135 Printing images by connecting the camera to a PictBridge compliant printer 137 Others Specifications 140 Troubleshooting 144 Warning messages 153 Precautions 156 Index 158 10
Instruction Manual
Page 11
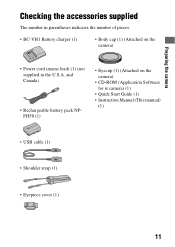
... cord (mains lead) (1) (not supplied in the U.S.A. Preparing the camera Preparing the camera Checking the accessories supplied The number in parentheses indicates the number of pieces. • BC-VH1 Battery charger (1) • Body cap (1) (Attached on the camera) • CD-ROM (Application Software for α camera) (1) • Quick Start Guide (1) • Instruction Manual (This...
... cord (mains lead) (1) (not supplied in the U.S.A. Preparing the camera Preparing the camera Checking the accessories supplied The number in parentheses indicates the number of pieces. • BC-VH1 Battery charger (1) • Body cap (1) (Attached on the camera) • CD-ROM (Application Software for α camera) (1) • Quick Start Guide (1) • Instruction Manual (This...

Instruction Manual
Page 12
Charging the battery pack The "InfoLITHIUM" battery pack can also be sure to charge the NP-FH50 "InfoLITHIUM" battery pack (supplied). It can be charged even when it has not been fully charged. 1 Insert the battery pack on the battery charger. Push the battery pack until it clicks. 12 Preparing the battery pack When using the camera for the first time, be used when it has not been fully depleted.
Charging the battery pack The "InfoLITHIUM" battery pack can also be sure to charge the NP-FH50 "InfoLITHIUM" battery pack (supplied). It can be charged even when it has not been fully charged. 1 Insert the battery pack on the battery charger. Push the battery pack until it clicks. 12 Preparing the battery pack When using the camera for the first time, be used when it has not been fully depleted.

Instruction Manual
Page 13
... (wall socket). Fast flashing: Turns the light on the remaining capacity of 1.5 seconds. 13 and Canada Plug To the wall outlet (wall socket) Preparing the camera CHARGE lamp For customers in countries/regions other than the U.S.A.
... (wall socket). Fast flashing: Turns the light on the remaining capacity of 1.5 seconds. 13 and Canada Plug To the wall outlet (wall socket) Preparing the camera CHARGE lamp For customers in countries/regions other than the U.S.A.
Instruction Manual
Page 14
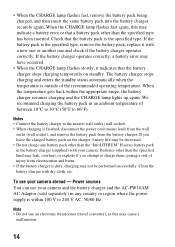
... of between 10°C to 30°C (50°F to charge them, posing a risk of injury from the battery charger. To use your camera and the battery charger and the AC-PW10AM AC Adaptor (sold separately) in any battery pack other than the "InfoLITHIUM" H series battery pack in ... the specified kind may leak, overheat, or explode if you leave the charged battery pack on standby. Note • Do not use your camera abroad - The battery charger stops charging and enters the standby status automatically when the temperature is the specified type. We recommend charging the battery ...
... of between 10°C to 30°C (50°F to charge them, posing a risk of injury from the battery charger. To use your camera and the battery charger and the AC-PW10AM AC Adaptor (sold separately) in any battery pack other than the "InfoLITHIUM" H series battery pack in ... the specified kind may leak, overheat, or explode if you leave the charged battery pack on standby. Note • Do not use your camera abroad - The battery charger stops charging and enters the standby status automatically when the temperature is the specified type. We recommend charging the battery ...

Instruction Manual
Page 15
To remove the battery pack Turn off the camera and slide the lock lever in the direction of the battery. 3 Close the battery cover. Be careful not to drop the battery pack. Lock lever Lock lever 15 Preparing the camera Inserting the charged battery pack 1 While sliding the battery cover open lever, open the battery cover. 2 Firmly insert the battery pack all the way while pressing the lock lever with the tip of the arrow.
To remove the battery pack Turn off the camera and slide the lock lever in the direction of the battery. 3 Close the battery cover. Be careful not to drop the battery pack. Lock lever Lock lever 15 Preparing the camera Inserting the charged battery pack 1 While sliding the battery cover open lever, open the battery cover. 2 Firmly insert the battery pack all the way while pressing the lock lever with the tip of the arrow.
Instruction Manual
Page 16
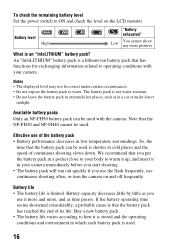
... its life. If the battery operating time seems shortened considerably, a probable cause is that the NP-FH30 and NP-FH40 cannot be used with your camera immediately before you start shooting. • The battery pack will run out quickly if you put the battery pack in a pocket close to your body... to ON and check the level on and off frequently. To check the remaining battery level Set the power switch to how it in your camera. The battery pack is not water-resistant. • Do not leave the battery pack in extremely hot places, such as time passes. Note that the...
... its life. If the battery operating time seems shortened considerably, a probable cause is that the NP-FH30 and NP-FH40 cannot be used with your camera immediately before you start shooting. • The battery pack will run out quickly if you put the battery pack in a pocket close to your body... to ON and check the level on and off frequently. To check the remaining battery level Set the power switch to how it in your camera. The battery pack is not water-resistant. • Do not leave the battery pack in extremely hot places, such as time passes. Note that the...

Instruction Manual
Page 17
Preparing the camera How to store the battery pack If the battery pack is not to be used for a long time, fully charge it and then fully use it up once a year on your camera before storing the battery pack in a dry, cool place to prolong the battery life. 17
Preparing the camera How to store the battery pack If the battery pack is not to be used for a long time, fully charge it and then fully use it up once a year on your camera before storing the battery pack in a dry, cool place to prolong the battery life. 17

Instruction Manual
Page 18
Attaching a lens 1 Remove the body cap from the camera and the packaging lid from the rear of the lens. • When changing the lens, quickly change the lens away from dusty locations so as to keep dust or debris from getting inside the camera. 2 Mount the lens by aligning the orange index marks... on the lens and camera. 3 Turn the lens clockwise until it to the camera, purchase the Rear Lens Cap ALC-R55. • When attaching a lens, do not press...
Attaching a lens 1 Remove the body cap from the camera and the packaging lid from the rear of the lens. • When changing the lens, quickly change the lens away from dusty locations so as to keep dust or debris from getting inside the camera. 2 Mount the lens by aligning the orange index marks... on the lens and camera. 3 Turn the lens clockwise until it to the camera, purchase the Rear Lens Cap ALC-R55. • When attaching a lens, do not press...

Instruction Manual
Page 19
Setup menu 19 Preparing the camera To remove the lens 1 Press the lens release button all the way in the (page...R55 also. Lens release button Note on changing the lens When changing the lens, if dust or debris gets inside the camera and lands on the surface of the image sensor (the part that acts as the film), it stops. 2 Replace... lens and attach the body cap to prevent dust from landing on the shooting environment. The camera is equipped with an anti-dust function to the camera. • Before you attach them, remove dust from dusty locations when attaching/removing a lens.
Setup menu 19 Preparing the camera To remove the lens 1 Press the lens release button all the way in the (page...R55 also. Lens release button Note on changing the lens When changing the lens, if dust or debris gets inside the camera and lands on the surface of the image sensor (the part that acts as the film), it stops. 2 Replace... lens and attach the body cap to prevent dust from landing on the shooting environment. The camera is equipped with an anti-dust function to the camera. • Before you attach them, remove dust from dusty locations when attaching/removing a lens.

Instruction Manual
Page 20
... card Only "Memory Stick PRO Duo" media, "Memory Stick PRO-HG Duo" media, SD memory cards and SDHC memory cards can be used with this camera. The "Memory Stick PRO Duo" media and "Memory Stick PRO-HG Duo" media are referred to as the "Memory Stick PRO Duo" media and the...
... card Only "Memory Stick PRO Duo" media, "Memory Stick PRO-HG Duo" media, SD memory cards and SDHC memory cards can be used with this camera. The "Memory Stick PRO Duo" media and "Memory Stick PRO-HG Duo" media are referred to as the "Memory Stick PRO Duo" media and the...
