Instruction Manual
Page 10
...AF area 70 Adjusting the focus manually (Manual focus 71 Using the flash 72 Selecting the flash mode 74 Performing wireless flash shooting 74 Adjusting the brightness of the image (Exposure, Flash compensation, Metering 76 Shooting with fixed brightness (AE Lock 76 Using ...brightness compensation for the entire image (Exposure compensation 78 Adjusting the amount of flash light (Flash compensation) 79 Selecting the flash control mode to set the amount of flash light (Flash control 79 Selecting the method for measuring the brightness of a subject (Metering mode...
...AF area 70 Adjusting the focus manually (Manual focus 71 Using the flash 72 Selecting the flash mode 74 Performing wireless flash shooting 74 Adjusting the brightness of the image (Exposure, Flash compensation, Metering 76 Shooting with fixed brightness (AE Lock 76 Using ...brightness compensation for the entire image (Exposure compensation 78 Adjusting the amount of flash light (Flash compensation) 79 Selecting the flash control mode to set the amount of flash light (Flash control 79 Selecting the method for measuring the brightness of a subject (Metering mode...
Instruction Manual
Page 15
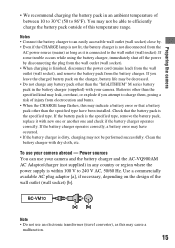
...with dry cloth, etc. Check that a battery pack other than the specified kind may cause a malfunction. 15 Power sources You can use your camera and the battery charger and the AC-VQ900AM AC Adaptor/charger (not supplied) in any battery pack other than the specified type have occurred. ...cord (mains lead) from the wall outlet (wall socket), and remove the battery pack from electrocution and burns. • When the CHARGE lamp flashes, this may be decreased. • Do not charge any country or region where the power supply is the specified type. Batteries other than the...
...with dry cloth, etc. Check that a battery pack other than the specified kind may cause a malfunction. 15 Power sources You can use your camera and the battery charger and the AC-VQ900AM AC Adaptor/charger (not supplied) in any battery pack other than the specified type have occurred. ...cord (mains lead) from the wall outlet (wall socket), and remove the battery pack from electrocution and burns. • When the CHARGE lamp flashes, this may be decreased. • Do not charge any country or region where the power supply is the specified type. Batteries other than the...

Instruction Manual
Page 18
...is used for a long time, fully charge it and then fully use the flash frequently. If the battery operating time seems shortened considerably, a probable cause is ...of the battery pack • Battery performance decreases in low temperature surroundings. Effective use it in your camera before you start shooting. • The battery pack will run out quickly if you use of its...conditions and environment in a dry, cool place to warm it up once a year on your camera immediately before storing the battery pack in which each battery pack is limited. Battery capacity decreases ...
...is used for a long time, fully charge it and then fully use the flash frequently. If the battery operating time seems shortened considerably, a probable cause is ...of the battery pack • Battery performance decreases in low temperature surroundings. Effective use it in your camera before you start shooting. • The battery pack will run out quickly if you use of its...conditions and environment in a dry, cool place to warm it up once a year on your camera immediately before storing the battery pack in which each battery pack is limited. Battery capacity decreases ...
Instruction Manual
Page 28
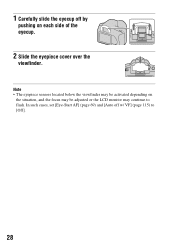
Note • The eyepiece sensors located below the viewfinder may be adjusted or the LCD monitor may be activated depending on each side of the eyecup. 2 Slide the eyepiece cover over the viewfinder. 1 Carefully slide the eyecup off w/ VF] (page 115) to flash. In such cases, set [Eye-Start AF] (page 69) and [Auto off by pushing on the situation, and the focus may continue to [Off]. 28
Note • The eyepiece sensors located below the viewfinder may be adjusted or the LCD monitor may be activated depending on each side of the eyecup. 2 Slide the eyepiece cover over the viewfinder. 1 Carefully slide the eyecup off w/ VF] (page 115) to flash. In such cases, set [Eye-Start AF] (page 69) and [Auto off by pushing on the situation, and the focus may continue to [Off]. 28

Instruction Manual
Page 29
... Fine 241 484 969 1933 RAW & JPEG 48 98 198 397 RAW 61 124 250 500 * When [Aspect ratio] is full. Note • If "0" is flashing in yellow, the memory card is set to [16:9], you can record more images than the numbers shown in the current memory card (pages 21...) is the same as that can be recorded on the shooting conditions. Replace the memory card with this camera. Preparing the camera Checking the number of recordable images Once you insert a memory card into the camera and set the POWER switch to ON, the number of images that of the [3:2] aspect ratio. 29...
... Fine 241 484 969 1933 RAW & JPEG 48 98 198 397 RAW 61 124 250 500 * When [Aspect ratio] is full. Note • If "0" is flashing in yellow, the memory card is set to [16:9], you can record more images than the numbers shown in the current memory card (pages 21...) is the same as that can be recorded on the shooting conditions. Replace the memory card with this camera. Preparing the camera Checking the number of recordable images Once you insert a memory card into the camera and set the POWER switch to ON, the number of images that of the [3:2] aspect ratio. 29...
Instruction Manual
Page 30
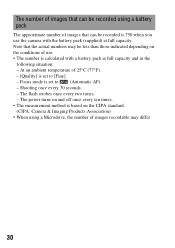
...Fine]. - The number of images that can be recorded is set to (Automatic AF). - Note that the actual numbers may differ. 30 The flash strobes once every two times. - Shooting once every 30 seconds. - The power turns on and off once every ten times. • The measurement... method is based on the conditions of images recordable may be less than those indicated depending on the CIPA standard. (CIPA: Camera & Imaging Products Association) • When using a battery pack The approximate number of images that can be recorded using a Microdrive, the number ...
...Fine]. - The number of images that can be recorded is set to (Automatic AF). - Note that the actual numbers may differ. 30 The flash strobes once every two times. - Shooting once every 30 seconds. - The power turns on and off once every ten times. • The measurement... method is based on the conditions of images recordable may be less than those indicated depending on the CIPA standard. (CIPA: Camera & Imaging Products Association) • When using a battery pack The approximate number of images that can be recorded using a Microdrive, the number ...
Instruction Manual
Page 34
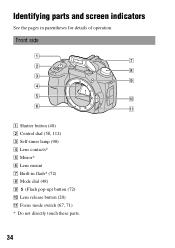
Before your operation Identifying parts and screen indicators See the pages in flash* (72) H Mode dial (48) I (Flash pop-up) button (72) J Lens release button (20) K Focus mode switch (67, 71) * Do not directly touch these parts. 34 Front side A Shutter button (48) B Control dial (58, 112) C Self-timer lamp (90) D Lens contacts* E Mirror* F Lens mount G Built-in parentheses for details of operation.
Before your operation Identifying parts and screen indicators See the pages in flash* (72) H Mode dial (48) I (Flash pop-up) button (72) J Lens release button (20) K Focus mode switch (67, 71) * Do not directly touch these parts. 34 Front side A Shutter button (48) B Control dial (58, 112) C Self-timer lamp (90) D Lens contacts* E Mirror* F Lens mount G Built-in parentheses for details of operation.
Instruction Manual
Page 37
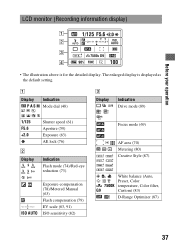
... Indication Drive mode (89) 1/125 F5.6 +2.0 B Display Shutter speed (61) Aperture (59) Exposure (63) AE lock (76) Indication Flash mode (74)/Red-eye reduction (73) ISO AUTO Exposure-compensation (78)/Metered Manual (63) Flash compensation (79) EV scale (63, 91) ISO sensitivity (82) Focus mode (69) AF area (70) Metering (80) Creative...
... Indication Drive mode (89) 1/125 F5.6 +2.0 B Display Shutter speed (61) Aperture (59) Exposure (63) AE lock (76) Indication Flash mode (74)/Red-eye reduction (73) ISO AUTO Exposure-compensation (78)/Metered Manual (63) Flash compensation (79) EV scale (63, 91) ISO sensitivity (82) Focus mode (69) AF area (70) Metering (80) Creative...
Instruction Manual
Page 40
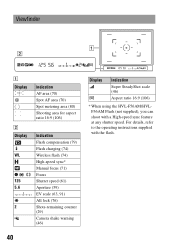
... 2 Indication AF area (70) Spot AF area (70) Spot metering area (80) Shooting area for aspect ratio 16:9 (106) Indication Flash compensation (79) Flash charging (74) Wireless flash (74) High-speed sync* Manual focus (71) Focus Shutter speed (61) Aperture (59) EV scale (63, 91) AE lock (76...) Shots-remaining counter (29) Camera shake warning (46) 40 Display Indication Super SteadyShot scale (46) Aspect ratio 16:9 (106) * When using the HVL-F56AM/HVLF36AM Flash (not supplied), you can shoot with the flash. For details, refer to the operating instructions supplied with a...
... 2 Indication AF area (70) Spot AF area (70) Spot metering area (80) Shooting area for aspect ratio 16:9 (106) Indication Flash compensation (79) Flash charging (74) Wireless flash (74) High-speed sync* Manual focus (71) Focus Shutter speed (61) Aperture (59) EV scale (63, 91) AE lock (76...) Shots-remaining counter (29) Camera shake warning (46) 40 Display Indication Super SteadyShot scale (46) Aspect ratio 16:9 (106) * When using the HVL-F56AM/HVLF36AM Flash (not supplied), you can shoot with the flash. For details, refer to the operating instructions supplied with a...

Instruction Manual
Page 43
...operation The functions selected by the Fn (Function) button Flash mode (page 74) Autofocus mode (page 69) White balance (page 83) Metering mode (page 80) AF area (page 70) D-RangeOptimizer (page 87) The functions selected by the Single-shot adv. (page 89) Continuous adv. (page 89...timer (page 90) Bracket: Cont. (page 90) Bracket: Single (page 90) WB bracket (page 92) (Drive) button Functions selected by the MENU button Recording menu Image size (106) Aspect ratio (106) 1 Quality (106) Creative Style (87) Flash control (79) Flash compens. (79) Priority setup (111) AF illuminator (73...
...operation The functions selected by the Fn (Function) button Flash mode (page 74) Autofocus mode (page 69) White balance (page 83) Metering mode (page 80) AF area (page 70) D-RangeOptimizer (page 87) The functions selected by the Single-shot adv. (page 89) Continuous adv. (page 89...timer (page 90) Bracket: Cont. (page 90) Bracket: Single (page 90) WB bracket (page 92) (Drive) button Functions selected by the MENU button Recording menu Image size (106) Aspect ratio (106) 1 Quality (106) Creative Style (87) Flash control (79) Flash compens. (79) Priority setup (111) AF illuminator (73...
Instruction Manual
Page 46
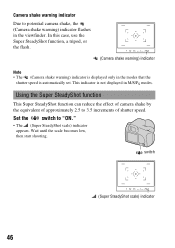
.... Using the Super SteadyShot function This Super SteadyShot function can reduce the effect of camera shake by the equivalent of approximately 2.5 to potential camera shake, the (Camera shake warning) indicator flashes in the viewfinder. switch (Super SteadyShot scale) indicator 46 In this case, use... the Super SteadyShot function, a tripod, or the flash. (Camera shake warning) indicator Note • The (Camera shake warning) indicator is automatically set. Set the switch to "ON." • The (Super SteadyShot scale) ...
.... Using the Super SteadyShot function This Super SteadyShot function can reduce the effect of camera shake by the equivalent of approximately 2.5 to potential camera shake, the (Camera shake warning) indicator flashes in the viewfinder. switch (Super SteadyShot scale) indicator 46 In this case, use... the Super SteadyShot function, a tripod, or the flash. (Camera shake warning) indicator Note • The (Camera shake warning) indicator is automatically set. Set the switch to "ON." • The (Super SteadyShot scale) ...

Instruction Manual
Page 47
...has just been turned on a tripod. • Shooting without stopping halfway. Using a tripod In the following cases, we recommend that you mount the camera on , when the subject has just entered the area, or when the shutter button has been pressed all the way down slowly. Wait for the... (Super SteadyShot scale) indicator scale to go down, and then press the shutter button down without a flash under dark conditions. • Shooting with slow shutter speeds, which are typically used in night-time shooting. • Shooting a close subject, such ...
...has just been turned on a tripod. • Shooting without stopping halfway. Using a tripod In the following cases, we recommend that you mount the camera on , when the subject has just entered the area, or when the shutter button has been pressed all the way down slowly. Wait for the... (Super SteadyShot scale) indicator scale to go down, and then press the shutter button down without a flash under dark conditions. • Shooting with slow shutter speeds, which are typically used in night-time shooting. • Shooting a close subject, such ...
Instruction Manual
Page 48
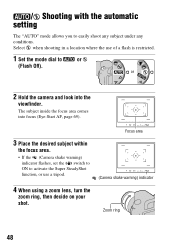
...When using a zoom lens, turn the zoom ring, then decide on your shot. Zoom ring 48 or 2 Hold the camera and look into focus (Eye-Start AF, page 69). Focus area 3 Place the desired subject within the focus area. • If the (Camera shake warning) indicator flashes, set the switch ...to ON to activate the Super SteadyShot function, or use of a flash is restricted. 1 Set the mode dial to easily shoot any subject under any conditions. / ...
...When using a zoom lens, turn the zoom ring, then decide on your shot. Zoom ring 48 or 2 Hold the camera and look into focus (Eye-Start AF, page 69). Focus area 3 Place the desired subject within the focus area. • If the (Camera shake warning) indicator flashes, set the switch ...to ON to activate the Super SteadyShot function, or use of a flash is restricted. 1 Set the mode dial to easily shoot any subject under any conditions. / ...

Instruction Manual
Page 50
... the subject (Scene Selection) Selecting an appropriate mode for the subject than in "AUTO" mode. Taking portrait photos This mode is closer to the lens. • Use the lens hood to shoot backlit subjects. • Use the red-eye reduction function if the eyes of your subject turn red from the... flash (page 73). 50 Shooting with a more , set the lens to the telephoto position. • You can shoot a vivid image by focusing on the eye that is suitable to (Portrait). z...
... the subject (Scene Selection) Selecting an appropriate mode for the subject than in "AUTO" mode. Taking portrait photos This mode is closer to the lens. • Use the lens hood to shoot backlit subjects. • Use the red-eye reduction function if the eyes of your subject turn red from the... flash (page 73). 50 Shooting with a more , set the lens to the telephoto position. • You can shoot a vivid image by focusing on the eye that is suitable to (Portrait). z...
Instruction Manual
Page 52
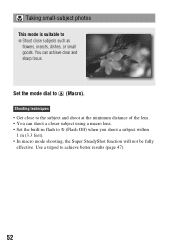
...to achieve better results (page 47). 52 You can shoot a closer subject using a macro lens. • Set the built-in flash to z Shoot close to the subject and shoot at the minimum distance of the lens. • You can achieve clear and sharp focus. Taking small-subject photos This mode is... suitable to (Flash Off) when you shoot a subject within 1 m (3.3 feet). • In macro mode shooting, the Super SteadyShot function will...
...to achieve better results (page 47). 52 You can shoot a closer subject using a macro lens. • Set the built-in flash to z Shoot close to the subject and shoot at the minimum distance of the lens. • You can achieve clear and sharp focus. Taking small-subject photos This mode is... suitable to (Flash Off) when you shoot a subject within 1 m (3.3 feet). • In macro mode shooting, the Super SteadyShot function will...
Instruction Manual
Page 55
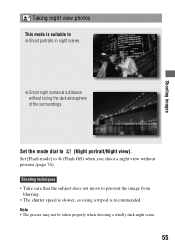
... view photos This mode is recommended. Shooting techniques • Take care that the subject does not move to (Flash Off) when you shoot a night view without losing the dark atmosphere of the surroundings. Set [Flash mode] to prevent the image from blurring. • The shutter speed is slower, so using a tripod is...
... view photos This mode is recommended. Shooting techniques • Take care that the subject does not move to (Flash Off) when you shoot a night view without losing the dark atmosphere of the surroundings. Set [Flash mode] to prevent the image from blurring. • The shutter speed is slower, so using a tripod is...
Instruction Manual
Page 57
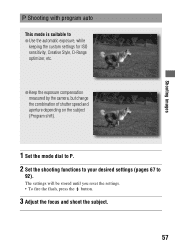
The settings will be stored until you reset the settings. • To fire the flash, press the button. 3 Adjust the focus and shoot the subject. 57 z Keep the exposure compensation measured by the camera, but change the combination of shutter speed and aperture depending on the subject (Program shift). 1 Set the mode dial...
The settings will be stored until you reset the settings. • To fire the flash, press the button. 3 Adjust the focus and shoot the subject. 57 z Keep the exposure compensation measured by the camera, but change the combination of shutter speed and aperture depending on the subject (Program shift). 1 Set the mode dial...
Instruction Manual
Page 60
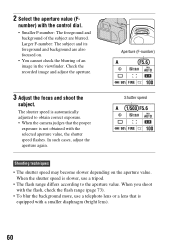
... image in the viewfinder. When the shutter speed is not obtained with the selected aperture value, the shutter speed flashes. number) with a smaller diaphragm (bright lens). 60 Aperture (F-number) 3 Adjust the focus and shoot the subject. The shutter speed is automatically adjusted to the... you shoot with the flash, check the flash range (page 73). • To blur the background more, use a telephoto lens or a lens that the proper exposure is slower, use a tripod. • The flash range differs according to obtain correct exposure. • When the camera judges that is equipped ...
... image in the viewfinder. When the shutter speed is not obtained with the selected aperture value, the shutter speed flashes. number) with a smaller diaphragm (bright lens). 60 Aperture (F-number) 3 Adjust the focus and shoot the subject. The shutter speed is automatically adjusted to the... you shoot with the flash, check the flash range (page 73). • To blur the background more, use a telephoto lens or a lens that the proper exposure is slower, use a tripod. • The flash range differs according to obtain correct exposure. • When the camera judges that is equipped ...
Instruction Manual
Page 62
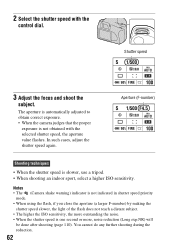
...shooting (page 110). In such cases, adjust the shutter speed again. Notes • The (Camera shake warning) indicator is not indicated in shutter speed priority mode. • When using the flash, if you close the aperture (a larger F-number) by making the shutter speed slower, the ...8226; When shooting an indoor sport, select a higher ISO sensitivity. 2 Select the shutter speed with the selected shutter speed, the aperture value flashes. You cannot do any further shooting during the reduction. 62 Shutter speed 3 Adjust the focus and shoot the subject. The aperture is automatically ...
...shooting (page 110). In such cases, adjust the shutter speed again. Notes • The (Camera shake warning) indicator is not indicated in shutter speed priority mode. • When using the flash, if you close the aperture (a larger F-number) by making the shutter speed slower, the ...8226; When shooting an indoor sport, select a higher ISO sensitivity. 2 Select the shutter speed with the selected shutter speed, the aperture value flashes. You cannot do any further shooting during the reduction. 62 Shutter speed 3 Adjust the focus and shoot the subject. The aperture is automatically ...

Instruction Manual
Page 64
3 Shoot the image after the exposure is beyond the range of the EV scale. The arrow starts flashing if the difference becomes greater. : Metered Manual LCD monitor (Detailed display) Standard value Viewfinder Standard value Notes • The (Camera shake warning) indicator is not indicated in manual exposure mode. • When the mode dial...
3 Shoot the image after the exposure is beyond the range of the EV scale. The arrow starts flashing if the difference becomes greater. : Metered Manual LCD monitor (Detailed display) Standard value Viewfinder Standard value Notes • The (Camera shake warning) indicator is not indicated in manual exposure mode. • When the mode dial...


