Instruction Manual
Page 1
Printed on a computer Printing images Printed in Japan Digital Single Lens Reflex Camera Instruction Manual DSLR-A200 © 2008 Sony Corporation 3-277-950-11 (1) Preparing the camera Before your operation Shooting images Using the shooting function Using the viewing function Changing your setup Viewing images on 70% or more recycled paper using VOC (Volatile Organic Compound)-free vegetable oil based ink. Additional information on this product and answers to frequently asked questions can be found at our Customer Support Website.
Printed on a computer Printing images Printed in Japan Digital Single Lens Reflex Camera Instruction Manual DSLR-A200 © 2008 Sony Corporation 3-277-950-11 (1) Preparing the camera Before your operation Shooting images Using the shooting function Using the viewing function Changing your setup Viewing images on 70% or more recycled paper using VOC (Volatile Organic Compound)-free vegetable oil based ink. Additional information on this product and answers to frequently asked questions can be found at our Customer Support Website.
Instruction Manual
Page 13
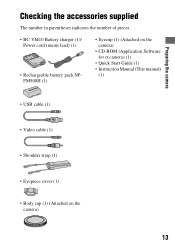
Preparing the camera Preparing the camera Checking the accessories supplied The number in parentheses indicates the number of pieces. • BC-VM10 Battery charger (1)/ Power cord (mains lead) (1) • Rechargeable battery pack NPFM500H (1) • Eyecup (1) (Attached on the camera) • CD-ROM (Application Software for α camera) (1) • Quick Start Guide (1) • Instruction Manual (This manual) (1) • USB cable (1) • Video cable (1) • Shoulder strap (1) • Eyepiece cover (1) • Body cap (1) (Attached on the camera) 13
Preparing the camera Preparing the camera Checking the accessories supplied The number in parentheses indicates the number of pieces. • BC-VM10 Battery charger (1)/ Power cord (mains lead) (1) • Rechargeable battery pack NPFM500H (1) • Eyecup (1) (Attached on the camera) • CD-ROM (Application Software for α camera) (1) • Quick Start Guide (1) • Instruction Manual (This manual) (1) • USB cable (1) • Video cable (1) • Shoulder strap (1) • Eyepiece cover (1) • Body cap (1) (Attached on the camera) 13
Instruction Manual
Page 19
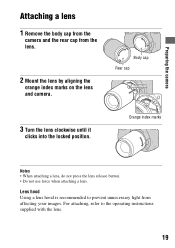
... is recommended to the operating instructions supplied with the lens. 19 Body cap Rear cap 3 Turn the lens clockwise until it clicks into the locked position. For attaching, refer to prevent unnecessary light from the lens. 2 Mount the lens by aligning the orange index marks on the lens and camera. Orange index marks Notes • When attaching...
... is recommended to the operating instructions supplied with the lens. 19 Body cap Rear cap 3 Turn the lens clockwise until it clicks into the locked position. For attaching, refer to prevent unnecessary light from the lens. 2 Mount the lens by aligning the orange index marks on the lens and camera. Orange index marks Notes • When attaching...
Instruction Manual
Page 40
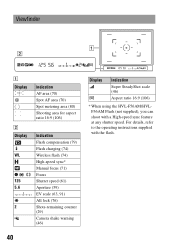
... flash (74) High-speed sync* Manual focus (71) Focus Shutter speed (61) Aperture (59) EV scale (63, 91) AE lock (76) Shots-remaining counter (29) Camera shake warning (46) 40 Display Indication Super SteadyShot scale (46) Aspect ratio 16:9 (106) * When using the HVL-F56AM/HVLF36AM Flash (not supplied), you can...
... flash (74) High-speed sync* Manual focus (71) Focus Shutter speed (61) Aperture (59) EV scale (63, 91) AE lock (76) Shots-remaining counter (29) Camera shake warning (46) 40 Display Indication Super SteadyShot scale (46) Aspect ratio 16:9 (106) * When using the HVL-F56AM/HVLF36AM Flash (not supplied), you can...
Instruction Manual
Page 41
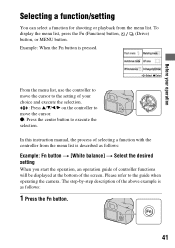
... controller to execute the selection. z: Press the center button to move the cursor. In this instruction manual, the process of selecting a function with the controller from the menu list. Please refer to the guide when operating the camera. Selecting a function/setting You can select a function for shooting or playback from the menu...
... controller to execute the selection. z: Press the center button to move the cursor. In this instruction manual, the process of selecting a function with the controller from the menu list. Please refer to the guide when operating the camera. Selecting a function/setting You can select a function for shooting or playback from the menu...
Instruction Manual
Page 45
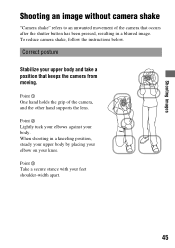
... holds the grip of the camera that keeps the camera from moving. Shooting images Shooting images Shooting an image without camera shake "Camera shake" refers to an unwanted movement of the camera, and the other hand supports the lens. Point 3 Take a secure... stance with your upper body and take a position that occurs after the shutter button has been pressed, resulting in a kneeling position, steady your upper body by placing your elbow on your body. Point 2 Lightly tuck your elbows against your knee. To reduce camera shake, follow the instructions...
... holds the grip of the camera that keeps the camera from moving. Shooting images Shooting images Shooting an image without camera shake "Camera shake" refers to an unwanted movement of the camera, and the other hand supports the lens. Point 3 Take a secure... stance with your upper body and take a position that occurs after the shutter button has been pressed, resulting in a kneeling position, steady your upper body by placing your elbow on your body. Point 2 Lightly tuck your elbows against your knee. To reduce camera shake, follow the instructions...
Instruction Manual
Page 74
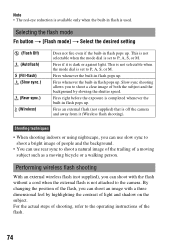
...indoors or using nightscape, you can shoot an image with the flash without a cord when the external flash is off the camera and away from it is used. By changing the position of the flash, you to P, A, S, or M. For the... actual steps of shooting, refer to the camera. Note • The red-eye reduction is available only when the built-in flash is dark or against light. Selecting the.... Fires an external flash (not supplied) that is not attached to the operating instructions of light and shadow on the subject.
...indoors or using nightscape, you can shoot an image with the flash without a cord when the external flash is off the camera and away from it is used. By changing the position of the flash, you to P, A, S, or M. For the... actual steps of shooting, refer to the camera. Note • The red-eye reduction is available only when the built-in flash is dark or against light. Selecting the.... Fires an external flash (not supplied) that is not attached to the operating instructions of light and shadow on the subject.
Instruction Manual
Page 75
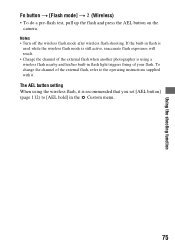
... is recommended that you set [AEL button] (page 112) to [AEL hold] in flash light triggers firing of the external flash, refer to the operating instructions supplied with it is using the wireless flash, it . The AEL button setting When using a wireless flash nearby and his/her built-in the Custom... the shooting function Fn button t [Flash mode] t (Wireless) • To do a pre-flash test, pull up the flash and press the AEL button on the camera.
... is recommended that you set [AEL button] (page 112) to [AEL hold] in flash light triggers firing of the external flash, refer to the operating instructions supplied with it is using the wireless flash, it . The AEL button setting When using a wireless flash nearby and his/her built-in the Custom... the shooting function Fn button t [Flash mode] t (Wireless) • To do a pre-flash test, pull up the flash and press the AEL button on the camera.
Instruction Manual
Page 80
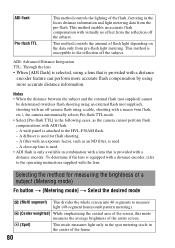
... of the entire screen. (Spot) This mode measures light only in the spot metering circle in the center of the frame. 80 A close-up lens is used for measuring the brightness of a subject (Metering mode) Fn button t [Metering mode] t Select the desired mode (Multi segment) This ...divides the whole screen into 40 segments to the operating instructions supplied with virtually no effect from the pre-flash. A diffuser is provided with an exposure factor, such as the camera cannot perform flash compensations with ADI flash. - ADI flash Pre-flash TTL This ...
... of the entire screen. (Spot) This mode measures light only in the spot metering circle in the center of the frame. 80 A close-up lens is used for measuring the brightness of a subject (Metering mode) Fn button t [Metering mode] t Select the desired mode (Multi segment) This ...divides the whole screen into 40 segments to the operating instructions supplied with virtually no effect from the pre-flash. A diffuser is provided with an exposure factor, such as the camera cannot perform flash compensations with ADI flash. - ADI flash Pre-flash TTL This ...

Instruction Manual
Page 104
Images shot with the camera appear on . 2 To the VIDEO OUT terminal Controller button 104 Select the desired image with the TV. 3 Turn on the camera, and press the button. Viewing images on a TV screen 1 Turn off both your camera and the TV, and connect the camera to the TV. 1 To video input jack Video cable 2 Turn on the TV and switch the input. • See also the operating instructions supplied with b/B on the controller. • The LCD monitor on the rear of the camera does not turned on the TV screen.
Images shot with the camera appear on . 2 To the VIDEO OUT terminal Controller button 104 Select the desired image with the TV. 3 Turn on the camera, and press the button. Viewing images on a TV screen 1 Turn off both your camera and the TV, and connect the camera to the TV. 1 To video input jack Video cable 2 Turn on the TV and switch the input. • See also the operating instructions supplied with b/B on the controller. • The LCD monitor on the rear of the camera does not turned on the TV screen.
Instruction Manual
Page 150
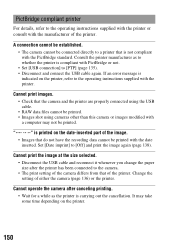
...files cannot be printed. • Images shot using cameras other than this camera or images modified with a computer may take some time depending on the printer. 150 is printed on the printer, refer to the operating instructions supplied with the printer. PictBridge compliant printer For ...details, refer to the operating instructions supplied with the printer or consult with the manufacturer of either the camera (page 136) or the printer. Cannot operate the camera after the printer has been connected to whether the printer is ...
...files cannot be printed. • Images shot using cameras other than this camera or images modified with a computer may take some time depending on the printer. 150 is printed on the printer, refer to the operating instructions supplied with the printer. PictBridge compliant printer For ...details, refer to the operating instructions supplied with the printer or consult with the manufacturer of either the camera (page 136) or the printer. Cannot operate the camera after the printer has been connected to whether the printer is ...
Instruction Manual
Page 152
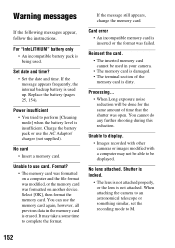
...The terminal section of time that the shutter was formatted on another device. Shutter is locked. • The lens is not attached properly, or the lens is erased. No lens attached. If the message appears frequently, the internal backup battery is dirty. Power insufficient • You tried...M. 152 When attaching the camera to an astronomical telescope or something similar, set the recording mode to perform [Cleaning mode] when the battery level is inserted or the format was failed. Warning messages If the following messages appear, follow the instructions. Select [OK], then ...
...The terminal section of time that the shutter was formatted on another device. Shutter is locked. • The lens is not attached properly, or the lens is erased. No lens attached. If the message appears frequently, the internal backup battery is dirty. Power insufficient • You tried...M. 152 When attaching the camera to an astronomical telescope or something similar, set the recording mode to perform [Cleaning mode] when the battery level is inserted or the format was failed. Warning messages If the following messages appear, follow the instructions. Select [OK], then ...

Quick Start Quide (DSLR-A200)
Page 1
... 2 Insert the battery pack into the viewfinder. Adjust the diopter-adjustment dial if the focus of your single lens reflex camera, consult the "Instruction Manual." Playback Press . The memory card Date/time setup 1 Turn the camera on the controller. Firmly insert the battery pack all the way while pressing the lock lever with a label ...
... 2 Insert the battery pack into the viewfinder. Adjust the diopter-adjustment dial if the focus of your single lens reflex camera, consult the "Instruction Manual." Playback Press . The memory card Date/time setup 1 Turn the camera on the controller. Firmly insert the battery pack all the way while pressing the lock lever with a label ...


