Operating Instructions
Page 4
...DIGITAL DEVICE COMPLIES WITH PART 15 OF THE FCC RULES AND THE CANADIAN ICES-003 OPERATION IS SUBJECT TO THE FOLLOWING TWO CONDITIONS: (1) THIS DEVICE MAY NOT CAUSE HARMFUL INTERFERENCE, AND (2) THIS DEVICE MUST ACCEPT ANY INTERFERENCE RECEIVED, INCLUDING INTERFERENCE THAT MAY CAUSE UNDESIRED OPERATION. 4 Trademarks • "Memory Stick," , "MagicGate Memory... Stick," and , are trademarks of Sony Corporation. • "MagicGate" and are trademarks of Sony Corporation. • Microsoft and Windows ... camera.
...DIGITAL DEVICE COMPLIES WITH PART 15 OF THE FCC RULES AND THE CANADIAN ICES-003 OPERATION IS SUBJECT TO THE FOLLOWING TWO CONDITIONS: (1) THIS DEVICE MAY NOT CAUSE HARMFUL INTERFERENCE, AND (2) THIS DEVICE MUST ACCEPT ANY INTERFERENCE RECEIVED, INCLUDING INTERFERENCE THAT MAY CAUSE UNDESIRED OPERATION. 4 Trademarks • "Memory Stick," , "MagicGate Memory... Stick," and , are trademarks of Sony Corporation. • "MagicGate" and are trademarks of Sony Corporation. • Microsoft and Windows ... camera.
Operating Instructions
Page 5
...camera In addition to malfunctions and inability to remove it . These points are operational for Camera...camera are manufactured using extremely highprecision technology so over 99.99% of the DSCP71 unless noted otherwise. Do not aim the camera... camera on how to record images, this camera....camera is equipped with an auto zoom lens. Back up ) data to it before using this may render the "Memory...; Be careful when placing the camera near a window or outdoors. ...camera or recording medium, etc. However, there may cause malfunctions. Do not get the camera...camera is working correctly. ...
...camera In addition to malfunctions and inability to remove it . These points are operational for Camera...camera are manufactured using extremely highprecision technology so over 99.99% of the DSCP71 unless noted otherwise. Do not aim the camera... camera on how to record images, this camera....camera is equipped with an auto zoom lens. Back up ) data to it before using this may render the "Memory...; Be careful when placing the camera near a window or outdoors. ...camera or recording medium, etc. However, there may cause malfunctions. Do not get the camera...camera is working correctly. ...
Operating Instructions
Page 6
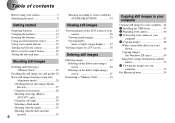
... on the Index (triple-image) screen 41 Formatting a "Memory Stick 43 Copying still images to your computer Copying still images to your computer ...44 1 Installing the USB driver 45 2 Preparing your camera 46 3 Connecting your camera to scene conditions (SCENE SELECTION 34 Viewing still images Viewing images... your camera 20 How to use the control button 20 Setting the date and time 21 Shooting still images Inserting and removing a "Memory Stick 23 Deciding the still image size and quality 24 Basic still image shooting (using auto adjustment mode 26 Checking the last shot image ...
... on the Index (triple-image) screen 41 Formatting a "Memory Stick 43 Copying still images to your computer Copying still images to your computer ...44 1 Installing the USB driver 45 2 Preparing your camera 46 3 Connecting your camera to scene conditions (SCENE SELECTION 34 Viewing still images Viewing images... your camera 20 How to use the control button 20 Setting the date and time 21 Shooting still images Inserting and removing a "Memory Stick 23 Deciding the still image size and quality 24 Basic still image shooting (using auto adjustment mode 26 Checking the last shot image ...
Operating Instructions
Page 7
... 76 Deleting on the Index (triple-image) screen 77 Editing movies 78 Cutting movies 78 Deleting unnecessary portions of a movie 79 Copying movies to your camera ...55 Changing menu settings 55 Changing items in Multi Burst mode (MULTI BURST 64 Shooting still images for e-mail (E-MAIL 65 Advanced still image viewing... Enlarging a portion of images that can be saved/ shooting time 91 Menu items 92 SET UP items 97 Precautions 99 The "Memory Stick 100 The nickel hydride batteries 100 Specifications 101 The LCD screen 103 Index 106 7
... 76 Deleting on the Index (triple-image) screen 77 Editing movies 78 Cutting movies 78 Deleting unnecessary portions of a movie 79 Copying movies to your camera ...55 Changing menu settings 55 Changing items in Multi Burst mode (MULTI BURST 64 Shooting still images for e-mail (E-MAIL 65 Advanced still image viewing... Enlarging a portion of images that can be saved/ shooting time 91 Menu items 92 SET UP items 97 Precautions 99 The "Memory Stick 100 The nickel hydride batteries 100 Specifications 101 The LCD screen 103 Index 106 7
Operating Instructions
Page 9
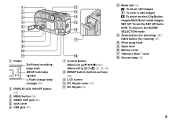
... SCN: To shoot in the SCENE SELECTION mode M Zoom button (for shooting) (28)/ Index button (for viewing) (37) N Wrist strap hook O Open lever P Battery cover Q "Memory Stick" cover R Access lamp (23) 9
... SCN: To shoot in the SCENE SELECTION mode M Zoom button (for shooting) (28)/ Index button (for viewing) (37) N Wrist strap hook O Open lever P Battery cover Q "Memory Stick" cover R Access lamp (23) 9
Operating Instructions
Page 11
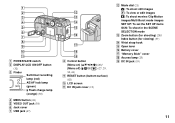
... SCN: To shoot in the SCENE SELECTION mode M Zoom button (for shooting) (28)/ Index button (for viewing) (37) N Wrist strap hook O Open lever P Battery cover Q "Memory Stick" cover R Access lamp (23) S DC IN jack (19) 11
... SCN: To shoot in the SCENE SELECTION mode M Zoom button (for shooting) (28)/ Index button (for viewing) (37) N Wrist strap hook O Open lever P Battery cover Q "Memory Stick" cover R Access lamp (23) S DC IN jack (19) 11
Operating Instructions
Page 13
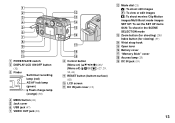
... SCN: To shoot in the SCENE SELECTION mode M Zoom button (for shooting) (28)/ Index button (for viewing) (37) N Wrist strap hook O Open lever P Battery cover Q "Memory Stick" cover R Access lamp (23) S DC IN jack (19) 13 1 2 3 4 5 6 7 8 9 q;
... SCN: To shoot in the SCENE SELECTION mode M Zoom button (for shooting) (28)/ Index button (for viewing) (37) N Wrist strap hook O Open lever P Battery cover Q "Memory Stick" cover R Access lamp (23) S DC IN jack (19) 13 1 2 3 4 5 6 7 8 9 q;
Operating Instructions
Page 15
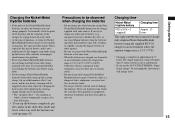
...;F to charge fully depleted Nickel-Metal Hydride batteries using up the batteries completely, put the camera in the slide show mode and leave it , should correct the problem. * The "memory effect" - Precautions to charge any other type of battery (e.g., manganese batteries, alkaline dry cells..., or one-time lithium batteries) than expected. Otherwise, there is a danger of burns or other batteries except Sony Nickel-Metal Hydride batteries in an ...
...;F to charge fully depleted Nickel-Metal Hydride batteries using up the batteries completely, put the camera in the slide show mode and leave it , should correct the problem. * The "memory effect" - Precautions to charge any other type of battery (e.g., manganese batteries, alkaline dry cells..., or one-time lithium batteries) than expected. Otherwise, there is a danger of burns or other batteries except Sony Nickel-Metal Hydride batteries in an ...
Operating Instructions
Page 18
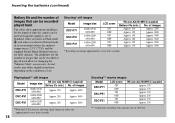
...×480 LCD screen ON OFF ON OFF ON OFF R6 (size AA) Ni-MH (2) (supplied) Battery life (min.) No. The guidelines for changing the "Memory Stick" as necessary. of images Approx. 230 Approx. 4600 Approx. 280 Approx. 5600 Approx. 280 Approx. 5600 **With the LCD screen on the conditions of... (continued) Battery life and the number of images that can be recorded/ played back The tables show approximate guidelines for the length of time the camera can be recorded or played back allow for the number of images that can be used when picture quality is set to Standard, when you...
...×480 LCD screen ON OFF ON OFF ON OFF R6 (size AA) Ni-MH (2) (supplied) Battery life (min.) No. The guidelines for changing the "Memory Stick" as necessary. of images Approx. 230 Approx. 4600 Approx. 280 Approx. 5600 Approx. 280 Approx. 5600 **With the LCD screen on the conditions of... (continued) Battery life and the number of images that can be recorded/ played back The tables show approximate guidelines for the length of time the camera can be recorded or played back allow for the number of images that can be used when picture quality is set to Standard, when you...
Operating Instructions
Page 23
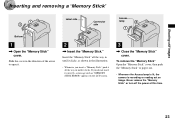
... time. 23 Insert the "Memory Stick" all the way in the direction of the arrow to pop it correctly, a message such as shown in the illustration. • Whenever you do not insert it out. • Whenever the Access lamp is lit, the camera is recording or reading out... an image. If you insert a "Memory Stick," push it all the way in until it . 2 , Insert the "Memory Stick." Shooting still images Inserting and removing a "Memory Stick" Shooting still images Label side Connector side Access lamp...
... time. 23 Insert the "Memory Stick" all the way in the direction of the arrow to pop it correctly, a message such as shown in the illustration. • Whenever you do not insert it out. • Whenever the Access lamp is lit, the camera is recording or reading out... an image. If you insert a "Memory Stick," push it all the way in until it . 2 , Insert the "Memory Stick." Shooting still images Inserting and removing a "Memory Stick" Shooting still images Label side Connector side Access lamp...

Operating Instructions
Page 25
... vertical proportion of 3:2 to e-mail The number of images* that can be saved in a "Memory Stick" The number of images that can be saved in FINE (STANDARD) mode are viewed on the LCD screen of the camera, they all look the same size. • Number of shooting images can differ from the... A4 size images 1600 (3:2) (DSC-P51/P31) 3:2 prints* 1280×960 Printing postcard size images 640×480 For images to be saved in your "Memory Stick." Choose an image size and quality level appropriate for the kind of images you want to preserve your image. You can resize the images...
... vertical proportion of 3:2 to e-mail The number of images* that can be saved in a "Memory Stick" The number of images that can be saved in FINE (STANDARD) mode are viewed on the LCD screen of the camera, they all look the same size. • Number of shooting images can differ from the... A4 size images 1600 (3:2) (DSC-P51/P31) 3:2 prints* 1280×960 Printing postcard size images 640×480 For images to be saved in your "Memory Stick." Choose an image size and quality level appropriate for the kind of images you want to preserve your image. You can resize the images...
Operating Instructions
Page 27
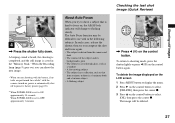
...from a mirror, or there is a luminous body and a lustrous subject • A flashing subject Checking the last shot image (Quick Review) REVIEW 2048 8/8 100-0029 2002 7 4 10:30PM , Press b (7) on the control ...you are shooting with the battery, if no tasks are performed for a while* with in the "Memory Stick." To return to shooting mode, press the shutter lightly or press b (7) on , the AE...button to display the menu. 2 Press B on the control button to shoot a subject that from the camera and dark • The contrast of the subject and its background is poor • The subject is ...
...from a mirror, or there is a luminous body and a lustrous subject • A flashing subject Checking the last shot image (Quick Review) REVIEW 2048 8/8 100-0029 2002 7 4 10:30PM , Press b (7) on the control ...you are shooting with the battery, if no tasks are performed for a while* with in the "Memory Stick." To return to shooting mode, press the shutter lightly or press b (7) on , the AE...button to display the menu. 2 Press B on the control button to shoot a subject that from the camera and dark • The contrast of the subject and its background is poor • The subject is ...

Operating Instructions
Page 40
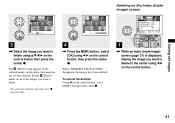
... deletion, select [EXIT], then press the center z. 40 When this message disappears, the image has been deleted. To cancel the deletion Using V on the screen. "MEMORY STICK ACCESS" appears on the control button, choose [CANCEL], then press the center z.
... deletion, select [EXIT], then press the center z. 40 When this message disappears, the image has been deleted. To cancel the deletion Using V on the screen. "MEMORY STICK ACCESS" appears on the control button, choose [CANCEL], then press the center z.
Operating Instructions
Page 41
... the center z. The (Delete) mark appears on the control button then press the center z. At this point, the image has not yet been deleted. When "MEMORY STICK ACCESS" disappears, the images have been deleted. Deleting still images Deleting on the Index (tripleimage) screen • SET MENU TO NEXT DELETE EXIT OK...
... the center z. The (Delete) mark appears on the control button then press the center z. At this point, the image has not yet been deleted. When "MEMORY STICK ACCESS" disappears, the images have been deleted. Deleting still images Deleting on the Index (tripleimage) screen • SET MENU TO NEXT DELETE EXIT OK...
Operating Instructions
Page 42
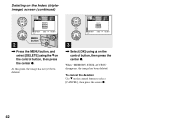
To cancel the deletion Use V on the control button, then press the center z. When "MEMORY STICK ACCESS" disappears, the image has been deleted. Deleting on the Index (tripleimage) screen (continued) PRINT PROTECT DELETE 100-0028 2002 7 4 10:30PM • OK MENU button 2 , Press the MENU button, and select [DELETE] using v on the control button, then press the center z. DELETE O K CANCEL 100-0028 2002 7 4 10:30PM • OK 3 , Select [OK] using the V on the control button to select [CANCEL], then press the center z. 42 At this point, the image has not yet been deleted.
To cancel the deletion Use V on the control button, then press the center z. When "MEMORY STICK ACCESS" disappears, the image has been deleted. Deleting on the Index (tripleimage) screen (continued) PRINT PROTECT DELETE 100-0028 2002 7 4 10:30PM • OK MENU button 2 , Press the MENU button, and select [DELETE] using v on the control button, then press the center z. DELETE O K CANCEL 100-0028 2002 7 4 10:30PM • OK 3 , Select [OK] using the V on the control button to select [CANCEL], then press the center z. 42 At this point, the image has not yet been deleted.
Operating Instructions
Page 43
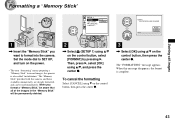
this process is complete. 43 When this camera, and those available commercially, are already formatted, and can be permanently deleted. 2 , Select (SETUP 1) using v/V on the power. • The term "formatting" means preparing a "Memory Stick" to SET UP, and turn on the control button, select ...[FORMAT] by pressing B. When you want to format into the camera. The "FORMATTING" message appears. Deleting still images Formatting a " Memory Stick" SETUP 1 FORMAT : FILE NUMBER : /LANGUAGE : CLOCK SET : O K CANCEL OK FORMAT ALL DATA WILL...
this process is complete. 43 When this camera, and those available commercially, are already formatted, and can be permanently deleted. 2 , Select (SETUP 1) using v/V on the power. • The term "formatting" means preparing a "Memory Stick" to SET UP, and turn on the control button, select ...[FORMAT] by pressing B. When you want to format into the camera. The "FORMATTING" message appears. Deleting still images Formatting a " Memory Stick" SETUP 1 FORMAT : FILE NUMBER : /LANGUAGE : CLOCK SET : O K CANCEL OK FORMAT ALL DATA WILL...
Operating Instructions
Page 44
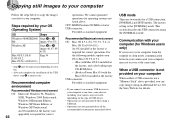
... images using the [NORMAL] mode. USB mode There are not guaranteed for operating systems not listed above . See the Sony Website for Windows users only) If you shot to your OS to Mac OS 9.0 or 9.1. - We cannot guarantee operations for all the recommended environments mentioned above ....XP Home Edition, or Windows XP Professional An OS installed at one time, some devices, including your camera, may not work, depending on your computer When neither a USB connector nor a "Memory Stick" slot is required for correct 44 operations. When a USB connector is not provided on the ...
... images using the [NORMAL] mode. USB mode There are not guaranteed for operating systems not listed above . See the Sony Website for Windows users only) If you shot to your OS to Mac OS 9.0 or 9.1. - We cannot guarantee operations for all the recommended environments mentioned above ....XP Home Edition, or Windows XP Professional An OS installed at one time, some devices, including your camera, may not work, depending on your computer When neither a USB connector nor a "Memory Stick" slot is required for correct 44 operations. When a USB connector is not provided on the ...
Operating Instructions
Page 46
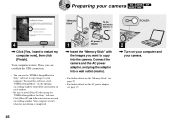
...instructions on each succeeding window. AC power 2 1 adaptor , Insert the "Memory Stick" with the images you can establish the USB connection. • You can use the "PIXELA ImageMixer for Sony" software. Click [DirectX] and follow instructions on each window. • Be... sure to install DirectX when using the "PIXELA ImageMixer for Sony" software to copy images to your camera. 46 Connect the camera and the AC power adaptor, and plug the adaptor into the camera. 2 Preparing your camera "Memory Stick" To the wall outlet (mains) 3 1 1 4 2 , Click...
...instructions on each succeeding window. AC power 2 1 adaptor , Insert the "Memory Stick" with the images you can establish the USB connection. • You can use the "PIXELA ImageMixer for Sony" software. Click [DirectX] and follow instructions on each window. • Be... sure to install DirectX when using the "PIXELA ImageMixer for Sony" software to copy images to your camera. 46 Connect the camera and the AC power adaptor, and plug the adaptor into the camera. 2 Preparing your camera "Memory Stick" To the wall outlet (mains) 3 1 1 4 2 , Click...
Operating Instructions
Page 47
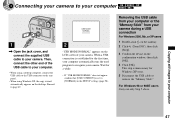
...[OK]. When a USB connection is established for Windows XP users. 5 Disconnect the USB cable or remove the "Memory Stick." For Windows 98 or 98SE users Carry out only Step 5 above. 3 Connecting your camera to your computer USB MODE NORMAL a a a a 1 , Open the jack cover, and connect the supplied USB... cable to your camera. Removing the USB cable from your computer or the "Memory Stick" from your camera during a USB connection For Windows 2000, Me, or XP users 1 Double-click on the tasktray. 2 Click (Sony DSC), then click [Stop]. 3 Confirm the device...
...[OK]. When a USB connection is established for Windows XP users. 5 Disconnect the USB cable or remove the "Memory Stick." For Windows 98 or 98SE users Carry out only Step 5 above. 3 Connecting your camera to your computer USB MODE NORMAL a a a a 1 , Open the jack cover, and connect the supplied USB... cable to your camera. Removing the USB cable from your computer or the "Memory Stick" from your camera during a USB connection For Windows 2000, Me, or XP users 1 Double-click on the tasktray. 2 Click (Sony DSC), then click [Stop]. 3 Confirm the device...
Operating Instructions
Page 48
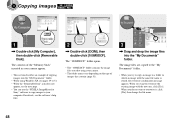
..., see the next page. • You can use the "PIXELA ImageMixer for Sony" software to copy images to a folder in your camera appear. • This section describes an example of copying images into the "My... 4 Copying images 1 , Double-click [My Computer], then double-click [Removable Disk]. The contents of the "Memory Stick" inserted in which an image with the new one, click [Yes]. The "100MSDCF" folder opens. •... , Double-click [DCIM], then double-click [100MSDCF]. When you shot using Windows XP, see pages 49 to overwrite it, click [No], then change the file name. 48
..., see the next page. • You can use the "PIXELA ImageMixer for Sony" software to copy images to a folder in your camera appear. • This section describes an example of copying images into the "My... 4 Copying images 1 , Double-click [My Computer], then double-click [Removable Disk]. The contents of the "Memory Stick" inserted in which an image with the new one, click [Yes]. The "100MSDCF" folder opens. •... , Double-click [DCIM], then double-click [100MSDCF]. When you shot using Windows XP, see pages 49 to overwrite it, click [No], then change the file name. 48

