Operating Instructions
Page 1
DSC-P71/P51/P31 © 2002 Sony Corporation 3-074-351-13(1) Getting started Shooting still images Viewing still images Deleting still images Copying still images to these numbers whenever you call upon ... image editting Enjoying movies Troubleshooting Additional information Index Refer to your Sony dealer regarding this manual thoroughly, and retain it for future reference. Record the serial number in the space provided below. DSC-P71/P51/P31 Serial No. Model No. Digital Still Camera Operating Instructions Before operating the unit, please read this product...
DSC-P71/P51/P31 © 2002 Sony Corporation 3-074-351-13(1) Getting started Shooting still images Viewing still images Deleting still images Copying still images to these numbers whenever you call upon ... image editting Enjoying movies Troubleshooting Additional information Index Refer to your Sony dealer regarding this manual thoroughly, and retain it for future reference. Record the serial number in the space provided below. DSC-P71/P51/P31 Serial No. Model No. Digital Still Camera Operating Instructions Before operating the unit, please read this product...
Operating Instructions
Page 4
...and connect the USB cable again. However, the ™ or ® marks are registered trademarks of Sony Corporation. • Microsoft and Windows are not used in this manual are, in this camera. N50 For the Customers in Europe This product has been tested and found compliant with the limits sets... out on the EMC Directive for the Customers in the U.S.A. and Canada THIS CLASS B DIGITAL DEVICE COMPLIES WITH PART 15 OF THE FCC...
...and connect the USB cable again. However, the ™ or ® marks are registered trademarks of Sony Corporation. • Microsoft and Windows are not used in this manual are, in this camera. N50 For the Customers in Europe This product has been tested and found compliant with the limits sets... out on the EMC Directive for the Customers in the U.S.A. and Canada THIS CLASS B DIGITAL DEVICE COMPLIES WITH PART 15 OF THE FCC...
Operating Instructions
Page 5
...may cause malfunctions. On illustrations Illustrations used in this manual are reproduced images, and are not actual images shot using this camera. Do not shake or strike the camera In addition to malfunctions and inability to record images, this manual are normal in the manufacturing process and do... follow the instructions on the LCD screen and the LCD finder. Unauthorized recording of such materials may be copyrighted. Before using your camera Trial recording Before you record one-time events, you may want to make a trial recording to make sure that constantly appear on...
...may cause malfunctions. On illustrations Illustrations used in this manual are reproduced images, and are not actual images shot using this camera. Do not shake or strike the camera In addition to malfunctions and inability to record images, this manual are normal in the manufacturing process and do... follow the instructions on the LCD screen and the LCD finder. Unauthorized recording of such materials may be copyrighted. Before using your camera Trial recording Before you record one-time events, you may want to make a trial recording to make sure that constantly appear on...
Operating Instructions
Page 6
...8 Getting started Preparing batteries 14 Charging the batteries 14 Inserting the batteries 17 Using an external power source 19 Using your camera abroad 19 Turning on/off your camera 20 How to use the control button 20 Setting the date and time 21 Shooting still images Inserting and removing a "...Memory Stick 23 Deciding the still image size and quality 24 Basic still image shooting (using auto adjustment mode 26 Checking the last shot image (Quick...
...8 Getting started Preparing batteries 14 Charging the batteries 14 Inserting the batteries 17 Using an external power source 19 Using your camera abroad 19 Turning on/off your camera 20 How to use the control button 20 Setting the date and time 21 Shooting still images Inserting and removing a "...Memory Stick 23 Deciding the still image size and quality 24 Basic still image shooting (using auto adjustment mode 26 Checking the last shot image (Quick...
Operating Instructions
Page 7
... Burst mode (MULTI BURST 64 Shooting still images for e-mail (E-MAIL 65 Advanced still image viewing Enlarging a portion of a movie 79 Copying movies to your camera ...55 Changing menu settings 55 Changing items in the SET UP screen 55 Advanced still image shooting Adjusting the exposure (EV adjustment) 56 Adjusting color...
... Burst mode (MULTI BURST 64 Shooting still images for e-mail (E-MAIL 65 Advanced still image viewing Enlarging a portion of a movie 79 Copying movies to your camera ...55 Changing menu settings 55 Changing items in the SET UP screen 55 Advanced still image shooting Adjusting the exposure (EV adjustment) 56 Adjusting color...
Operating Instructions
Page 8
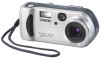
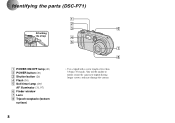
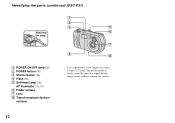
Identifying the parts (DSC-P71) Attaching the strap A POWER ON/OFF lamp (20) B POWER button (20) C Shutter button (26) D Flash (30) E Self-timer lamp (29)/ AF illuminator (31, 97) F Finder window G Lens H Tripod receptacle (bottom surface) 1 2 3 6 4 5 7 8 • Use a tripod with a screw length of less than 5.5mm (7/32 inch). You will be unable to firmly secure the camera to tripods having longer screws, and may damage the camera. 8
Identifying the parts (DSC-P71) Attaching the strap A POWER ON/OFF lamp (20) B POWER button (20) C Shutter button (26) D Flash (30) E Self-timer lamp (29)/ AF illuminator (31, 97) F Finder window G Lens H Tripod receptacle (bottom surface) 1 2 3 6 4 5 7 8 • Use a tripod with a screw length of less than 5.5mm (7/32 inch). You will be unable to firmly secure the camera to tripods having longer screws, and may damage the camera. 8
Operating Instructions
Page 10
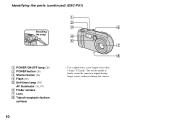
Identifying the parts (continued) (DSC-P51) 1 2 3 6 Attaching the strap 4 5 7 8 A POWER ON/OFF lamp (20) B POWER button (20) C Shutter button (26) D Flash (30) E Self-timer lamp (29)/ AF illuminator (31, 97) F Finder window G Lens H Tripod receptacle (bottom surface) • Use a tripod with a screw length of less than 5.5mm (7/32 inch). You will be unable to firmly secure the camera to tripods having longer screws, and may damage the camera. 10
Identifying the parts (continued) (DSC-P51) 1 2 3 6 Attaching the strap 4 5 7 8 A POWER ON/OFF lamp (20) B POWER button (20) C Shutter button (26) D Flash (30) E Self-timer lamp (29)/ AF illuminator (31, 97) F Finder window G Lens H Tripod receptacle (bottom surface) • Use a tripod with a screw length of less than 5.5mm (7/32 inch). You will be unable to firmly secure the camera to tripods having longer screws, and may damage the camera. 10
Operating Instructions
Page 12
Identifying the parts (continued) (DSC-P31) 1 2 3 5 Attaching 6 the strap 7 4 8 A POWER ON/OFF lamp (20) B POWER button (20) C Shutter button (26) D Flash (30) E Self-timer lamp (29)/ AF illuminator (31, 97) F Finder window G Lens H Tripod receptacle (bottom surface) • Use a tripod with a screw length of less than 5.5mm (7/32 inch). You will be unable to firmly secure the camera to tripods having longer screws, and may damage the camera. 12
Identifying the parts (continued) (DSC-P31) 1 2 3 5 Attaching 6 the strap 7 4 8 A POWER ON/OFF lamp (20) B POWER button (20) C Shutter button (26) D Flash (30) E Self-timer lamp (29)/ AF illuminator (31, 97) F Finder window G Lens H Tripod receptacle (bottom surface) • Use a tripod with a screw length of less than 5.5mm (7/32 inch). You will be unable to firmly secure the camera to tripods having longer screws, and may damage the camera. 12
Operating Instructions
Page 14
...batteries are shorted, there is outside that cannot be used Manganese batteries, lithium batteries, nicad batteries, alkaline batteries (cannot be able to shoot your camera before using them. • Be sure to charge the batteries in an environment where the ambient temperature is especially true in this... camera. This will lengthen battery life (page 16). • There is finished, disconnect the power cord (mains lead) from the wall outlet (mains), and ...
...batteries are shorted, there is outside that cannot be used Manganese batteries, lithium batteries, nicad batteries, alkaline batteries (cannot be able to shoot your camera before using them. • Be sure to charge the batteries in an environment where the ambient temperature is especially true in this... camera. This will lengthen battery life (page 16). • There is finished, disconnect the power cord (mains lead) from the wall outlet (mains), and ...
Operating Instructions
Page 15
...batteries are used they may not charge properly. If this happens, repeatedly using up (page 67). Precautions to charge any other batteries except Sony Nickel-Metal Hydride batteries in any other type of battery (e.g., manganese batteries, alkaline dry cells, or one-time lithium batteries) than full...up the battery fully, and then recharging it that you recharge the batteries just before fully using up the batteries completely, put the camera in an environment where the temperature range is 0°C to 40°C (32°F to charge fully depleted Nickel-Metal Hydride ...
...batteries are used they may not charge properly. If this happens, repeatedly using up (page 67). Precautions to charge any other batteries except Sony Nickel-Metal Hydride batteries in any other type of battery (e.g., manganese batteries, alkaline dry cells, or one-time lithium batteries) than full...up the battery fully, and then recharging it that you recharge the batteries just before fully using up the batteries completely, put the camera in an environment where the temperature range is 0°C to 40°C (32°F to charge fully depleted Nickel-Metal Hydride ...
Operating Instructions
Page 16
... BACKLIGHT] at this switch is set to ON. The factory setting of the charge, or on the conditions under which the camera is being used and the state of the camera is set to [ON] (page 98). You cannot change the settings for fully charged ones, or charge these batteries. When the... camera is shipped from the factory, this time (page 98). To make the available shooting time even longer, it is recommended that you can shoot for a ...
... BACKLIGHT] at this switch is set to ON. The factory setting of the charge, or on the conditions under which the camera is being used and the state of the camera is set to [ON] (page 98). You cannot change the settings for fully charged ones, or charge these batteries. When the... camera is shipped from the factory, this time (page 98). To make the available shooting time even longer, it is recommended that you can shoot for a ...
Operating Instructions
Page 17
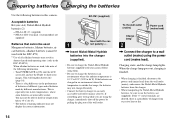
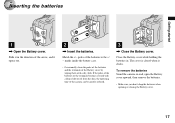
... batteries and the terminals of the Battery cover by wiping them with a film of dirt or oil from the skin, the operating time of the camera can be greatly reduced. 3 , Close the Battery cover. If the poles of the arrow, and it clicks. The cover is closed when it opens... batteries or the terminals become covered with a dry cloth. Inserting the batteries Getting started 1 , Open the Battery cover. To remove the batteries Stand the camera on end, open the Battery cover upward, then remove the batteries. • Make sure you don't drop the batteries when opening or closing the Battery...
... batteries and the terminals of the Battery cover by wiping them with a film of dirt or oil from the skin, the operating time of the camera can be greatly reduced. 3 , Close the Battery cover. If the poles of the arrow, and it clicks. The cover is closed when it opens... batteries or the terminals become covered with a dry cloth. Inserting the batteries Getting started 1 , Open the Battery cover. To remove the batteries Stand the camera on end, open the Battery cover upward, then remove the batteries. • Make sure you don't drop the batteries when opening or closing the Battery...
Operating Instructions
Page 18
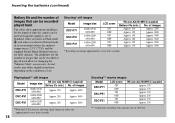
.... Inserting the batteries (continued) Battery life and the number of images that can be recorded or played back allow for the length of time the camera can be used when picture quality is 25°C (77°F), and the supplied Nickel-Metal Hydride batteries are fully charged.
.... Inserting the batteries (continued) Battery life and the number of images that can be recorded or played back allow for the length of time the camera can be used when picture quality is 25°C (77°F), and the supplied Nickel-Metal Hydride batteries are fully charged.
Operating Instructions
Page 19
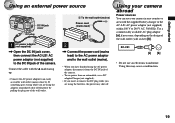
...or the AC-LS1 AC power adaptor (not supplied) within 100 V to the DC IN jack of the wall outlet (wall socket) [b]. Using your camera in any country or area with the v mark facing up. • Connect the AC power adaptor to an easily accessible wall outlet (mains) close ...are using the batteries, the power may cause a malfunction. 19 Use a commercially available AC plug adaptor [a], if necessary, depending on the design of the camera. If something goes wrong while you are using the adaptor, immediately shut off . Using this may shut off the power by . Getting started Using an...
...or the AC-LS1 AC power adaptor (not supplied) within 100 V to the DC IN jack of the wall outlet (wall socket) [b]. Using your camera in any country or area with the v mark facing up. • Connect the AC power adaptor to an easily accessible wall outlet (mains) close ...are using the batteries, the power may cause a malfunction. 19 Use a commercially available AC plug adaptor [a], if necessary, depending on the design of the camera. If something goes wrong while you are using the adaptor, immediately shut off . Using this may shut off the power by . Getting started Using an...
Operating Instructions
Page 20
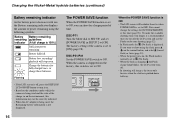
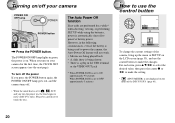
...touch the lens. However, in the following circumstances, even if the battery is being used to power the camera, the Auto Power Off feature will not work. • Movies are performed for the first time, the... off the power If you press the POWER button again, the POWER ON/OFF lamp goes out, and the camera turns off. • When the mode dial is set to OFF: approximately 3 minutes How to use the... control button 0EV 0EV EV WB ISO AUTO WHITE BAL ISO To change the current settings of the camera, bring up the menu or SET UP on the LCD screen (page 55), and use the control button to...
...touch the lens. However, in the following circumstances, even if the battery is being used to power the camera, the Auto Power Off feature will not work. • Movies are performed for the first time, the... off the power If you press the POWER button again, the POWER ON/OFF lamp goes out, and the camera turns off. • When the mode dial is set to OFF: approximately 3 minutes How to use the... control button 0EV 0EV EV WB ISO AUTO WHITE BAL ISO To change the current settings of the camera, bring up the menu or SET UP on the LCD screen (page 55), and use the control button to...
Operating Instructions
Page 23
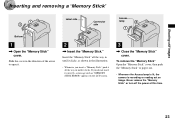
... the "Memory Stick" Open the "Memory Stick" cover, then push the "Memory Stick" to open it out. • Whenever the Access lamp is lit, the camera is recording or reading out an image. Slide the cover in until it correctly, a message such as "MEMORY STICK ERROR" appears on the LCD screen...
... the "Memory Stick" Open the "Memory Stick" cover, then push the "Memory Stick" to open it out. • Whenever the Access lamp is lit, the camera is recording or reading out an image. Slide the cover in until it correctly, a message such as "MEMORY STICK ERROR" appears on the LCD screen...
Operating Instructions
Page 24
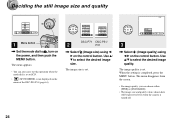
... menu appears. • You can choose either [FINE] or [STANDARD]. • The image size and quality values chosen here will be preserved even when the camera is completed, press the MENU button. The menu disappears from the screen. • For image quality, you can also carry out this operation when the...
... menu appears. • You can choose either [FINE] or [STANDARD]. • The image size and quality values chosen here will be preserved even when the camera is completed, press the MENU button. The menu disappears from the screen. • For image quality, you can also carry out this operation when the...

Operating Instructions
Page 25
... 71). Image size and quality You can choose image size (number of pixels) and image quality (compression ratio) based on the LCD screen of the camera, they all look the same size. • Number of shooting images can differ from the following tables. Choose an image size and quality level appropriate...
... 71). Image size and quality You can choose image size (number of pixels) and image quality (compression ratio) based on the LCD screen of the camera, they all look the same size. • Number of shooting images can differ from the following tables. Choose an image size and quality level appropriate...

Operating Instructions
Page 26
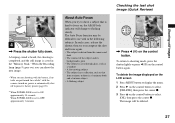
... to the W (wide angle) side, and 50cm (19 3/4 inches) with the Zoom button set to , the exposure and focus are adjusted automatically. 26 2 , Hold your camera with your fingers. • You can choose either Multi-point AF mode or Center AF as the AF mode (page 58). The... camera beeps. When the AE/AF lock indicator stops flashing and remains on, the camera is ready for shooting. • If you remove your finger from the shutter, shooting will be adjusted. (For...
... to the W (wide angle) side, and 50cm (19 3/4 inches) with the Zoom button set to , the exposure and focus are adjusted automatically. 26 2 , Hold your camera with your fingers. • You can choose either Multi-point AF mode or Center AF as the AF mode (page 58). The... camera beeps. When the AE/AF lock indicator stops flashing and remains on, the camera is ready for shooting. • If you remove your finger from the shutter, shooting will be adjusted. (For...
Operating Instructions
Page 27
...REVIEW 2048 8/8 100-0029 2002 7 4 10:30PM , Press b (7) on , the AE/AF lock indicator will be difficult to recompose the shot and focus again. • The subject is distant from the camera and dark • The contrast of the subject and its background is poor • The subject is seen through glass... goes out, you can shoot the next image. • When you are shooting with the battery, if no tasks are performed for a while* with the camera turned on, power is automatically shut off to preserve battery power (page 20). * When POWER SAVE is set to ON: approximately 90 seconds When POWER...
...REVIEW 2048 8/8 100-0029 2002 7 4 10:30PM , Press b (7) on , the AE/AF lock indicator will be difficult to recompose the shot and focus again. • The subject is distant from the camera and dark • The contrast of the subject and its background is poor • The subject is seen through glass... goes out, you can shoot the next image. • When you are shooting with the battery, if no tasks are performed for a while* with the camera turned on, power is automatically shut off to preserve battery power (page 20). * When POWER SAVE is set to ON: approximately 90 seconds When POWER...


