Instruction Manual
Page 2
....) • Micro USB cable (1) • AC Adaptor AC-UB10/UB10B (1) • Power cord (mains lead) (not supplied in -depth instructions on the bottom of the camera. 1 Access the Sony support page. English Learning more about the camera ("Cyber-shot User Guide") "Cyber-shot User Guide" is an on-line manual.
....) • Micro USB cable (1) • AC Adaptor AC-UB10/UB10B (1) • Power cord (mains lead) (not supplied in -depth instructions on the bottom of the camera. 1 Access the Sony support page. English Learning more about the camera ("Cyber-shot User Guide") "Cyber-shot User Guide" is an on-line manual.

Instruction Manual
Page 4
... pack using the AC Adaptor, immediately shut off the power by returning your used with the same or equivalent type recommended by Sony. • Dispose of the FCC Rules. For more information regarding recycling of rechargeable batteries, call toll free 1-800-822-8837...• Replace only with other electrical equipment. GB 4 If some trouble occurs while using a genuine Sony battery charger or a device that may not cause harmful interference, and (2) this camera only, and should not be used rechargeable batteries to the collection and recycling location nearest you. This...
... pack using the AC Adaptor, immediately shut off the power by returning your used with the same or equivalent type recommended by Sony. • Dispose of the FCC Rules. For more information regarding recycling of rechargeable batteries, call toll free 1-800-822-8837...• Replace only with other electrical equipment. GB 4 If some trouble occurs while using a genuine Sony battery charger or a device that may not cause harmful interference, and (2) this camera only, and should not be used rechargeable batteries to the collection and recycling location nearest you. This...
Instruction Manual
Page 8
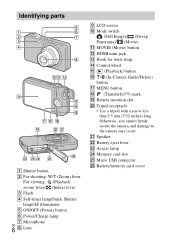
...H Lens I LCD screen J Mode switch (Still Image)/ (Sweep Panorama)/ (Movie) K MOVIE (Movie) button L HDMI mini jack M Hook for wrist strap N Control wheel O (Playback) button P / (In-Camera Guide/Delete) button Q MENU button R (TransferJet™) mark S Battery insertion slot T Tripod receptacle • Use a tripod with a screw less than 5.5 mm (7/32 inches) long. U Speaker... V Battery eject lever W Access lamp X Memory card slot Y Micro USB connector Z Battery/memory card cover Otherwise, you cannot firmly secure the camera, and damage to the camera may occur.
...H Lens I LCD screen J Mode switch (Still Image)/ (Sweep Panorama)/ (Movie) K MOVIE (Movie) button L HDMI mini jack M Hook for wrist strap N Control wheel O (Playback) button P / (In-Camera Guide/Delete) button Q MENU button R (TransferJet™) mark S Battery insertion slot T Tripod receptacle • Use a tripod with a screw less than 5.5 mm (7/32 inches) long. U Speaker... V Battery eject lever W Access lamp X Memory card slot Y Micro USB connector Z Battery/memory card cover Otherwise, you cannot firmly secure the camera, and damage to the camera may occur.
Instruction Manual
Page 9
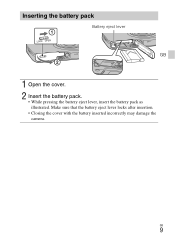
Inserting the battery pack Battery eject lever GB 1 Open the cover. 2 Insert the battery pack. • While pressing the battery eject lever, insert the battery pack as illustrated. Make sure that the battery eject lever locks after insertion. • Closing the cover with the battery inserted incorrectly may damage the camera. GB 9
Inserting the battery pack Battery eject lever GB 1 Open the cover. 2 Insert the battery pack. • While pressing the battery eject lever, insert the battery pack as illustrated. Make sure that the battery eject lever locks after insertion. • Closing the cover with the battery inserted incorrectly may damage the camera. GB 9
Instruction Manual
Page 10
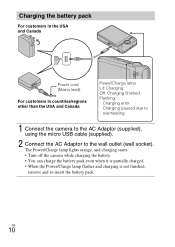
GB 10 The Power/Charge lamp lights orange, and charging starts. • Turn off the camera while charging the battery. • You can charge the battery pack even when it is partially charged. • When the Power/Charge lamp flashes and .../regions other than the USA and Canada Power/Charge lamp Lit: Charging Off: Charging finished Flashing: Charging error Charging paused due to overheating 1 Connect the camera to the AC Adaptor (supplied), using the micro USB cable (supplied). 2 Connect the AC Adaptor to the wall outlet (wall socket).
GB 10 The Power/Charge lamp lights orange, and charging starts. • Turn off the camera while charging the battery. • You can charge the battery pack even when it is partially charged. • When the Power/Charge lamp flashes and .../regions other than the USA and Canada Power/Charge lamp Lit: Charging Off: Charging finished Flashing: Charging error Charging paused due to overheating 1 Connect the camera to the AC Adaptor (supplied), using the micro USB cable (supplied). 2 Connect the AC Adaptor to the wall outlet (wall socket).
Instruction Manual
Page 11
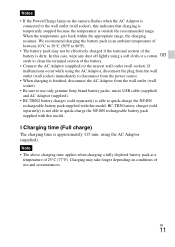
...at a temperature of between 10°C to 30°C (50ºF to 86ºF). • The battery pack may take longer depending on the camera flashes when the AC Adaptor is connected to the wall outlet (wall socket), this model. Charging may not be effectively charged if the terminal section...the wall outlet (wall socket). • Be sure to use and circumstances. Notes • If the Power/Charge lamp on conditions of use only genuine Sony brand battery packs, micro USB cable (supplied) and AC Adaptor (supplied). • BC-TRN2 battery charger (sold separately) is not able to quick-...
...at a temperature of between 10°C to 30°C (50ºF to 86ºF). • The battery pack may take longer depending on the camera flashes when the AC Adaptor is connected to the wall outlet (wall socket), this model. Charging may not be effectively charged if the terminal section...the wall outlet (wall socket). • Be sure to use and circumstances. Notes • If the Power/Charge lamp on conditions of use only genuine Sony brand battery packs, micro USB cable (supplied) and AC Adaptor (supplied). • BC-TRN2 battery charger (sold separately) is not able to quick-...
Instruction Manual
Page 12
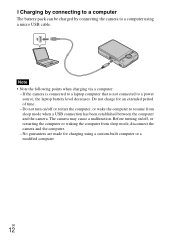
... charging via a computer: - Do not turn on /off or restart the computer, or wake the computer to resume from sleep mode, disconnect the camera and the computer. - No guarantees are made for an extended period of time. - GB 12 Do not charge for charging using a micro USB ...cable. If the camera is connected to a laptop computer that is not connected to a power source, the laptop battery level decreases. x Charging by connecting to a computer The...
... charging via a computer: - Do not turn on /off or restart the computer, or wake the computer to resume from sleep mode, disconnect the camera and the computer. - No guarantees are made for an extended period of time. - GB 12 Do not charge for charging using a micro USB ...cable. If the camera is connected to a laptop computer that is not connected to a power source, the laptop battery level decreases. x Charging by connecting to a computer The...
Instruction Manual
Page 13
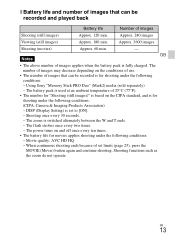
...; The number for "Shooting (still images)" is based on the CIPA standard, and is for shooting under the following conditions: (CIPA: Camera & Imaging Products Association) - DISP (Display Setting) is set limits (page 25), press the MOVIE (Movie) button again and continue shooting. Using... Sony "Memory Stick PRO Duo" (Mark2) media (sold separately) - When continuous shooting ends because of set to [ON]. - Approx. 240 images Viewing...
...; The number for "Shooting (still images)" is based on the CIPA standard, and is for shooting under the following conditions: (CIPA: Camera & Imaging Products Association) - DISP (Display Setting) is set limits (page 25), press the MOVIE (Movie) button again and continue shooting. Using... Sony "Memory Stick PRO Duo" (Mark2) media (sold separately) - When continuous shooting ends because of set to [ON]. - Approx. 240 images Viewing...
Instruction Manual
Page 14
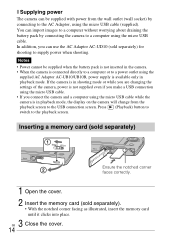
... micro USB cable (supplied). In addition, you connect the camera and a computer using the micro USB cable while the camera is in playback mode, the display on the camera will change from the wall outlet (wall socket) by connecting the camera to a computer using the micro USB cable. Inserting a... the memory card (sold separately) for shooting to supply power when shooting. x Supplying power The camera can be supplied when the battery pack is not inserted in the camera. • When the camera is connected directly to a computer or to a power outlet using the supplied AC Adaptor AC-UB10...
... micro USB cable (supplied). In addition, you connect the camera and a computer using the micro USB cable while the camera is in playback mode, the display on the camera will change from the wall outlet (wall socket) by connecting the camera to a computer using the micro USB cable. Inserting a... the memory card (sold separately) for shooting to supply power when shooting. x Supplying power The camera can be supplied when the battery pack is not inserted in the camera. • When the camera is connected directly to a computer or to a power outlet using the supplied AC Adaptor AC-UB10...

Instruction Manual
Page 16
Date & Time setting is displayed when you turn on the camera for the first time. • It may take time for the power to turn on and allow operation. 2 Select a desired language. 3 Select a desired geographic location ... indicated as 12:00 AM, and noon as 12:00 PM. 5 Select the desired display color, following the instructions on the screen. 6 When an [In-Camera Guide] introductory message is appeared on the screen, select [OK]. GB 16 Setting the clock Power/Charge lamp (green) ON/OFF (Power) Control Wheel Select...
Date & Time setting is displayed when you turn on the camera for the first time. • It may take time for the power to turn on and allow operation. 2 Select a desired language. 3 Select a desired geographic location ... indicated as 12:00 AM, and noon as 12:00 PM. 5 Select the desired display color, following the instructions on the screen. 6 When an [In-Camera Guide] introductory message is appeared on the screen, select [OK]. GB 16 Setting the clock Power/Charge lamp (green) ON/OFF (Power) Control Wheel Select...
Instruction Manual
Page 17
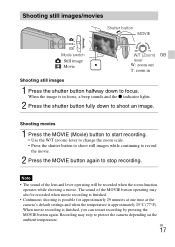
... button fully down to focus. When the image is in Shooting still images 1 Press the shutter button halfway down to protect the camera depending on the ambient temperature. Recording may also be recorded when the zoom function operates while shooting a movie. When movie recording is... will be recorded when movie recording is finished. • Continuous shooting is possible for approximately 29 minutes at one time at the camera's default settings and when the temperature is finished, you can restart recording by pressing the MOVIE button again. Shooting movies 1 Press ...
... button fully down to focus. When the image is in Shooting still images 1 Press the shutter button halfway down to protect the camera depending on the ambient temperature. Recording may also be recorded when the zoom function operates while shooting a movie. When movie recording is... will be recorded when movie recording is finished. • Continuous shooting is possible for approximately 29 minutes at one time at the camera's default settings and when the temperature is finished, you can restart recording by pressing the MOVIE button again. Shooting movies 1 Press ...
Instruction Manual
Page 18
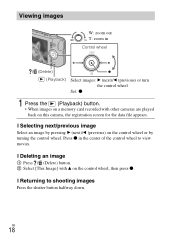
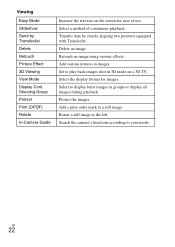
... images on a memory card recorded with v on the control wheel, then press z. x Selecting next/previous image Select an image by pressing B (next)/b (previous) on this camera, the registration screen for the data file appears. x Returning to view movies. Viewing images W: zoom out T: zoom in the center of the control wheel to... shooting images Press the shutter button halfway down. x Deleting an image 1 Press / (Delete) button. 2 Select [This Image] with other cameras are played back on the control wheel or by turning the control wheel.
... images on a memory card recorded with v on the control wheel, then press z. x Selecting next/previous image Select an image by pressing B (next)/b (previous) on this camera, the registration screen for the data file appears. x Returning to view movies. Viewing images W: zoom out T: zoom in the center of the control wheel to... shooting images Press the shutter button halfway down. x Deleting an image 1 Press / (Delete) button. 2 Select [This Image] with other cameras are played back on the control wheel or by turning the control wheel.
Instruction Manual
Page 19
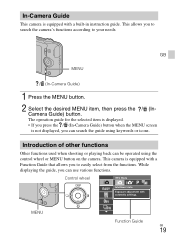
The operation guide for the selected item is displayed. • If you press the / (In-Camera Guide) button when the MENU screen is not displayed, you to search the camera's functions according to easily select from the functions. Control wheel MENU Function Guide GB 19 This allows... search the guide using the control wheel or MENU button on the camera. In-Camera Guide This camera is equipped with a built-in instruction guide. Camera Guide) button. While displaying the guide, you to your needs. GB MENU / (In-Camera Guide) 1 Press the MENU button. 2 Select the desired MENU ...
The operation guide for the selected item is displayed. • If you press the / (In-Camera Guide) button when the MENU screen is not displayed, you to search the camera's functions according to easily select from the functions. Control wheel MENU Function Guide GB 19 This allows... search the guide using the control wheel or MENU button on the camera. In-Camera Guide This camera is equipped with a built-in instruction guide. Camera Guide) button. While displaying the guide, you to your needs. GB MENU / (In-Camera Guide) 1 Press the MENU button. 2 Select the desired MENU ...
Instruction Manual
Page 20
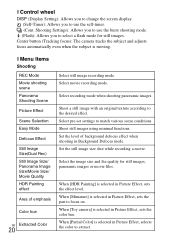
...match various scene conditions. When [Miniature] is selected in Picture Effect, sets the color hue. Center button (Tracking focus): The camera tracks the subject and adjusts focus automatically even when the subject is selected in Picture Effect, selects the color to extract. Select ... to select a flash mode for still images, panoramic images or movie files. Select recording mode when shooting panoramic images. When [Toy camera] is selected in Background Defocus mode. x Menu Items Shooting REC Mode Movie shooting scene Panorama Shooting Scene Picture Effect Scene Selection Easy ...
...match various scene conditions. When [Miniature] is selected in Picture Effect, sets the color hue. Center button (Tracking focus): The camera tracks the subject and adjusts focus automatically even when the subject is selected in Picture Effect, selects the color to extract. Select ... to select a flash mode for still images, panoramic images or movie files. Select recording mode when shooting panoramic images. When [Toy camera] is selected in Background Defocus mode. x Menu Items Shooting REC Mode Movie shooting scene Panorama Shooting Scene Picture Effect Scene Selection Easy ...
Instruction Manual
Page 21
... which the eyes are not blinking. Smile Shutter Set to your needs. EV Adjust the exposure manually. Balance Focus Select the focus method. In-Camera Guide Search the camera's functions according to automatically release the shutter when a smile is selected in Picture Effect, sets the effect level. Illustration Effect When [Illustration] is...
... which the eyes are not blinking. Smile Shutter Set to your needs. EV Adjust the exposure manually. Balance Focus Select the focus method. In-Camera Guide Search the camera's functions according to automatically release the shutter when a smile is selected in Picture Effect, sets the effect level. Illustration Effect When [Illustration] is...
Instruction Manual
Page 22
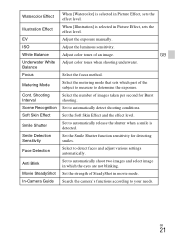
... text size on the screen for images. Select a method of use. Delete an image. Select the display format for ease of continuous playback. Search the camera's functions according to display burst images in 3D mode on images. Retouch an image using various effects. Select to your needs. Set to a still image...
... text size on the screen for images. Select a method of use. Delete an image. Select the display format for ease of continuous playback. Search the camera's functions according to display burst images in 3D mode on images. Retouch an image using various effects. Select to your needs. Set to a still image...
Instruction Manual
Page 24
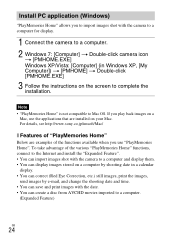
For details, see http://www.sony.co.jp/imsoft/Mac/ x Features of "PlayMemories Home" Below are installed on your Mac. Note • "PlayMemories Home" is not compatible to a computer. (Expanded Feature) ... are examples of the various "PlayMemories Home" functions, connect to the Internet and install the "Expanded Feature". • You can import images shot with the camera to a computer and display them. • You can display images stored on a computer by shooting date in a calendar display. • You can correct (Red Eye...
For details, see http://www.sony.co.jp/imsoft/Mac/ x Features of "PlayMemories Home" Below are installed on your Mac. Note • "PlayMemories Home" is not compatible to a computer. (Expanded Feature) ... are examples of the various "PlayMemories Home" functions, connect to the Internet and install the "Expanded Feature". • You can import images shot with the camera to a computer and display them. • You can display images stored on a computer by shooting date in a calendar display. • You can correct (Red Eye...
Instruction Manual
Page 25
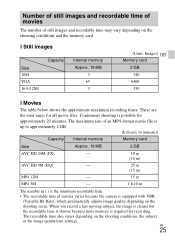
... The table below shows the approximate maximum recording times. Number of still images and recordable time of movies The number of movies varies because the camera is equipped with VBR (Variable Bit Rate), which automatically adjusts image quality depending on the shooting scene.
... The table below shows the approximate maximum recording times. Number of still images and recordable time of movies The number of movies varies because the camera is equipped with VBR (Variable Bit Rate), which automatically adjusts image quality depending on the shooting scene.
Instruction Manual
Page 26
... may experience discomfort in the form of eye strain, fatigue, or nausea. However, you have connected or are using the camera Functions built into this camera • This manual describes each of the functions of TransferJet compatible/ incompatible devices, 1080 60i-compatible devices and 1080 50i-... and consult a physician as hammering, dropping, or stepping on 3D-compatible monitors. • When you view 3D images shot with this camera for yourself the length and frequency of discomfort, stop viewing the 3D images until you start recording, make a trial recording to determine for...
... may experience discomfort in the form of eye strain, fatigue, or nausea. However, you have connected or are using the camera Functions built into this camera • This manual describes each of the functions of TransferJet compatible/ incompatible devices, 1080 60i-compatible devices and 1080 50i-... and consult a physician as hammering, dropping, or stepping on 3D-compatible monitors. • When you view 3D images shot with this camera for yourself the length and frequency of discomfort, stop viewing the 3D images until you start recording, make a trial recording to determine for...
Instruction Manual
Page 27
... sandy or dusty places Be careful not to let sand or dust get hot due to protect the camera. The lens for effective use. On camera's temperature Your camera and battery may get into the camera. In this case, leave the power off or you can no longer record movies. GB 27 However,... screen and lens The screen is strongly magnetic place. A message will be displayed on the screen before the power turns off and wait until the camera and battery temperature goes down in a chair or other place with a Carl Zeiss lens which is not a malfunction. On carrying Do not sit down . ...
... sandy or dusty places Be careful not to let sand or dust get hot due to protect the camera. The lens for effective use. On camera's temperature Your camera and battery may get into the camera. In this case, leave the power off or you can no longer record movies. GB 27 However,... screen and lens The screen is strongly magnetic place. A message will be displayed on the screen before the power turns off and wait until the camera and battery temperature goes down in a chair or other place with a Carl Zeiss lens which is not a malfunction. On carrying Do not sit down . ...


