Handycam® Handbook
Page 2
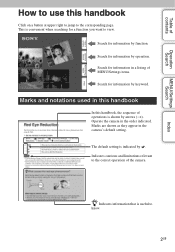
... contents Operation Search Operation Search MENU/Settings Search MENU/Settings Search Index Index How to use this handbook, the sequence of the camera. Marks and notations used in a listing of MENU/Settings items. Search for a function you want to the correct operation of...is shown by function. Marks are shown as they appear in the order indicated. Search for information by arrows (t). Operate the camera in the camera's default setting. Indicates cautions and limitations relevant to view. The default setting is convenient when searching for information by . Search...
... contents Operation Search Operation Search MENU/Settings Search MENU/Settings Search Index Index How to use this handbook, the sequence of the camera. Marks and notations used in a listing of MENU/Settings items. Search for a function you want to the correct operation of...is shown by function. Marks are shown as they appear in the order indicated. Search for information by arrows (t). Operate the camera in the camera's default setting. Indicates cautions and limitations relevant to view. The default setting is convenient when searching for information by . Search...
Handycam® Handbook
Page 3
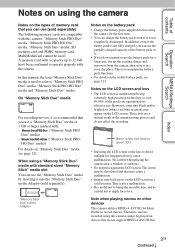
..., white, red, blue or green dots • Exposing the LCD screen or the lens to direct sunlight for effective use. Therefore, movies recorded using this camera cannot be discolored and that may cause a malfunction. • Images may appear on the LCD screen. A memory card with a capacity up to 32 GB...-precision technology so over 99.99% of the pixels are a normal result of the manufacturing process and do not support MPEG-4 AVC/H.264. In this camera: "Memory Stick PRO Duo" media, "Memory Stick PRO-HG Duo" media, "Memory Stick Duo" media, SD memory card and SDHC memory card. Notes on...
..., white, red, blue or green dots • Exposing the LCD screen or the lens to direct sunlight for effective use. Therefore, movies recorded using this camera cannot be discolored and that may cause a malfunction. • Images may appear on the LCD screen. A memory card with a capacity up to 32 GB...-precision technology so over 99.99% of the pixels are a normal result of the manufacturing process and do not support MPEG-4 AVC/H.264. In this camera: "Memory Stick PRO Duo" media, "Memory Stick PRO-HG Duo" media, "Memory Stick Duo" media, SD memory card and SDHC memory card. Notes on...
Handycam® Handbook
Page 4
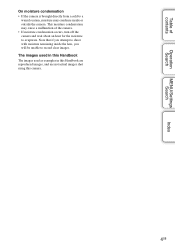
... attempt to shoot with moisture remaining inside or outside the camera. The images used in this Handbook The images used as examples in this Handbook are reproduced images, and are not actual images shot using this camera. 4GB Table of contents Operation Search MENU/Settings Search Index... On moisture condensation • If the camera is brought directly from a cold to a warm location, moisture may cause a ...
... attempt to shoot with moisture remaining inside or outside the camera. The images used in this Handbook The images used as examples in this Handbook are reproduced images, and are not actual images shot using this camera. 4GB Table of contents Operation Search MENU/Settings Search Index... On moisture condensation • If the camera is brought directly from a cold to a warm location, moisture may cause a ...
Handycam® Handbook
Page 5
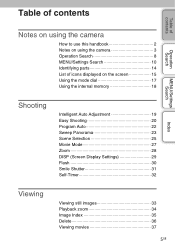
Table of contents Table of contents Operation Search MENU/Settings Search Index Notes on using the camera How to use this handbook 2 Notes on using the camera 3 Operation Search 8 MENU/Settings Search 10 Identifying parts 14 List of icons displayed on the screen 15 Using the mode dial 17 Using the internal ... Panorama 23 Scene Selection 25 Movie Mode 27 Zoom 28 DISP (Screen Display Settings 29 Flash 30 Smile Shutter 31 Self-Timer 32 Viewing Viewing still images 33 Playback zoom 34 Image Index 35 Delete 36 Viewing movies 37 5GB
Table of contents Table of contents Operation Search MENU/Settings Search Index Notes on using the camera How to use this handbook 2 Notes on using the camera 3 Operation Search 8 MENU/Settings Search 10 Identifying parts 14 List of icons displayed on the screen 15 Using the mode dial 17 Using the internal ... Panorama 23 Scene Selection 25 Movie Mode 27 Zoom 28 DISP (Screen Display Settings 29 Flash 30 Smile Shutter 31 Self-Timer 32 Viewing Viewing still images 33 Playback zoom 34 Image Index 35 Delete 36 Viewing movies 37 5GB

Handycam® Handbook
Page 6
Table of contents Operation Search MENU/Settings Search MENU (Shooting) MENU items (Shooting 10 MENU (Viewing) MENU items (Viewing 11 Settings Setting items 12 TV Viewing images on a TV 96 Computer Using with your computer 100 Using the software 101 Connecting the camera to the computer 103 Uploading images to a media service 105 Printing Printing still images 107 Troubleshooting Troubleshooting 109 Warning messages 117 Index 6GB
Table of contents Operation Search MENU/Settings Search MENU (Shooting) MENU items (Shooting 10 MENU (Viewing) MENU items (Viewing 11 Settings Setting items 12 TV Viewing images on a TV 96 Computer Using with your computer 100 Using the software 101 Connecting the camera to the computer 103 Uploading images to a media service 105 Printing Printing still images 107 Troubleshooting Troubleshooting 109 Warning messages 117 Index 6GB
Handycam® Handbook
Page 8
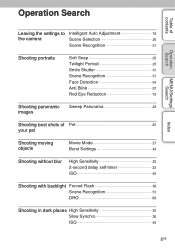
Operation Search Table of contents Operation Search MENU/Settings Search Index Leaving the settings to the camera Intelligent Auto Adjustment 19 Scene Selection 25 Scene Recognition 51 Shooting portraits Soft Snap 25 Twilight Portrait 25 Smile Shutter 31 Scene Recognition... 51 Face Detection 54 Anti Blink 57 Red Eye Reduction 73 Shooting panoramic images Sweep Panorama 23 Shooting best shots of Pet 25 your pet Shooting moving objects Movie Mode 27 Burst Settings 43 Shooting without blur High Sensitivity 25 2-second delay self-timer...
Operation Search Table of contents Operation Search MENU/Settings Search Index Leaving the settings to the camera Intelligent Auto Adjustment 19 Scene Selection 25 Scene Recognition 51 Shooting portraits Soft Snap 25 Twilight Portrait 25 Smile Shutter 31 Scene Recognition... 51 Face Detection 54 Anti Blink 57 Red Eye Reduction 73 Shooting panoramic images Sweep Panorama 23 Shooting best shots of Pet 25 your pet Shooting moving objects Movie Mode 27 Burst Settings 43 Shooting without blur High Sensitivity 25 2-second delay self-timer...
Handycam® Handbook
Page 10
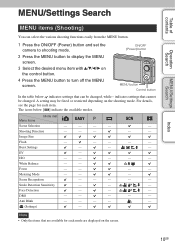
... shooting mode. indicates settings that can select the various shooting functions easily from the MENU button. 1 Press the ON/OFF (Power) button and set the camera to shooting mode. 2 Press the MENU button to display the MENU screen. 3 Select the desired menu item with v/V/b/B on the control button. 4 Press the MENU...
... shooting mode. indicates settings that can select the various shooting functions easily from the MENU button. 1 Press the ON/OFF (Power) button and set the camera to shooting mode. 2 Press the MENU button to display the MENU screen. 3 Select the desired menu item with v/V/b/B on the control button. 4 Press the MENU...
Handycam® Handbook
Page 13
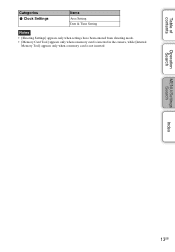
Operation Search MENU/Settings Search Index 13GB Table of contents Categories Clock Settings Items Area Setting Date & Time Setting Notes • [Shooting Settings] appears only when settings have been entered from shooting mode. • [Memory Card Tool] appears only when a memory card is inserted in the camera, while [Internal Memory Tool] appears only when a memory card is not inserted.
Operation Search MENU/Settings Search Index 13GB Table of contents Categories Clock Settings Items Area Setting Date & Time Setting Notes • [Shooting Settings] appears only when settings have been entered from shooting mode. • [Memory Card Tool] appears only when a memory card is inserted in the camera, while [Internal Memory Tool] appears only when a memory card is not inserted.
Handycam® Handbook
Page 14
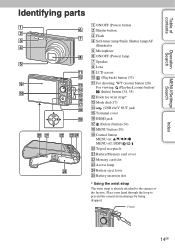
... cover V Memory card slot W Access lamp X Battery eject lever Y Battery insertion slot * Using the wrist strap The wrist strap is already attached to prevent the camera from damage by being dropped. Place your hand through the loop to the...
... cover V Memory card slot W Access lamp X Battery eject lever Y Battery insertion slot * Using the wrist strap The wrist strap is already attached to prevent the camera from damage by being dropped. Place your hand through the loop to the...

Handycam® Handbook
Page 15
... Scene Recognition Burst Settings DRO Smile Detection Sensitivity indicator Zoom scaling PictBridge connecting Protect Print order (DPOF) Playback zoom View Mode 15GB Continued r When shooting still images A Display Indication Battery remaining Low battery warning Image Size Operation Search MENU/Settings Search Index • The icons are displayed on the screen to...
... Scene Recognition Burst Settings DRO Smile Detection Sensitivity indicator Zoom scaling PictBridge connecting Protect Print order (DPOF) Playback zoom View Mode 15GB Continued r When shooting still images A Display Indication Battery remaining Low battery warning Image Size Operation Search MENU/Settings Search Index • The icons are displayed on the screen to...

Handycam® Handbook
Page 18
... on the internal memory when there is no memory card inserted in [Copy] (page 92). You can transfer data stored in the camera. When there is no memory card inserted [Recording]: Images are recorded on the memory card. memory [Playback]: Images stored in the ... memory card inserted in the internal memory to the internal memory. Table of contents Operation Search MENU/Settings Search Using the internal memory The camera has approximately 19 MB of your computer Perform the procedure on pages 103 without error using the internal B Internal memory. B [Playback]:...
... on the internal memory when there is no memory card inserted in [Copy] (page 92). You can transfer data stored in the camera. When there is no memory card inserted [Recording]: Images are recorded on the memory card. memory [Playback]: Images stored in the ... memory card inserted in the internal memory to the internal memory. Table of contents Operation Search MENU/Settings Search Using the internal memory The camera has approximately 19 MB of your computer Perform the procedure on pages 103 without error using the internal B Internal memory. B [Playback]:...
Handycam® Handbook
Page 19
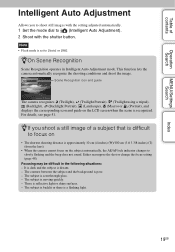
...lets the camera automatically recognize the shooting conditions and shoot the image. zIf you to shoot still images with the setting adjusted automatically. 1 Set the mode dial to (Intelligent Auto Adjustment). 2 Shoot with the shutter button. Either recompose the shot or change ...8226; Flash mode is moving quickly. - zOn Scene Recognition Scene Recognition operates in the following situations: - Scene Recognition icon and guide The camera recognizes (Twilight), (Twilight Portrait), (Twilight using a tripod), (Backlight), (Backlight Portrait), (Landscape), (Macro) or (Portrait), and displays ...
...lets the camera automatically recognize the shooting conditions and shoot the image. zIf you to shoot still images with the setting adjusted automatically. 1 Set the mode dial to (Intelligent Auto Adjustment). 2 Shoot with the shutter button. Either recompose the shot or change ...8226; Flash mode is moving quickly. - zOn Scene Recognition Scene Recognition operates in the following situations: - Scene Recognition icon and guide The camera recognizes (Twilight), (Twilight Portrait), (Twilight using a tripod), (Backlight), (Backlight Portrait), (Landscape), (Macro) or (Portrait), and displays ...
Handycam® Handbook
Page 20
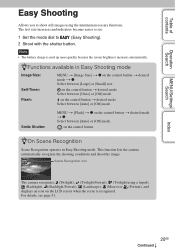
... [Image Size] t z on the control button t desired mode t z Select between [Auto] or [Off] mode. Scene Recognition icon The camera recognizes (Twilight), (Twilight Portrait), (Twilight using the minimum necessary functions. on the control button t desired mode Select between [10sec] or [Off]...to (Easy Shooting). 2 Shoot with the shutter button. Table of contents Operation Search MENU/Settings Search Easy Shooting Allows you to shoot still images using a tripod), (Backlight), (Backlight Portrait), (Landscape), (Macro) or (Portrait), and displays an icon on the control button ...
... [Image Size] t z on the control button t desired mode t z Select between [Auto] or [Off] mode. Scene Recognition icon The camera recognizes (Twilight), (Twilight Portrait), (Twilight using the minimum necessary functions. on the control button t desired mode Select between [10sec] or [Off]...to (Easy Shooting). 2 Shoot with the shutter button. Table of contents Operation Search MENU/Settings Search Easy Shooting Allows you to shoot still images using a tripod), (Backlight), (Backlight Portrait), (Landscape), (Macro) or (Portrait), and displays an icon on the control button ...
Handycam® Handbook
Page 23
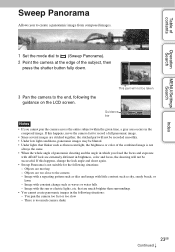
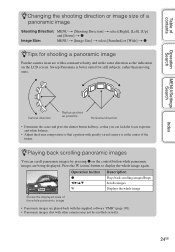
... the entire subject within the given time, a gray area occurs in the following situations: - Objects are much camera shake Index 23GB Continued r You pan the camera too fast or too slow - Image with little contrast such as fluorescent light, the brightness or color of the...8226; Under lights that are moving - Image with a repeating pattern such as waves or water falls - If this happens, move the camera fast to the camera - Table of contents Operation Search MENU/Settings Search Sweep Panorama Allows you to create a panoramic image from composed images. 1 Set the ...
... the entire subject within the given time, a gray area occurs in the following situations: - Objects are much camera shake Index 23GB Continued r You pan the camera too fast or too slow - Image with little contrast such as fluorescent light, the brightness or color of the...8226; Under lights that are moving - Image with a repeating pattern such as waves or water falls - If this happens, move the camera fast to the camera - Table of contents Operation Search MENU/Settings Search Sweep Panorama Allows you to create a panoramic image from composed images. 1 Set the ...
Handycam® Handbook
Page 24
... t [Image Size] t select [Standard] or [Wide] t z zTips for shooting a panoramic image Pan the camera in an arc with greatly varied scenery is better suited for still subjects, rather than moving ones. Press the W (zoom) button to display the whole image again. Sweep Panorama is... in the same direction as the indication on the control button while panoramic images are played back with the supplied software "PMB" (page 101). • Panoramic images shot with other cameras...
... t [Image Size] t select [Standard] or [Wide] t z zTips for shooting a panoramic image Pan the camera in an arc with greatly varied scenery is better suited for still subjects, rather than moving ones. Press the W (zoom) button to display the whole image again. Sweep Panorama is... in the same direction as the indication on the control button while panoramic images are played back with the supplied software "PMB" (page 101). • Panoramic images shot with other cameras...
Handycam® Handbook
Page 26
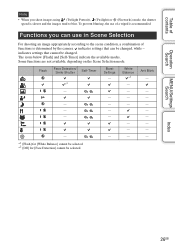
Table of functions is determined by the camera. Some functions are not available, depending on the Scene Selection mode. Index 26GB Functions you shoot images using (Twilight Portrait), (Twilight) or (Fireworks) mode, the ...
Table of functions is determined by the camera. Some functions are not available, depending on the Scene Selection mode. Index 26GB Functions you shoot images using (Twilight Portrait), (Twilight) or (Fireworks) mode, the ...
Handycam® Handbook
Page 28
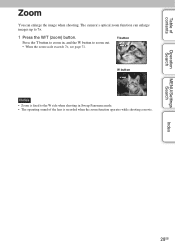
The camera's optical zoom function can enlarge the image when shooting. MENU/Settings Search Index 28GB Table of the lens is fixed to the W side when shooting in , and the W button to 7×. 1 Press the W/T (zoom) button. T button W button Notes • Zoom is recorded when the zoom function operates while shooting a movie. Press the T button to zoom in Sweep Panorama mode. • The operating sound of contents Operation Search Zoom You can enlarge images up to zoom out. • When the zoom scale exceeds 7×, see page 71.
The camera's optical zoom function can enlarge the image when shooting. MENU/Settings Search Index 28GB Table of the lens is fixed to the W side when shooting in , and the W button to 7×. 1 Press the W/T (zoom) button. T button W button Notes • Zoom is recorded when the zoom function operates while shooting a movie. Press the T button to zoom in Sweep Panorama mode. • The operating sound of contents Operation Search Zoom You can enlarge images up to zoom out. • When the zoom scale exceeds 7×, see page 71.
Handycam® Handbook
Page 30
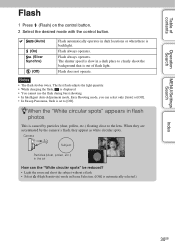
Flash always operates. The shutter speed is slow in flash photos This is caused by the camera's flash, they are accentuated by particles (dust, pollen, etc.) floating close to the lens. Notes • The flash strobes twice. The first flash adjusts the ... there is backlight. zWhen the "White circular spots" appears in a dark place to [Off]. When they appear as white circular spots. Flash does not operate. Camera Subject Particles (dust, pollen, etc.) in the air How can select only [Auto] or [Off]. • In Sweep Panorama, flash is set to clearly shoot...
Flash always operates. The shutter speed is slow in flash photos This is caused by the camera's flash, they are accentuated by particles (dust, pollen, etc.) floating close to the lens. Notes • The flash strobes twice. The first flash adjusts the ... there is backlight. zWhen the "White circular spots" appears in a dark place to [Off]. When they appear as white circular spots. Flash does not operate. Camera Subject Particles (dust, pollen, etc.) in the air How can select only [Auto] or [Off]. • In Sweep Panorama, flash is set to clearly shoot...

Handycam® Handbook
Page 31
... full. • Smiles may not be detected correctly depending on the indicator, the camera records images automatically. When the smile level exceeds the b point on the conditions. • You cannot use the digital zoom function. • If Sweep Panorama or Movie Mode is selected, you press ...the shutter button during Smile Shutter, the camera shoots the image, then returns to orient the face in setting menu. Keep ...
... full. • Smiles may not be detected correctly depending on the indicator, the camera records images automatically. When the smile level exceeds the b point on the conditions. • You cannot use the digital zoom function. • If Sweep Panorama or Movie Mode is selected, you press ...the shutter button during Smile Shutter, the camera shoots the image, then returns to orient the face in setting menu. Keep ...
Handycam® Handbook
Page 32
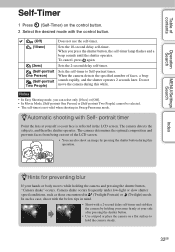
... the control button. (Off) (10sec) (2sec) (Self-portrait One Person) (Self-portrait Two People) Does not use the self-timer. When the camera detects the specified number of contents Operation Search Self-Timer 1 Press (Self-Timer) on a flat surface to Self-portrait timer. Notes • In Easy... mode, you press the shutter button, the self-timer lamp flashes and a beep sounds until the shutter operates. To cancel, press again. The camera determines the optimal composition and prevents faces from being cut out of the LCD screen. • You can select only [10sec] or [Off]. ...
... the control button. (Off) (10sec) (2sec) (Self-portrait One Person) (Self-portrait Two People) Does not use the self-timer. When the camera detects the specified number of contents Operation Search Self-Timer 1 Press (Self-Timer) on a flat surface to Self-portrait timer. Notes • In Easy... mode, you press the shutter button, the self-timer lamp flashes and a beep sounds until the shutter operates. To cancel, press again. The camera determines the optimal composition and prevents faces from being cut out of the LCD screen. • You can select only [10sec] or [Off]. ...


