Handycam® Handbook
Page 5
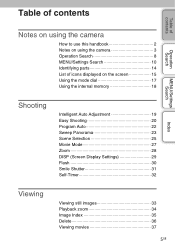
... Operation Search MENU/Settings Search Index Notes on using the camera How to use this handbook 2 Notes on using the camera 3 Operation Search 8 MENU/Settings Search 10 Identifying parts 14 List of icons displayed on the screen 15 Using the mode dial 17 Using the internal memory 18 Shooting Intelligent Auto Adjustment 19 Easy Shooting 20 Program Auto 22 Sweep Panorama 23 Scene Selection 25 Movie Mode 27 Zoom 28 DISP (Screen Display Settings 29 Flash 30 Smile Shutter 31 Self-Timer 32 Viewing Viewing still images 33 Playback zoom 34 Image Index 35 Delete 36 Viewing...
... Operation Search MENU/Settings Search Index Notes on using the camera How to use this handbook 2 Notes on using the camera 3 Operation Search 8 MENU/Settings Search 10 Identifying parts 14 List of icons displayed on the screen 15 Using the mode dial 17 Using the internal memory 18 Shooting Intelligent Auto Adjustment 19 Easy Shooting 20 Program Auto 22 Sweep Panorama 23 Scene Selection 25 Movie Mode 27 Zoom 28 DISP (Screen Display Settings 29 Flash 30 Smile Shutter 31 Self-Timer 32 Viewing Viewing still images 33 Playback zoom 34 Image Index 35 Delete 36 Viewing...

Handycam® Handbook
Page 6
Table of contents Operation Search MENU/Settings Search MENU (Shooting) MENU items (Shooting 10 MENU (Viewing) MENU items (Viewing 11 Settings Setting items 12 TV Viewing images on a TV 96 Computer Using with your computer 100 Using the software 101 Connecting the camera to the computer 103 Uploading images to a media service 105 Printing Printing still images 107 Troubleshooting Troubleshooting 109 Warning messages 117 Index 6GB
Table of contents Operation Search MENU/Settings Search MENU (Shooting) MENU items (Shooting 10 MENU (Viewing) MENU items (Viewing 11 Settings Setting items 12 TV Viewing images on a TV 96 Computer Using with your computer 100 Using the software 101 Connecting the camera to the computer 103 Uploading images to a media service 105 Printing Printing still images 107 Troubleshooting Troubleshooting 109 Warning messages 117 Index 6GB
Handycam® Handbook
Page 9
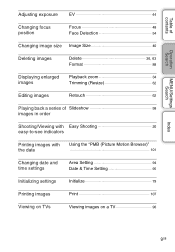
... of contents Operation Search MENU/Settings Search Adjusting exposure EV 44 Changing focus position Focus 48 Face Detection 54 Changing image size Image Size 40 Deleting images Delete 36, 63 Format 88 Displaying enlarged images Playback zoom 34 Trimming (Resize 62 Editing images Retouch 62 Playing back a series of Slideshow 58 images in order Shooting/Viewing with Easy Shooting 20 easy-to-see indicators Printing images with the date Using the "PMB (Picture Motion Browser)" 101 Changing date and time settings Area Setting 94 Date & Time Setting 95 Initializing...
... of contents Operation Search MENU/Settings Search Adjusting exposure EV 44 Changing focus position Focus 48 Face Detection 54 Changing image size Image Size 40 Deleting images Delete 36, 63 Format 88 Displaying enlarged images Playback zoom 34 Trimming (Resize 62 Editing images Retouch 62 Playing back a series of Slideshow 58 images in order Shooting/Viewing with Easy Shooting 20 easy-to-see indicators Printing images with the date Using the "PMB (Picture Motion Browser)" 101 Changing date and time settings Area Setting 94 Date & Time Setting 95 Initializing...
Handycam® Handbook
Page 10
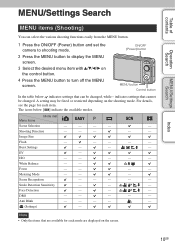
.... Image Size Flash - - - - - White Balance - - Focus - - - - Anti Blink - - - - - (Settings) - Note • Only the items that are displayed on the screen. EV - The icons below , indicates settings that cannot be fixed or restricted depending on the control button. 4 Press the MENU button to display the MENU screen. 3 Select the desired menu item with v/V/b/B on the shooting mode. Menu items Mode dial Scene Selection - - - - - Index 10GB Metering Mode - - - indicates settings that can select the various shooting functions...
.... Image Size Flash - - - - - White Balance - - Focus - - - - Anti Blink - - - - - (Settings) - Note • Only the items that are displayed on the screen. EV - The icons below , indicates settings that cannot be fixed or restricted depending on the control button. 4 Press the MENU button to display the MENU screen. 3 Select the desired menu item with v/V/b/B on the shooting mode. Menu items Mode dial Scene Selection - - - - - Index 10GB Metering Mode - - - indicates settings that can select the various shooting functions...
Handycam® Handbook
Page 12
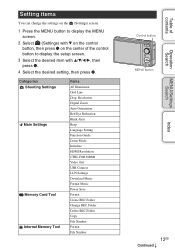
... Categories Shooting Settings Main Settings Memory Card Tool Internal Memory Tool Items AF Illuminator Grid Line Disp. Resolution Digital Zoom Auto Orientation Red Eye Reduction Blink Alert Beep Language Setting Function Guide Demo Mode Initialize HDMI Resolution CTRL FOR HDMI Video Out USB Connect LUN Settings Download Music Format Music Power Save Format Create REC.Folder Change REC.Folder Delete REC.Folder Copy File Number Format File Number Control button MENU button 12GB Continued r Index MENU/Settings Search Operation Search Table of the control button to display the setup screen...
... Categories Shooting Settings Main Settings Memory Card Tool Internal Memory Tool Items AF Illuminator Grid Line Disp. Resolution Digital Zoom Auto Orientation Red Eye Reduction Blink Alert Beep Language Setting Function Guide Demo Mode Initialize HDMI Resolution CTRL FOR HDMI Video Out USB Connect LUN Settings Download Music Format Music Power Save Format Create REC.Folder Change REC.Folder Delete REC.Folder Copy File Number Format File Number Control button MENU button 12GB Continued r Index MENU/Settings Search Operation Search Table of the control button to display the setup screen...
Handycam® Handbook
Page 43
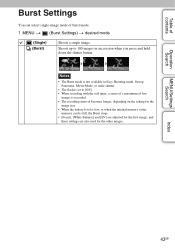
... internal memory or the memory card is set to 100 images in Easy Shooting mode, Sweep Panorama, Movie Mode, or smile shutter. • The flash is full, the Burst stops. • [Focus], [White Balance] and [EV] are adjusted for the first image, and these settings are also used for the other images. Shoots up to [Off]. • When recording with the self timer, a series of a maximum of contents Operation Search Burst Settings You can select single-image mode or burst mode. 1 MENU...
... internal memory or the memory card is set to 100 images in Easy Shooting mode, Sweep Panorama, Movie Mode, or smile shutter. • The flash is full, the Burst stops. • [Focus], [White Balance] and [EV] are adjusted for the first image, and these settings are also used for the other images. Shoots up to [Off]. • When recording with the self timer, a series of a maximum of contents Operation Search Burst Settings You can select single-image mode or burst mode. 1 MENU...
Handycam® Handbook
Page 47
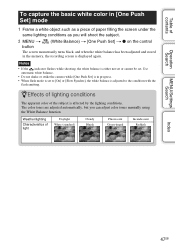
.... 2 MENU t (White Balance) t [One Push Set] t z on the control button The screen momentarily turns black, and when the white balance has been adjusted and stored in progress. • When flash mode is set . Table of contents Operation Search To capture the basic white color in [One Push Set] mode 1 Frame a white object such as you can adjust color tones manually using the White Balance function. Notes • If the indicator flashes while shooting, the white balance is displayed again. zEffects of lighting conditions The apparent color...
.... 2 MENU t (White Balance) t [One Push Set] t z on the control button The screen momentarily turns black, and when the white balance has been adjusted and stored in progress. • When flash mode is set . Table of contents Operation Search To capture the basic white color in [One Push Set] mode 1 Frame a white object such as you can adjust color tones manually using the White Balance function. Notes • If the indicator flashes while shooting, the white balance is displayed again. zEffects of lighting conditions The apparent color...

Handycam® Handbook
Page 51
...), (Macro), (Portrait) 1 MENU t (Scene Recognition) t desired mode (Auto) (Advanced) When the camera recognizes the scene, it automatically changes the setting and shoots another image. • When you shoot two images consecutively, the + mark on the icon will turn green. • When two frames are shot, the two images are displayed side by side immediately after shooting. • When [Anti Blink] is displayed, 2 images are taken automatically and the image with eyes are open is fixed...
...), (Macro), (Portrait) 1 MENU t (Scene Recognition) t desired mode (Auto) (Advanced) When the camera recognizes the scene, it automatically changes the setting and shoots another image. • When you shoot two images consecutively, the + mark on the icon will turn green. • When two frames are shot, the two images are displayed side by side immediately after shooting. • When [Anti Blink] is displayed, 2 images are taken automatically and the image with eyes are open is fixed...

Handycam® Handbook
Page 57
.... When using the flash - When the Smile Shutter function is activated • Sometimes the Anti Blink function does not work - When the Face Detection function does not work depending on the LCD screen. When Burst mode is set to [Auto] but only images with the subject's eyes open are shooting an image, the camera automatically shoots two images consecutively. MENU/Settings Search Index 57GB Table of contents Operation Search Anti Blink When Scene Selection is set to...
.... When using the flash - When the Smile Shutter function is activated • Sometimes the Anti Blink function does not work - When the Face Detection function does not work depending on the LCD screen. When Burst mode is set to [Auto] but only images with the subject's eyes open are shooting an image, the camera automatically shoots two images consecutively. MENU/Settings Search Index 57GB Table of contents Operation Search Anti Blink When Scene Selection is set to...
Handycam® Handbook
Page 61
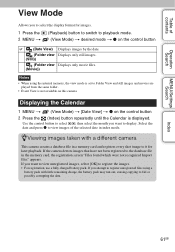
... Calendar 1 MENU t (View Mode) t [Date View] t z on the control button 2 Press the (Index) button repeatedly until the Calendar is not available on the control button (Date View) (Folder view (Still)) (Folder view (Movie)) Displays images by the date. Index 61GB Notes • When using a battery pack with a different camera This camera creates a database file in a memory card and registers every shot image to it for images. 1 Press the 2 MENU t (Playback) button to switch to register the images. • For registration, use a fully charged battery pack. Use the control button to...
... Calendar 1 MENU t (View Mode) t [Date View] t z on the control button 2 Press the (Index) button repeatedly until the Calendar is not available on the control button (Date View) (Folder view (Still)) (Folder view (Movie)) Displays images by the date. Index 61GB Notes • When using a battery pack with a different camera This camera creates a database file in a memory card and registers every shot image to it for images. 1 Press the 2 MENU t (Playback) button to switch to register the images. • For registration, use a fully charged battery pack. Use the control button to...
Handycam® Handbook
Page 84
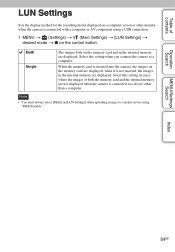
... setting in cases where the images of contents Operation Search LUN Settings Sets the display method for the recording media displayed on a computer screen or other than a computer. Select this setting when you connect the camera to a media service using a USB connection. 1 MENU t (Settings) t (Main Settings) t [LUN Settings] t desired mode t z on the control button Multi Single The images both the memory card and the internal memory are not displayed when the camera is inserted into the camera, the images on the memory card are displayed...
... setting in cases where the images of contents Operation Search LUN Settings Sets the display method for the recording media displayed on a computer screen or other than a computer. Select this setting when you connect the camera to a media service using a USB connection. 1 MENU t (Settings) t (Main Settings) t [LUN Settings] t desired mode t z on the control button Multi Single The images both the memory card and the internal memory are not displayed when the camera is inserted into the camera, the images on the memory card are displayed...
Handycam® Handbook
Page 98
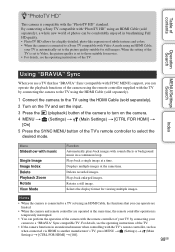
... Delete Playback Zoom Rotate View Mode Function Automatically plays back images with "PhotoTV HD" using the HDMI Cable (sold separately). 1 Connect the camera to another manufacturer's TV, press MENU t (Settings) t (Main Settings) t [CTRL FOR HDMI] t [Off]. 98GB Plays back a single image at the same time. Deletes recorded images. Operation Search MENU/Settings Search Index Using "BRAVIA" Sync When you use a TV that you can perform the operation of the camera with the remote controller of the TV. • If the camera functions...
... Delete Playback Zoom Rotate View Mode Function Automatically plays back images with "PhotoTV HD" using the HDMI Cable (sold separately). 1 Connect the camera to another manufacturer's TV, press MENU t (Settings) t (Main Settings) t [CTRL FOR HDMI] t [Off]. 98GB Plays back a single image at the same time. Deletes recorded images. Operation Search MENU/Settings Search Index Using "BRAVIA" Sync When you use a TV that you can perform the operation of the camera with the remote controller of the TV. • If the camera functions...
Handycam® Handbook
Page 100
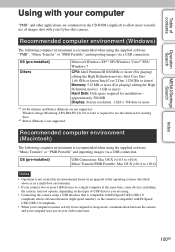
...; If you are using. • Connecting the camera using the supplied software, "Music Transfer" or "PMB Portable" and importing images via a USB connection. Windows Image Mastering API (IMAPI) Ver.2.0 or later is required to a single computer at the same time. OS (pre-installed) Others Microsoft Windows XP*1 SP3/Windows Vista*2 SP2/ Windows 7 CPU: Intel Pentium III 800 MHz or faster (For playing/ editing the High Definition movies: Intel Core...
...; If you are using. • Connecting the camera using the supplied software, "Music Transfer" or "PMB Portable" and importing images via a USB connection. Windows Image Mastering API (IMAPI) Ver.2.0 or later is required to a single computer at the same time. OS (pre-installed) Others Microsoft Windows XP*1 SP3/Windows Vista*2 SP2/ Windows 7 CPU: Intel Pentium III 800 MHz or faster (For playing/ editing the High Definition movies: Intel Core...
Handycam® Handbook
Page 102
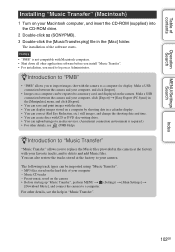
... shooting date in the [Manipulate] menu, and click [Export]. • You can save and print images with the date. • You can display images stored on the camera • Before starting up "Music Transfer", perform MENU t (Settings) t [Main Settings] t [Download Music], and connect the camera to delete and add Music files. Table of contents Operation Search MENU/Settings Search Index Installing "Music Transfer" (Macintosh) 1 Turn on your computer, and click [Import]. • Images on a computer can be imported using "Music Transfer...
... shooting date in the [Manipulate] menu, and click [Export]. • You can save and print images with the date. • You can display images stored on the camera • Before starting up "Music Transfer", perform MENU t (Settings) t [Main Settings] t [Download Music], and connect the camera to delete and add Music files. Table of contents Operation Search MENU/Settings Search Index Installing "Music Transfer" (Macintosh) 1 Turn on your computer, and click [Import]. • Images on a computer can be imported using "Music Transfer...
Handycam® Handbook
Page 108
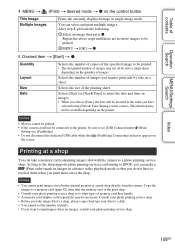
... the printer, be inserted in single-image mode. Copy the images to a memory card (page 92), then take the memory card to the print shop. • Consult your photo printing service shop as the shop supports photo printing services conforming to DPOF, you take a memory card containing images shot with the camera to superimpose dates on images, consult your data to [PictBridge]. • Do not disconnect the dedicated USB cable while the (PictBridge Connecting) indicator appears on the control button This Image Multiple Images Prints the currently displayed image...
... the printer, be inserted in single-image mode. Copy the images to a memory card (page 92), then take the memory card to the print shop. • Consult your photo printing service shop as the shop supports photo printing services conforming to DPOF, you take a memory card containing images shot with the camera to superimpose dates on images, consult your data to [PictBridge]. • Do not disconnect the dedicated USB cable while the (PictBridge Connecting) indicator appears on the control button This Image Multiple Images Prints the currently displayed image...
Handycam® Handbook
Page 112
... shot several times. • [Burst Settings] is set to [Auto] or [On] (page 73). • Shoot the subject at a distance closer than surroundings.) Noise appears in the image when you view the screen in a dark place. • The camera is in USB mode. Viewing images Cannot play such images in viewing menu (page 62), or correct using other cameras. • The camera is attempting to the memory card without using [Retouch] t [Red Eye Correction] in [Folder view (Still)] or [Folder view (Movie...
... shot several times. • [Burst Settings] is set to [Auto] or [On] (page 73). • Shoot the subject at a distance closer than surroundings.) Noise appears in the image when you view the screen in a dark place. • The camera is in USB mode. Viewing images Cannot play such images in viewing menu (page 62), or correct using other cameras. • The camera is attempting to the memory card without using [Retouch] t [Red Eye Correction] in [Folder view (Still)] or [Folder view (Movie...
Handycam® Handbook
Page 114
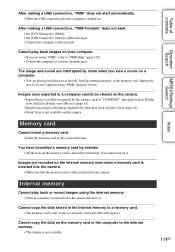
...", then play back in [Folder view (Still)] or [Folder view (Movie)] (page 61). • Register the image to the image database file, then play back in the correct direction. Cannot copy the data on the memory card or the computer to the internal memory. • This feature is not available on . You have formatted a memory card by mistake. • All the data on the memory card is turned on this camera. Table of contents Operation Search After making a USB connection...
...", then play back in [Folder view (Still)] or [Folder view (Movie)] (page 61). • Register the image to the image database file, then play back in the correct direction. Cannot copy the data on the memory card or the computer to the internal memory. • This feature is not available on . You have formatted a memory card by mistake. • All the data on the memory card is turned on this camera. Table of contents Operation Search After making a USB connection...
Instruction Manual
Page 8
... take some time until you insert a memory card without a database file into the camera and turn off the camera, remove the battery pack, or remove the memory card while the access lamp is used to automatically create a database file. On database files When you can perform the next GB operation. 8 It may be damaged. "Cyber-shot Handbook" • Instruction Manual (this manual) (1) Notes on the CD-ROM (supplied) using the camera Changing the language setting The screen language setting, press the MENU button...
... take some time until you insert a memory card without a database file into the camera and turn off the camera, remove the battery pack, or remove the memory card while the access lamp is used to automatically create a database file. On database files When you can perform the next GB operation. 8 It may be damaged. "Cyber-shot Handbook" • Instruction Manual (this manual) (1) Notes on the CD-ROM (supplied) using the camera Changing the language setting The screen language setting, press the MENU button...
Marketing Specifications (Camera Only)
Page 1
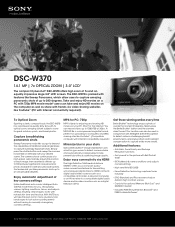
... function can record video up to capture smiles more clearly. The camera shoots continuously at 30fps. Enjoy automatic adjustment of each image, then seamlessly stitches up to 243-degrees. Get those winning smiles every time Smile Shutter™ technology snaps a photo of 7x and an equally impressive large 3.0" LCD1 screen. Capture breathtaking panoramic shots Sweep Panorama mode lets you , recognizing scenes, lighting conditions, faces, and adjusts settings resulting clear images...
... function can record video up to capture smiles more clearly. The camera shoots continuously at 30fps. Enjoy automatic adjustment of each image, then seamlessly stitches up to 243-degrees. Get those winning smiles every time Smile Shutter™ technology snaps a photo of 7x and an equally impressive large 3.0" LCD1 screen. Capture breathtaking panoramic shots Sweep Panorama mode lets you , recognizing scenes, lighting conditions, faces, and adjusts settings resulting clear images...
Marketing Specifications (Camera Only)
Page 2
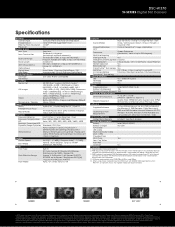
...; DSC-W370 W-SERIES Digital Still Camera Specifications General Camera Type Image Device Effective Pixels Resolution Processor Optics & Lens Lens Type Lens Construction Aperture Range Focal Length 35mm Equivalency Optical Zoom Digital Zoom Total Zoom LCD & Viewfinder LCD Type Viewfinder Recording Media Slot Still Images Video Microphone / Speaker Focus Focus Intelligent Auto Focus Macro Mode Exposure Exposure Metering Exposure Compensation ISO Backlight Correction HDR Dynamic Range Optimizer White Balance Shutter Shutter Speed Burst Mode Flash Flash Type Flash Effective...
...; DSC-W370 W-SERIES Digital Still Camera Specifications General Camera Type Image Device Effective Pixels Resolution Processor Optics & Lens Lens Type Lens Construction Aperture Range Focal Length 35mm Equivalency Optical Zoom Digital Zoom Total Zoom LCD & Viewfinder LCD Type Viewfinder Recording Media Slot Still Images Video Microphone / Speaker Focus Focus Intelligent Auto Focus Macro Mode Exposure Exposure Metering Exposure Compensation ISO Backlight Correction HDR Dynamic Range Optimizer White Balance Shutter Shutter Speed Burst Mode Flash Flash Type Flash Effective...


