
Operating Instructions
Page 5
...This product has been tested and found to comply with the limits for a Class B digital device, pursuant to Subpart B of Part 15 of the FCC Rules. For more of... are designed to discontinue midway (fail), restart the application or disconnect and connect the communication cable (USB, etc.) again. [ Disposal of the following two conditions: (1) This device may not cause... SONY Model No.: DSC-W110, DSC-W115 Responsible Party: Sony Electronics Inc. Reorient or relocate the receiving antenna. - Increase the separation between the equipment and receiver. - The supplied interface cable ...
...This product has been tested and found to comply with the limits for a Class B digital device, pursuant to Subpart B of Part 15 of the FCC Rules. For more of... are designed to discontinue midway (fail), restart the application or disconnect and connect the communication cable (USB, etc.) again. [ Disposal of the following two conditions: (1) This device may not cause... SONY Model No.: DSC-W110, DSC-W115 Responsible Party: Sony Electronics Inc. Reorient or relocate the receiving antenna. - Increase the separation between the equipment and receiver. - The supplied interface cable ...
Operating Instructions
Page 9
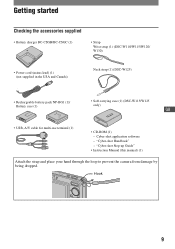
... battery pack NP-BG1 (1)/ Battery case (1) • Soft carrying case (1) (DSC-W115/W125 only) GB • USB, A/V cable for multi-use terminal (1) • CD-ROM (1) - Cyber-shot application software - "Cyber-shot Step-up Guide" • Instruction Manual (this manual) (1) Attach the strap and place your hand through the loop to prevent the camera from damage by being dropped.
... battery pack NP-BG1 (1)/ Battery case (1) • Soft carrying case (1) (DSC-W115/W125 only) GB • USB, A/V cable for multi-use terminal (1) • CD-ROM (1) - Cyber-shot application software - "Cyber-shot Step-up Guide" • Instruction Manual (this manual) (1) Attach the strap and place your hand through the loop to prevent the camera from damage by being dropped.
Operating Instructions
Page 19
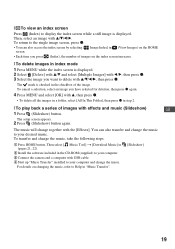
..., 22). 2 Install the software included in the CD-ROM (supplied) to your computer. 3 Connect the camera and a computer with v/V/b/B, then press z. The mark is displayed. You can also access the index screen ...the number of images on changing the music, refer to display the index screen while a still image is checked in the checkbox of images with v, then press z. • To delete...a series of the image. To cancel a selection, select an image you want to delete with USB cable. 4 Start up "Music Transfer" installed to your computer and change together with v/V/b/B. For details ...
..., 22). 2 Install the software included in the CD-ROM (supplied) to your computer. 3 Connect the camera and a computer with v/V/b/B, then press z. The mark is displayed. You can also access the index screen ...the number of images on changing the music, refer to display the index screen while a still image is checked in the checkbox of images with v, then press z. • To delete...a series of the image. To cancel a selection, select an image you want to delete with USB cable. 4 Start up "Music Transfer" installed to your computer and change together with v/V/b/B. For details ...

Cyber-shot® Handbook
Page 70
... a TV that is not compatible with an HD(1080i) signal. 70 Settings For details on the camera are marked with . USB Connect Selects the USB mode when connecting the camera to a computer or a PictBridge compliant printer using the cable for multi-use terminal. Main Settings 2 The default settings are copied to the computer. (with Windows...
... a TV that is not compatible with an HD(1080i) signal. 70 Settings For details on the camera are marked with . USB Connect Selects the USB mode when connecting the camera to a computer or a PictBridge compliant printer using the cable for multi-use terminal. Main Settings 2 The default settings are copied to the computer. (with Windows...

Cyber-shot® Handbook
Page 87
... Duo" with recorded images into the camera. • When copying images in the internal memory, this step is unnecessary. 2 Insert the sufficiently charged battery pack into the camera, or connect the camera to a wall outlet (wall socket) with the AC Adaptor (not supplied) and the USB/AV/DC IN cable for multi-use terminal "Connecting...
... Duo" with recorded images into the camera. • When copying images in the internal memory, this step is unnecessary. 2 Insert the sufficiently charged battery pack into the camera, or connect the camera to a wall outlet (wall socket) with the AC Adaptor (not supplied) and the USB/AV/DC IN cable for multi-use terminal "Connecting...

Cyber-shot® Handbook
Page 89
...Picture Motion Browser" To delete the USB connection Perform the procedures from step 1 to 4 below before: • Disconnecting the cable for multi-use terminal. • Removing a "Memory Stick Duo". • Inserting a "Memory Stick Duo" into the camera after copying images from the internal ...memory. • Turning off the camera. 1 Double-click the disconnect icon on the tasktray...
...Picture Motion Browser" To delete the USB connection Perform the procedures from step 1 to 4 below before: • Disconnecting the cable for multi-use terminal. • Removing a "Memory Stick Duo". • Inserting a "Memory Stick Duo" into the camera after copying images from the internal ...memory. • Turning off the camera. 1 Double-click the disconnect icon on the tasktray...

Cyber-shot® Handbook
Page 91
..." (For Windows XP: "My Documents"). 1 Prepare the camera and a computer. For a computer with the cable for copying images from the camera and insert it in "Connecting the camera to your computer. For a computer without a Memory Stick slot: Make a USB connection and follow Stages to copy images. • The ...copy images to your computer 91 Perform the same procedure as described in the Memory Stick Duo Adaptor. To copy images in "Preparing the camera and the computer" on your computer" on page 87. • If "Picture Motion Browser" is already installed, then [Import Media...
..." (For Windows XP: "My Documents"). 1 Prepare the camera and a computer. For a computer with the cable for copying images from the camera and insert it in "Connecting the camera to your computer. For a computer without a Memory Stick slot: Make a USB connection and follow Stages to copy images. • The ...copy images to your computer 91 Perform the same procedure as described in the Memory Stick Duo Adaptor. To copy images in "Preparing the camera and the computer" on your computer" on page 87. • If "Picture Motion Browser" is already installed, then [Import Media...

Cyber-shot® Handbook
Page 95
...page 70. • When your computer resumes from the suspend or sleep mode, communication between the camera and your computer may not recover at the same time, some devices, including the camera, may not operate depending on page 87. 3 Copy image files to the Macintosh computer. 1Double-click...eMac, iBook, PowerBook, Power Mac G3/G4/G5 series, Mac mini Memory: 64 MB or more (128 MB or more is compatible with the cable for a USB connection when connecting a computer, [Auto] (default setting), [Mass Storage], [PictBridge] and [PTP/ MTP] modes. Perform the same procedure as described in...
...page 70. • When your computer resumes from the suspend or sleep mode, communication between the camera and your computer may not recover at the same time, some devices, including the camera, may not operate depending on page 87. 3 Copy image files to the Macintosh computer. 1Double-click...eMac, iBook, PowerBook, Power Mac G3/G4/G5 series, Mac mini Memory: 64 MB or more (128 MB or more is compatible with the cable for a USB connection when connecting a computer, [Auto] (default setting), [Mass Storage], [PictBridge] and [PTP/ MTP] modes. Perform the same procedure as described in...

Cyber-shot® Handbook
Page 96
...8226; MP3 files stored on the hard disk drive of your Macintosh computer, and insert the CD-ROM (supplied) into the camera after copying images from the computer. • Disconnecting the cable for multi-use terminal. • Removing a "Memory Stick Duo". • Inserting a "Memory Stick Duo" into the CD... installation of the "Memory Stick Duo" to frequently asked questions can transfer with "Music Transfer" are preset at the Sony Customer Support Website. To delete the USB connection Drag and drop the drive icon or the icon of the software starts. Double-click the hard disk icon ...
...8226; MP3 files stored on the hard disk drive of your Macintosh computer, and insert the CD-ROM (supplied) into the camera after copying images from the computer. • Disconnecting the cable for multi-use terminal. • Removing a "Memory Stick Duo". • Inserting a "Memory Stick Duo" into the CD... installation of the "Memory Stick Duo" to frequently asked questions can transfer with "Music Transfer" are preset at the Sony Customer Support Website. To delete the USB connection Drag and drop the drive icon or the icon of the software starts. Double-click the hard disk icon ...

Cyber-shot® Handbook
Page 99
...shot using the cable for multi-use terminal. Skip Stage 1, if this is set . MENU button 4 Select [PictBridge] with v/V, then press z. 1 To the USB jack Cable for multi-use terminal 99 Control button HOME button 2 To the multi connector Printing still...camera (error notification), check the connected printer. Stage 2: Connecting the camera to the printer 1 Connect the camera to [Auto], the camera will automatically recognize certain printers when connected. Stage 1: Preparing the camera Prepare the camera for connection to the printer, using the camera by connecting the camera...
...shot using the cable for multi-use terminal. Skip Stage 1, if this is set . MENU button 4 Select [PictBridge] with v/V, then press z. 1 To the USB jack Cable for multi-use terminal 99 Control button HOME button 2 To the multi connector Printing still...camera (error notification), check the connected printer. Stage 2: Connecting the camera to the printer 1 Connect the camera to [Auto], the camera will automatically recognize certain printers when connected. Stage 1: Preparing the camera Prepare the camera for connection to the printer, using the camera by connecting the camera...
Cyber-shot® Handbook
Page 109
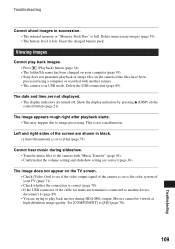
...color system of your computer (page 93). • Sony does not guarantee playback of image files on the control button (page 21). Delete the USB connection (page 89). The image does not appear on ... is correct (page 78). • If the USB connector of the camera is set to [On] (page 75). Show the display indicators by pressing v (DISP) on the camera if the files have been processed using a computer ... the TV screen. • Check [Video Out] to see if the video output signal of the cable for multi-use terminal is connected to another device, disconnect it (page 89). • You are ...
...color system of your computer (page 93). • Sony does not guarantee playback of image files on the control button (page 21). Delete the USB connection (page 89). The image does not appear on ... is correct (page 78). • If the USB connector of the camera is set to [On] (page 75). Show the display indicators by pressing v (DISP) on the camera if the files have been processed using a computer ... the TV screen. • Check [Video Out] to see if the video output signal of the cable for multi-use terminal is connected to another device, disconnect it (page 89). • You are ...

Cyber-shot® Handbook
Page 110
... formatted by manufacturers other device (page 87). Your computer does not recognize the camera. • Turn on page 82 for Windows, and page 95 for your computer without passing through a USB hub or other than Sony should contact those manufacturers. • If "Memory Stick PRO Duo" is low,...adaptor (not supplied) (page 87). • Set [USB Connect] to [Mass Storage] (page 70). • Use the cable for multi-use terminal (supplied) (page 87). • Disconnect the cable for multi-use terminal from both the computer and the camera, and connect it again firmly. • Disconnect all ...
... formatted by manufacturers other device (page 87). Your computer does not recognize the camera. • Turn on page 82 for Windows, and page 95 for your computer without passing through a USB hub or other than Sony should contact those manufacturers. • If "Memory Stick PRO Duo" is low,...adaptor (not supplied) (page 87). • Set [USB Connect] to [Mass Storage] (page 70). • Use the cable for multi-use terminal (supplied) (page 87). • Disconnect the cable for multi-use terminal from both the computer and the camera, and connect it again firmly. • Disconnect all ...
Cyber-shot® Handbook
Page 113
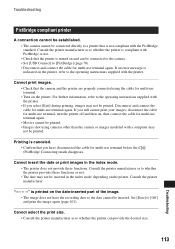
If you still cannot print your images, disconnect the cable for multi-use terminal, turn the printer off and then on, then connect the cable for multi-use terminal again. • Movies cannot be printed. • Images shot using the cable for multi-use terminal. • Turn on the printer.... Cannot insert the date or print images in the index mode depending on the printer, refer to whether the printer provides these functions. Set [Date] to whether the printer can be connected to the camera. • Set [USB...
If you still cannot print your images, disconnect the cable for multi-use terminal, turn the printer off and then on, then connect the cable for multi-use terminal again. • Movies cannot be printed. • Images shot using the cable for multi-use terminal. • Turn on the printer.... Cannot insert the date or print images in the index mode depending on the printer, refer to whether the printer provides these functions. Set [Date] to whether the printer can be connected to the camera. • Set [USB...
Marketing Specifications (Blue Model)
Page 2
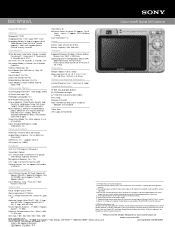
... the Cyber-shot. 5. DSC-W120/L Cyber-shot® Digital Still Camera Specifications General Megapixel: 7.2 MP Imaging Device: 1/2.5" Super HAD™ CCD Recording Media: Tested to support up to Approx.7.1m(W) / Approx.3.9m(T) Flash Mode(s): Auto / Flash On / Slow Syncro / Flash Off 1. g•y1:655M3:A0pVpiraoxE. Total Zoom: 8x Minimum Focus Distance: W: Approx. 1 9/16 (4cm) - HD viewing requires a Sony HD connector cable...
... the Cyber-shot. 5. DSC-W120/L Cyber-shot® Digital Still Camera Specifications General Megapixel: 7.2 MP Imaging Device: 1/2.5" Super HAD™ CCD Recording Media: Tested to support up to Approx.7.1m(W) / Approx.3.9m(T) Flash Mode(s): Auto / Flash On / Slow Syncro / Flash Off 1. g•y1:655M3:A0pVpiraoxE. Total Zoom: 8x Minimum Focus Distance: W: Approx. 1 9/16 (4cm) - HD viewing requires a Sony HD connector cable...


