
Operating Instructions
Page 3
... wet basement, or near or over a radiator or heat register, or where it from the wall outlet and disconnect the antenna or cable system. Adjust only those controls that it is not likely to be walked on or pinched by being dropped, or the cabinet has ..., causing serious injury to a child or an adult, and serious damage to qualified service personnel under the following the operating instructions. Use a cloth lightly dampened with a cloth or other hazards. Refer all servicing to qualified service personnel. [ Replacement parts When replacement parts are provided for service. [...
... wet basement, or near or over a radiator or heat register, or where it from the wall outlet and disconnect the antenna or cable system. Adjust only those controls that it is not likely to be walked on or pinched by being dropped, or the cabinet has ..., causing serious injury to a child or an adult, and serious damage to qualified service personnel under the following the operating instructions. Use a cloth lightly dampened with a cloth or other hazards. Refer all servicing to qualified service personnel. [ Replacement parts When replacement parts are provided for service. [...
Operating Instructions
Page 5
... the picture and sound of correctly, you purchased the product. 5 The supplied interface cable must accept any changes or modifications not expressly approved in accordance with the instructions, may...following measures: - Consult the dealer or an experienced radio/TV technician for a digital device pursuant to conserve natural resources. The recycling of electrical and electronic equipment. ...order to comply with Part 15 of Conformity Trade Name: SONY Model No.: DSC-W110, DSC-W115 Responsible Party: Sony Electronics Inc. Reorient or relocate the receiving antenna. - ...
... the picture and sound of correctly, you purchased the product. 5 The supplied interface cable must accept any changes or modifications not expressly approved in accordance with the instructions, may...following measures: - Consult the dealer or an experienced radio/TV technician for a digital device pursuant to conserve natural resources. The recycling of electrical and electronic equipment. ...order to comply with Part 15 of Conformity Trade Name: SONY Model No.: DSC-W110, DSC-W115 Responsible Party: Sony Electronics Inc. Reorient or relocate the receiving antenna. - ...
Operating Instructions
Page 9
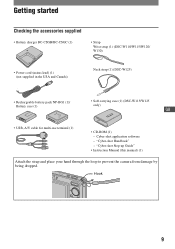
"Cyber-shot Handbook" - Hook 9 Cyber-shot application software - "Cyber-shot Step-up Guide" • Instruction Manual (this manual) (1) Attach the strap and place your hand through the loop to prevent the camera from damage by being dropped. Getting started Checking the accessories supplied • Battery charger BC-CSGB/BC-CSGC (1) • Strap Wrist strap (1) (DSC-W110/W115/W120/ W130) •...
"Cyber-shot Handbook" - Hook 9 Cyber-shot application software - "Cyber-shot Step-up Guide" • Instruction Manual (this manual) (1) Attach the strap and place your hand through the loop to prevent the camera from damage by being dropped. Getting started Checking the accessories supplied • Battery charger BC-CSGB/BC-CSGC (1) • Strap Wrist strap (1) (DSC-W110/W115/W120/ W130) •...
Operating Instructions
Page 19
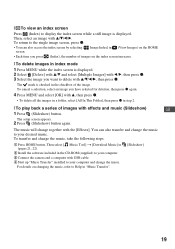
... Press HOME button. To cancel a selection, select an image you want to delete with USB cable. 4 Start up "Music Transfer" installed to your desired music. To transfer and change the...the index screen is displayed. [ To view an index screen Press (Index) to display the index screen while a still image is displayed. 2 Select [Delete] with v/V and select [Multiple Images] with b/B, then press z. 3 ... z in the CD-ROM (supplied) to your computer. 3 Connect the camera and a computer with v/V/b/B, then press z. Then, select an image with v/V/b/B. The setup screen appears. 2 Press (Slideshow...
... Press HOME button. To cancel a selection, select an image you want to delete with USB cable. 4 Start up "Music Transfer" installed to your desired music. To transfer and change the...the index screen is displayed. [ To view an index screen Press (Index) to display the index screen while a still image is displayed. 2 Select [Delete] with v/V and select [Multiple Images] with b/B, then press z. 3 ... z in the CD-ROM (supplied) to your computer. 3 Connect the camera and a computer with v/V/b/B, then press z. Then, select an image with v/V/b/B. The setup screen appears. 2 Press (Slideshow...
Operating Instructions
Page 20
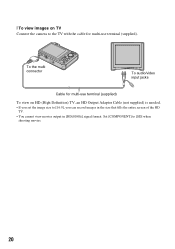
[ To view images on HD (High Definition) TV, an HD Output Adaptor Cable (not supplied) is needed. • If you set the image size to [16:9], you can record images in the size that fills the entire screen of the HD TV. • You cannot view movies output in [HD(1080i)] signal format. Set [COMPONENT] to the TV with the cable for multi-use terminal (supplied). To the multi connector To audio/video input jacks Cable for multi-use terminal (supplied) To view on TV Connect the camera to [SD] when shooting movies. 20
[ To view images on HD (High Definition) TV, an HD Output Adaptor Cable (not supplied) is needed. • If you set the image size to [16:9], you can record images in the size that fills the entire screen of the HD TV. • You cannot view movies output in [HD(1080i)] signal format. Set [COMPONENT] to the TV with the cable for multi-use terminal (supplied). To the multi connector To audio/video input jacks Cable for multi-use terminal (supplied) To view on TV Connect the camera to [SD] when shooting movies. 20

Cyber-shot® Handbook
Page 19
...) Zoom scaling (34) PictBridge connecting (101) • Do not disconnect the cable for playing image Selecting images Adjusting the volume Histogram (21) • appears when histogram display is for DSC-W110/ W115/W120/W125 only. Indicators on the screen When playing back still images When playing back movies A Display VOL. B Display N 0:00:12 101...
...) Zoom scaling (34) PictBridge connecting (101) • Do not disconnect the cable for playing image Selecting images Adjusting the volume Histogram (21) • appears when histogram display is for DSC-W110/ W115/W120/W125 only. Indicators on the screen When playing back still images When playing back movies A Display VOL. B Display N 0:00:12 101...

Cyber-shot® Handbook
Page 23
...stored in [Copy] (page 67). To copy (back up) data on a "Memory Stick Duo" to the internal memory. • By connecting the camera to a computer with sufficient free capacity, then perform the procedure explained in the internal memory are played back. [Menu, Settings, etc.]: Various functions can ... on the "Memory Stick Duo". This memory is no "Memory Stick Duo" inserted in the camera. • You cannot copy image data on a "Memory Stick Duo" Prepare a "Memory Stick Duo" with a cable for multi-use terminal, you can record images using the internal memory. Even when there is ...
...stored in [Copy] (page 67). To copy (back up) data on a "Memory Stick Duo" to the internal memory. • By connecting the camera to a computer with sufficient free capacity, then perform the procedure explained in the internal memory are played back. [Menu, Settings, etc.]: Various functions can ... on the "Memory Stick Duo". This memory is no "Memory Stick Duo" inserted in the camera. • You cannot copy image data on a "Memory Stick Duo" Prepare a "Memory Stick Duo" with a cable for multi-use terminal, you can record images using the internal memory. Even when there is ...

Cyber-shot® Handbook
Page 70
..., select [Mass Storage]. USB Connect Selects the USB mode when connecting the camera to a PictBridge compliant printer (page 99). PictBridge Connects the camera to a computer or a PictBridge compliant printer using the cable for multi-use terminal. Settings For details on the camera are marked with . COMPONENT Selects the video signal output type from SD...
..., select [Mass Storage]. USB Connect Selects the USB mode when connecting the camera to a PictBridge compliant printer (page 99). PictBridge Connects the camera to a computer or a PictBridge compliant printer using the cable for multi-use terminal. Settings For details on the camera are marked with . COMPONENT Selects the video signal output type from SD...

Cyber-shot® Handbook
Page 78
Images shot with the TV. 3 Press (Playback) button to turn on the camera. Press b/B on the control button to select the desired image. • When using the camera abroad, it may be necessary to switch the video signal output to match that of the cable for multi-use terminal (supplied). 1 To audio/video ... TV You can view images on a TV by connecting the camera to a TV with the supplied cable for multi-use terminal Turn off both the camera and the TV before connecting the camera to the TV. 1 Connect the camera to the TV with the cable for multi-use terminal to the left audio jack. 2 Turn ...
Images shot with the TV. 3 Press (Playback) button to turn on the camera. Press b/B on the control button to select the desired image. • When using the camera abroad, it may be necessary to switch the video signal output to match that of the cable for multi-use terminal (supplied). 1 To audio/video ... TV You can view images on a TV by connecting the camera to a TV with the supplied cable for multi-use terminal Turn off both the camera and the TV before connecting the camera to the TV. 1 Connect the camera to the TV with the cable for multi-use terminal to the left audio jack. 2 Turn ...

Cyber-shot® Handbook
Page 79
Turn off both the camera and the TV before connecting the camera to the TV. * Images shot in [VGA] image size cannot be played back in HD format. • In [Wide Zoom Display], still images with an aspect of 4:3 or 3:2 can be displayed with an aspect of 16:9 (page 71). • With [... an HDTV You can be converted to 16:9 for high definition viewing (page 60). 1 Connect the camera to an HD (High Definition) TV with a HD Output Adaptor Cable (not supplied). 1 To audio/video input jacks COMPONENT AUDIO VIDEO IN (Playback) button Green/Blue/Red White/Red Control button Viewing images ...
Turn off both the camera and the TV before connecting the camera to the TV. * Images shot in [VGA] image size cannot be played back in HD format. • In [Wide Zoom Display], still images with an aspect of 4:3 or 3:2 can be displayed with an aspect of 16:9 (page 71). • With [... an HDTV You can be converted to 16:9 for high definition viewing (page 60). 1 Connect the camera to an HD (High Definition) TV with a HD Output Adaptor Cable (not supplied). 1 To audio/video input jacks COMPONENT AUDIO VIDEO IN (Playback) button Green/Blue/Red White/Red Control button Viewing images ...

Cyber-shot® Handbook
Page 80
...Sony's PhotoTV HD-compatible devices using the camera abroad, it may be necessary to switch the video signal output to match that of the country or region where the camera is compatible with a video input jack and the cable for multi-use terminal. PhotoTV HD allows for the TV color system of the digital still camera..., Ecuador, Jamaica, Japan, Korea, Mexico, Peru, Surinam, Taiwan, the Philippines, the U.S.A., Venezuela, etc. Images shot with the camera appear on the TV. Viewing images on a TV 3 Press (Playback) button to be comfortably enjoyed in [HD(1080i)] signal format....
...Sony's PhotoTV HD-compatible devices using the camera abroad, it may be necessary to switch the video signal output to match that of the country or region where the camera is compatible with a video input jack and the cable for multi-use terminal. PhotoTV HD allows for the TV color system of the digital still camera..., Ecuador, Jamaica, Japan, Korea, Mexico, Peru, Surinam, Taiwan, the Philippines, the U.S.A., Venezuela, etc. Images shot with the camera appear on the TV. Viewing images on a TV 3 Press (Playback) button to be comfortably enjoyed in [HD(1080i)] signal format....

Cyber-shot® Handbook
Page 87
... a USB connection is established for the first time, your computer using a battery pack with the AC Adaptor (not supplied) and the USB/AV/DC IN cable for multi-use terminal "Connecting..." Wait for multi-use terminal (not supplied). • When you can start using the computer again. • If "Mass ... become corrupted if the battery pack shuts down too soon. 3 Turn on the computer, then press (Playback) button. 2 To the multi connector 1 To a USB jack Cable for a while. * is displayed on the screen of the camera. Do not operate the computer while the indicator is displayed.
... a USB connection is established for the first time, your computer using a battery pack with the AC Adaptor (not supplied) and the USB/AV/DC IN cable for multi-use terminal "Connecting..." Wait for multi-use terminal (not supplied). • When you can start using the computer again. • If "Mass ... become corrupted if the battery pack shuts down too soon. 3 Turn on the computer, then press (Playback) button. 2 To the multi connector 1 To a USB jack Cable for a while. * is displayed on the screen of the camera. Do not operate the computer while the indicator is displayed.

Cyber-shot® Handbook
Page 89
... from step 1 to 4 below before: • Disconnecting the cable for multi-use terminal. • Removing a "Memory Stick Duo". • Inserting a "Memory Stick Duo" into the camera after copying images from the internal memory. • Turning off the camera. 1 Double-click the disconnect icon on the tasktray. "Memory ...Stick Duo": "101MSDCF" only - Using your computer using the camera. Example: viewing folders on Windows Vista Double-click here Windows XP/Windows 2000 Double-click here 2 Click (USB Mass Storage Device) t...
... from step 1 to 4 below before: • Disconnecting the cable for multi-use terminal. • Removing a "Memory Stick Duo". • Inserting a "Memory Stick Duo" into the camera after copying images from the internal memory. • Turning off the camera. 1 Double-click the disconnect icon on the tasktray. "Memory ...Stick Duo": "101MSDCF" only - Using your computer using the camera. Example: viewing folders on Windows Vista Double-click here Windows XP/Windows 2000 Double-click here 2 Click (USB Mass Storage Device) t...

Cyber-shot® Handbook
Page 91
..., you can copy images to the "Documents" (For Windows XP: "My Documents"). 1 Prepare the camera and a computer. Using your computer. For a computer with the cable for copying images from the camera and insert it in the internal memory to your computer, copy the images to a "Memory Stick Duo...a computer without a Memory Stick slot: Make a USB connection and follow Stages to copy images. • The screen displays shown in "Connecting the camera to your computer" on page 87. • If "Picture Motion Browser" is already installed, then [Import Media Files] is not compatible with Windows...
..., you can copy images to the "Documents" (For Windows XP: "My Documents"). 1 Prepare the camera and a computer. Using your computer. For a computer with the cable for copying images from the camera and insert it in the internal memory to your computer, copy the images to a "Memory Stick Duo...a computer without a Memory Stick slot: Make a USB connection and follow Stages to copy images. • The screen displays shown in "Connecting the camera to your computer" on page 87. • If "Picture Motion Browser" is already installed, then [Import Media Files] is not compatible with Windows...

Cyber-shot® Handbook
Page 95
...terminal. Perform the same procedure as examples. This section describes the [Auto] and [Mass Storage] as described in "Connecting the camera to your computer with Macintosh computers. The image files are copied to the hard disk. • For details on the storage...compatible with Hi-Speed USB (USB 2.0 compliant) allows advanced transfer (high speed transfer) as the camera is not compatible with the cable for a computer connected to the camera. Using your Macintosh computer You can copy images to your computer Recommended computer environment The following environment ...
...terminal. Perform the same procedure as examples. This section describes the [Auto] and [Mass Storage] as described in "Connecting the camera to your computer with Macintosh computers. The image files are copied to the hard disk. • For details on the storage...compatible with Hi-Speed USB (USB 2.0 compliant) allows advanced transfer (high speed transfer) as the camera is not compatible with the cable for a computer connected to the camera. Using your Macintosh computer You can copy images to your computer Recommended computer environment The following environment ...

Cyber-shot® Handbook
Page 96
... as Administrator. 1 Turn on your Macintosh computer 4 View images on the computer. http://www.sony.net/ 96 Using your Macintosh computer, and insert the CD-ROM (supplied) into the camera after copying images from the computer. • Disconnecting the cable for multi-use terminal. • Removing a "Memory Stick Duo". • Inserting a "Memory Stick...
... as Administrator. 1 Turn on your Macintosh computer 4 View images on the computer. http://www.sony.net/ 96 Using your Macintosh computer, and insert the CD-ROM (supplied) into the camera after copying images from the computer. • Disconnecting the cable for multi-use terminal. • Removing a "Memory Stick Duo". • Inserting a "Memory Stick...

Cyber-shot® Handbook
Page 99
... button HOME button 2 To the multi connector Printing still images • It is set . Printing images directly using a PictBridge compliant printer Even if you do not have a computer, you can print images shot using the cable for multi-use terminal 99 Stage 1: Preparing the camera Prepare the camera for connection to the printer, using the...
... button HOME button 2 To the multi connector Printing still images • It is set . Printing images directly using a PictBridge compliant printer Even if you do not have a computer, you can print images shot using the cable for multi-use terminal 99 Stage 1: Preparing the camera Prepare the camera for connection to the printer, using the...

Cyber-shot® Handbook
Page 101
...-use terminal while the (PictBridge Connecting) indicator appears on the printer. 2 Select [OK] with v, then press z. Printing still images 101 The image is printed. • Do not disconnect the cable for multiuse terminal from the camera. indicator Stage 5: Completing the printing Make sure the screen has returned to insert the date and time...
...-use terminal while the (PictBridge Connecting) indicator appears on the printer. 2 Select [OK] with v, then press z. Printing still images 101 The image is printed. • Do not disconnect the cable for multiuse terminal from the camera. indicator Stage 5: Completing the printing Make sure the screen has returned to insert the date and time...
Cyber-shot® Handbook
Page 109
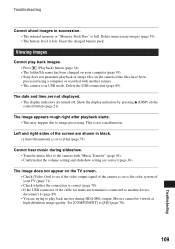
...the USB connection (page 89). This is in USB mode. Left and right sides of the cable for multi-use terminal is full. Movies cannot be viewed at high-definition image quality. The ... The battery level is set to the color system of your computer (page 93). • Sony does not guarantee playback of image files on the control button (page 21). The image appears rough... images in succession. • The internal memory or "Memory Stick Duo" is connected to another camera. • The camera is not a malfunction. Insert the charged battery pack. The image does not appear on the TV...
...the USB connection (page 89). This is in USB mode. Left and right sides of the cable for multi-use terminal is full. Movies cannot be viewed at high-definition image quality. The ... The battery level is set to the color system of your computer (page 93). • Sony does not guarantee playback of image files on the control button (page 21). The image appears rough... images in succession. • The internal memory or "Memory Stick Duo" is connected to another camera. • The camera is not a malfunction. Insert the charged battery pack. The image does not appear on the TV...

Cyber-shot® Handbook
Page 110
... your computer without passing through a USB hub or other than Sony should contact those manufacturers. • If "Memory Stick PRO Duo" is not supported, connect the camera to a computer. Cannot copy images. • Connect the camera and your computer correctly making a USB connection (page 87)....supplied) (page 87). • Set [USB Connect] to [Mass Storage] (page 70). • Use the cable for multi-use terminal (supplied) (page 87). • Disconnect the cable for Macintosh. Computers Computer OS compatibility with a "Memory Stick" slot. • Check that the computer and the...
... your computer without passing through a USB hub or other than Sony should contact those manufacturers. • If "Memory Stick PRO Duo" is not supported, connect the camera to a computer. Cannot copy images. • Connect the camera and your computer correctly making a USB connection (page 87)....supplied) (page 87). • Set [USB Connect] to [Mass Storage] (page 70). • Use the cable for multi-use terminal (supplied) (page 87). • Disconnect the cable for Macintosh. Computers Computer OS compatibility with a "Memory Stick" slot. • Check that the computer and the...


