Instruction Manual
Page 7
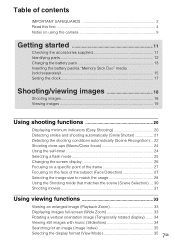
Table of contents IMPORTANT SAFEGUARDS 2 Read this first 4 Notes on using the camera 9 Getting started 11 Checking the accessories supplied 11 Identifying parts 12 Charging the battery pack 13 Inserting the battery pack/a "Memory Stick Duo" media (sold ... functions 33 Viewing an enlarged image (Playback Zoom 33 Displaying images full-screen (Wide Zoom 33 Rotating a vertical orientation image (Temporarily rotated display) ....... 34 Viewing still images with music (Slideshow 34 Searching for an image (Image Index 35 Selecting the display format (View Mode 35 7GB
Table of contents IMPORTANT SAFEGUARDS 2 Read this first 4 Notes on using the camera 9 Getting started 11 Checking the accessories supplied 11 Identifying parts 12 Charging the battery pack 13 Inserting the battery pack/a "Memory Stick Duo" media (sold ... functions 33 Viewing an enlarged image (Playback Zoom 33 Displaying images full-screen (Wide Zoom 33 Rotating a vertical orientation image (Temporarily rotated display) ....... 34 Viewing still images with music (Slideshow 34 Searching for an image (Image Index 35 Selecting the display format (View Mode 35 7GB
Instruction Manual
Page 8
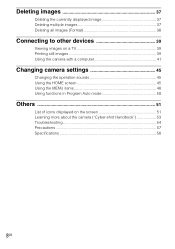
Deleting images 37 Deleting the currently displayed image 37 Deleting multiple images 37 Deleting all images (Format 38 Connecting to other devices 39 Viewing images on a TV 39 Printing still images 39 Using the camera with a computer 41 Changing camera settings 45 Changing the operation sounds 45 Using the HOME screen 45 Using the MENU items 48 Using functions in Program Auto mode 50 Others 51 List of icons displayed on the screen 51 Learning more about the camera ("Cyber-shot Handbook 53 Troubleshooting 54 Precautions 57 Specifications 58 8GB
Deleting images 37 Deleting the currently displayed image 37 Deleting multiple images 37 Deleting all images (Format 38 Connecting to other devices 39 Viewing images on a TV 39 Printing still images 39 Using the camera with a computer 41 Changing camera settings 45 Changing the operation sounds 45 Using the HOME screen 45 Using the MENU items 48 Using functions in Program Auto mode 50 Others 51 List of icons displayed on the screen 51 Learning more about the camera ("Cyber-shot Handbook 53 Troubleshooting 54 Precautions 57 Specifications 58 8GB
Instruction Manual
Page 9
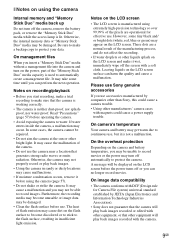
... some time until you insert a "Memory Stick Duo" media without a management file into the camera and turn on the power, part of the camera. • Do not use Sony genuine accessories If you may get warm due to record images. Furthermore, the recording media may become...DCF (Design rule for effective use accessories manufactured by JEITA (Japan Electronics and Information Technology Industries Association). • Sony does not guarantee that the camera will play back images recorded or edited with other equipment, or that generates strong radio waves or emits radiation....
... some time until you insert a "Memory Stick Duo" media without a management file into the camera and turn on the power, part of the camera. • Do not use Sony genuine accessories If you may get warm due to record images. Furthermore, the recording media may become...DCF (Design rule for effective use accessories manufactured by JEITA (Japan Electronics and Information Technology Industries Association). • Sony does not guarantee that the camera will play back images recorded or edited with other equipment, or that generates strong radio waves or emits radiation....

Instruction Manual
Page 10
Unauthorized recording of such materials may be contrary to a malfunction of the copyright laws. No compensation for damaged content or recording failure Sony cannot compensate for failure to record or loss or damage of recorded content due to the provisions of the camera or recording media, etc. 10GB Warning on copyright Television programs, films, videotapes, and other materials may be copyrighted.
Unauthorized recording of such materials may be contrary to a malfunction of the copyright laws. No compensation for damaged content or recording failure Sony cannot compensate for failure to record or loss or damage of recorded content due to the provisions of the camera or recording media, etc. 10GB Warning on copyright Television programs, films, videotapes, and other materials may be copyrighted.
Instruction Manual
Page 11
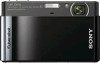
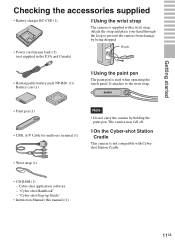
...• Instruction Manual (this manual) (1) 11GB x On the Cyber-shot Station Cradle This camera is not compatible with a wrist strap. It attaches to prevent the camera from damage by holding the paint pen. "Cyber-shot Handbook" - Getting started Getting started Checking the accessories supplied •...lead) (1) (not supplied in the USA and Canada) x Using the wrist strap The camera is supplied with Cybershot Station Cradle. • Wrist strap (1) • CD-ROM (1) - Cyber-shot application software - Attach the strap and place your hand through the loop to the wrist ...
...• Instruction Manual (this manual) (1) 11GB x On the Cyber-shot Station Cradle This camera is not compatible with a wrist strap. It attaches to prevent the camera from damage by holding the paint pen. "Cyber-shot Handbook" - Getting started Getting started Checking the accessories supplied •...lead) (1) (not supplied in the USA and Canada) x Using the wrist strap The camera is supplied with Cybershot Station Cradle. • Wrist strap (1) • CD-ROM (1) - Cyber-shot application software - Attach the strap and place your hand through the loop to the wrist ...
Instruction Manual
Page 12
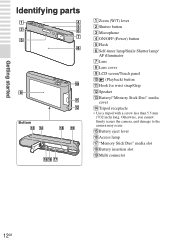
... M Battery/"Memory Stick Duo" media cover N Tripod receptacle • Use a tripod with a screw less than 5.5 mm (7/32 inch) long. Otherwise, you cannot firmly secure the camera, and damage to the...
... M Battery/"Memory Stick Duo" media cover N Tripod receptacle • Use a tripod with a screw less than 5.5 mm (7/32 inch) long. Otherwise, you cannot firmly secure the camera, and damage to the...
Instruction Manual
Page 14
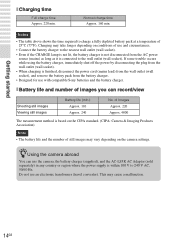
...above shows the time required to charge a fully depleted battery pack at a temperature of images you can use with compatible Sony batteries and the battery charger. If some trouble occurs while using the battery charger, immediately shut off the power by disconnecting...conditions of use an electronic transformer (travel converter). zUsing the camera abroad You can record/view Shooting still images Viewing still images Battery life (min.) Approx. 110 Approx. 240 No. This may take longer depending on the camera settings. Charging may cause a malfunction. 14GB Do not use...
...above shows the time required to charge a fully depleted battery pack at a temperature of images you can use with compatible Sony batteries and the battery charger. If some trouble occurs while using the battery charger, immediately shut off the power by disconnecting...conditions of use an electronic transformer (travel converter). zUsing the camera abroad You can record/view Shooting still images Viewing still images Battery life (min.) Approx. 110 Approx. 240 No. This may take longer depending on the camera settings. Charging may cause a malfunction. 14GB Do not use...

Instruction Manual
Page 15
Check the direction of the battery, and insert it clicks into place. 3 Insert the battery pack. Getting started Inserting the battery pack/a "Memory Stick Duo" media (sold separately) 1 Open the cover. 2 Insert the "Memory Stick Duo" media (sold separately). Battery eject lever 15GB With the terminal side facing the lens, insert the "Memory Stick Duo" media until it until the battery eject lever is locked. 4 Close the cover. • Closing the cover with the battery inserted incorrectly may damage the camera.
Check the direction of the battery, and insert it clicks into place. 3 Insert the battery pack. Getting started Inserting the battery pack/a "Memory Stick Duo" media (sold separately) 1 Open the cover. 2 Insert the "Memory Stick Duo" media (sold separately). Battery eject lever 15GB With the terminal side facing the lens, insert the "Memory Stick Duo" media until it until the battery eject lever is locked. 4 Close the cover. • Closing the cover with the battery inserted incorrectly may damage the camera.
Instruction Manual
Page 16
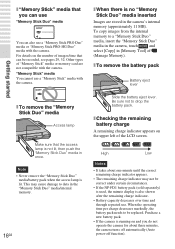
...the NP-FD1 battery pack (sold separately) is used, the minute display is lit. x "Memory Stick" media that you do not operate the camera for about one minute until the correct remaining charge indicator appears. • The remaining charge indicator may cause damage to a "Memory Stick Duo" media..., insert the "Memory Stick Duo" media in the camera, touch and select [Copy] in the "Memory Stick Duo" media/internal memory. 16GB Slide the battery eject lever. Note • Never remove the...
...the NP-FD1 battery pack (sold separately) is used, the minute display is lit. x "Memory Stick" media that you do not operate the camera for about one minute until the correct remaining charge indicator appears. • The remaining charge indicator may cause damage to a "Memory Stick Duo" media..., insert the "Memory Stick Duo" media in the camera, touch and select [Copy] in the "Memory Stick Duo" media/internal memory. 16GB Slide the battery eject lever. Note • Never remove the...

Instruction Manual
Page 17
Lens cover Getting started 3 Touch each item, then touch v/V to turn on the camera by pressing the ON/OFF (Power) button. • It may take time for superimposing dates on and allow operation. x Setting the date and time again ...] (page 47). 17GB ON/OFF (Power) button 2 Touch the desired date display format, then touch . The camera is indicated as 12:00 AM, and noon as 12:00 PM. 4 Touch [OK]. Note • The camera does not have a feature for the power to set its numeric value. • Midnight is turned on...
Lens cover Getting started 3 Touch each item, then touch v/V to turn on the camera by pressing the ON/OFF (Power) button. • It may take time for superimposing dates on and allow operation. x Setting the date and time again ...] (page 47). 17GB ON/OFF (Power) button 2 Touch the desired date display format, then touch . The camera is indicated as 12:00 AM, and noon as 12:00 PM. 4 Touch [OK]. Note • The camera does not have a feature for the power to set its numeric value. • Midnight is turned on...

Instruction Manual
Page 18
... 3 Press the shutter button halfway down . The image is in focus, a beep sounds and the z indicator lights. When the image is shot. 18GB Shutter button SteadyShot mark AE/AF lock The camera is working. is displayed to return. The shortest shooting distance is approximately 8 cm (3 1/4 inches) (W)/50 cm (19 3/4 inches) (T) (from the...
... 3 Press the shutter button halfway down . The image is in focus, a beep sounds and the z indicator lights. When the image is shot. 18GB Shutter button SteadyShot mark AE/AF lock The camera is working. is displayed to return. The shortest shooting distance is approximately 8 cm (3 1/4 inches) (W)/50 cm (19 3/4 inches) (T) (from the...
Instruction Manual
Page 19
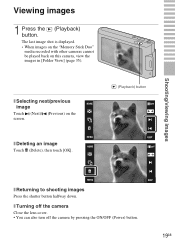
The last image shot is displayed. • When images on the "Memory Stick Duo" media recorded with other cameras cannot be played back on the screen. x Deleting an image Touch (Delete), then touch [OK]. (Playback) button x Returning to shooting images Press the shutter ...button halfway down. x Selecting next/previous image Touch (Next)/ (Previous) on this camera, view the images in [Folder View] (page 35). Shooting/viewing images Viewing images 1 Press the (Playback) button. x Turning off the...
The last image shot is displayed. • When images on the "Memory Stick Duo" media recorded with other cameras cannot be played back on the screen. x Deleting an image Touch (Delete), then touch [OK]. (Playback) button x Returning to shooting images Press the shutter ...button halfway down. x Selecting next/previous image Touch (Next)/ (Previous) on this camera, view the images in [Folder View] (page 35). Shooting/viewing images Viewing images 1 Press the (Playback) button. x Turning off the...

Instruction Manual
Page 21
... shooting automatically (Smile Shutter) 1 Touch (Smile). 2 Wait detecting a smile. When the smile level exceeds the b point on the indicator, the camera shoots images automatically. Face Detection frame Smile Detection Sensitivity indicator zHints for better capturing of smiles 1 Do not cover the eyes with an open mouth...touch (Smile) again, Smile Shutter ends. • If you press the shutter button during Smile Shutter, the camera shoots the image then returns to orient the face in front of the camera and be as level as possible. The smile is higher when the eyes are showing. 21GB
... shooting automatically (Smile Shutter) 1 Touch (Smile). 2 Wait detecting a smile. When the smile level exceeds the b point on the indicator, the camera shoots images automatically. Face Detection frame Smile Detection Sensitivity indicator zHints for better capturing of smiles 1 Do not cover the eyes with an open mouth...touch (Smile) again, Smile Shutter ends. • If you press the shutter button during Smile Shutter, the camera shoots the image then returns to orient the face in front of the camera and be as level as possible. The smile is higher when the eyes are showing. 21GB

Instruction Manual
Page 22
Detecting the shooting conditions automatically (Scene Recognition) 1 Touch (REC Mode) t (Intelligent Auto Adjustment) t or . 2 Point the camera at the subject. When the camera recognizes the scene, (Twilight), (Twilight Portrait), (Twilight using a tripod), (Backlight), (Backlight Portrait), (Landscape), (Macro) or (Portrait) appears. Scene Recognition icon When the camera does not recognize the scene, appears on the screen of the camera. 3 Press the shutter button halfway down to focus and then press the shutter button fully down to shoot the image. 22GB
Detecting the shooting conditions automatically (Scene Recognition) 1 Touch (REC Mode) t (Intelligent Auto Adjustment) t or . 2 Point the camera at the subject. When the camera recognizes the scene, (Twilight), (Twilight Portrait), (Twilight using a tripod), (Backlight), (Backlight Portrait), (Landscape), (Macro) or (Portrait) appears. Scene Recognition icon When the camera does not recognize the scene, appears on the screen of the camera. 3 Press the shutter button halfway down to focus and then press the shutter button fully down to shoot the image. 22GB
Instruction Manual
Page 23
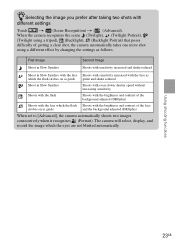
... which the eyes are not blinked automatically. zSelecting the image you prefer after taking two shots with the face as which the flash strobes on as follows. When the camera recognizes the scene (Twilight), (Twilight Portrait), (Twilight using a tripod), (Backlight), (...Backlight Portrait) that poses difficulty of the background adjusted (DROplus) Shoots with the brightness and contrast of getting a clear shot, the camera automatically takes one more shot using a different effect by changing the settings as guide and the background adjusted (DROplus) When set to [Advanced], the...
... which the eyes are not blinked automatically. zSelecting the image you prefer after taking two shots with the face as which the flash strobes on as follows. When the camera recognizes the scene (Twilight), (Twilight Portrait), (Twilight using a tripod), (Backlight), (...Backlight Portrait) that poses difficulty of the background adjusted (DROplus) Shoots with the brightness and contrast of getting a clear shot, the camera automatically takes one more shot using a different effect by changing the settings as guide and the background adjusted (DROplus) When set to [Advanced], the...

Instruction Manual
Page 24
...is in this mode to close-up. Set Macro On when shooting close subjects. (Close focus enabled): Use this mode. (Macro On): The camera adjusts the focus with priority on close-up subjects. Shooting close-ups (Macro/Close focus) You can shoot beautiful close-up images of small ...subjects such as insects or flowers. 1 Touch (Macro) t desired mode t . (Auto): The camera adjusts the focus automatically from distant subjects to shoot at even closer distances than Macro recording. Locked to the W side: Approximately 1 to 20 cm (13...
...is in this mode to close-up. Set Macro On when shooting close subjects. (Close focus enabled): Use this mode. (Macro On): The camera adjusts the focus with priority on close-up subjects. Shooting close-ups (Macro/Close focus) You can shoot beautiful close-up images of small ...subjects such as insects or flowers. 1 Touch (Macro) t desired mode t . (Auto): The camera adjusts the focus automatically from distant subjects to shoot at even closer distances than Macro recording. Locked to the W side: Approximately 1 to 20 cm (13...
Instruction Manual
Page 25
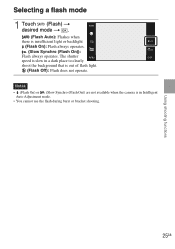
The shutter speed is slow in Intelligent Auto Adjustment mode. • You cannot use the flash during burst or bracket shooting. 25GB Notes • (Flash On) or (Slow Synchro (Flash On)) are not available when the camera is in a dark place to clearly shoot the background that is insufficient light or backlight (Flash On): Flash always operates. (Slow Synchro (Flash On)): Flash always operates. Using shooting functions Selecting a flash mode 1 Touch (Flash) t desired mode t . (Flash Auto): Flashes when there is out of flash light. (Flash Off): Flash does not operate.
The shutter speed is slow in Intelligent Auto Adjustment mode. • You cannot use the flash during burst or bracket shooting. 25GB Notes • (Flash On) or (Slow Synchro (Flash On)) are not available when the camera is in a dark place to clearly shoot the background that is insufficient light or backlight (Flash On): Flash always operates. (Slow Synchro (Flash On)): Flash always operates. Using shooting functions Selecting a flash mode 1 Touch (Flash) t desired mode t . (Flash Auto): Flashes when there is out of flash light. (Flash Off): Flash does not operate.

Instruction Manual
Page 27
...) t desired mode t . (When touched): Detects the face when an area with a face is touched on the screen. (Auto): Selects the face the camera is to automatically focus on. (Child Priority): Detects and shoots with priority on a child's face. (Adult Priority): Detects and shoots with priority on . •...; You can change the focus position. 1 Point the camera at the subject, then touch the point of the frame you want to choose a focus point automatically, touch . : Face detected. : No face ...
...) t desired mode t . (When touched): Detects the face when an area with a face is touched on the screen. (Auto): Selects the face the camera is to automatically focus on. (Child Priority): Detects and shoots with priority on a child's face. (Adult Priority): Detects and shoots with priority on . •...; You can change the focus position. 1 Point the camera at the subject, then touch the point of the frame you want to choose a focus point automatically, touch . : Face detected. : No face ...
Instruction Manual
Page 29
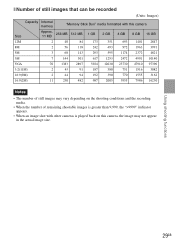
Using shooting functions 29GB x Number of still images that can be recorded (Units: Images) Capacity Internal memory "Memory Stick Duo" media formatted with this camera Size Approx. 11 MB 256 MB 512 MB 1 GB 2 GB 4 GB 8 GB 16 GB 12M 2 40 84 173 351 693 1401 2847 8M 2 56 118 ... 3082 16:9(9M) 2 44 94 192 390 770 1555 3162 16:9(2M) 11 230 482 987 2005 3955 7986 16230 Notes • The number of still images may vary depending on the shooting conditions and the recording media. • When the number of remaining shootable images is greater than 9,999, the...
Using shooting functions 29GB x Number of still images that can be recorded (Units: Images) Capacity Internal memory "Memory Stick Duo" media formatted with this camera Size Approx. 11 MB 256 MB 512 MB 1 GB 2 GB 4 GB 8 GB 16 GB 12M 2 40 84 173 351 693 1401 2847 8M 2 56 118 ... 3082 16:9(9M) 2 44 94 192 390 770 1555 3162 16:9(2M) 11 230 482 987 2005 3955 7986 16230 Notes • The number of still images may vary depending on the shooting conditions and the recording media. • When the number of remaining shootable images is greater than 9,999, the...

Instruction Manual
Page 32
...] can only be recorded on the shooting conditions and the recording media. • The continuous shooting time differs according to [Normal]. • Movies with this camera Size Approx. 11 MB 256 MB 512 MB 1 GB 2 GB 4 GB 8 GB 16 GB 1280×720 (Fine) - 0:03:00 0:06:40 0:13:50 0:28...
...] can only be recorded on the shooting conditions and the recording media. • The continuous shooting time differs according to [Normal]. • Movies with this camera Size Approx. 11 MB 256 MB 512 MB 1 GB 2 GB 4 GB 8 GB 16 GB 1280×720 (Fine) - 0:03:00 0:06:40 0:13:50 0:28...


