Instruction Manual
Page 2
... or electric shock. If you are not sure of the type of power source indicated on the marking label. DSC-T70/T75/T200 Serial No WARNING To reduce fire or shock hazard, do not... unable to the operating instructions. [ Polarization This set should still fail to them. If you call upon your dealer or local power company. Record the serial number in the U.S.A. Carefully observe ...constitute a risk of electric shock to operate from the type of electrical power supplied to your home, consult your Sony dealer regarding this can result in . [ Overloading Do not overload wall ...
... or electric shock. If you are not sure of the type of power source indicated on the marking label. DSC-T70/T75/T200 Serial No WARNING To reduce fire or shock hazard, do not... unable to the operating instructions. [ Polarization This set should still fail to them. If you call upon your dealer or local power company. Record the serial number in the U.S.A. Carefully observe ...constitute a risk of electric shock to operate from the type of electrical power supplied to your home, consult your Sony dealer regarding this can result in . [ Overloading Do not overload wall ...
Instruction Manual
Page 3
...are specified in damage and will prevent damage to rain or water. - This will often require extensive work by the manufacturer) to lightning and power-line surges. If the set does not operate normally when following conditions: - If the set has been exposed to the set . Improper ... condition. 3 Use only a cart, stand, tripod, bracket, or table recommended by being dropped, or the cabinet has been damaged. - When the power cord or plug is provided. - If the set has been subject to dangerous voltage or other materials. - Never place the set in the cabinet are...
...are specified in damage and will prevent damage to rain or water. - This will often require extensive work by the manufacturer) to lightning and power-line surges. If the set does not operate normally when following conditions: - If the set has been exposed to the set . Improper ... condition. 3 Use only a cart, stand, tripod, bracket, or table recommended by being dropped, or the cabinet has been damaged. - When the power cord or plug is provided. - If the set has been subject to dangerous voltage or other materials. - Never place the set in the cabinet are...
Instruction Manual
Page 4
Battery charger This power unit is subject to the following two conditions: (1) This...Via Esprillo, San Diego, CA 92127U.S.A. Otherwise, fire or injury may cause undesired operation. This Class B digital apparatus complies with the specified type only. Declaration of the FCC Rules. Read this first CAUTION Replace the... Trade Name: SONY Model No.: DSC-T70, DSC-T75 Responsible Party: Sony Electronics Inc. Operation is for the FCC related matters only. [ Regulatory Information Declaration of Conformity Trade Name: SONY Model No.: DSC-T200 Responsible Party: Sony Electronics Inc. ...
Battery charger This power unit is subject to the following two conditions: (1) This...Via Esprillo, San Diego, CA 92127U.S.A. Otherwise, fire or injury may cause undesired operation. This Class B digital apparatus complies with the specified type only. Declaration of the FCC Rules. Read this first CAUTION Replace the... Trade Name: SONY Model No.: DSC-T70, DSC-T75 Responsible Party: Sony Electronics Inc. Operation is for the FCC related matters only. [ Regulatory Information Declaration of Conformity Trade Name: SONY Model No.: DSC-T200 Responsible Party: Sony Electronics Inc. ...
Instruction Manual
Page 7
... 33 Troubleshooting 34 Battery pack and power 34 Shooting still images/movies 35 Viewing images 35 Precautions 36 Specifications 37 7 HOME/Menu 22 Using the HOME screen 22 HOME items 23 Using the menu items 24 Menu items 25 Enjoying your camera 8 Getting started 9 Checking the ...record/view 32 Number of still images and recording time of contents IMPORTANT SAFEGUARDS 2 Read this first 4 Notes on using your computer 26 Supported Operating Systems for USB connection and application software "Picture Motion Browser" (supplied 26 Viewing "Cyber-shot Handbook 27 Indicators on /...
... 33 Troubleshooting 34 Battery pack and power 34 Shooting still images/movies 35 Viewing images 35 Precautions 36 Specifications 37 7 HOME/Menu 22 Using the HOME screen 22 HOME items 23 Using the menu items 24 Menu items 25 Enjoying your camera 8 Getting started 9 Checking the ...record/view 32 Number of still images and recording time of contents IMPORTANT SAFEGUARDS 2 Read this first 4 Notes on using your computer 26 Supported Operating Systems for USB connection and application software "Picture Motion Browser" (supplied 26 Viewing "Cyber-shot Handbook 27 Indicators on /...
Instruction Manual
Page 9
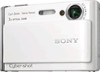
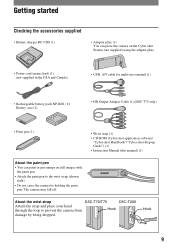
... • Battery charger BC-CSD (1) • Adaptor plate (1) You can place the camera on the Cyber-shot Station (not supplied) using the adaptor plate. • Power cord (mains lead) (1) (not supplied in the USA and Canada) • USB,...DSC-T75 only) • Paint pen (1) • Wrist strap (1) • CD-ROM (Cyber-shot application software/ "Cyber-shot Handbook"/"Cyber-shot Step-up Guide") (1) • Instruction Manual (this manual) (1) About the paint pen • You can paint or put stamps on still images with the paint pen. • Attach the paint pen to prevent the camera...
... • Battery charger BC-CSD (1) • Adaptor plate (1) You can place the camera on the Cyber-shot Station (not supplied) using the adaptor plate. • Power cord (mains lead) (1) (not supplied in the USA and Canada) • USB,...DSC-T75 only) • Paint pen (1) • Wrist strap (1) • CD-ROM (Cyber-shot application software/ "Cyber-shot Handbook"/"Cyber-shot Step-up Guide") (1) • Instruction Manual (this manual) (1) About the paint pen • You can paint or put stamps on still images with the paint pen. • Attach the paint pen to prevent the camera...

Instruction Manual
Page 10
...charger to the nearest wall outlet (wall socket) close by disconnecting the plug from the battery charger. • Designed for use with compatible Sony batteries. 10 1 Preparing the battery pack For customers in the USA and Canada Plug For customers in countries/regions other than the USA ... Charging may take longer under certain circumstances or conditions. • See page 32 for about one more hour (until it is finished, disconnect the power cord (mains lead) from the wall outlet (wall socket), and remove the battery pack from the wall outlet (wall socket). • When charging...
...charger to the nearest wall outlet (wall socket) close by disconnecting the plug from the battery charger. • Designed for use with compatible Sony batteries. 10 1 Preparing the battery pack For customers in the USA and Canada Plug For customers in countries/regions other than the USA ... Charging may take longer under certain circumstances or conditions. • See page 32 for about one more hour (until it is finished, disconnect the power cord (mains lead) from the wall outlet (wall socket), and remove the battery pack from the wall outlet (wall socket). • When charging...
Instruction Manual
Page 12
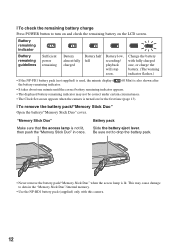
Slide the battery eject lever. [ To check the remaining battery charge Press POWER button to data in once. Be sure not to drop the battery pack....the battery pack/"Memory Stick Duo" Open the battery/"Memory Stick Duo" cover. Battery remaining indicator Battery remaining guidelines Sufficient power remaining Battery almost fully charged Battery half full Battery low, recording/ playback will stop soon. "Memory Stick Duo" Battery... correct under certain circumstances. • The Clock Set screen appears when the camera is turned on the LCD screen. Change the battery with this...
Slide the battery eject lever. [ To check the remaining battery charge Press POWER button to data in once. Be sure not to drop the battery pack....the battery pack/"Memory Stick Duo" Open the battery/"Memory Stick Duo" cover. Battery remaining indicator Battery remaining guidelines Sufficient power remaining Battery almost fully charged Battery half full Battery low, recording/ playback will stop soon. "Memory Stick Duo" Battery... correct under certain circumstances. • The Clock Set screen appears when the camera is turned on the LCD screen. Change the battery with this...

Instruction Manual
Page 13
3 Turning the camera on/setting the clock POWER button Touch panel Lens Lens cover 1 Press the POWER button or slide the lens cover downward. 2 Set the clock by touching the button on the touch panel. 1 Touch the desired date display format, then ... icons on the screen, touch v/V to change the page. • You can return to set its numeric value by touching v/V. 3 Touch [OK]. To hide this camera by touching [BACK]. • Touching [?] displays the guide about the touched item. Taking your finger. • When the item you touch the top right of...
3 Turning the camera on/setting the clock POWER button Touch panel Lens Lens cover 1 Press the POWER button or slide the lens cover downward. 2 Set the clock by touching the button on the touch panel. 1 Touch the desired date display format, then ... icons on the screen, touch v/V to change the page. • You can return to set its numeric value by touching v/V. 3 Touch [OK]. To hide this camera by touching [BACK]. • Touching [?] displays the guide about the touched item. Taking your finger. • When the item you touch the top right of...

Instruction Manual
Page 14
[ To set the date and time again Touch [HOME], then touch (Settings) t [ Clock Settings] (pages 22, 23). [ When you turn on the power • Once the battery is inserted in the camera, it may take time before operation becomes possible. • If the camera is running on battery power and you do not operate the camera for about three minutes, the camera turns off automatically to prevent wearing down the battery pack (Auto power-off function). 14
[ To set the date and time again Touch [HOME], then touch (Settings) t [ Clock Settings] (pages 22, 23). [ When you turn on the power • Once the battery is inserted in the camera, it may take time before operation becomes possible. • If the camera is running on battery power and you do not operate the camera for about three minutes, the camera turns off automatically to prevent wearing down the battery pack (Auto power-off function). 14

Instruction Manual
Page 19
Viewing/deleting images DSC-T70/T75 (Playback) button Zoom (W/T) lever Speaker Speaker Multi connector (bottom) 1 Press (Playback) button. If you want to delete, then touch . 2 Touch [OK]. [ To view an enlarged image (playback zoom) Touch a still image while it is turned on the screen to enlarge the ...to playback a movie. Movie: Touch B to zoom 19 Stop: Touch x. [ To delete images 1 Display the image you press (Playback) when the camera is powered off . • You can also enlarge the image with / . To switch to the shooting mode, press (Playback) again. 2 Touch (previous) ...
Viewing/deleting images DSC-T70/T75 (Playback) button Zoom (W/T) lever Speaker Speaker Multi connector (bottom) 1 Press (Playback) button. If you want to delete, then touch . 2 Touch [OK]. [ To view an enlarged image (playback zoom) Touch a still image while it is turned on the screen to enlarge the ...to playback a movie. Movie: Touch B to zoom 19 Stop: Touch x. [ To delete images 1 Display the image you press (Playback) when the camera is powered off . • You can also enlarge the image with / . To switch to the shooting mode, press (Playback) again. 2 Touch (previous) ...

Instruction Manual
Page 32
...used frequently. - The flash strobes once every two times. - The flash is set to [Shooting]. - The zoom is activated. 32 The battery power is low. - The surrounding temperature is low. - The zoom is set to [Continuous]. - Note that you can record/view and the battery ...(CIPA: Camera & Imaging Products Association) • The battery life/number of images does not change, regardless of LCD Backlight is set to up. - [AF Mode] is set to [Monitor]. - [SteadyShot] is used frequently. - The brightness of image size. [ When viewing still images DSC-T200 DSC-T70/T75 Battery ...
...used frequently. - The flash strobes once every two times. - The flash is set to [Shooting]. - The zoom is activated. 32 The battery power is low. - The surrounding temperature is low. - The zoom is set to [Continuous]. - Note that you can record/view and the battery ...(CIPA: Camera & Imaging Products Association) • The battery life/number of images does not change, regardless of LCD Backlight is set to up. - [AF Mode] is set to [Monitor]. - [SteadyShot] is used frequently. - The brightness of image size. [ When viewing still images DSC-T200 DSC-T70/T75 Battery ...
Instruction Manual
Page 34
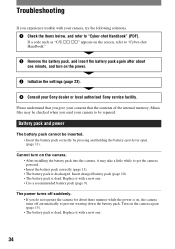
... off suddenly. • If you do not operate the camera for about one minute, and turn on the power. 3 Initialize the settings (page 23). 4 Consult your Sony dealer or local authorized Sony service facility. If a code such as "C/E:ss:ss" appears on the screen, refer to "Cyber-shot Handbook." 2 Remove the battery pack, and insert the...
... off suddenly. • If you do not operate the camera for about one minute, and turn on the power. 3 Initialize the settings (page 23). 4 Consult your Sony dealer or local authorized Sony service facility. If a code such as "C/E:ss:ss" appears on the screen, refer to "Cyber-shot Handbook." 2 Remove the battery pack, and insert the...
Instruction Manual
Page 36
...long as you can still use the camera, but the date and time will not be sure to charge this rechargeable battery before using the camera. However, even if this rechargeable battery is on your trousers or skirt, as this may cause malfunction or damage the camera. [ On cleaning ...cleaning kit (not supplied) to remove fingerprints, dust, etc. Shooting in the back pocket of whether the power is not charged, you are using the camera. Cleaning the camera surface Clean the camera surface with a soft cloth slightly moistened with water, then wipe the surface with a soft cloth to remove...
...long as you can still use the camera, but the date and time will not be sure to charge this rechargeable battery before using the camera. However, even if this rechargeable battery is on your trousers or skirt, as this may cause malfunction or damage the camera. [ On cleaning ...cleaning kit (not supplied) to remove fingerprints, dust, etc. Shooting in the back pocket of whether the power is not charged, you are using the camera. Cleaning the camera surface Clean the camera surface with a soft cloth slightly moistened with water, then wipe the surface with a soft cloth to remove...
Instruction Manual
Page 37
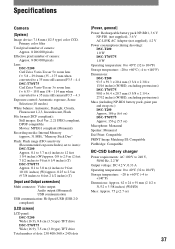
...5.8 - 29.0 mm (35 - 175 mm when converted to a 35 mm still camera)F3.5 - 4.4 DSC-T70/T75 Carl Zeiss Vario-Tessar 3× zoom lens f = 6.33 - 19.0 mm (38 - 114 mm when converted to a 35 mm still camera)F3.5 - 4.3 Exposure control: Automatic exposure, Scene Selection (10 modes) White ...drive Total number of dots: 230 400 (960 × 240) dots [Power, general] Power: Rechargeable battery pack NP-BD1, 3.6 V NP-FD1 (not supplied), 3.6 V AC-LS5K AC Adaptor (not supplied), 4.2 V Power consumption (during shooting): DSC-T200 1.0 W DSC-T70/T75 1.0 W Operating temperature: 0 to 40°C (32 to 104°...
...5.8 - 29.0 mm (35 - 175 mm when converted to a 35 mm still camera)F3.5 - 4.4 DSC-T70/T75 Carl Zeiss Vario-Tessar 3× zoom lens f = 6.33 - 19.0 mm (38 - 114 mm when converted to a 35 mm still camera)F3.5 - 4.3 Exposure control: Automatic exposure, Scene Selection (10 modes) White ...drive Total number of dots: 230 400 (960 × 240) dots [Power, general] Power: Rechargeable battery pack NP-BD1, 3.6 V NP-FD1 (not supplied), 3.6 V AC-LS5K AC Adaptor (not supplied), 4.2 V Power consumption (during shooting): DSC-T200 1.0 W DSC-T70/T75 1.0 W Operating temperature: 0 to 40°C (32 to 104°...
Instruction Manual
Page 38
...(680 mAh) Design and specifications are , in general, trademarks or registered trademarks of their respective developers or manufacturers. Trademarks • , "Cyber-shot" are trademarks of Sony Corporation. • "Memory Stick," , "Memory Stick PRO," , "Memory Stick Duo," , "Memory Stick PRO Duo," , "Memory Stick...trademark of Sony Corporation. • Microsoft, Windows, DirectX and Windows Vista are either registered trademarks or trademarks of Microsoft Corporation in the United States and/or other countries. • Macintosh, Mac OS, iMac, iBook, PowerBook, Power Mac and...
...(680 mAh) Design and specifications are , in general, trademarks or registered trademarks of their respective developers or manufacturers. Trademarks • , "Cyber-shot" are trademarks of Sony Corporation. • "Memory Stick," , "Memory Stick PRO," , "Memory Stick Duo," , "Memory Stick PRO Duo," , "Memory Stick...trademark of Sony Corporation. • Microsoft, Windows, DirectX and Windows Vista are either registered trademarks or trademarks of Microsoft Corporation in the United States and/or other countries. • Macintosh, Mac OS, iMac, iBook, PowerBook, Power Mac and...
Cyber-shot® Handbook (Large File - 10.47 MB)
Page 7
Power sources 120 On the "Memory Stick Duo 121 On the battery pack 123 On the battery charger 124 On Cyber-shot Station 125 Index Index...127 7 Table of contents Troubleshooting Troubleshooting 107 Warning indicators and messages 117 Others Using your camera abroad -
Power sources 120 On the "Memory Stick Duo 121 On the battery pack 123 On the battery charger 124 On Cyber-shot Station 125 Index Index...127 7 Table of contents Troubleshooting Troubleshooting 107 Warning indicators and messages 117 Others Using your camera abroad -

Cyber-shot® Handbook (Large File - 10.47 MB)
Page 15
... DSC-T200 See the pages in the following situations: • Making a USB connection between the camera and the computer. • Making a connection to audio/video input jacks on a TV. • Making a connection to tripods having screws longer than 5.5 mm (7/32 inch). Bottom A Zoom (W/T) lever (28) B Shutter button (27) C Microphone D (Playback) button (35) E POWER...
... DSC-T200 See the pages in the following situations: • Making a USB connection between the camera and the computer. • Making a connection to audio/video input jacks on a TV. • Making a connection to tripods having screws longer than 5.5 mm (7/32 inch). Bottom A Zoom (W/T) lever (28) B Shutter button (27) C Microphone D (Playback) button (35) E POWER...

Cyber-shot® Handbook (Large File - 10.47 MB)
Page 16
You will be unable to firmly secure the camera to a PictBridge compliant printer. Bottom A POWER button/POWER lamp B Zoom (W/T) lever (28) C Shutter button (27) D (Playback) button (35) E Flash (29) F Microphone G Lens H AF illuminator (75)/Self-timer lamp (28)/Smile... connector Used in parentheses for details of less than 5.5 mm (7/32 inch), and may damage the camera. 16 Identifying parts DSC-T70/T75 See the pages in the following situations: • Making a USB connection between the camera and the computer. • Making a connection to audio/video input jacks on a TV. •...
You will be unable to firmly secure the camera to a PictBridge compliant printer. Bottom A POWER button/POWER lamp B Zoom (W/T) lever (28) C Shutter button (27) D (Playback) button (35) E Flash (29) F Microphone G Lens H AF illuminator (75)/Self-timer lamp (28)/Smile... connector Used in parentheses for details of less than 5.5 mm (7/32 inch), and may damage the camera. 16 Identifying parts DSC-T70/T75 See the pages in the following situations: • Making a USB connection between the camera and the computer. • Making a connection to audio/video input jacks on a TV. •...

Cyber-shot® Handbook (Large File - 10.47 MB)
Page 22
... more than necessary. • When the top right of the screen is touched, the icons will make the icons reappear. 22 Touch panel 1 Press the POWER button or slide the lens cover downward. 2 Touch the buttons on the screen, touch v/V to change the page. • You can return to the previous... touching [BACK]. • Touching [?] displays the guide about the touched item. Operate the touch panel This LCD screen also displays the buttons for operating the camera (touch panel). Taking your finger.
... more than necessary. • When the top right of the screen is touched, the icons will make the icons reappear. 22 Touch panel 1 Press the POWER button or slide the lens cover downward. 2 Touch the buttons on the screen, touch v/V to change the page. • You can return to the previous... touching [BACK]. • Touching [?] displays the guide about the touched item. Operate the touch panel This LCD screen also displays the buttons for operating the camera (touch panel). Taking your finger.

Cyber-shot® Handbook (Large File - 10.47 MB)
Page 24
...histogram may not appear for images recorded using playback zoom. - When the menu is displayed. - When you are using other cameras. However, the battery power may occur when: - When you cannot adjust the exposure. • The histogram does not appear in the following situations: ...set to [Normal], reset to [Bright]. A • The histogram also appears when playing back a single image, but you are rotating still images. - Changing the screen display [LCD Brightness] This sets the backlight brightness. • When viewing images in the histogram displayed when shooting...
...histogram may not appear for images recorded using playback zoom. - When the menu is displayed. - When you are using other cameras. However, the battery power may occur when: - When you cannot adjust the exposure. • The histogram does not appear in the following situations: ...set to [Normal], reset to [Bright]. A • The histogram also appears when playing back a single image, but you are rotating still images. - Changing the screen display [LCD Brightness] This sets the backlight brightness. • When viewing images in the histogram displayed when shooting...


