

Instruction Manual
Page 7
... Motion Browser" (supplied 29 Viewing "Cyber-shot Handbook 30 Indicators on the screen 31 Battery life and memory capacity 33 Battery life and number of images you can record/view 33 Number of still images and recordable time of contents IMPORTANT SAFEGUARDS 2 Read this first 4 Notes on using the camera 8 Getting started 9 Checking the...
... Motion Browser" (supplied 29 Viewing "Cyber-shot Handbook 30 Indicators on the screen 31 Battery life and memory capacity 33 Battery life and number of images you can record/view 33 Number of still images and recordable time of contents IMPORTANT SAFEGUARDS 2 Read this first 4 Notes on using the camera 8 Getting started 9 Checking the...
Instruction Manual
Page 8
... No compensation for damaged content or recording failure Sony cannot compensate for Camera File system) universal standard established by JEITA (Japan Electronics and Information Technology Industries Association). • Sony does not guarantee that the camera will play back images recorded with a soft ...cloth. Leaving liquids on recording/playback • Before you may cause the malfunction of the camera or recording media, etc. 8 It ...
... No compensation for damaged content or recording failure Sony cannot compensate for Camera File system) universal standard established by JEITA (Japan Electronics and Information Technology Industries Association). • Sony does not guarantee that the camera will play back images recorded with a soft ...cloth. Leaving liquids on recording/playback • Before you may cause the malfunction of the camera or recording media, etc. 8 It ...
Instruction Manual
Page 9
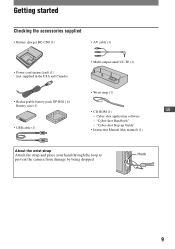
Cyber-shot application software - "Cyber-shot Step-up Guide" • Instruction Manual (this manual) (1) About the wrist strap Attach the strap and place your hand through the loop to prevent the camera from damage by being dropped. Hook 9 Getting started Checking the accessories supplied • Battery charger BC-CSD (1) • AV cable (1) • Power cord ...USA and Canada) • Multi-output stand UC-TE (1) • Wrist strap (1) • Rechargeable battery pack NP-BD1 (1)/ Battery case (1) • CD-ROM (1) GB - "Cyber-shot Handbook" • USB cable (1) -
Cyber-shot application software - "Cyber-shot Step-up Guide" • Instruction Manual (this manual) (1) About the wrist strap Attach the strap and place your hand through the loop to prevent the camera from damage by being dropped. Hook 9 Getting started Checking the accessories supplied • Battery charger BC-CSD (1) • AV cable (1) • Power cord ...USA and Canada) • Multi-output stand UC-TE (1) • Wrist strap (1) • Rechargeable battery pack NP-BD1 (1)/ Battery case (1) • CD-ROM (1) GB - "Cyber-shot Handbook" • USB cable (1) -
Instruction Manual
Page 10
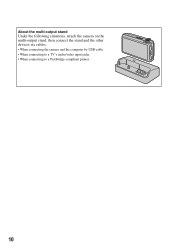
About the multi-output stand Under the following situations, attach the camera on the multi-output stand, then connect the stand and the other devices via cables. • When connecting the camera and the computer by USB cable. • When connecting to a TV's audio/video input jacks. • When connecting to a PictBridge-compliant printer. 10
About the multi-output stand Under the following situations, attach the camera on the multi-output stand, then connect the stand and the other devices via cables. • When connecting the camera and the computer by USB cable. • When connecting to a TV's audio/video input jacks. • When connecting to a PictBridge-compliant printer. 10

Instruction Manual
Page 12
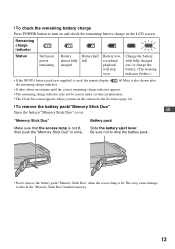
... "Memory Stick Duo" (not supplied). 3Insert the battery pack. 4Close the battery/"Memory Stick Duo" cover. [ When there is no "Memory Stick Duo" inserted The camera records/plays back images using the internal memory (approx. 4 MB). 12
... "Memory Stick Duo" (not supplied). 3Insert the battery pack. 4Close the battery/"Memory Stick Duo" cover. [ When there is no "Memory Stick Duo" inserted The camera records/plays back images using the internal memory (approx. 4 MB). 12
Instruction Manual
Page 13
... may not be correct under certain circumstances. • The Clock Set screen appears when you turn on and check the remaining battery charge on the camera for the first time (page 14). [ To remove the battery pack/"Memory Stick Duo" GB Open the battery/"Memory Stick Duo" cover. [ To check the...
... may not be correct under certain circumstances. • The Clock Set screen appears when you turn on and check the remaining battery charge on the camera for the first time (page 14). [ To remove the battery pack/"Memory Stick Duo" GB Open the battery/"Memory Stick Duo" cover. [ To check the...
Instruction Manual
Page 14
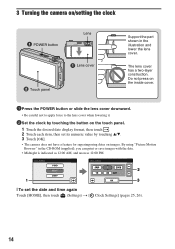
... cover downward. • Be careful not to apply force to the lens cover when lowering it. 2Set the clock by touching v/V. 3 Touch [OK]. • The camera does not have a feature for superimposing dates on /setting the clock POWER button Lens Lens cover Touch panel Support the part shown in the CD..., then touch . 2 Touch each item, then set the date and time again Touch [HOME], then touch (Settings) t [ Clock Settings] (pages 25, 26). 14 3 Turning the camera on images. The lens cover has a two-layer construction.
... cover downward. • Be careful not to apply force to the lens cover when lowering it. 2Set the clock by touching v/V. 3 Touch [OK]. • The camera does not have a feature for superimposing dates on /setting the clock POWER button Lens Lens cover Touch panel Support the part shown in the CD..., then touch . 2 Touch each item, then set the date and time again Touch [HOME], then touch (Settings) t [ Clock Settings] (pages 25, 26). 14 3 Turning the camera on images. The lens cover has a two-layer construction.
Instruction Manual
Page 15
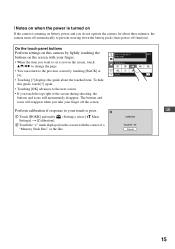
...the screen during shooting, the buttons and icons will reappear when you do not operate the camera for about the touched item. The buttons and icons will momentarily disappear. To hide this camera by touching [BACK] or [×]. • Touching [?] displays the guide about three ...minutes, the camera turns off automatically to prevent wearing down the battery pack (Auto power-off the screen....
...the screen during shooting, the buttons and icons will reappear when you do not operate the camera for about the touched item. The buttons and icons will momentarily disappear. To hide this camera by touching [BACK] or [×]. • Touching [?] displays the guide about three ...minutes, the camera turns off automatically to prevent wearing down the battery pack (Auto power-off the screen....

Instruction Manual
Page 16
Position the subject in the center of the focus frame. 16 When shooting movies: Select . 2Open the lens cover. 3Hold the camera, with the mode switch. Shooting images Mode switch Zoom (W/T) lever Stereo microphone Flash Mode switch (Touch panel side) Tripod receptacle (bottom) Shutter button Self-timer lamp Lens cover 1Select the shooting mode with your elbows pressed against your body to steady it. When shooting still images: Select .
Position the subject in the center of the focus frame. 16 When shooting movies: Select . 2Open the lens cover. 3Hold the camera, with the mode switch. Shooting images Mode switch Zoom (W/T) lever Stereo microphone Flash Mode switch (Touch panel side) Tripod receptacle (bottom) Shutter button Self-timer lamp Lens cover 1Select the shooting mode with your elbows pressed against your body to steady it. When shooting still images: Select .

Instruction Manual
Page 17
... mode, while is used when shooting in [VGA] mode. When shooting still images: 1 Press and hold the shutter button halfway down to stop the recording. • You can select the point to bring into the camera. AE/AF lock indicator When shooting movies: 1 Press the shutter button ...fully down. 2 Press the shutter button fully down . • You can shoot the still images by touching the screen. The z (AE/AF lock) indicator (...
... mode, while is used when shooting in [VGA] mode. When shooting still images: 1 Press and hold the shutter button halfway down to stop the recording. • You can select the point to bring into the camera. AE/AF lock indicator When shooting movies: 1 Press the shutter button ...fully down. 2 Press the shutter button fully down . • You can shoot the still images by touching the screen. The z (AE/AF lock) indicator (...
Instruction Manual
Page 21
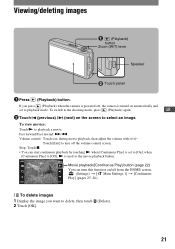
... on/off from the HOME screen, (Settings) t [ Main Settings 1] t [Continuous Play] (pages 25, 26). [ To delete images 1 Display the image you press (Playback) when the camera is set to playback a movie. Stop: Touch x. • You can turn off , the...
... on/off from the HOME screen, (Settings) t [ Main Settings 1] t [Continuous Play] (pages 25, 26). [ To delete images 1 Display the image you press (Playback) when the camera is set to playback a movie. Stop: Touch x. • You can turn off , the...
Instruction Manual
Page 22
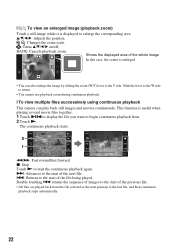
... from the file selected as the start of the whole image In this case, the center is enlarged. • You can play back still images and movies continuously. This function is displayed to the last file, and then continuous playback stops automatically. 22 Double touching . Shows the...lever to the W side to return. • You cannot use playback zoom during continuous playback. [ To view multiple files successively using continuous playback This camera can also enlarge the image by sliding the zoom (W/T) lever to the start of the previous file. • All files are played back from ....
... from the file selected as the start of the whole image In this case, the center is enlarged. • You can play back still images and movies continuously. This function is displayed to the last file, and then continuous playback stops automatically. 22 Double touching . Shows the...lever to the W side to return. • You cannot use playback zoom during continuous playback. [ To view multiple files successively using continuous playback This camera can also enlarge the image by sliding the zoom (W/T) lever to the start of the previous file. • All files are played back from ....

Instruction Manual
Page 23
... index mode, you want to delete. For details on changing the music, refer to Help in the CD-ROM (supplied) to your computer. 3 Attach the camera on the multi-output stand, then connect the stand and a computer via USB cable. 4 Start up "Music Transfer" installed to your computer and change the...
... index mode, you want to delete. For details on changing the music, refer to Help in the CD-ROM (supplied) to your computer. 3 Attach the camera on the multi-output stand, then connect the stand and a computer via USB cable. 4 Start up "Music Transfer" installed to your computer and change the...
Instruction Manual
Page 24
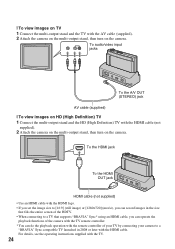
...; Use an HDMI cable with the HDMI logo. • If you set the image size to [16:9] (still image) or [1280×720] (movie), you can record images in the size that fills the entire screen ...BRAVIA" Sync* using an HDMI cable, you can operate the playback functions of the camera with the TV remote controller. * You can do the playback operation with the remote controller of your ...Connect the multi-output stand and the TV with the AV cable (supplied). 2 Attach the camera on the multi-output stand, then turn on the camera. To audio/video input jacks To the A/V OUT (STEREO) jack AV cable (supplied)...
...; Use an HDMI cable with the HDMI logo. • If you set the image size to [16:9] (still image) or [1280×720] (movie), you can record images in the size that fills the entire screen ...BRAVIA" Sync* using an HDMI cable, you can operate the playback functions of the camera with the TV remote controller. * You can do the playback operation with the remote controller of your ...Connect the multi-output stand and the TV with the AV cable (supplied). 2 Attach the camera on the multi-output stand, then turn on the camera. To audio/video input jacks To the A/V OUT (STEREO) jack AV cable (supplied)...

Instruction Manual
Page 25
... category you want to display the HOME screen. GB Function Guide If the function guide is the gateway screen for all the functions of the camera, and can be called up regardless of the screen to display the other setting items. • This operation only applies when (Settings) has been selected...
... category you want to display the HOME screen. GB Function Guide If the function guide is the gateway screen for all the functions of the camera, and can be called up regardless of the screen to display the other setting items. • This operation only applies when (Settings) has been selected...
Instruction Manual
Page 29
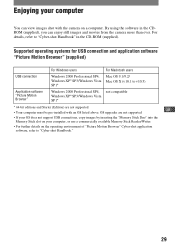
... your computer You can enjoy still images and movies from the camera more than ever. OS upgrades are not supported. Enjoying your computer, or use a commercially available Memory Stick Reader/Writer. • For further details on the operating environment of "Picture Motion Browser" Cyber-shot application software, refer to "Cyber-shot Handbook." 29 Supported operating systems...
... your computer You can enjoy still images and movies from the camera more than ever. OS upgrades are not supported. Enjoying your computer, or use a commercially available Memory Stick Reader/Writer. • For further details on the operating environment of "Picture Motion Browser" Cyber-shot application software, refer to "Cyber-shot Handbook." 29 Supported operating systems...
Instruction Manual
Page 30
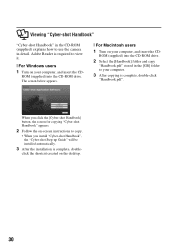
...insert the CD- Adobe Reader is required to view it. [ For Windows users 1 Turn on the desktop. 30 When you install "Cyber-shot Handbook", the "Cyber-shot Step-up Guide" will be installed automatically. 3 After the installation is complete, double- ROM (supplied) into the CD-ROM drive. ...) into the CD-ROM drive. 2 Select the [Handbook] folder and copy "Handbook.pdf" stored in detail. Viewing "Cyber-shot Handbook" "Cyber-shot Handbook" in the CD-ROM (supplied) explains how to use the camera in the [GB] folder to your computer. 3 After copying is complete, double-click "Handbook.pdf".
...insert the CD- Adobe Reader is required to view it. [ For Windows users 1 Turn on the desktop. 30 When you install "Cyber-shot Handbook", the "Cyber-shot Step-up Guide" will be installed automatically. 3 After the installation is complete, double- ROM (supplied) into the CD-ROM drive. ...) into the CD-ROM drive. 2 Select the [Handbook] folder and copy "Handbook.pdf" stored in detail. Viewing "Cyber-shot Handbook" "Cyber-shot Handbook" in the CD-ROM (supplied) explains how to use the camera in the [GB] folder to your computer. 3 After copying is complete, double-click "Handbook.pdf".
Instruction Manual
Page 33
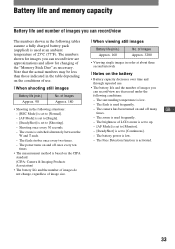
...used at about three second intervals [ Notes on the CIPA standard. (CIPA: Camera & Imaging Products Association) • The battery life and the number of images do not change, regardless of image size. [ When viewing still images Battery life (min.) Approx. 160 No. The zoom is used frequently....measurement method is set to [Shooting]. - The numbers shown for images you can record/view are decreased under the following conditions: - The camera has been turned on the conditions of use . • The battery life and the number of images you can record/view are approximations ...
...used at about three second intervals [ Notes on the CIPA standard. (CIPA: Camera & Imaging Products Association) • The battery life and the number of images do not change, regardless of image size. [ When viewing still images Battery life (min.) Approx. 160 No. The zoom is used frequently....measurement method is set to [Shooting]. - The numbers shown for images you can record/view are decreased under the following conditions: - The camera has been turned on the conditions of use . • The battery life and the number of images you can record/view are approximations ...

Instruction Manual
Page 34
... and the length of time for movies may be different. [ The approximate recordable number of still images (Units: Images) Internal Capacity memory "Memory Stick Duo" formatted with this camera Size Approx. 4 MB 256 MB 512 MB 1 GB 2 GB 4 GB 8 GB 16 GB 10M 1 58 120 246 496 982 1973 4001 5M 1 92...]. • When the number of remaining shootable images is greater than 9,999, the ">9999" indicator appears. • When an image was recorded using an earlier Sony model and is played back on the camera, the image may not appear in the actual image size. 34
... and the length of time for movies may be different. [ The approximate recordable number of still images (Units: Images) Internal Capacity memory "Memory Stick Duo" formatted with this camera Size Approx. 4 MB 256 MB 512 MB 1 GB 2 GB 4 GB 8 GB 16 GB 10M 1 58 120 246 496 982 1973 4001 5M 1 92...]. • When the number of remaining shootable images is greater than 9,999, the ">9999" indicator appears. • When an image was recorded using an earlier Sony model and is played back on the camera, the image may not appear in the actual image size. 34

Instruction Manual
Page 35
... 1:08:30 2:15:50 4:32:50 9:13:20 * Movies with this camera will be recorded on a "Memory Stick PRO Duo". • You cannot play back the movies shot using another camera. • The movies shot with the size set to media therefore varies. For example, the recording time... to media is used to the scene being shot. GB • The camera incorporates a VBR (Variable Bit Rate) system for all...
... 1:08:30 2:15:50 4:32:50 9:13:20 * Movies with this camera will be recorded on a "Memory Stick PRO Duo". • You cannot play back the movies shot using another camera. • The movies shot with the size set to media therefore varies. For example, the recording time... to media is used to the scene being shot. GB • The camera incorporates a VBR (Variable Bit Rate) system for all...


