

User Guide
Page 1
... the serial number in Japan Digital Still Camera User's Guide/ Troubleshooting DSC-T30 "Read This First" (separate volume) Explains the set-up and basic operations for future reference. Model No. DSC-T30 Serial No © 2006 Sony Corporation Enjoying the camera Using the menu Using the ...Setup screen Using your computer Printing still images Connecting your camera to frequently asked questions can be found at our Customer...
... the serial number in Japan Digital Still Camera User's Guide/ Troubleshooting DSC-T30 "Read This First" (separate volume) Explains the set-up and basic operations for future reference. Model No. DSC-T30 Serial No © 2006 Sony Corporation Enjoying the camera Using the menu Using the ...Setup screen Using your computer Printing still images Connecting your camera to frequently asked questions can be found at our Customer...

User Guide
Page 5
...camera. 5 Otherwise, fire or injury may cause harmful interference to radio communications. For more of the following two conditions: (1) This device may not cause harmful interference, and (2) this device must be determined by one or more information regarding recycling of Conformity Trade Name: SONY Model No.: DSC-T30 Responsible Party: Sony... Electronics Inc. Telephone No.: 858-942-2230 This device complies with the limits for a digital device pursuant to Subpart B of Part...
...camera. 5 Otherwise, fire or injury may cause harmful interference to radio communications. For more of the following two conditions: (1) This device may not cause harmful interference, and (2) this device must be determined by one or more information regarding recycling of Conformity Trade Name: SONY Model No.: DSC-T30 Responsible Party: Sony... Electronics Inc. Telephone No.: 858-942-2230 This device complies with the limits for a digital device pursuant to Subpart B of Part...

User Guide
Page 7
... or other bright light. "Memory Stick": you can use a "Memory Stick Duo" with your data by making a back up Do not turn off the camera or remove the battery pack or "Memory Stick Duo" while the access lamp is not completely discharged. The lens for if recording or playback is... battery pack for a long time, use up method. Notes on "Memory Stick Duo", see page 106. Other memory cards cannot be used by this camera has been produced under a quality assurance system certified by Carl Zeiss in accordance with the quality standards of the battery pack as the internal memory...
... or other bright light. "Memory Stick": you can use a "Memory Stick Duo" with your data by making a back up Do not turn off the camera or remove the battery pack or "Memory Stick Duo" while the access lamp is not completely discharged. The lens for if recording or playback is... battery pack for a long time, use up method. Notes on "Memory Stick Duo", see page 106. Other memory cards cannot be used by this camera has been produced under a quality assurance system certified by Carl Zeiss in accordance with the quality standards of the battery pack as the internal memory...
User Guide
Page 8
... manufactured using extremely high-precision technology so over 99.99% of images recorded or edited with your camera on your camera are not actual images shot using the camera (page 108). • Do not shake or strike the camera. The heat of flash emission may be contrary to direct sunlight for effective use . Black, white...
... manufactured using extremely high-precision technology so over 99.99% of images recorded or edited with your camera on your camera are not actual images shot using the camera (page 108). • Do not shake or strike the camera. The heat of flash emission may be contrary to direct sunlight for effective use . Black, white...
User Guide
Page 9
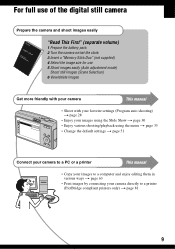
...the digital still camera Prepare the camera and shoot images easily "Read This First" (separate volume) 1 Prepare the battery pack 2 Turn the camera on/set the clock 3 Insert a "Memory Stick Duo" (not supplied) 4 Select the image size for use 5 Shoot images easily (Auto adjustment mode) Shoot still images... (Scene Selection) 6 View/delete images Get more friendly with your camera This manual • Shoot with your favorite settings (Program auto shooting) t page 28 • Enjoy ...
...the digital still camera Prepare the camera and shoot images easily "Read This First" (separate volume) 1 Prepare the battery pack 2 Turn the camera on/set the clock 3 Insert a "Memory Stick Duo" (not supplied) 4 Select the image size for use 5 Shoot images easily (Auto adjustment mode) Shoot still images... (Scene Selection) 6 View/delete images Get more friendly with your camera This manual • Shoot with your favorite settings (Program auto shooting) t page 28 • Enjoy ...

User Guide
Page 10
... the screen 19 Changing the screen display 23 Number of still images and recording time of movies 24 When you do ... Using the mode switch 28 Using the Slide Show 30 Using the menu Using menu items 33 Menu items 34 Shooting menu 36 (Camera) COLOR (Color Mode) (EV) 9 (Focus) (Metering Mode) WB (White Bal) ISO (P.Quality) Mode (REC Mode)...) (Contrast) (Sharpness) (Setup) 10 On the effects of contents Read this first 5 Notes on using your camera 7 Enjoying the camera Basic techniques for better images 13 Focus - Adjusting the light intensity 14 Color - On "image quality" and "image...
... the screen 19 Changing the screen display 23 Number of still images and recording time of movies 24 When you do ... Using the mode switch 28 Using the Slide Show 30 Using the menu Using menu items 33 Menu items 34 Shooting menu 36 (Camera) COLOR (Color Mode) (EV) 9 (Focus) (Metering Mode) WB (White Bal) ISO (P.Quality) Mode (REC Mode)...) (Contrast) (Sharpness) (Setup) 10 On the effects of contents Read this first 5 Notes on using your camera 7 Enjoying the camera Basic techniques for better images 13 Focus - Adjusting the light intensity 14 Color - On "image quality" and "image...
User Guide
Page 11
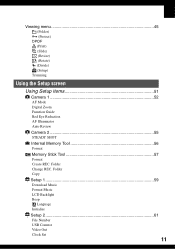
Folder Change REC. Viewing menu 45 (Folder) - (Protect) DPOF (Print) (Slide) (Resize) (Rotate) (Divide) (Setup) Trimming Using the Setup screen Using Setup items 51 Camera 1 52 1 AF Mode Digital Zoom Function Guide Red Eye Reduction AF Illuminator Auto Review Camera 2 55 2 STEADY SHOT Internal Memory Tool 56 Format Memory Stick Tool 57 Format Create REC. Folder Copy Setup 1 59 1 Download Music Format Music LCD Backlight Beep Language Initialize Setup 2 61 2 File Number USB Connect Video Out Clock Set 11
Folder Change REC. Viewing menu 45 (Folder) - (Protect) DPOF (Print) (Slide) (Resize) (Rotate) (Divide) (Setup) Trimming Using the Setup screen Using Setup items 51 Camera 1 52 1 AF Mode Digital Zoom Function Guide Red Eye Reduction AF Illuminator Auto Review Camera 2 55 2 STEADY SHOT Internal Memory Tool 56 Format Memory Stick Tool 57 Format Create REC. Folder Copy Setup 1 59 1 Download Music Format Music LCD Backlight Beep Language Initialize Setup 2 61 2 File Number USB Connect Video Out Clock Set 11
User Guide
Page 12
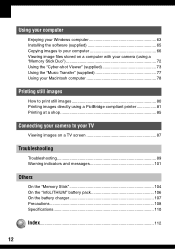
... to your computer 66 Viewing image files stored on a computer with your camera (using a "Memory Stick Duo 72 Using the "Cyber-shot Viewer" (supplied 73 Using the "Music Transfer" (supplied 77 Using your Macintosh computer 78 Printing still images How to print still images 80 Printing images directly using a PictBridge compliant printer 81 Printing at...
... to your computer 66 Viewing image files stored on a computer with your camera (using a "Memory Stick Duo 72 Using the "Cyber-shot Viewer" (supplied 73 Using the "Music Transfer" (supplied 77 Using your Macintosh computer 78 Printing still images How to print still images 80 Printing images directly using a PictBridge compliant printer 81 Printing at...

User Guide
Page 13
... flashing, down . Indicator lit/beeps 60min Then press the shutter button fully down . Press the shutter button fully down . To shoot a still image difficult to press the shutter button only halfway down straight away. Use the flash when you shoot under a low light condition. 13 Remember... to focus on a subject successfully When you press the shutter button halfway down, the camera adjusts the focus automatically (Auto Focus). t See "Hints for preventing blur" (as the mode switch (page 28), the menus (page 33), and...
... flashing, down . Indicator lit/beeps 60min Then press the shutter button fully down . Press the shutter button fully down . To shoot a still image difficult to press the shutter button only halfway down straight away. Use the flash when you shoot under a low light condition. 13 Remember... to focus on a subject successfully When you press the shutter button halfway down, the camera adjusts the focus automatically (Auto Focus). t See "Hints for preventing blur" (as the mode switch (page 28), the menus (page 33), and...

User Guide
Page 14
... using the functions below. However, the image tends to become darker. 14 Adjusting EV: Allows you can create various images by the camera. To adjust the ISO sensitivity t page 41 High ISO sensitivity Records a bright image even when shooting in the auto adjustment mode. ...too much light an image pickup device (equivalent to determine the exposure. Shutter speed = Length of time the camera receives Exposure: light Aperture = Size of light that the camera will receive when you to change the part of measurement (sensitivity), estimating how much light Whitish image Correct ...
... using the functions below. However, the image tends to become darker. 14 Adjusting EV: Allows you can create various images by the camera. To adjust the ISO sensitivity t page 41 High ISO sensitivity Records a bright image even when shooting in the auto adjustment mode. ...too much light an image pickup device (equivalent to determine the exposure. Shutter speed = Length of time the camera receives Exposure: light Aperture = Size of light that the camera will receive when you to change the part of measurement (sensitivity), estimating how much light Whitish image Correct ...
User Guide
Page 15
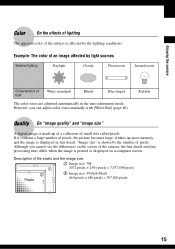
Reddish Quality On "image quality" and "image size" A digital image is displayed in the auto adjustment mode. "Image size" is shown by...up more memory, and the image is made up of a collection of small dots called pixels. Description of the camera, the fine detail and data processing time differ when the image is affected by the lighting conditions. Example: The color... of an image affected by the number of pixels. Enjoying the camera 2304 480 Color On the effects of lighting The apparent color of the subject is printed or displayed on ...
Reddish Quality On "image quality" and "image size" A digital image is displayed in the auto adjustment mode. "Image size" is shown by...up more memory, and the image is made up of a collection of small dots called pixels. Description of the camera, the fine detail and data processing time differ when the image is affected by the lighting conditions. Example: The color... of an image affected by the number of pixels. Enjoying the camera 2304 480 Color On the effects of lighting The apparent color of the subject is printed or displayed on ...

User Guide
Page 17
Identifying parts See the pages in parentheses for details of operation. 1 3 5 1 2 6 2 4 3 5 7 6 4 8 7 8 9 Enjoying the camera A (STEADY SHOT) button (t step 5 in "Read This First") B Shutter button (t step 5 in "Read This First") C POWER button/POWER lamp (t step 2 in "Read This First") D Hook for wrist ...
Identifying parts See the pages in parentheses for details of operation. 1 3 5 1 2 6 2 4 3 5 7 6 4 8 7 8 9 Enjoying the camera A (STEADY SHOT) button (t step 5 in "Read This First") B Shutter button (t step 5 in "Read This First") C POWER button/POWER lamp (t step 2 in "Read This First") D Hook for wrist ...
User Guide
Page 18
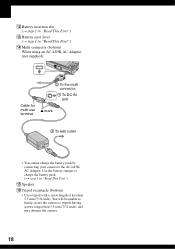
You will be unable to firmly secure the camera to charge the battery pack. (t step 1 in "Read This First") N Multi connector (bottom) When using an AC-LS5K AC ... 2 To the multi connector 1 To DC IN jack v mark 3 To wall outlet • You cannot charge the battery pack by connecting your camera to the AC-LS5K AC Adaptor. Use the battery charger to tripods having screws longer than 5.5 mm (7/32 inch). L Battery insertion slot (t step...First") O Speaker P Tripod receptacle (bottom) • Use a tripod with a screw length of less than 5.5 mm (7/32 inch), and may damage the camera. 18
You will be unable to firmly secure the camera to charge the battery pack. (t step 1 in "Read This First") N Multi connector (bottom) When using an AC-LS5K AC ... 2 To the multi connector 1 To DC IN jack v mark 3 To wall outlet • You cannot charge the battery pack by connecting your camera to the AC-LS5K AC Adaptor. Use the battery charger to tripods having screws longer than 5.5 mm (7/32 inch). L Battery insertion slot (t step...First") O Speaker P Tripod receptacle (bottom) • Use a tripod with a screw length of less than 5.5 mm (7/32 inch), and may damage the camera. 18

User Guide
Page 19
When shooting still images 60min 1 3 4 Display SL 5 1.3 2 Indication Camera mode (Scene Selection) (t step 5 in "Read This First") Camera mode (Program) (28) Flash mode (t step 5 in "Read This First") Flash charging Zoom scaling (t 52, step 5 in "Read This First") When shooting movies 60min 1 STBY... Macro/Magnifying Glass (t step 5 in "Read This First") AF mode (52) AF range finder frame indicator (38) Focus preset distance (38) STEADY SHOT OFF (t step 5 in parentheses for details of operation. Enjoying the camera Indicators on the screen See the pages in "Read This First") 19
When shooting still images 60min 1 3 4 Display SL 5 1.3 2 Indication Camera mode (Scene Selection) (t step 5 in "Read This First") Camera mode (Program) (28) Flash mode (t step 5 in "Read This First") Flash charging Zoom scaling (t 52, step 5 in "Read This First") When shooting movies 60min 1 STBY... Macro/Magnifying Glass (t step 5 in "Read This First") AF mode (52) AF range finder frame indicator (38) Focus preset distance (38) STEADY SHOT OFF (t step 5 in parentheses for details of operation. Enjoying the camera Indicators on the screen See the pages in "Read This First") 19

User Guide
Page 20
Even if the vibration warning appears, you turn on the previous page) However, we recommend that you can still shoot images. Remaining internal memory capacity (25) Remaining "Memory Stick" capacity (24) Recording time [maximum recordable time] (24) Multi Burst interval (43) Remaining...number (41) Bracket Step value (43) Indication Vibration warning (13) • Indicates vibration may prevent you from shooting clear images due to stabilize the camera. Image quality (41) Recording folder (57) • This does not appear when using a tripod or other means to insufficient lighting.
Even if the vibration warning appears, you turn on the previous page) However, we recommend that you can still shoot images. Remaining internal memory capacity (25) Remaining "Memory Stick" capacity (24) Recording time [maximum recordable time] (24) Multi Burst interval (43) Remaining...number (41) Bracket Step value (43) Indication Vibration warning (13) • Indicates vibration may prevent you from shooting clear images due to stabilize the camera. Image quality (41) Recording folder (57) • This does not appear when using a tripod or other means to insufficient lighting.

User Guide
Page 21
Enjoying the camera When playing back still images 60min M VGA 101 1 101 12/12 3 C:32:00 1.3 +2.0EV 4 500 F3.5 5 2 2006 1 1 9: 30 AM BACK/NEXT VOLUME When playing back movies 60min 1 3 4 2 5 A Display 60min M ...
Enjoying the camera When playing back still images 60min M VGA 101 1 101 12/12 3 C:32:00 1.3 +2.0EV 4 500 F3.5 5 2 2006 1 1 9: 30 AM BACK/NEXT VOLUME When playing back movies 60min 1 3 4 2 5 A Display 60min M ...

User Guide
Page 23
... display switch) button longer, you can increase the LCD backlight. • When you are rotating still images. - The shutter speed is displayed. - In index mode - Enjoying the camera Changing the screen display Each time you are using other cameras. 23 When recording movies During playback - When you press the (Screen display switch) button...
... display switch) button longer, you can increase the LCD backlight. • When you are rotating still images. - The shutter speed is displayed. - In index mode - Enjoying the camera Changing the screen display Each time you are using other cameras. 23 When recording movies During playback - When you press the (Screen display switch) button...
User Guide
Page 24
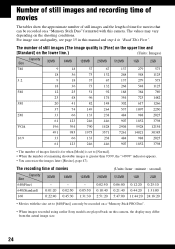
... approximate number of still images and the length of remaining shootable images is greater than 9,999, the ">9999" indicator appears. • You can only be recorded on a "Memory Stick PRO Duo". • When images recorded using earlier Sony models are played back on this camera, the display may... vary depending on a "Memory Stick Duo" formatted with the size set to [640(Fine)] can resize the images later ([Resize], page 47). The number of still images (The image quality is [Fine]...
... approximate number of still images and the length of remaining shootable images is greater than 9,999, the ">9999" indicator appears. • You can only be recorded on a "Memory Stick PRO Duo". • When images recorded using earlier Sony models are played back on this camera, the display may... vary depending on a "Memory Stick Duo" formatted with the size set to [640(Fine)] can resize the images later ([Resize], page 47). The number of still images (The image quality is [Fine]...

User Guide
Page 25
...When a "Memory Stick Duo" is [Fine] on the upper line and [Standard] on images in the internal memory are as follows. The number of still images (The image quality is inserted B [Recording]: Images are recorded on the "Memory Stick Duo". [Playback]: Images on the "Memory Stick Duo". ...[640(Fine)] cannot be recorded using the internal memory. [Playback]: Images stored in the internal memory. This memory is not removable. Enjoying the camera When you can be performed on images on the "Memory Stick Duo" are played back. [Menu, Setup, etc.]: Various functions can record images...
...When a "Memory Stick Duo" is [Fine] on the upper line and [Standard] on images in the internal memory are as follows. The number of still images (The image quality is inserted B [Recording]: Images are recorded on the "Memory Stick Duo". [Playback]: Images on the "Memory Stick Duo". ...[640(Fine)] cannot be recorded using the internal memory. [Playback]: Images stored in the internal memory. This memory is not removable. Enjoying the camera When you can be performed on images on the "Memory Stick Duo" are played back. [Menu, Setup, etc.]: Various functions can record images...

User Guide
Page 26
... that you cannot copy data on a computer to the internal memory. 26 However you copy (back up) data without a "Memory Stick Duo" inserted in the camera. • You cannot copy image data on a "Memory Stick Duo" to the internal memory. • By connecting the...
... that you cannot copy data on a computer to the internal memory. 26 However you copy (back up) data without a "Memory Stick Duo" inserted in the camera. • You cannot copy image data on a "Memory Stick Duo" to the internal memory. • By connecting the...


