Instruction Manual
Page 6
... effective use. These points are operational for if recording or playback is not possible due to the flash surface, resulting in color) that the camera is neither dust-proof, nor splashproof, nor water-proof. In addition to malfunctions and an inability to record images, this manual are not guaranteed.... [ Notes on the LCD screen • The LCD screen is manufactured using extremely high-precision technology so over 99.99% of the camera may cause dirt on the flash surface to become discolored or to stick to a malfunction of the recording cannot be copyrighted. Notes on using...
... effective use. These points are operational for if recording or playback is not possible due to the flash surface, resulting in color) that the camera is neither dust-proof, nor splashproof, nor water-proof. In addition to malfunctions and an inability to record images, this manual are not guaranteed.... [ Notes on the LCD screen • The LCD screen is manufactured using extremely high-precision technology so over 99.99% of the camera may cause dirt on the flash surface to become discolored or to stick to a malfunction of the recording cannot be copyrighted. Notes on using...
Instruction Manual
Page 7
... the batteries/a "Memory Stick Duo" (not supplied 9 2 Turning the camera on/setting the clock 11 Shooting images easily 12 Viewing/deleting images 15 Indicators on using your computer 22 GB Supported Operating Systems for USB connection and application software (supplied 22 Viewing "Cyber-shot Handbook 22 Battery life and memory capacity 23 Battery...
... the batteries/a "Memory Stick Duo" (not supplied 9 2 Turning the camera on/setting the clock 11 Shooting images easily 12 Viewing/deleting images 15 Indicators on using your computer 22 GB Supported Operating Systems for USB connection and application software (supplied 22 Viewing "Cyber-shot Handbook 22 Battery life and memory capacity 23 Battery...
Instruction Manual
Page 8
Hook 8 Getting started Checking the accessories supplied • LR6 (size AA) alkaline batteries (2) • Dedicated USB cable (1) • Wrist strap (1) • Dedicated A/V cable (1) • CD-ROM (Cyber-shot application software/ "Cyber-shot Handbook") (1) • Instruction Manual (this manual) (1) Attach the strap to prevent the camera from damage by being dropped, etc.
Hook 8 Getting started Checking the accessories supplied • LR6 (size AA) alkaline batteries (2) • Dedicated USB cable (1) • Wrist strap (1) • Dedicated A/V cable (1) • CD-ROM (Cyber-shot application software/ "Cyber-shot Handbook") (1) • Instruction Manual (this manual) (1) Attach the strap to prevent the camera from damage by being dropped, etc.
Instruction Manual
Page 9
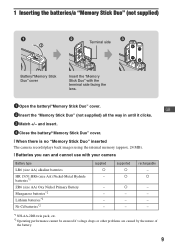
and insert. 4 Close the battery/"Memory Stick Duo" cover. [ When there is no "Memory Stick Duo" inserted The camera records/plays back images using the internal memory (approx. 24 MB). [ Batteries you can and cannot use with the terminal side facing the ...+/- 1 Inserting the batteries/a "Memory Stick Duo" (not supplied) 2 1 ɟ ɠ Terminal side Battery/"Memory Stick Duo" cover Insert the "Memory Stick Duo" with your camera Battery type LR6 (size AA) alkaline batteries HR 15/51:HR6 (size AA) Nickel-Metal Hydride batteries*1 ZR6 (size AA) Oxy Nickel Primary Battery Manganese...
and insert. 4 Close the battery/"Memory Stick Duo" cover. [ When there is no "Memory Stick Duo" inserted The camera records/plays back images using the internal memory (approx. 24 MB). [ Batteries you can and cannot use with the terminal side facing the ...+/- 1 Inserting the batteries/a "Memory Stick Duo" (not supplied) 2 1 ɟ ɠ Terminal side Battery/"Memory Stick Duo" cover Insert the "Memory Stick Duo" with your camera Battery type LR6 (size AA) alkaline batteries HR 15/51:HR6 (size AA) Nickel-Metal Hydride batteries*1 ZR6 (size AA) Oxy Nickel Primary Battery Manganese...
Instruction Manual
Page 10
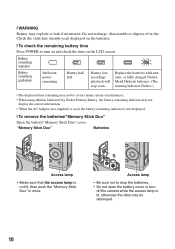
... open the battery cover or turn on and check the time on the LCD screen. Access lamp • Be sure not to turn off the camera while the access lamp is lit, otherwise the data may not display the correct information. • When the AC Adaptor (not supplied) is used, the...
... open the battery cover or turn on and check the time on the LCD screen. Access lamp • Be sure not to turn off the camera while the access lamp is lit, otherwise the data may not display the correct information. • When the AC Adaptor (not supplied) is used, the...
Instruction Manual
Page 11
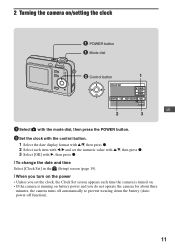
2 Turning the camera on/setting the clock POWER button Mode dial ɟ Control button 1 GB 2 3 1 Select with the mode dial, then press the POWER button. 2 Set the clock ... • Unless you set the clock, the Clock Set screen appears each time the camera is turned on. • If the camera is running on battery power and you do not operate the camera for about three minutes, the camera turns off automatically to prevent wearing down the battery (Auto power-off function). 11
2 Turning the camera on/setting the clock POWER button Mode dial ɟ Control button 1 GB 2 3 1 Select with the mode dial, then press the POWER button. 2 Set the clock ... • Unless you set the clock, the Clock Set screen appears each time the camera is turned on. • If the camera is running on battery power and you do not operate the camera for about three minutes, the camera turns off automatically to prevent wearing down the battery (Auto power-off function). 11
Instruction Manual
Page 12
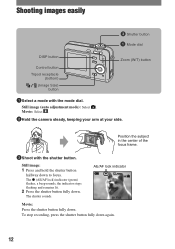
... Size) button Zoom (W/T) button 1Select a mode with the shutter button. To stop recording, press the shutter button fully down to focus. Movie: Select . 2Hold the camera steady, keeping your arm at your side. Still image: 1 Press and hold the shutter button halfway down again. 12 The shutter sounds.
... Size) button Zoom (W/T) button 1Select a mode with the shutter button. To stop recording, press the shutter button fully down to focus. Movie: Select . 2Hold the camera steady, keeping your arm at your side. Still image: 1 Press and hold the shutter button halfway down again. 12 The shutter sounds.
Instruction Manual
Page 13
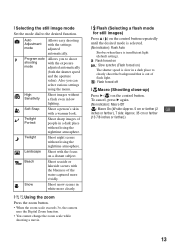
... with the blueness of the water captured more clearly. [ Using the zoom Press the zoom button. • When the zoom scale exceeds 3×, the camera uses the Digital Zoom function. • You cannot change the zoom scale while shooting a movie. [ Flash (Selecting a flash mode for still images) Press v ( ) on the control button...
... with the blueness of the water captured more clearly. [ Using the zoom Press the zoom button. • When the zoom scale exceeds 3×, the camera uses the Digital Zoom function. • You cannot change the zoom scale while shooting a movie. [ Flash (Selecting a flash mode for still images) Press v ( ) on the control button...
Instruction Manual
Page 15
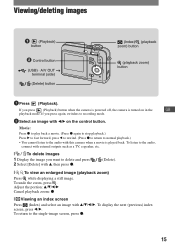
... outputs such as a TV, a speaker, etc. [ To delete images 1 Display the image you want to recording mode. 2 Select an image with this camera when a movie is turned on the control button. Viewing/deleting images (Playback) button ɟ Control button (USB) · A/V OUT terminal (side) (... and press 2 Select [Delete] with v/V/b/B. To display the next (previous) index screen, press b/B. If you press (Playback) button when the camera is powered off, the camera is played back. Movie: Press z to play back a movie. (Press z again to stop playback.) Press B to fast forward, press b...
... outputs such as a TV, a speaker, etc. [ To delete images 1 Display the image you want to recording mode. 2 Select an image with this camera when a movie is turned on the control button. Viewing/deleting images (Playback) button ɟ Control button (USB) · A/V OUT terminal (side) (... and press 2 Select [Delete] with v/V/b/B. To display the next (previous) index screen, press b/B. If you press (Playback) button when the camera is powered off, the camera is played back. Movie: Press z to play back a movie. (Press z again to stop playback.) Press B to fast forward, press b...
Instruction Manual
Page 16
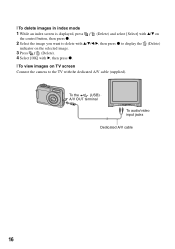
[ To delete images in index mode 1 While an index screen is displayed, press (Delete) and select [Select] with v/V on the control button, then press z. 2 Select the image you want to delete with v/V/b/B, then press z to display the (Delete) indicator on the selected image. 3 Press (Delete). 4 Select [OK] with B, then press z. [ To view images on TV screen Connect the camera to the TV with the dedicated A/V cable (supplied). To the (USB) · A/V OUT terminal To audio/video input jacks Dedicated A/V cable 16
[ To delete images in index mode 1 While an index screen is displayed, press (Delete) and select [Select] with v/V on the control button, then press z. 2 Select the image you want to delete with v/V/b/B, then press z to display the (Delete) indicator on the selected image. 3 Press (Delete). 4 Select [OK] with B, then press z. [ To view images on TV screen Connect the camera to the TV with the dedicated A/V cable (supplied). To the (USB) · A/V OUT terminal To audio/video input jacks Dedicated A/V cable 16
Instruction Manual
Page 17
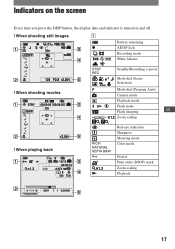
Indicators on the screen Every time you press the DISP button, the display data and indicator is turned on and off. [ When shooting still images A Battery remaining z AE/AF lock Recording mode White balance [ When shooting movies STBY REC Standby/Recording a movie Mode dial (Scene Selection) Mode dial (Program Auto) Camera mode Playback mode Flash mode Flash charging GB 1.3 Zoom scaling [ When playing back RICH NATURAL SEPIA B&W - N Red-eye reduction Sharpness Metering mode Color mode Protect Print order (DPOF) mark Zoom scaling Playback 17
Indicators on the screen Every time you press the DISP button, the display data and indicator is turned on and off. [ When shooting still images A Battery remaining z AE/AF lock Recording mode White balance [ When shooting movies STBY REC Standby/Recording a movie Mode dial (Scene Selection) Mode dial (Program Auto) Camera mode Playback mode Flash mode Flash charging GB 1.3 Zoom scaling [ When playing back RICH NATURAL SEPIA B&W - N Red-eye reduction Sharpness Metering mode Color mode Protect Print order (DPOF) mark Zoom scaling Playback 17
Instruction Manual
Page 19
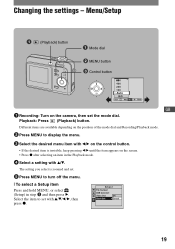
Playback: Press (Playback) button. The setting you select is invisible, keep pressing b/B until the item appears on the camera, then set with v/V. Different items are available depending on the position of the mode dial and Recording/Playback mode. 2 Press MENU to display the menu. 3 ...
Playback: Press (Playback) button. The setting you select is invisible, keep pressing b/B until the item appears on the camera, then set with v/V. Different items are available depending on the position of the mode dial and Recording/Playback mode. 2 Press MENU to display the menu. 3 ...
Instruction Manual
Page 21
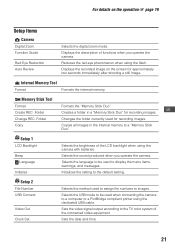
... cable. For details on the screen for recording images. Displays the recorded image on the operation 1 page 19 Setup items Camera Digital Zoom Function Guide Red Eye Reduction Auto Review Selects the digital zoom mode. Internal Memory Tool Format Formats the internal memory. Folder Formats the "Memory Stick Duo". Setup 1 LCD Backlight Beep...
... cable. For details on the screen for recording images. Displays the recorded image on the operation 1 page 19 Setup items Camera Digital Zoom Function Guide Red Eye Reduction Auto Review Selects the digital zoom mode. Internal Memory Tool Format Formats the internal memory. Folder Formats the "Memory Stick Duo". Setup 1 LCD Backlight Beep...
Instruction Manual
Page 22
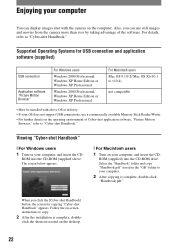
..." [ For Windows users 1 Turn on your OS does not support USB connections, use still images and movies from the camera more than ever by taking advantage of Cyber-shot application software, "Picture Motion Browser," refer to copy. 2 After the installation is complete, double-click "Handbook.pdf." ROM into the CD-ROM drive. click...
..." [ For Windows users 1 Turn on your OS does not support USB connections, use still images and movies from the camera more than ever by taking advantage of Cyber-shot application software, "Picture Motion Browser," refer to copy. 2 After the installation is complete, double-click "Handbook.pdf." ROM into the CD-ROM drive. click...
Instruction Manual
Page 23
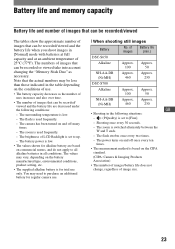
.... The flash is used frequently. - The camera has been turned on the CIPA standard. (CIPA: Camera & Imaging Products Association) • The number of images/battery life does not change, regardless of images Battery life (min.) DSC-S650 Alkaline Approx. The zoom is low. - Approx. 460 230 DSC-S700 Alkaline Approx. You may vary, depending on... and off many times. - The surrounding temperature is switched alternately between the W and T ends. - The battery power is low. • The values shown for regular camera use only.
.... The flash is used frequently. - The camera has been turned on the CIPA standard. (CIPA: Camera & Imaging Products Association) • The number of images/battery life does not change, regardless of images Battery life (min.) DSC-S650 Alkaline Approx. The zoom is low. - Approx. 460 230 DSC-S700 Alkaline Approx. You may vary, depending on... and off many times. - The surrounding temperature is switched alternately between the W and T ends. - The battery power is low. • The values shown for regular camera use only.
Instruction Manual
Page 25
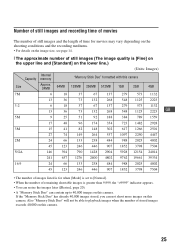
...image quality is [Fine] on the upper line and [Standard] on the lower line.) (Units: Images) Internal Capacity memory "Memory Stick Duo" formatted with this camera Size Approx. 24MB 64MB 128MB 256MB 512MB 1GB 2GB 4GB 7M 6 18 37 67 137 279 573 1132 13 36 73 132 268 548 1125..., the ">9999" indicator appears. • You can resize the images later ([Resize], page 20). • A "Memory Stick Duo" can not shoot more images on this camera. Also "Memory Stick Duo" will not be able to playback images when the number of remaining shootable images is set to 40,000 images on...
...image quality is [Fine] on the upper line and [Standard] on the lower line.) (Units: Images) Internal Capacity memory "Memory Stick Duo" formatted with this camera Size Approx. 24MB 64MB 128MB 256MB 512MB 1GB 2GB 4GB 7M 6 18 37 67 137 279 573 1132 13 36 73 132 268 548 1125..., the ">9999" indicator appears. • You can resize the images later ([Resize], page 20). • A "Memory Stick Duo" can not shoot more images on this camera. Also "Memory Stick Duo" will not be able to playback images when the number of remaining shootable images is set to 40,000 images on...
Instruction Manual
Page 26
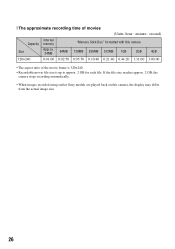
If the file size reaches approx. 2 GB, the camera stops recording automatically. • When images recorded using earlier Sony models are played back on this camera Size Approx. 24MB 64MB 128MB 256MB 512MB 1GB 2GB 4GB 320×240 0:01:00 0:02:50 0:05:50 0:10:40 0:21:40 0:44:20 1:... to approx. 2 GB for each file. [ The approximate recording time of movies (Units: hour : minute : second) Internal Capacity memory "Memory Stick Duo" formatted with this camera, the display may differ from the actual image size. 26
If the file size reaches approx. 2 GB, the camera stops recording automatically. • When images recorded using earlier Sony models are played back on this camera Size Approx. 24MB 64MB 128MB 256MB 512MB 1GB 2GB 4GB 320×240 0:01:00 0:02:50 0:05:50 0:10:40 0:21:40 0:44:20 1:... to approx. 2 GB for each file. [ The approximate recording time of movies (Units: hour : minute : second) Internal Capacity memory "Memory Stick Duo" formatted with this camera, the display may differ from the actual image size. 26
Instruction Manual
Page 27
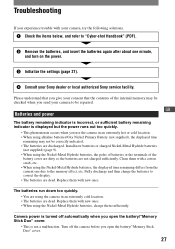
Troubleshooting If you experience trouble with your camera, try the following solutions. 1 Check the items below, and refer to "Cyber-shot Handbook" (PDF). 2 Remove the batteries, and insert the batteries again after about one due to the memory effect, etc. GB Batteries...8226; When using alkaline batteries/Oxy Nickel Primary Battery (not supplied), the displayed time remaining may be checked when you give your Sony dealer or local authorized Sony service facility. Replace them sufficiently. The batteries run down too quickly. • You are dead. Turn off automatically when you ...
Troubleshooting If you experience trouble with your camera, try the following solutions. 1 Check the items below, and refer to "Cyber-shot Handbook" (PDF). 2 Remove the batteries, and insert the batteries again after about one due to the memory effect, etc. GB Batteries...8226; When using alkaline batteries/Oxy Nickel Primary Battery (not supplied), the displayed time remaining may be checked when you give your Sony dealer or local authorized Sony service facility. Replace them sufficiently. The batteries run down too quickly. • You are dead. Turn off automatically when you ...
Instruction Manual
Page 28
... a feature for about three minutes while the power is full, do one of the following: - Turn on the camera again (page 11). • The batteries are discharged. Cannot turn on the camera. • Install the batteries correctly (page 9). • Properly connect the AC Adaptor (not supplied). • ... the "Memory Stick Duo" with new ones. Replace them with the write-protect switch, and the switch is in USB mode. Viewing images Your camera cannot play back images. • Press (Playback) button (page 15). • The folder/file name has been changed on your computer. •...
... a feature for about three minutes while the power is full, do one of the following: - Turn on the camera again (page 11). • The batteries are discharged. Cannot turn on the camera. • Install the batteries correctly (page 9). • Properly connect the AC Adaptor (not supplied). • ... the "Memory Stick Duo" with new ones. Replace them with the write-protect switch, and the switch is in USB mode. Viewing images Your camera cannot play back images. • Press (Playback) button (page 15). • The folder/file name has been changed on your computer. •...
Instruction Manual
Page 29
... not use the following places • In an extremely hot, cold or humid place In places such as this may cause malfunction or damage the camera. [ On cleaning Cleaning the LCD screen Wipe the screen surface with an LCD cleaning kit (not supplied) to remove fingerprints, dust, etc. This moisture ... to rocking vibration • Near strong magnetic place • In sandy or dusty places Be careful not to let sand or dust get into the camera. In this case, be repaired. [ On carrying Do not sit down in a chair or other settings regardless of the internal rechargeable backup battery Insert ...
... not use the following places • In an extremely hot, cold or humid place In places such as this may cause malfunction or damage the camera. [ On cleaning Cleaning the LCD screen Wipe the screen surface with an LCD cleaning kit (not supplied) to remove fingerprints, dust, etc. This moisture ... to rocking vibration • Near strong magnetic place • In sandy or dusty places Be careful not to let sand or dust get into the camera. In this case, be repaired. [ On carrying Do not sit down in a chair or other settings regardless of the internal rechargeable backup battery Insert ...


