Operating Instructions
Page 74
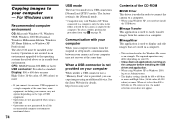
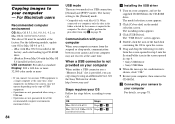
...above . The factory setting is needed in order to connect the camera to a computer. • When using Windows XP or Windows 2000, log on your camera, may differ depending on the type of the CD-ROM x USB Driver This driver is the [Normal] mode. * Compatible only with your computer ... computer resumes from the camera to the operating systems described above or in a computer. • This section describes the Windows Me screen as Administrators. • The display settings should be installed at the same time. Enjoying images on page 58. http://www.sony.net/ 74 Contents of...
...above . The factory setting is needed in order to connect the camera to a computer. • When using Windows XP or Windows 2000, log on your camera, may differ depending on the type of the CD-ROM x USB Driver This driver is the [Normal] mode. * Compatible only with your computer ... computer resumes from the camera to the operating systems described above or in a computer. • This section describes the Windows Me screen as Administrators. • The display settings should be installed at the same time. Enjoying images on page 58. http://www.sony.net/ 74 Contents of...
Operating Instructions
Page 75
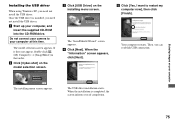
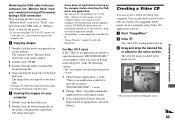
... supplied CD-ROM into the CD-ROM drive. Your computer restarts. Once the USB driver is completed, the screen informs you need not install the USB driver. Do not connect your camera to restart my computer now], then click [Finish]. The "InstallShield Wizard" screen appears... selection screen appears. Enjoying images on your computer Installing the USB driver When using Windows XP, you can establish USB connection. The installing menu screen appears. The USB driver installation starts. b Click [Cyber-shot] on the installing menu screen. Then, you need not install ...
... supplied CD-ROM into the CD-ROM drive. Your computer restarts. Once the USB driver is completed, the screen informs you need not install the USB driver. Do not connect your camera to restart my computer now], then click [Finish]. The "InstallShield Wizard" screen appears... selection screen appears. Enjoying images on your computer Installing the USB driver When using Windows XP, you can establish USB connection. The installing menu screen appears. The USB driver installation starts. b Click [Cyber-shot] on the installing menu screen. Then, you need not install ...
Operating Instructions
Page 77
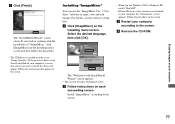
... b Follow instructions on the installing menu screen. Follow the procedure on the installing menu screen and then follow the procedure. • The USB driver is needed in your computer g Click [Finish]. d Remove the CD-ROM. 77 Enjoying images on your computer, the "Information" screen appears... Wizard" screen closes. Follow the instructions that asks if you wish to use the "ImageMixer Ver. 1.5 for Sony" software to the screen. If the necessary driver is not installed in order to continue with the installation of "ImageMixer," click [ImageMixer] on the screen. If...
... b Follow instructions on the installing menu screen. Follow the procedure on the installing menu screen and then follow the procedure. • The USB driver is needed in your computer g Click [Finish]. d Remove the CD-ROM. 77 Enjoying images on your computer, the "Information" screen appears... Wizard" screen closes. Follow the instructions that asks if you wish to use the "ImageMixer Ver. 1.5 for Sony" software to the screen. If the necessary driver is not installed in order to continue with the installation of "ImageMixer," click [ImageMixer] on the screen. If...

Operating Instructions
Page 80
...into the "My Documents" folder. The image files are copied to a folder in your camera appear. • This section describes an example of the devices above window, you can ...The "System Properties" screen appears. • When using "Image Transfer" - Try the USB driver installation again using Windows XP, see page 81. Changing "Image Transfer" settings You can set...already installed. 1 Click [Device Manager]. 2 Double-click [ Other Devices]. 3 Confirm if there is a " Sony DSC" with the same file name is not shown, see the following procedure. b Double-click [DCIM], then double...
...into the "My Documents" folder. The image files are copied to a folder in your camera appear. • This section describes an example of the devices above window, you can ...The "System Properties" screen appears. • When using "Image Transfer" - Try the USB driver installation again using Windows XP, see page 81. Changing "Image Transfer" settings You can set...already installed. 1 Click [Device Manager]. 2 Double-click [ Other Devices]. 3 Confirm if there is a " Sony DSC" with the same file name is not shown, see the following procedure. b Double-click [DCIM], then double...
Operating Instructions
Page 84
... click "OK." 7 Restart your computer For details, see page 78. The installing menu appears. 3 Click [USB Driver]. Copying images to your computer may not operate depending on your computer When neither a USB connector nor a "Memory ...Sony Website for all the recommended computer environments mentioned above OS must be installed at the factory. When a USB connector is copied to the computer. To select a folder, perform the procedure from the suspend or sleep mode, communication between your camera and your computer - The model selection screen appears. 2 Click [Cyber-shot...
... click "OK." 7 Restart your computer For details, see page 78. The installing menu appears. 3 Click [USB Driver]. Copying images to your computer may not operate depending on your computer When neither a USB connector nor a "Memory ...Sony Website for all the recommended computer environments mentioned above OS must be installed at the factory. When a USB connector is copied to the computer. To select a folder, perform the procedure from the suspend or sleep mode, communication between your camera and your computer - The model selection screen appears. 2 Click [Cyber-shot...
Operating Instructions
Page 85
...files. The image file opens. • Close down all applications running on the computer before installing the USB driver and application. • You can use the "ImageMixer Ver. 1.5 for the operation method. • "...82 and 83 for details about the installation method, or see the software's help files for Sony" software to copy images to your computer. For Mac OS X users If the "There is...manual supplied with Macintosh. Removing the USB cable from your computer, the "Memory Stick" from your camera or turning off the power during a USB connection Drag and drop the drive icon or the "...
...files. The image file opens. • Close down all applications running on the computer before installing the USB driver and application. • You can use the "ImageMixer Ver. 1.5 for the operation method. • "...82 and 83 for details about the installation method, or see the software's help files for Sony" software to copy images to your computer. For Mac OS X users If the "There is...manual supplied with Macintosh. Removing the USB cable from your computer, the "Memory Stick" from your camera or turning off the power during a USB connection Drag and drop the drive icon or the "...
Operating Instructions
Page 92
... You cannot display print (DPOF) marks on the camera (page 14). p Turn on movies (MPEG Movie) and Clip Motion. • The movie (MPEG Movie) is not long enough to cut. • Protected movie (MPEG Movie), Clip Motion, Multi Burst files and still images cannot be cut a movie. You cannot cut...computer is displayed on the screen (pages 78 and 84). p Disconnect all equipment other than your camera from your computer, then install the USB driver (pages 75 and 80). 92 Cause - - • The camera is turned off. • The battery level is low. • You are connected to other ...
... You cannot display print (DPOF) marks on the camera (page 14). p Turn on movies (MPEG Movie) and Clip Motion. • The movie (MPEG Movie) is not long enough to cut. • Protected movie (MPEG Movie), Clip Motion, Multi Burst files and still images cannot be cut a movie. You cannot cut...computer is displayed on the screen (pages 78 and 84). p Disconnect all equipment other than your camera from your computer, then install the USB driver (pages 75 and 80). 92 Cause - - • The camera is turned off. • The battery level is low. • You are connected to other ...
Operating Instructions
Page 111
P8: 16 MB) • CD-ROM (USB driver SPVD-010) • Operating instructions • Soft carrying case (DSC-P12 only) Design and specifications are subject to +140°F) Dimensions Approx. 48×29×81 mm (1 15/16×1 3/16&#...for Clip Motion), DPOF compatible Audio with still image: MPEG1 compliant (Monaural) Moving images: MPEG1 compliant (Monaural) Recording media "Memory Stick" Flash Recommended distance (ISO set to Auto): DSC-P10/P12 0.5 m to 3.5 m (19 3/4 inches to 11 feet 5 3/16 inches) (W) 0.6 m to 2.5 m (23 5/8 inches to 8 feet 2 7/16 inches) (T) DSC-P8 0.5 m to 3.5 m (19 ...
P8: 16 MB) • CD-ROM (USB driver SPVD-010) • Operating instructions • Soft carrying case (DSC-P12 only) Design and specifications are subject to +140°F) Dimensions Approx. 48×29×81 mm (1 15/16×1 3/16&#...for Clip Motion), DPOF compatible Audio with still image: MPEG1 compliant (Monaural) Moving images: MPEG1 compliant (Monaural) Recording media "Memory Stick" Flash Recommended distance (ISO set to Auto): DSC-P10/P12 0.5 m to 3.5 m (19 3/4 inches to 11 feet 5 3/16 inches) (W) 0.6 m to 2.5 m (23 5/8 inches to 8 feet 2 7/16 inches) (T) DSC-P8 0.5 m to 3.5 m (19 ...

Operating Instructions
Page 115
... charging time 11 Cleaning 107 Clip Motion 51 Clock Set 15 Computer copying images 79, 85 Image Transfer 76 ImageMixer 77 USB cable 78 USB driver 75 Contrast 101 Control button 9, 14, 39 Copying images 79, 85 D DC plug 10, 13 Deleting images 34, 70 Divide 72 DPOF 65 E Editing... still images Print (DPOF) mark 65 Protect 63 Resize 65 E-Mail 53 Enlarging an image 59 EV adjustment 45 Exposure bracket 48 External power source 13 F ...
... charging time 11 Cleaning 107 Clip Motion 51 Clock Set 15 Computer copying images 79, 85 Image Transfer 76 ImageMixer 77 USB cable 78 USB driver 75 Contrast 101 Control button 9, 14, 39 Copying images 79, 85 D DC plug 10, 13 Deleting images 34, 70 Divide 72 DPOF 65 E Editing... still images Print (DPOF) mark 65 Protect 63 Resize 65 E-Mail 53 Enlarging an image 59 EV adjustment 45 Exposure bracket 48 External power source 13 F ...

Operating Instructions
Page 116
..., 40 image size 18, 19, 98 Image Transfer 79 ImageMixer 77 Index screen 30 "InfoLITHIUM" battery pack 109 Installation Image Transfer 76 ImageMixer 77 USB driver 75 ISO 101 J Jog playback 62 JPEG 83 L LCD screen brightness 105 on/off 28 screen display 112, 113, 114 M Memory Stick formatting a "Memory Stick...
..., 40 image size 18, 19, 98 Image Transfer 79 ImageMixer 77 Index screen 30 "InfoLITHIUM" battery pack 109 Installation Image Transfer 76 ImageMixer 77 USB driver 75 ISO 101 J Jog playback 62 JPEG 83 L LCD screen brightness 105 on/off 28 screen display 112, 113, 114 M Memory Stick formatting a "Memory Stick...
Marketing Specifications
Page 2
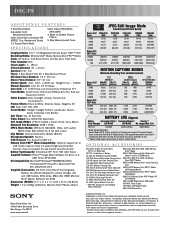
...Sony, Cyber-shot, Digital. Features and specifications subject to 1GB media capacity; Flash operated every other trademarks are approximate. 1 Available storage capacity of Sony. All rights reserved. Macintosh® OS 8.5.1/8.6/9.0/9.1/9.2 Supplied Accessories: NP-FC11 InfoLithium® Rechargeable Battery, AC-LS5 AC Adaptor/In-camera...DSC-P8 ADDITIONAL FEATURES 2 Shot Burst Mode Adjustable Color Saturation/Contrast Clear Color/Clear Luminance NR MPEG1 Cue, Review and Divide 3:2 Aspect Ratio Mode Video Output (PAL/NTSC Selectable) 4 Mode In-Camera...Still...Sony v1.5, USB Driver...
...Sony, Cyber-shot, Digital. Features and specifications subject to 1GB media capacity; Flash operated every other trademarks are approximate. 1 Available storage capacity of Sony. All rights reserved. Macintosh® OS 8.5.1/8.6/9.0/9.1/9.2 Supplied Accessories: NP-FC11 InfoLithium® Rechargeable Battery, AC-LS5 AC Adaptor/In-camera...DSC-P8 ADDITIONAL FEATURES 2 Shot Burst Mode Adjustable Color Saturation/Contrast Clear Color/Clear Luminance NR MPEG1 Cue, Review and Divide 3:2 Aspect Ratio Mode Video Output (PAL/NTSC Selectable) 4 Mode In-Camera...Still...Sony v1.5, USB Driver...


