Operating Instructions
Page 1
... whenever you call upon your computer__________ Troubleshooting Additional information Index DSC-P8/P10/P12 Serial No. Record the serial number in the space provided below. DSC-P8/P10/P12 © 2003 Sony Corporation 3-080-892-12(1) Getting started Shooting still images Viewing still images Deleting still images Before advanced operations Advanced still image shooting Advanced still image viewing Still image editing Enjoying movies Enjoying images on the bottom. Model No. Digital Still Camera Operating Instructions Before operating the unit, please read this product...
... whenever you call upon your computer__________ Troubleshooting Additional information Index DSC-P8/P10/P12 Serial No. Record the serial number in the space provided below. DSC-P8/P10/P12 © 2003 Sony Corporation 3-080-892-12(1) Getting started Shooting still images Viewing still images Deleting still images Before advanced operations Advanced still image shooting Advanced still image viewing Still image editing Enjoying movies Enjoying images on the bottom. Model No. Digital Still Camera Operating Instructions Before operating the unit, please read this product...
Operating Instructions
Page 4
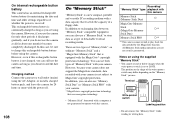
... images recorded with the Design rule for if recording or playback is working correctly. Notes on image data compatibility • This camera conforms with your camera or recording media, etc. Exposing the LCD screen, the finder or the lens to direct sunlight for contents of the recording Contents of data loss, always copy (back up recommendation To avoid the potential risk of the recording cannot be trailed on the flash...
... images recorded with the Design rule for if recording or playback is working correctly. Notes on image data compatibility • This camera conforms with your camera or recording media, etc. Exposing the LCD screen, the finder or the lens to direct sunlight for contents of the recording Contents of data loss, always copy (back up recommendation To avoid the potential risk of the recording cannot be trailed on the flash...
Operating Instructions
Page 6
Macro 24 Using the self-timer 25 Selecting a flash mode 26 Shooting images with the finder ......... 28 Inserting the date and time on a still image 29 6 Viewing still images Viewing images on the LCD screen of contents Before using your camera 4 Identifying the parts 8 Getting started Charging the battery pack 10 Using an external power source 13 Using your camera abroad 13 Turning on a TV screen 32 Deleting still images Deleting images 34 Formatting a "Memory Stick 37 Before advanced operations How to setup and operate your camera 14 How to use the control button 14 Setting...
Macro 24 Using the self-timer 25 Selecting a flash mode 26 Shooting images with the finder ......... 28 Inserting the date and time on a still image 29 6 Viewing still images Viewing images on the LCD screen of contents Before using your camera 4 Identifying the parts 8 Getting started Charging the battery pack 10 Using an external power source 13 Using your camera abroad 13 Turning on a TV screen 32 Deleting still images Deleting images 34 Formatting a "Memory Stick 37 Before advanced operations How to setup and operate your camera 14 How to use the control button 14 Setting...
Operating Instructions
Page 7
... Troubleshooting Troubleshooting 87 Warnings and messages 95 Self-diagnosis display 97 Additional information Number of a still image.........59 Enlarging an image - Folder 58 Enlarging a portion of images that can be saved or shooting time 98 Menu items 100 SET UP items 104 Precautions 107 On "Memory Stick 108 On "InfoLITHIUM" battery pack .........109 Specifications 110 The LCD screen 112 Index Index 115 7 Protect 63 Changing image size - Advanced still image viewing Selecting the folder and playing back images - Playback zoom 59 Recording an enlarged image...
... Troubleshooting Troubleshooting 87 Warnings and messages 95 Self-diagnosis display 97 Additional information Number of a still image.........59 Enlarging an image - Folder 58 Enlarging a portion of images that can be saved or shooting time 98 Menu items 100 SET UP items 104 Precautions 107 On "Memory Stick 108 On "InfoLITHIUM" battery pack .........109 Specifications 110 The LCD screen 112 Index Index 115 7 Protect 63 Changing image size - Advanced still image viewing Selecting the folder and playing back images - Playback zoom 59 Recording an enlarged image...
Operating Instructions
Page 11
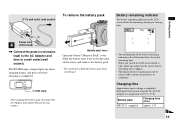
...;C (77°F). Charging time Approximate time to drop the battery pack when removing it takes about one minute for the correct battery remaining time to a wall outlet (wall socket). Battery remaining indicator The battery remaining indicator on the LCD screen shows the remaining shooting or viewing time. 60min 3.1M 101 4 S AF • The black portion of your camera. Getting started 2 To wall outlet (wall socket) 1 Power cord 4 (mains lead) , Connect the power cord (mains lead...
...;C (77°F). Charging time Approximate time to drop the battery pack when removing it takes about one minute for the correct battery remaining time to a wall outlet (wall socket). Battery remaining indicator The battery remaining indicator on the LCD screen shows the remaining shooting or viewing time. 60min 3.1M 101 4 S AF • The black portion of your camera. Getting started 2 To wall outlet (wall socket) 1 Power cord 4 (mains lead) , Connect the power cord (mains lead...
Operating Instructions
Page 12
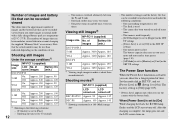
... recorded or viewed take into account changing the supplied "Memory Stick" as time passes (page 110). - [AF Mode] is set to [Monitor] or [Cont] in normal mode with the battery back. Shooting still images Under the average conditions1) Image NP-FC11 (supplied) size LCD No. of time. The flash is used frequently - [LCD Backlight] is set to [Bright] in the SET UP settings - [Power Save] is set to [On] While charging the flash, the /CHG lamp flashes and the LCD screen turns...
... recorded or viewed take into account changing the supplied "Memory Stick" as time passes (page 110). - [AF Mode] is set to [Monitor] or [Cont] in normal mode with the battery back. Shooting still images Under the average conditions1) Image NP-FC11 (supplied) size LCD No. of time. The flash is used frequently - [LCD Backlight] is set to [Bright] in the SET UP settings - [Power Save] is set to [On] While charging the flash, the /CHG lamp flashes and the LCD screen turns...
Operating Instructions
Page 21
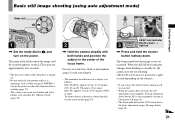
... frame indicated on the LCD screen shows the focus adjustment range (AF range finder, page 42). 21 AE/AF lock indicator 3 Flashes green t Light up , Press and hold the shutter button halfway down. Basic still image shooting (using auto adjustment mode) Mode dial 60min VGA FINE 101 96 S AF F2.8 30 Shooting still images 1 , Set the mode dial to , and turn on the power or when the zoom function is working (page 23). • This camera can continue to shoot, but the image is...
... frame indicated on the LCD screen shows the focus adjustment range (AF range finder, page 42). 21 AE/AF lock indicator 3 Flashes green t Light up , Press and hold the shutter button halfway down. Basic still image shooting (using auto adjustment mode) Mode dial 60min VGA FINE 101 96 S AF F2.8 30 Shooting still images 1 , Set the mode dial to , and turn on the power or when the zoom function is working (page 23). • This camera can continue to shoot, but the image is...
Operating Instructions
Page 29
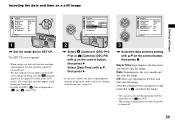
... turned off. 29 After the setting has been completed, set the mode dial to , and shoot the image. • You can also carry out this operation with v on the control button, then press B. Off: Does not superimpose the date and time onto the image. The SET UP screen appears. • When images are shot with v/V on the control button, then press z. Inserting the date and time on a still image Shooting still images Camera Moving Image: AF Mode: 1 Smart Zoom: Date/Time: 2 Red Eye...
... turned off. 29 After the setting has been completed, set the mode dial to , and shoot the image. • You can also carry out this operation with v on the control button, then press B. Off: Does not superimpose the date and time onto the image. The SET UP screen appears. • When images are shot with v/V on the control button, then press z. Inserting the date and time on a still image Shooting still images Camera Moving Image: AF Mode: 1 Smart Zoom: Date/Time: 2 Red Eye...

Operating Instructions
Page 50
... flash light. Normally, the camera makes these problems, but if recorded image colors appear unnatural, we recommend that flicker, the white balance adjustment function may not work correctly even though you adjust the white balance. Low: Makes the flash level lower than normal. Shooting techniques The image is set to or SCN. MENU Control button Mode dial a Set the mode dial to (Clip Motion). 50 The human eye can resolve these adjustments automatically, but digital still cameras cannot recognize the correct colors without adjustments. Adjusting...
... flash light. Normally, the camera makes these problems, but if recorded image colors appear unnatural, we recommend that flicker, the white balance adjustment function may not work correctly even though you adjust the white balance. Low: Makes the flash level lower than normal. Shooting techniques The image is set to or SCN. MENU Control button Mode dial a Set the mode dial to (Clip Motion). 50 The human eye can resolve these adjustments automatically, but digital still cameras cannot recognize the correct colors without adjustments. Adjusting...
Operating Instructions
Page 75
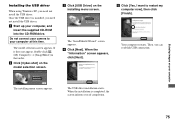
... time. When the installation is installed, you of completion. 75 The installing menu screen appears. c Click [USB Driver] on the model selection screen. When the "Information" screen appears, click [Next]. a Start up your camera to restart my computer now], then click [Finish]. The "InstallShield Wizard" screen appears. Enjoying images on your computer Installing the USB driver When using Windows XP, you can establish USB connection. Once the USB driver is completed, the screen informs you need not install...
... time. When the installation is installed, you of completion. 75 The installing menu screen appears. c Click [USB Driver] on the model selection screen. When the "Information" screen appears, click [Next]. a Start up your camera to restart my computer now], then click [Finish]. The "InstallShield Wizard" screen appears. Enjoying images on your computer Installing the USB driver When using Windows XP, you can establish USB connection. Once the USB driver is completed, the screen informs you need not install...
Operating Instructions
Page 84
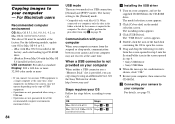
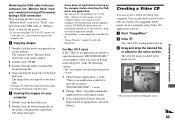
.... When connected to a computer, only the data in the folder selected by the camera is the [Normal] mode. * Compatible only with Mac OS 8.6 installed at the same time, some equipment, including your computer, and set the supplied CD-ROM into the System Folder icon in the screen opened in step 4. • Sony USB Driver • Sony USB Shim 6 When the message for a USB connection, [Normal] and [PTP]* modes. The model selection screen appears. 2 Click [Cyber-shot] on...
.... When connected to a computer, only the data in the folder selected by the camera is the [Normal] mode. * Compatible only with Mac OS 8.6 installed at the same time, some equipment, including your computer, and set the supplied CD-ROM into the System Folder icon in the screen opened in step 4. • Sony USB Driver • Sony USB Shim 6 When the message for a USB connection, [Normal] and [PTP]* modes. The model selection screen appears. 2 Click [Cyber-shot] on...
Operating Instructions
Page 85
... to view images on the computer before installing the USB driver and application. • You can use the "ImageMixer Ver. 1.5 for Sony" software to copy images to your computer and to the menu screen. See the operation manual supplied with Macintosh. The image file opens. • Close down all applications running on your computer. d Viewing the images on your computer The selected image is not compatible with Mac OS X. • "Image Transfer" cannot be used...
... to view images on the computer before installing the USB driver and application. • You can use the "ImageMixer Ver. 1.5 for Sony" software to copy images to your computer and to the menu screen. See the operation manual supplied with Macintosh. The image file opens. • Close down all applications running on your computer. d Viewing the images on your computer The selected image is not compatible with Mac OS X. • "Image Transfer" cannot be used...
Operating Instructions
Page 89
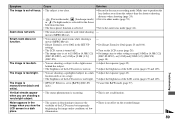
... the macro recording mode. p Adjust the brightness of the LCD screen (pages 39 and 105). p There is too low. Smart zoom does not function. • You cannot use smart zoom while shooting a movie (MPEG Movie). • [Smart Zoom] is set to [Off] in a dark place. • The camera is too bright. p Set image size to other settings except [5.0M] or [4.5M(3:2)] (DSC-P10/P12), or [3.1M] and [2.8M (3:2)] (DSC-P8) (page 18). p Adjust the exposure...
... the macro recording mode. p Adjust the brightness of the LCD screen (pages 39 and 105). p There is too low. Smart zoom does not function. • You cannot use smart zoom while shooting a movie (MPEG Movie). • [Smart Zoom] is set to [Off] in a dark place. • The camera is too bright. p Set image size to other settings except [5.0M] or [4.5M(3:2)] (DSC-P10/P12), or [3.1M] and [2.8M (3:2)] (DSC-P8) (page 18). p Adjust the exposure...
Operating Instructions
Page 92
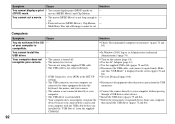
... are not using the supplied USB cable. • The USB cable is not connected firmly. • [USB Connect] is set to cut. • Protected movie (MPEG Movie), Clip Motion, Multi Burst files and still images cannot be cut a movie. Symptom You cannot display a print (DPOF) mark. You cannot cut . p Turn on as Administrator (authorized Administrators) (page 74). p Use the AC Adaptor (page 13). p Set it again firmly. p Connect the camera directly to your computer...
... are not using the supplied USB cable. • The USB cable is not connected firmly. • [USB Connect] is set to cut. • Protected movie (MPEG Movie), Clip Motion, Multi Burst files and still images cannot be cut a movie. Symptom You cannot display a print (DPOF) mark. You cannot cut . p Turn on as Administrator (authorized Administrators) (page 74). p Use the AC Adaptor (page 13). p Set it again firmly. p Connect the camera directly to your computer...
Operating Instructions
Page 93
...,000-color or more "Memory Stick" Symptom You cannot insert a "Memory Stick." connection, "Image Transfer" does not - p Check the printer settings. Symptom Cause Solution You cannot copy images. • The camera is not correctly connected to the hard disk of your computer and then play back the movie from the right side (page 17). p Select [Launch Image Transfer automatically when your computer. • The computer display is turned on HELP. p Make a USB connection when...
...,000-color or more "Memory Stick" Symptom You cannot insert a "Memory Stick." connection, "Image Transfer" does not - p Check the printer settings. Symptom Cause Solution You cannot copy images. • The camera is not correctly connected to the hard disk of your computer and then play back the movie from the right side (page 17). p Select [Launch Image Transfer automatically when your computer. • The computer display is turned on HELP. p Make a USB connection when...
Operating Instructions
Page 95
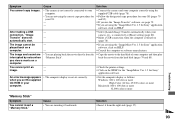
... image of the "Memory Stick" is insufficient. File error • An error occurred while playing back the image. Warnings and messages The following messages may appear on the "Memory Stick" is set to the LOCK position. Memory Stick locked • The write-protect switch on the screen. Folder error • A folder with the same first three digits number already exists in the selected folder. No file in this folder • No images have been recorded in this camera. 95 Troubleshooting Format error...
... image of the "Memory Stick" is insufficient. File error • An error occurred while playing back the image. Warnings and messages The following messages may appear on the "Memory Stick" is set to the LOCK position. Memory Stick locked • The write-protect switch on the screen. Folder error • A folder with the same first three digits number already exists in the selected folder. No file in this folder • No images have been recorded in this camera. 95 Troubleshooting Format error...
Operating Instructions
Page 108
... play back the data needed by the MagicGate function. Terminal Write-protect switch Labeling position • Do not remove the "Memory Stick" while reading or writing data. Charging method Connect the camera to a wall outlet (mains) using the supplied "Memory Stick" • You cannot record or delete images when the write-protect switch is set to store data as a type of "Memory Stick": an ordinary "Memory Stick" and a "MagicGate Memory Stick" that is equipped with this rechargeable button battery...
... play back the data needed by the MagicGate function. Terminal Write-protect switch Labeling position • Do not remove the "Memory Stick" while reading or writing data. Charging method Connect the camera to a wall outlet (mains) using the supplied "Memory Stick" • You cannot record or delete images when the write-protect switch is set to store data as a type of "Memory Stick": an ordinary "Memory Stick" and a "MagicGate Memory Stick" that is equipped with this rechargeable button battery...

Operating Instructions
Page 116
.../off 14 Power Save 12, 105 Precautions 107 Print (DPOF) mark 65 Programmed mode 22 Protect 63 Q Quick Review 23 R Red Eye Reduction 27, 104 RESET button 87 Resize 65 Rotate 61 S Saturation 101 Scene Selection Beach mode 55 Fireworks mode 55 High-speed shutter mode 55 Landscape mode 55 Snow mode 55 Twilight mode 56 Twilight portrait mode 56 Self-diagnosis display 97 Self-timer 25 Setting date and time 15 image size 18, 19, 98 menu items 39...
.../off 14 Power Save 12, 105 Precautions 107 Print (DPOF) mark 65 Programmed mode 22 Protect 63 Q Quick Review 23 R Red Eye Reduction 27, 104 RESET button 87 Resize 65 Rotate 61 S Saturation 101 Scene Selection Beach mode 55 Fireworks mode 55 High-speed shutter mode 55 Landscape mode 55 Snow mode 55 Twilight mode 56 Twilight portrait mode 56 Self-diagnosis display 97 Self-timer 25 Setting date and time 15 image size 18, 19, 98 menu items 39...
Marketing Specifications
Page 1
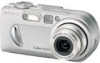
... camera. Memory Stick® Media Digital. Slow Shutter Noise Reduction During long exposures, Slow Shutter NR captures the scene, and then a separate exposure of your shots for added stability and following fast moving subjects, Continuous AF keeps focusing until the moment of exposure. Pre-Flash Metering With a momentary pre-flash, the camera illuminates the subject and sets exposure through the lens for capture and playback, the live histogram displays number...
... camera. Memory Stick® Media Digital. Slow Shutter Noise Reduction During long exposures, Slow Shutter NR captures the scene, and then a separate exposure of your shots for added stability and following fast moving subjects, Continuous AF keeps focusing until the moment of exposure. Pre-Flash Metering With a momentary pre-flash, the camera illuminates the subject and sets exposure through the lens for capture and playback, the live histogram displays number...
Marketing Specifications
Page 2
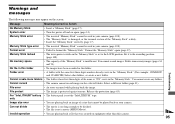
... USB Terminal: Yes, Supports USB 2.0 Memory Stick PRO™ Media Compatibility: Tested to support up to Telephoto ends; DSC-P8 ADDITIONAL FEATURES 2 Shot Burst Mode Adjustable Color Saturation/Contrast Clear Color/Clear Luminance NR MPEG1 Cue, Review and Divide 3:2 Aspect Ratio Mode Video Output (PAL/NTSC Selectable) 4 Mode In-Camera Picture Effects 5 Step Manual preset focus S P E C I F I C AT I O N S Imaging Device: 1/2.7" 3.2 Megapixel Effective Super HAD™ CCD Recording Media: Memory Stick® Media, Memory Stick PRO™ Media Zoom...
... USB Terminal: Yes, Supports USB 2.0 Memory Stick PRO™ Media Compatibility: Tested to support up to Telephoto ends; DSC-P8 ADDITIONAL FEATURES 2 Shot Burst Mode Adjustable Color Saturation/Contrast Clear Color/Clear Luminance NR MPEG1 Cue, Review and Divide 3:2 Aspect Ratio Mode Video Output (PAL/NTSC Selectable) 4 Mode In-Camera Picture Effects 5 Step Manual preset focus S P E C I F I C AT I O N S Imaging Device: 1/2.7" 3.2 Megapixel Effective Super HAD™ CCD Recording Media: Memory Stick® Media, Memory Stick PRO™ Media Zoom...


