Operating Instructions
Page 57
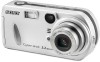
... button MENU Mode selector Shutter button If you hold down the shutter button, sound is recorded for up to the Help files of the e-mail software you release the shutter button for five seconds. 57 If you press and release the shutter button, sound is recorded until you are using. •...
... button MENU Mode selector Shutter button If you hold down the shutter button, sound is recorded for up to the Help files of the e-mail software you release the shutter button for five seconds. 57 If you press and release the shutter button, sound is recorded until you are using. •...

Operating Instructions
Page 64
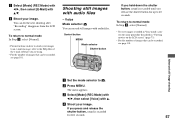
...Burst modes cannot be rotated. • You may not be rotated and displayed horizontally. Rotate Mode selector: Images shot when holding the camera vertically can be reflected depending on the application software. 64 d Select with v , and rotate the image with v/V, then press z. e Select [OK] ...with b/B. c Select [Rotate] with other cameras. • Also, when viewing images on factors like the size of the image. Control button ...
...Burst modes cannot be rotated. • You may not be rotated and displayed horizontally. Rotate Mode selector: Images shot when holding the camera vertically can be reflected depending on the application software. 64 d Select with v , and rotate the image with v/V, then press z. e Select [OK] ...with b/B. c Select [Rotate] with other cameras. • Also, when viewing images on factors like the size of the image. Control button ...

Operating Instructions
Page 80
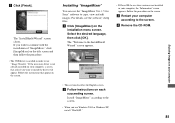
a Click [Cyber-shot] on the installation menu screen. When "License Agreement" screen appears, click [Yes]. The "Information" screen appears. b Click [Image Transfer] on the model selection screen. d Click [... the checkbox is completed, the screen informs you accept the terms of completion. Installing "Image Transfer" You can use the "Image Transfer" software to copy images to your computer automatically when you connect the camera to the InstallShield Wizard" screen appears. c Click [Next]. e Select the folder to be installed, then click [Next].
a Click [Cyber-shot] on the installation menu screen. When "License Agreement" screen appears, click [Yes]. The "Information" screen appears. b Click [Image Transfer] on the model selection screen. d Click [... the checkbox is completed, the screen informs you accept the terms of completion. Installing "Image Transfer" You can use the "Image Transfer" software to copy images to your computer automatically when you connect the camera to the InstallShield Wizard" screen appears. c Click [Next]. e Select the folder to be installed, then click [Next].
Operating Instructions
Page 81
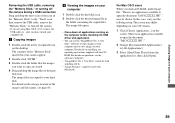
...2000 or Windows XP, install "WinASPI." 81 b Follow instructions on the screen. The "InstallShield Wizard" screen closes. For details, see the software's help files. The "Welcome to the InstallShield Wizard" screen appears. • If DirectX8.0a or a later version is needed in your...already installed on the installation menu screen. If you want to the screen. Installing "ImageMixer" You can use the "ImageMixer Ver. 1.5 for Sony" software to the screen. • When you use "Image Transfer." c Restart your computer • This section describes the English screen. Install ...
...2000 or Windows XP, install "WinASPI." 81 b Follow instructions on the screen. The "InstallShield Wizard" screen closes. For details, see the software's help files. The "Welcome to the InstallShield Wizard" screen appears. • If DirectX8.0a or a later version is needed in your...already installed on the installation menu screen. If you want to the screen. Installing "ImageMixer" You can use the "ImageMixer Ver. 1.5 for Sony" software to the screen. • When you use "Image Transfer." c Restart your computer • This section describes the English screen. Install ...

Operating Instructions
Page 85
...83 to a folder on your computer The image is completed, the "Other Options" screen appears. Windows XP Copying images using Microsoft Scanner and Camera Wizard], then click [OK]. Image copying starts. Viewing the images on my computer using the Windows XP AutoPlay wizard a Make a USB ...stored on your computer to your computer. c Click the checkbox of images that order. • You can use the "ImageMixer Ver. 1.5 for Sony" software to view and edit images on the "Memory Stick" are displayed. • This section describes the procedure for your pictures, then click [Next]....
...83 to a folder on your computer The image is completed, the "Other Options" screen appears. Windows XP Copying images using Microsoft Scanner and Camera Wizard], then click [OK]. Image copying starts. Viewing the images on my computer using the Windows XP AutoPlay wizard a Make a USB ...stored on your computer to your computer. c Click the checkbox of images that order. • You can use the "ImageMixer Ver. 1.5 for Sony" software to view and edit images on the "Memory Stick" are displayed. • This section describes the procedure for your pictures, then click [Next]....
Operating Instructions
Page 89
...] from the application list, then click [Open]. 89 Enjoying images on your computer Removing the USB cable, removing the "Memory Stick," or turning off the camera during a USB connection Drag and drop the drive icon or the icon of the "Memory Stick" to the "Trash" icon, then remove the USB cable... "Memory Stick," or turn off . The contents of the "Memory Stick" inserted in the folder containing the copied files. For details on operation, see the software's help files. • "ImageMixer Ver. 1.5 for Sony" software to copy images to your computer and to view images on the desktop.
...] from the application list, then click [Open]. 89 Enjoying images on your computer Removing the USB cable, removing the "Memory Stick," or turning off the camera during a USB connection Drag and drop the drive icon or the icon of the "Memory Stick" to the "Trash" icon, then remove the USB cable... "Memory Stick," or turn off . The contents of the "Memory Stick" inserted in the folder containing the copied files. For details on operation, see the software's help files. • "ImageMixer Ver. 1.5 for Sony" software to copy images to your computer and to view images on the desktop.
Operating Instructions
Page 90
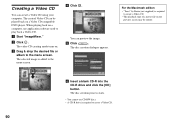
... required to the menu screen. The selected image is required to the menu screen. e Click . The disc creation process starts. • You cannot use application software used to play back a Video CD. c Drag & drop the desired file or album to create a Video CD. • The playback time of a movie file on...
... required to the menu screen. The selected image is required to the menu screen. e Click . The disc creation process starts. • You cannot use application software used to play back a Video CD. c Drag & drop the desired file or album to create a Video CD. • The playback time of a movie file on...

Operating Instructions
Page 96
...camera is turned on a "Memory Stick." 96 Cause • You are using the "ImageMixer Ver. 1.5 for your computer correctly (page 82). After making a USB connection, "Image Transfer" does not automatically start. The image cannot be played back on your OS. - The error message - p Follow the copy procedure for Sony" software... by noise when you are using the "ImageMixer Ver. 1.5 for Sony" software, click on HELP. You cannot print an image. - - - - • You are using the "ImageMixer Ver. 1.5 for Sony" software, click on HELP. "Memory Stick" Symptom You cannot insert a...
...camera is turned on a "Memory Stick." 96 Cause • You are using the "ImageMixer Ver. 1.5 for your computer correctly (page 82). After making a USB connection, "Image Transfer" does not automatically start. The image cannot be played back on your OS. - The error message - p Follow the copy procedure for Sony" software... by noise when you are using the "ImageMixer Ver. 1.5 for Sony" software, click on HELP. You cannot print an image. - - - - • You are using the "ImageMixer Ver. 1.5 for Sony" software, click on HELP. "Memory Stick" Symptom You cannot insert a...


