Operating Instructions
Page 7
... and file names 86 Copying images to your computer - For Windows users 78 Installing the USB driver 79 Installing "Image Transfer 80 Installing "ImageMixer 81 Connecting the camera to your computer 82 Copying images using "Image Transfer" 83 Changing "Image Transfer" settings .. 84... Copying images without using "Image Transfer 84 Viewing the images on your computer Copying images to your computer - Rotate 64 Playing back images shot in Multi...
... and file names 86 Copying images to your computer - For Windows users 78 Installing the USB driver 79 Installing "Image Transfer 80 Installing "ImageMixer 81 Connecting the camera to your computer 82 Copying images using "Image Transfer" 83 Changing "Image Transfer" settings .. 84... Copying images without using "Image Transfer 84 Viewing the images on your computer Copying images to your computer - Rotate 64 Playing back images shot in Multi...
Operating Instructions
Page 78
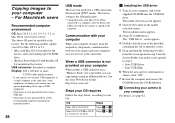
... upgraded to the operating systems described above . 78 USB mode There are two modes for a USB connection, [Normal] and [PTP]* modes. http://www.sony.net/ Contents of USB equipment. • Operations are not guaranteed when using a USB hub. • Operations are stored in the folder selected by the...or more High Color (16-bit color, 65 000 colors) or more • If you need not install the USB driver. The required operations may differ depending on your camera, may not recover at the same time. x ImageMixer This application is used to easily transfer images from the suspend or ...
... upgraded to the operating systems described above . 78 USB mode There are two modes for a USB connection, [Normal] and [PTP]* modes. http://www.sony.net/ Contents of USB equipment. • Operations are not guaranteed when using a USB hub. • Operations are stored in the folder selected by the...or more High Color (16-bit color, 65 000 colors) or more • If you need not install the USB driver. The required operations may differ depending on your camera, may not recover at the same time. x ImageMixer This application is used to easily transfer images from the suspend or ...
Operating Instructions
Page 79
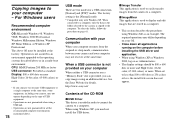
...Driver] on your camera to restart my computer now], then click [Finish]. Enjoying images on the title screen. The "InstallShield wizard" screen appears. e Click [Yes, I want to your computer, and insert the supplied CD-ROM into the CD-ROM drive. When the installation is installed, you can establish USB connection. b Click [Cyber-shot...] on your computer at this time. d Click [Next]. When the "Information" screen appears, click [Next]. Installing the USB driver When using Windows XP, you of completion. 79...
...Driver] on your camera to restart my computer now], then click [Finish]. Enjoying images on the title screen. The "InstallShield wizard" screen appears. e Click [Yes, I want to your computer, and insert the supplied CD-ROM into the CD-ROM drive. When the installation is installed, you can establish USB connection. b Click [Cyber-shot...] on your computer at this time. d Click [Next]. When the "Information" screen appears, click [Next]. Installing the USB driver When using Windows XP, you of completion. 79...
Operating Instructions
Page 81
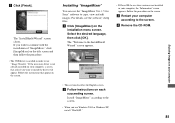
...[ImageMixer] on the screen. Enjoying images on the title screen and then follow the procedure. • The USB driver is not installed in order to install the driver will appear. The "InstallShield Wizard" screen closes. If you wish to the screen. Follow the instructions that asks if... instructions on the screen. Install "ImageMixer" according to copy, view and edit images. Installing "ImageMixer" You can use the "ImageMixer Ver. 1.5 for Sony" software to the screen. • When you want to use Windows 2000 or Windows XP, install "WinASPI." 81 c Restart your computer, a screen...
...[ImageMixer] on the screen. Enjoying images on the title screen and then follow the procedure. • The USB driver is not installed in order to install the driver will appear. The "InstallShield Wizard" screen closes. If you wish to the screen. Follow the instructions that asks if... instructions on the screen. Install "ImageMixer" according to copy, view and edit images. Installing "ImageMixer" You can use the "ImageMixer Ver. 1.5 for Sony" software to the screen. • When you want to use Windows 2000 or Windows XP, install "WinASPI." 81 c Restart your computer, a screen...

Operating Instructions
Page 84
...Documents" folder. • When you do not set are copied to a folder in your camera appear. • This section describes an example of Windows 2000, click [Uninstall].) The "...here When the "Image Transfer" starts, the below to delete them. 1 Click [ Sony DSC]. (In case of Windows 2000, right-click [ Sony DSC].) 2 Click [Remove]. (In case of copying images to copy are already installed. ... 79). a Double-click [My Computer], then double-click [Removable Disk]. Try the USB driver installation again using Windows XP, see page 85. The settings you can only change "Image ...
...Documents" folder. • When you do not set are copied to a folder in your camera appear. • This section describes an example of Windows 2000, click [Uninstall].) The "...here When the "Image Transfer" starts, the below to delete them. 1 Click [ Sony DSC]. (In case of Windows 2000, right-click [ Sony DSC].) 2 Click [Remove]. (In case of copying images to copy are already installed. ... 79). a Double-click [My Computer], then double-click [Removable Disk]. Try the USB driver installation again using Windows XP, see page 85. The settings you can only change "Image ...
Operating Instructions
Page 88
...the [Normal] mode. * Compatible only with Mac OS 8.6 installed at the factory. The model selection screen appears. 2 Click [Cyber-shot] on your camera, may not recover at the factory USB connector: Provided as standard Display: 800 × 600 dots or more 32 000-color ... modes. The installation menu appears. 3 Click [USB Driver]. b Connecting your camera to your OS. When connected to a computer, only the data in step 4. • Sony USB Driver • Sony USB Shim 6 When the message for details. See the Sony Website for confirmation is copied to the computer. OS Mac...
...the [Normal] mode. * Compatible only with Mac OS 8.6 installed at the factory. The model selection screen appears. 2 Click [Cyber-shot] on your camera, may not recover at the factory USB connector: Provided as standard Display: 800 × 600 dots or more 32 000-color ... modes. The installation menu appears. 3 Click [USB Driver]. b Connecting your camera to your OS. When connected to a computer, only the data in step 4. • Sony USB Driver • Sony USB Shim 6 When the message for details. See the Sony Website for confirmation is copied to the computer. OS Mac...
Operating Instructions
Page 89
...on operation, see the software's help files. • "ImageMixer Ver. 1.5 for Sony" software to copy images to your computer and to the "Trash" icon, then... the USB cable, remove the "Memory Stick," or turn off the camera • If you click an E-MAIL mode image file, "There is...computer Removing the USB cable, removing the "Memory Stick," or turning off the camera during a USB connection Drag and drop the drive icon or the icon of...Double-click the hard disk icon. 2 Double-click the desired image file in your camera appear. 2 Double-click "DCIM." 3 Double-click the folder that the images you...
...on operation, see the software's help files. • "ImageMixer Ver. 1.5 for Sony" software to copy images to your computer and to the "Trash" icon, then... the USB cable, remove the "Memory Stick," or turn off the camera • If you click an E-MAIL mode image file, "There is...computer Removing the USB cable, removing the "Memory Stick," or turning off the camera during a USB connection Drag and drop the drive icon or the icon of...Double-click the hard disk icon. 2 Double-click the desired image file in your camera appear. 2 Double-click "DCIM." 3 Double-click the folder that the images you...
Operating Instructions
Page 95
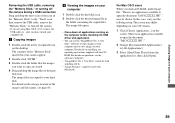
... USB hub. • The USB driver is not connected securely. your computer without using the supplied USB cable. Multi Burst files and still images cannot be used with the USB cable before you connected the camera and then install the USB driver (pages 79, 84). or not ...your computer, device because you installed the "USB Driver" from your OS can be cut . - • Protected movie (MPEG movie), Clip...
... USB hub. • The USB driver is not connected securely. your computer without using the supplied USB cable. Multi Burst files and still images cannot be used with the USB cable before you connected the camera and then install the USB driver (pages 79, 84). or not ...your computer, device because you installed the "USB Driver" from your OS can be cut . - • Protected movie (MPEG movie), Clip...
Operating Instructions
Page 112
...;220) dots [Power, general] Power AA nickel hydride batteries (2) 2.4 V AC-LS5 AC Adaptor (not supplied), 4.2 V Power consumption (when recording) DSC-P72 1.7W DSC-P52 1.6W DSC-P32 1.7W Operating temperature range 0° to +40°C (32° to +104°F) Storage temperature range −20° to +60°... cord (mains lead) (1) • USB cable (1) • A/V connecting cable (1) • Wrist strap (1) • "Memory Stick" (16MB) (1) • CD-ROM (USB driver: SPVD-010) (1) • Operating Instructions (1) Design and specifications are subject to change without notice.
...;220) dots [Power, general] Power AA nickel hydride batteries (2) 2.4 V AC-LS5 AC Adaptor (not supplied), 4.2 V Power consumption (when recording) DSC-P72 1.7W DSC-P52 1.6W DSC-P32 1.7W Operating temperature range 0° to +40°C (32° to +104°F) Storage temperature range −20° to +60°... cord (mains lead) (1) • USB cable (1) • A/V connecting cable (1) • Wrist strap (1) • "Memory Stick" (16MB) (1) • CD-ROM (USB driver: SPVD-010) (1) • Operating Instructions (1) Design and specifications are subject to change without notice.

Operating Instructions
Page 116
... recording folder 47 Charging Charging the battery 14 Charging time 15 Cleaning 108 Computer Copying images to your computer ........ 78, 88 USB cable 82 USB driver 79, 88 Control button 20 Creating a new folder 47 116 D Date and time 21, 35 DC plug 19 Deleting images 40, 74 Divide 76 E Editing...
... recording folder 47 Charging Charging the battery 14 Charging time 15 Cleaning 108 Computer Copying images to your computer ........ 78, 88 USB cable 82 USB driver 79, 88 Control button 20 Creating a new folder 47 116 D Date and time 21, 35 DC plug 19 Deleting images 40, 74 Divide 76 E Editing...
Operating Instructions
Page 117
... 26 Using the self-timer 31 White balance 52 T Trimming 63 U USB Cancel the USB connection 83, 89 Installing the USB driver 79, 88 USB connection 82, 88 Using your camera abroad 19 V Viewing on the single-image screen 36 Voice 57 W Warnings and messages 98 White balance 52 Z Zoom Playback zoom...
... 26 Using the self-timer 31 White balance 52 T Trimming 63 U USB Cancel the USB connection 83, 89 Installing the USB driver 79, 88 USB connection 82, 88 Using your camera abroad 19 V Viewing on the single-image screen 36 Voice 57 W Warnings and messages 98 White balance 52 Z Zoom Playback zoom...


