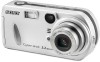

Operating Instructions
Page 3
...radio/TV technician for a digital device pursuant to operate this equipment. Notice on a circuit different from that to which the receiver is no guarantee that any changes or modifications not expressly approved in this manual could void your nearest Sony service station. If you should...on, the user is fitted to comply with the limits for a Class B digital device, pursuant to discontinue midway (fail), restart the application or disconnect and connect the USB cable again. 3 For more of this digital camera. If the plug supplied with this equipment has a detachable fuse cover, be...
...radio/TV technician for a digital device pursuant to operate this equipment. Notice on a circuit different from that to which the receiver is no guarantee that any changes or modifications not expressly approved in this manual could void your nearest Sony service station. If you should...on, the user is fitted to comply with the limits for a Class B digital device, pursuant to discontinue midway (fail), restart the application or disconnect and connect the USB cable again. 3 For more of this digital camera. If the plug supplied with this equipment has a detachable fuse cover, be...
Operating Instructions
Page 7
... an enlarged image - Trimming 63 Playing back successive images - For Windows users 78 Installing the USB driver 79 Installing "Image Transfer 80 Installing "ImageMixer 81 Connecting the camera to your computer 82 Copying images using "Image Transfer" 83 Changing "Image Transfer" settings .. ...an alphabet letter appears......100 Additional information The number of a still image.........62 Enlarging an image - Rotate 64 Playing back images shot in Multi Burst mode 65 Playing back continuously 65 Playing back frame by frame - Advanced still image viewing Selecting the folder and ...
... an enlarged image - Trimming 63 Playing back successive images - For Windows users 78 Installing the USB driver 79 Installing "Image Transfer 80 Installing "ImageMixer 81 Connecting the camera to your computer 82 Copying images using "Image Transfer" 83 Changing "Image Transfer" settings .. ...an alphabet letter appears......100 Additional information The number of a still image.........62 Enlarging an image - Rotate 64 Playing back images shot in Multi Burst mode 65 Playing back continuously 65 Playing back frame by frame - Advanced still image viewing Selecting the folder and ...
Operating Instructions
Page 9
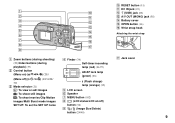
J RESET button (91) K DC IN jack (19) 1 q; L (USB) jack (82) 2 qa M A/V OUT (MONO) jack (38) 3 4 N Battery cover qs O OPEN button (16) qd P Wrist strap hook 5 qf Attaching the wrist strap 6 qg 7 qh 8 qj 9 A ...
J RESET button (91) K DC IN jack (19) 1 q; L (USB) jack (82) 2 qa M A/V OUT (MONO) jack (38) 3 4 N Battery cover qs O OPEN button (16) qd P Wrist strap hook 5 qf Attaching the wrist strap 6 qg 7 qh 8 qj 9 A ...

Operating Instructions
Page 11
J RESET button (91) K DC IN jack (19) 1 q; L (USB) jack (82) 2 qa M A/V OUT (MONO) jack (38) 3 4 N Battery cover qs O OPEN button (16) qd P Wrist strap hook 5 qf Attaching the wrist strap 6 qg 7 qh 8 qj 9 A ...
J RESET button (91) K DC IN jack (19) 1 q; L (USB) jack (82) 2 qa M A/V OUT (MONO) jack (38) 3 4 N Battery cover qs O OPEN button (16) qd P Wrist strap hook 5 qf Attaching the wrist strap 6 qg 7 qh 8 qj 9 A ...

Operating Instructions
Page 13
L (USB) jack (82) 2 qa M A/V OUT (MONO) jack (38) 3 4 N Battery cover qs O OPEN button (16) qd P Wrist strap hook 5 qf Attaching the wrist strap 6 qg 7 qh 8 qj 9 A ...
L (USB) jack (82) 2 qa M A/V OUT (MONO) jack (38) 3 4 N Battery cover qs O OPEN button (16) qd P Wrist strap hook 5 qf Attaching the wrist strap 6 qg 7 qh 8 qj 9 A ...

Operating Instructions
Page 20
...show is being shown • A cable is connected to the (USB) jack or the A/V OUT (MONO) jack * When [Power Save] is set to [On]: approximately 90 seconds When [Power Save] is set to or , the lens begins to move (DSC-P72 only). However, in green and the power is automatically shut off... approximately three minutes How to use the control button to make the setting. Turning your camera on/off to preserve battery power. This may cause a malfunction (DSC-P72 only). • When you turn the power on the camera for a while* when shooting, viewing images, or setting up the menu or the SET...
...show is being shown • A cable is connected to the (USB) jack or the A/V OUT (MONO) jack * When [Power Save] is set to [On]: approximately 90 seconds When [Power Save] is set to or , the lens begins to move (DSC-P72 only). However, in green and the power is automatically shut off... approximately three minutes How to use the control button to make the setting. Turning your camera on/off to preserve battery power. This may cause a malfunction (DSC-P72 only). • When you turn the power on the camera for a while* when shooting, viewing images, or setting up the menu or the SET...
Operating Instructions
Page 78
Operation is not assured in an environment upgraded to the operating systems described above or in the folder selected by the camera is copied to a computer, only the data in a multi-boot environment. When connected to the computer. Communication with Windows XP. The required operations may differ ... × 600 dots or more High Color (16-bit color, 65 000 colors) or more • If you connect two or more . See the Sony Website for a USB connection, [Normal] and [PTP]* modes. Copying images to less than 800 × 600 dots or 256 colors or less, the install title screen does...
Operation is not assured in an environment upgraded to the operating systems described above or in the folder selected by the camera is copied to a computer, only the data in a multi-boot environment. When connected to the computer. Communication with Windows XP. The required operations may differ ... × 600 dots or more High Color (16-bit color, 65 000 colors) or more • If you connect two or more . See the Sony Website for a USB connection, [Normal] and [PTP]* modes. Copying images to less than 800 × 600 dots or 256 colors or less, the install title screen does...
Operating Instructions
Page 79
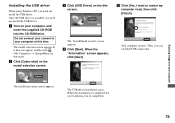
Do not connect your camera to restart my computer now], then click [Finish]. b Click [Cyber-shot] on the title screen. c Click [USB Driver] on the model selection screen. d Click [Next]. The USB driver installation starts. The model selection screen appears. The "InstallShield wizard" screen appears. e...] in that order. Once the USB driver is completed, the screen informs you can establish USB connection. a Turn on your computer at this time. Installing the USB driver When using Windows XP, you need not install the USB driver. When the installation is installed...
Do not connect your camera to restart my computer now], then click [Finish]. b Click [Cyber-shot] on the title screen. c Click [USB Driver] on the model selection screen. d Click [Next]. The USB driver installation starts. The model selection screen appears. The "InstallShield wizard" screen appears. e...] in that order. Once the USB driver is completed, the screen informs you can establish USB connection. a Turn on your computer at this time. Installing the USB driver When using Windows XP, you need not install the USB driver. When the installation is installed...
Operating Instructions
Page 81
... you use the "ImageMixer Ver. 1.5 for Sony" software to install the driver will appear. c Restart your computer, the "Information" screen appears. If you wish to continue with the installation of "ImageMixer," click [ImageMixer] on the title screen and then follow the procedure. • The USB driver is needed in your computer according...
... you use the "ImageMixer Ver. 1.5 for Sony" software to install the driver will appear. c Restart your computer, the "Information" screen appears. If you wish to continue with the installation of "ImageMixer," click [ImageMixer] on the title screen and then follow the procedure. • The USB driver is needed in your computer according...

Operating Instructions
Page 82
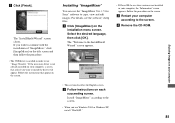
...for the first time, your computer automatically runs the used program to recognize the camera. d Connect the USB cable to your computer. • When using a desktop computer, connect the USB cable to the USB connector on the rear panel. • When using weak batteries, copying may fail... XP, the AutoPlay wizard automatically appears on your computer and the camera. When a USB connection is established for a while. * During communication, the access indicators turn red. • If "USB MODE NORMAL" does not appear, confirm that [USB Connect] is set to [Normal] in the SET UP settings...
...for the first time, your computer automatically runs the used program to recognize the camera. d Connect the USB cable to your computer. • When using a desktop computer, connect the USB cable to the USB connector on the rear panel. • When using weak batteries, copying may fail... XP, the AutoPlay wizard automatically appears on your computer and the camera. When a USB connection is established for a while. * During communication, the access indicators turn red. • If "USB MODE NORMAL" does not appear, confirm that [USB Connect] is set to [Normal] in the SET UP settings...

Operating Instructions
Page 83
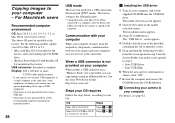
...starts up automatically even if the USB connection is unnecessary for Windows XP users. 5 Disconnect the USB cable, remove the "Memory Stick," or turn off the camera during a USB connection For Windows 2000, Me, or XP users 1 Double-click on the task tray. 2 Click (Sony DSC), then click [Stop]. 3... Confirm the device on your computer with the USB cable. b Right-click [Sony MemoryStick], then click [Properties]. For Windows...
...starts up automatically even if the USB connection is unnecessary for Windows XP users. 5 Disconnect the USB cable, remove the "Memory Stick," or turn off the camera during a USB connection For Windows 2000, Me, or XP users 1 Double-click on the task tray. 2 Click (Sony DSC), then click [Stop]. 3... Confirm the device on your computer with the USB cable. b Right-click [Sony MemoryStick], then click [Properties]. For Windows...

Operating Instructions
Page 84
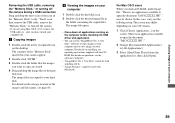
..." automatically, you can set are copied to the "My Documents" folder. • When you try to copy an image to a folder in your camera appear. • This section describes an example of Windows 2000, click [Uninstall].) The "Confirm Device Removal" screen appears. 3 Click [OK]. When you... click [Properties]. Try the USB driver installation again using Windows XP, see page 85. Right-click the "Image Transfer" icon on the "System Properties" screen. 2 Confirm if other devices are stored. The settings you do not set to delete them. 1 Click [ Sony DSC]. (In case of Windows 2000...
..." automatically, you can set are copied to the "My Documents" folder. • When you try to copy an image to a folder in your camera appear. • This section describes an example of Windows 2000, click [Uninstall].) The "Confirm Device Removal" screen appears. 3 Click [OK]. When you... click [Properties]. Try the USB driver installation again using Windows XP, see page 85. Right-click the "Image Transfer" icon on the "System Properties" screen. 2 Confirm if other devices are stored. The settings you do not set to delete them. 1 Click [ Sony DSC]. (In case of Windows 2000...

Operating Instructions
Page 85
...working with these pictures], then click [Next]. f Click [Finish]. Windows XP Copying images using Microsoft Scanner and Camera Wizard], then click [OK]. The "Scanner and Camera Wizard" screen appears. When the copying is displayed. 85 Enjoying images on your computer a Double-click [My ...Next]. Viewing the images on your computer. The "My Documents" folder contents are displayed. d Select a name and destination for Sony" software to disconnect the USB cable and reconnect it. - c Click the checkbox of images that order. • You can use the "ImageMixer Ver....
...working with these pictures], then click [Next]. f Click [Finish]. Windows XP Copying images using Microsoft Scanner and Camera Wizard], then click [OK]. The "Scanner and Camera Wizard" screen appears. When the copying is displayed. 85 Enjoying images on your computer a Double-click [My ...Next]. Viewing the images on your computer. The "My Documents" folder contents are displayed. d Select a name and destination for Sony" software to disconnect the USB cable and reconnect it. - c Click the checkbox of images that order. • You can use the "ImageMixer Ver....
Operating Instructions
Page 88
... screen opened in the folder selected by the camera is not provided on your computer may not operate depending on the model selection screen. When connected to a computer, only the data in step 4. • Sony USB Driver • Sony USB Shim 6 When the message for confirmation is ...9.0 or 9.1. - Communication with Mac OS X. The "USB Driver" screen appears. 4 Double-click the icon of USB equipment. • Operations are not guaranteed when using an additional device. The model selection screen appears. 2 Click [Cyber-shot] on the type of the hard disk containing the OS...
... screen opened in the folder selected by the camera is not provided on your computer may not operate depending on the model selection screen. When connected to a computer, only the data in step 4. • Sony USB Driver • Sony USB Shim 6 When the message for confirmation is ...9.0 or 9.1. - Communication with Mac OS X. The "USB Driver" screen appears. 4 Double-click the icon of USB equipment. • Operations are not guaranteed when using an additional device. The model selection screen appears. 2 Click [Cyber-shot] on the type of the hard disk containing the OS...
Operating Instructions
Page 89
... supplied with Macintosh. The screen may be used with the CDROM. Enjoying images on your computer Removing the USB cable, removing the "Memory Stick," or turning off the camera during a USB connection Drag and drop the drive icon or the icon of the "Memory Stick" to the "Trash" ... your hard disk. The image file opens. • Close down all applications running on the computer before installing the USB driver and application. • You can use the "ImageMixer Ver. 1.5 for Sony" cannot be used with Mac OS X. • "Image Transfer" cannot be shown. For details on the desktop...
... supplied with Macintosh. The screen may be used with the CDROM. Enjoying images on your computer Removing the USB cable, removing the "Memory Stick," or turning off the camera during a USB connection Drag and drop the drive icon or the icon of the "Memory Stick" to the "Trash" ... your hard disk. The image file opens. • Close down all applications running on the computer before installing the USB driver and application. • You can use the "ImageMixer Ver. 1.5 for Sony" cannot be used with Mac OS X. • "Image Transfer" cannot be shown. For details on the desktop...
Operating Instructions
Page 94
... and time are not set correctly. p Set the mode selector to . • You cannot play back the image on the camera, if it is modified on a computer. p Cancel USB communication (page 83). Unknown beeps are heard when the auto focus is working. p Set [Video Out] to the LOCK position....played back on a computer or its folder/file name is changed. • The camera is in USB mode. - • The [Video Out] setting for the camera in focus preset mode (page 49). Deleting/editing an image Symptom Your camera cannot delete an image. p The write-protect switch on the "Memory Stick" p...
... and time are not set correctly. p Set the mode selector to . • You cannot play back the image on the camera, if it is modified on a computer. p Cancel USB communication (page 83). Unknown beeps are heard when the auto focus is working. p Set [Video Out] to the LOCK position....played back on a computer or its folder/file name is changed. • The camera is in USB mode. - • The [Video Out] setting for the camera in focus preset mode (page 49). Deleting/editing an image Symptom Your camera cannot delete an image. p The write-protect switch on the "Memory Stick" p...
Operating Instructions
Page 95
...files cannot be resized. • Print (DPOF) marks cannot be used with the USB cable before you installed the "USB Driver" from your computer without using the supplied USB cable. or not your camera. • The camera is set to [PTP] in the SET UP p Set it again. p Turn ...not supplied) (page 19). • You are p Disconnect the USB cables except for those connected to the connected to your p Directly connect the camera and your computer, device because you connected the camera and then install the USB driver (pages 79, 84). Symptom The resizing function does not work...
...files cannot be resized. • Print (DPOF) marks cannot be used with the USB cable before you installed the "USB Driver" from your computer without using the supplied USB cable. or not your camera. • The camera is set to [PTP] in the SET UP p Set it again. p Turn ...not supplied) (page 19). • You are p Disconnect the USB cables except for those connected to the connected to your p Directly connect the camera and your computer, device because you connected the camera and then install the USB driver (pages 79, 84). Symptom The resizing function does not work...

Operating Instructions
Page 96
... for your OS (pages 83, 84, 88). p If you play the movie file back from the hard disk (page 88). Solution p Connect the camera and your OS. - p Copy the movie to your computer as follows: For Windows, 800 × 600 dots or more, high color (16-bit...on a "Memory Stick." 96 Cause • You are using the "ImageMixer Ver. 1.5 for Sony" software, click on a computer. p Delete unnecessary images (pages 40, 74). Symptom You cannot copy images. After making a USB connection, "Image Transfer" does not automatically start. The error message - p If you are playing ...
... for your OS (pages 83, 84, 88). p If you play the movie file back from the hard disk (page 88). Solution p Connect the camera and your OS. - p Copy the movie to your computer as follows: For Windows, 800 × 600 dots or more, high color (16-bit...on a "Memory Stick." 96 Cause • You are using the "ImageMixer Ver. 1.5 for Sony" software, click on a computer. p Delete unnecessary images (pages 40, 74). Symptom You cannot copy images. After making a USB connection, "Image Transfer" does not automatically start. The error message - p If you are playing ...
Operating Instructions
Page 107
...the date and time (pages 21, 45). (Setup 2) Item USB Connect Video Out Setting PTP/xNormal NTSC PAL Description Switches the USB mode (page 78). - Sets the video output signal to see when using the camera with the batteries. Additional information 107 Folder Change REC. Item ...menu items, warnings and messages in other bright locations, but also uses up the battery charge faster. Displayed only when you are using the camera outdoors or in selected language. Folder Setting OK / Cancel OK / Cancel Description Creates a folder for recording images (page 46). (Setup ...
...the date and time (pages 21, 45). (Setup 2) Item USB Connect Video Out Setting PTP/xNormal NTSC PAL Description Switches the USB mode (page 78). - Sets the video output signal to see when using the camera with the batteries. Additional information 107 Folder Change REC. Item ...menu items, warnings and messages in other bright locations, but also uses up the battery charge faster. Displayed only when you are using the camera outdoors or in selected language. Folder Setting OK / Cancel OK / Cancel Description Creates a folder for recording images (page 46). (Setup ...
Operating Instructions
Page 111
...camera conversion: 41 to 82 mm (1 5/8 to Auto) Additional information [Output connectors] A/V OUT (MONO) jack (Monaural) Minijack Video: 1 Vp-p, 75 Ω, unbalanced, sync negative Audio: 327 mV (at a 47 kΩ load) Output impedance 2.2 kΩ USB jack mini-B [LCD screen] LCD panel used DSC-P72 3.8 cm (1.5 type) TFT drive DSC... hydride battery. First, verify that the battery charger works properly. If you charge other batteries except the Sony nickel hydride battery using the supplied battery charger, the full capacity of the battery may not be the cause of the malfunction...
...camera conversion: 41 to 82 mm (1 5/8 to Auto) Additional information [Output connectors] A/V OUT (MONO) jack (Monaural) Minijack Video: 1 Vp-p, 75 Ω, unbalanced, sync negative Audio: 327 mV (at a 47 kΩ load) Output impedance 2.2 kΩ USB jack mini-B [LCD screen] LCD panel used DSC-P72 3.8 cm (1.5 type) TFT drive DSC... hydride battery. First, verify that the battery charger works properly. If you charge other batteries except the Sony nickel hydride battery using the supplied battery charger, the full capacity of the battery may not be the cause of the malfunction...


