
Operating Instructions
Page 8
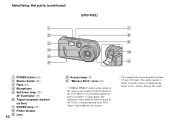
...(DSC-P72) 1 7 2 8 3 9 4 q; 5 qa 6 A POWER button (20) B Shutter button (26) C Flash (32) D Microphone E Self-timer lamp (31)/ AF illuminator (33) F Tripod receptacle (bottom surface) G POWER lamp (20) H Finder window I Lens 8 J Access lamp (23) K "Memory Stick" cover (23) • "3.2MEGA PIXELS" shown on the surface of the camera ...of effective pixels of less than 5.5 mm (7/32 inch). You will be unable to firmly secure the camera to tripods having longer screws, and may damage the camera. The indication of the number of effective pixels of the CCD is 3.1 mega pixels. However, the ...
...(DSC-P72) 1 7 2 8 3 9 4 q; 5 qa 6 A POWER button (20) B Shutter button (26) C Flash (32) D Microphone E Self-timer lamp (31)/ AF illuminator (33) F Tripod receptacle (bottom surface) G POWER lamp (20) H Finder window I Lens 8 J Access lamp (23) K "Memory Stick" cover (23) • "3.2MEGA PIXELS" shown on the surface of the camera ...of effective pixels of less than 5.5 mm (7/32 inch). You will be unable to firmly secure the camera to tripods having longer screws, and may damage the camera. The indication of the number of effective pixels of the CCD is 3.1 mega pixels. However, the ...
Operating Instructions
Page 10
..., the maximum number of pixels recorded is a recommendation of the JCIA (Japan Camera Industry Association). • Use a tripod with a screw length of the CCD. Identifying the parts (continued) (DSC-P52) 1 7 2 8 3 9 4 q; 5 6 qa A POWER button (20) B Shutter button (26) C Flash (32) D Microphone E Self-timer lamp (31)/ AF illuminator (33) F Tripod receptacle (bottom surface) G POWER lamp (20...
..., the maximum number of pixels recorded is a recommendation of the JCIA (Japan Camera Industry Association). • Use a tripod with a screw length of the CCD. Identifying the parts (continued) (DSC-P52) 1 7 2 8 3 9 4 q; 5 6 qa A POWER button (20) B Shutter button (26) C Flash (32) D Microphone E Self-timer lamp (31)/ AF illuminator (33) F Tripod receptacle (bottom surface) G POWER lamp (20...

Operating Instructions
Page 12
... of the number of effective pixels of the CCD is a recommendation of the JCIA (Japan Camera Industry Association). • Use a tripod with a screw length of the CCD. Identifying the parts (continued) (DSC-P32) 1 7 2 8 3 9 4 5 q; 6 qa A POWER button (20) B Shutter button (26) C Flash (32) D Finder window E Lens F Tripod receptacle (bottom surface) G POWER lamp (20) H Microphone...
... of the number of effective pixels of the CCD is a recommendation of the JCIA (Japan Camera Industry Association). • Use a tripod with a screw length of the CCD. Identifying the parts (continued) (DSC-P32) 1 7 2 8 3 9 4 5 q; 6 qa A POWER button (20) B Shutter button (26) C Flash (32) D Finder window E Lens F Tripod receptacle (bottom surface) G POWER lamp (20) H Microphone...
Operating Instructions
Page 17
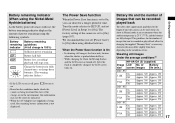
...150 Approx. 500 Approx. 250 DSC-P52 3.1M On Off Approx. 320 Approx. 160 Approx. 540 Approx. 270 VGA On Off Approx. 320 Approx. 160 Approx. 540 Approx. 270 DSC-P32 3.1M On Off Approx. ...the Power Save function is On • In shooting still images, the focus only focuses when the shutter is pushed down halfway. • While charging the flash, the lamp flashes and the LCD screen ...be correctly indicated. • When the AC Adaptor (not supplied) is not displayed. of the camera is 25°C (77°F), and the batteries are fully charged. Battery remaining indicator (When using...
...150 Approx. 500 Approx. 250 DSC-P52 3.1M On Off Approx. 320 Approx. 160 Approx. 540 Approx. 270 VGA On Off Approx. 320 Approx. 160 Approx. 540 Approx. 270 DSC-P32 3.1M On Off Approx. ...the Power Save function is On • In shooting still images, the focus only focuses when the shutter is pushed down halfway. • While charging the flash, the lamp flashes and the LCD screen ...be correctly indicated. • When the AC Adaptor (not supplied) is not displayed. of the camera is 25°C (77°F), and the batteries are fully charged. Battery remaining indicator (When using...
Operating Instructions
Page 26
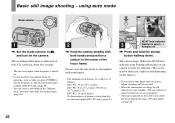
...while it is operating, such as follows: DSC-P72: 50 cm (19 3/4 inches) DSC-P52: 8 cm (3 1/4 inches) (W)/40 cm (15 3/4 inches) (T) DSC-P32: 10 cm (4 inches) To shoot subjects at distances closer than this, use the macro mode (DSC-P72 only) (page 30). The camera beeps. using auto mode Mode selector VGA ...F2.8 30 1 , Set the mode selector to shoot, but the focus is as when you release your finger from the shutter button, shooting will be canceled. • When the camera does not beep, the AF adjustment is ready for shooting. (The screen may be frozen for storing images (page 46). ...
...while it is operating, such as follows: DSC-P72: 50 cm (19 3/4 inches) DSC-P52: 8 cm (3 1/4 inches) (W)/40 cm (15 3/4 inches) (T) DSC-P32: 10 cm (4 inches) To shoot subjects at distances closer than this, use the macro mode (DSC-P72 only) (page 30). The camera beeps. using auto mode Mode selector VGA ...F2.8 30 1 , Set the mode selector to shoot, but the focus is as when you release your finger from the shutter button, shooting will be canceled. • When the camera does not beep, the AF adjustment is ready for shooting. (The screen may be frozen for storing images (page 46). ...

Operating Instructions
Page 27
... to preserve battery power (page 20). Program mode shooting [Program] You can set to [Multi AF], and the metering mode is automatically shut off to (Camera) and [Mode] (REC Mode). Landscape mode [ ] See page 58. When the recording lamp (pages 9, 11, 13) goes out, you can shoot ... exposure, and white balance. The shutter clicks, the shooting is completed, and the still image is set to , the functions that can be selected change the camera mode 1 Set the mode selector to . 2 Press MENU. 3 Select (Camera) with b on the control button. 4 Select the desired camera mode with v/ V on the ...
... to preserve battery power (page 20). Program mode shooting [Program] You can set to [Multi AF], and the metering mode is automatically shut off to (Camera) and [Mode] (REC Mode). Landscape mode [ ] See page 58. When the recording lamp (pages 9, 11, 13) goes out, you can shoot ... exposure, and white balance. The shutter clicks, the shooting is completed, and the still image is set to , the functions that can be selected change the camera mode 1 Set the mode selector to . 2 Press MENU. 3 Select (Camera) with b on the control button. 4 Select the desired camera mode with v/ V on the ...
Operating Instructions
Page 28
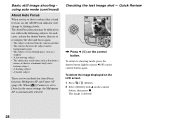
... use with v on the LCD screen 1 Press (Delete). 2 Select [Delete] with in the menu settings, the Multipoint AF is deleted. 28 Checking the last image shot - When [ ] (Camera) is a luminous body and a lustrous subject • A flashing subject. • A backlit subject There are two methods for Auto Focus function: Multipoint AF and Center... control button, then press z. Basic still image shooting - The image is automatically selected. The Auto Focus function may be difficult to shooting mode, press the shutter button lightly or press b (7) on the control button.
... use with v on the LCD screen 1 Press (Delete). 2 Select [Delete] with in the menu settings, the Multipoint AF is deleted. 28 Checking the last image shot - When [ ] (Camera) is a luminous body and a lustrous subject • A flashing subject. • A backlit subject There are two methods for Auto Focus function: Multipoint AF and Center... control button, then press z. Basic still image shooting - The image is automatically selected. The Auto Focus function may be difficult to shooting mode, press the shutter button lightly or press b (7) on the control button.

Operating Instructions
Page 30
If you actually shoot may be different. 30 Macro (DSC-P72 only) VGA 101 98 VGA FINE 101 97 For close -ups of subjects up to the distances specified below. The (Macro) indicator appears on ... macro feature. The indicator disappears from the end of the lens 1 , Set the mode selector to . 2 , Center the subject in the frame, and press the shutter button fully down. When the zoom is set to , and press B ( ) on the control button again. To return to shoot when using the macro feature...
If you actually shoot may be different. 30 Macro (DSC-P72 only) VGA 101 98 VGA FINE 101 97 For close -ups of subjects up to the distances specified below. The (Macro) indicator appears on ... macro feature. The indicator disappears from the end of the lens 1 , Set the mode selector to . 2 , Center the subject in the frame, and press the shutter button fully down. When the zoom is set to , and press B ( ) on the control button again. To return to shoot when using the macro feature...

Operating Instructions
Page 31
...The Self-timer lamp (pages 8, 10, 12) will be correctly set to . 2 , Center the subject in front of the camera and press the shutter button, the focus and the exposure may not be shot after approximately 10 seconds. Using the self-timer VGA 101 98 VGA FINE 101 98 F2.8 30 Shooting still... images 1 , Set the mode selector to , and press V ( ) on the control button again. The image will flash in orange, and you stand in the frame, and press the shutter button...
...The Self-timer lamp (pages 8, 10, 12) will be correctly set to . 2 , Center the subject in front of the camera and press the shutter button, the focus and the exposure may not be shot after approximately 10 seconds. Using the self-timer VGA 101 98 VGA FINE 101 98 F2.8 30 Shooting still... images 1 , Set the mode selector to , and press V ( ) on the control button again. The image will flash in orange, and you stand in the frame, and press the shutter button...

Operating Instructions
Page 32
... a background that you can change the brightness of the flash using [Flash Level] in the menu settings (page 103). • Because the shutter speed is slower under dark conditions when (Slow synchro) or (No flash) is selected, it is recommended that is not enough light or when... you use the flash based on the control button repeatedly to 10 feet 9 29/32 inches) (DSC-P52). - After charging is completed, the lamp goes out. • The flash mode selected here is preserved even when the camera is being charged, the lamp flashes. About 0.5 m to 3.3 m (19 3/4 inches to select a...
... a background that you can change the brightness of the flash using [Flash Level] in the menu settings (page 103). • Because the shutter speed is slower under dark conditions when (Slow synchro) or (No flash) is selected, it is recommended that is not enough light or when... you use the flash based on the control button repeatedly to 10 feet 9 29/32 inches) (DSC-P52). - After charging is completed, the lamp goes out. • The flash mode selected here is preserved even when the camera is being charged, the lamp flashes. About 0.5 m to 3.3 m (19 3/4 inches to select a...

Operating Instructions
Page 33
...7/16 inches) • If AF illuminator light misses the center of red-eye reduction possible varies according to focus on. • When [ ] (Camera) is pressed halfway down and the focus locks. Set [AF Illuminator] to shoot under insufficient lighting conditions, ON appears on the LCD screen. VGA FINE...automatically during the time between when the shutter button is set to [Multi AF] or [Center AF], the AF range finder is as follows: DSC-P72: Up to approximately 3.8 m (12 feet 5 19/32 inches) (W)/Up to approximately 2.5 m (8 feet 2 7/16 inches) (T) DSC-P52: Up to assist in focusing when...
...7/16 inches) • If AF illuminator light misses the center of red-eye reduction possible varies according to focus on. • When [ ] (Camera) is pressed halfway down and the focus locks. Set [AF Illuminator] to shoot under insufficient lighting conditions, ON appears on the LCD screen. VGA FINE...automatically during the time between when the shutter button is set to [Multi AF] or [Center AF], the AF range finder is as follows: DSC-P72: Up to approximately 3.8 m (12 feet 5 19/32 inches) (W)/Up to approximately 2.5 m (8 feet 2 7/16 inches) (T) DSC-P52: Up to assist in focusing when...
Operating Instructions
Page 36
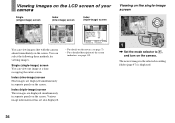
... separate panels on the screen. Various image information items are displayed simultaneously in separate panels on the screen. You can view images shot with the camera almost immediately on the screen. Index (triple-image) screen Three images are also displayed. • For details on the movies,...image) screen Index (triple-image) screen VGA 101 8/9 101-0008 2003 7 4 10:30PM BACK/NEXT VOLUME SINGLE DISPLAY MOVE Aperture Value: F2.8 Shutter Speed: 1/30 Exposure Value: 0.0 ISO: 100 101-0002 2003 7 4 10:30PM SINGLE DISPLAY BACK/NEXT You can select the following three methods...
... separate panels on the screen. Various image information items are displayed simultaneously in separate panels on the screen. You can view images shot with the camera almost immediately on the screen. Index (triple-image) screen Three images are also displayed. • For details on the movies,...image) screen Index (triple-image) screen VGA 101 8/9 101-0008 2003 7 4 10:30PM BACK/NEXT VOLUME SINGLE DISPLAY MOVE Aperture Value: F2.8 Shutter Speed: 1/30 Exposure Value: 0.0 ISO: 100 101-0002 2003 7 4 10:30PM SINGLE DISPLAY BACK/NEXT You can select the following three methods...

Operating Instructions
Page 37
... to the Index (nineimage) screen. or triple-image) screen VGA 101 3/9 101-0003 2003 7 4 10:30PM BACK/NEXT VOLUME SINGLE DISPLAY MOVE Aperture Value: F2.8 Shutter Speed: 1/30 Exposure Value: 0.0 ISO: 100 101-0002 2003 7 4 10:30PM SINGLE DISPLAY BACK/NEXT 2 , Select the desired still image with b/B on the index (nine...
... to the Index (nineimage) screen. or triple-image) screen VGA 101 3/9 101-0003 2003 7 4 10:30PM BACK/NEXT VOLUME SINGLE DISPLAY MOVE Aperture Value: F2.8 Shutter Speed: 1/30 Exposure Value: 0.0 ISO: 100 101-0002 2003 7 4 10:30PM SINGLE DISPLAY BACK/NEXT 2 , Select the desired still image with b/B on the index (nine...
Operating Instructions
Page 42
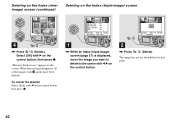
... not yet been deleted at this message disappears, all of the images with B on the Index (triple-image) screen Delete Exit OK Aperture Value: F2.8 Shutter Speed: 1/30 Exposure Value: 0.0 ISO: 100 101-0002 2003 7 4 10:30PM SINGLE DISPLAY BACK/NEXT Delete Exit 101-0002 2003 7 4 10:30PM OK BACK/NEXT...
... not yet been deleted at this message disappears, all of the images with B on the Index (triple-image) screen Delete Exit OK Aperture Value: F2.8 Shutter Speed: 1/30 Exposure Value: 0.0 ISO: 100 101-0002 2003 7 4 10:30PM SINGLE DISPLAY BACK/NEXT Delete Exit 101-0002 2003 7 4 10:30PM OK BACK/NEXT...

Operating Instructions
Page 49
...can focus in this , use of the Focus preset is centered in the AF range finder, and press the shutter button halfway down. Before operation When shooting still images, set distance to the subject, or when shooting a subject... the frame. • You can carry out the AF lock adjustment process before you press the shutter button fully down . Focus preset Mode selector: / When shooting an image using Center AF. In a case like... focus even if the subject is a gap between them, the camera may focus on , return to the fully composed shot, and press the shutter button fully down .
...can focus in this , use of the Focus preset is centered in the AF range finder, and press the shutter button halfway down. Before operation When shooting still images, set distance to the subject, or when shooting a subject... the frame. • You can carry out the AF lock adjustment process before you press the shutter button fully down . Focus preset Mode selector: / When shooting an image using Center AF. In a case like... focus even if the subject is a gap between them, the camera may focus on , return to the fully composed shot, and press the shutter button fully down .
Operating Instructions
Page 54
...- b Press (Image Size). Clip Motion Mode selector: You can select from the latest one Clip Motion shot is suitable for use on a home page. This is 10. Control button Mode selector Shutter button a Set the mode selector to [Clip Motion] in this reason, the image quality of the frames... will be shot in Clip Motion in the SET UP settings (pages 45, 106). Before operation Set [Moving ...
...- b Press (Image Size). Clip Motion Mode selector: You can select from the latest one Clip Motion shot is suitable for use on a home page. This is 10. Control button Mode selector Shutter button a Set the mode selector to [Clip Motion] in this reason, the image quality of the frames... will be shot in Clip Motion in the SET UP settings (pages 45, 106). Before operation Set [Moving ...

Operating Instructions
Page 55
... choose the frame interval from the actual image recorded. • GIF files made on other cameras may appear different from the menu settings (page 104). Multi Burst Mode selector: Pressing the shutter button once records 16 frames in Multi Burst mode - The menu appears. Advanced still image ...; For the number of images you play back images recorded in Multi Burst mode on the camera, see page 65. • For the number of the DSC-P52/P32. • When you can be recorded, see page 101. c Select (Interval) with b/B, then select the desired between-frame interval with v/ V. ...
... choose the frame interval from the actual image recorded. • GIF files made on other cameras may appear different from the menu settings (page 104). Multi Burst Mode selector: Pressing the shutter button once records 16 frames in Multi Burst mode - The menu appears. Advanced still image ...; For the number of images you play back images recorded in Multi Burst mode on the camera, see page 65. • For the number of the DSC-P52/P32. • When you can be recorded, see page 101. c Select (Interval) with b/B, then select the desired between-frame interval with v/ V. ...

Operating Instructions
Page 56
...Select [Mode] (REC Mode) with b/B, then select [Burst 2] with v/V. b Press MENU. The menu appears. Compose the picture before pressing the shutter button. • The interval needed for e-mail - E-Mail Mode selector: You can do the next shooting after "Recording" disappears from the LCD screen... Shooting still images for recording is also recorded. Control button MENU Mode selector Shutter button a Set the mode selector to . The menu appears. 56 b Press MENU. Control button MENU Mode selector Shutter button a Set the mode selector to . To return to an e-mail ...
...Select [Mode] (REC Mode) with b/B, then select [Burst 2] with v/V. b Press MENU. The menu appears. Compose the picture before pressing the shutter button. • The interval needed for e-mail - E-Mail Mode selector: You can do the next shooting after "Recording" disappears from the LCD screen... Shooting still images for recording is also recorded. Control button MENU Mode selector Shutter button a Set the mode selector to . The menu appears. 56 b Press MENU. Control button MENU Mode selector Shutter button a Set the mode selector to . To return to an e-mail ...
Operating Instructions
Page 57
...from the LCD screen. Advanced still image shooting a Set the mode selector to 40 seconds. If you press and release the shutter button, sound is recorded until you hold down the shutter button, sound is recorded for up to . d Shoot your image. c Select [Mode] (REC Mode) with b/B, ...then select [E-Mail] with audio files - You can record still images with v. Control button MENU Mode selector Shutter button If you release the shutter button for five seconds. 57 The menu appears. Shooting still images with v/V. b Press MENU.
...from the LCD screen. Advanced still image shooting a Set the mode selector to 40 seconds. If you press and release the shutter button, sound is recorded until you hold down the shutter button, sound is recorded for up to . d Shoot your image. c Select [Mode] (REC Mode) with b/B, ...then select [E-Mail] with audio files - You can record still images with v. Control button MENU Mode selector Shutter button If you release the shutter button for five seconds. 57 The menu appears. Shooting still images with v/V. b Press MENU.

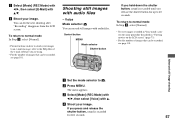
Operating Instructions
Page 58
Because the shutter speed is slow, it is recommended that you are shooting a snowscape, use this mode when shooting people in Macro mode. • The flash is set ... as when you are shooting at night. Landscape mode Focuses on images far away, so is convenient for shooting landscapes at night. However, because the shutter speed is slower under these conditions, we recommend you use a tripod. • The flash forcely strobes. Shooting according to scene conditions Mode selector: When shooting...
Because the shutter speed is slow, it is recommended that you are shooting a snowscape, use this mode when shooting people in Macro mode. • The flash is set ... as when you are shooting at night. Landscape mode Focuses on images far away, so is convenient for shooting landscapes at night. However, because the shutter speed is slower under these conditions, we recommend you use a tripod. • The flash forcely strobes. Shooting according to scene conditions Mode selector: When shooting...


