
Operating Instructions (primary manual)
Page 1
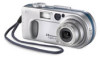
...for future reference. Model No. DSC-P2 © 2002 Sony Corporation 3-075-509-12(1) Getting started Shooting still images Viewing still images Deleting still images Copying still images to these numbers whenever you call upon your computer _________ Before advanced operations Advanced still image shooting Advanced still image viewing Still image editing Enjoying movies Troubleshooting Additional information Index Owner's Record The model and serial numbers are located on the bottom. DSC-P2 Serial No. Digital Still Camera Operating Instructions Before operating the unit...
...for future reference. Model No. DSC-P2 © 2002 Sony Corporation 3-075-509-12(1) Getting started Shooting still images Viewing still images Deleting still images Copying still images to these numbers whenever you call upon your computer _________ Before advanced operations Advanced still image shooting Advanced still image viewing Still image editing Enjoying movies Troubleshooting Additional information Index Owner's Record The model and serial numbers are located on the bottom. DSC-P2 Serial No. Digital Still Camera Operating Instructions Before operating the unit...
Operating Instructions (primary manual)
Page 2
... turning the equipment off and on, the user is connected. -Consult the dealer or an experienced radio/TV technician for the FCC related matters only. WARNING To prevent fire or shock hazard, do not expose the unit to the presence of Conformity Trade Name: SONY Model No.: DSC-P2 Responsible Party:Sony Electronics Inc. This symbol is for help. Operation...
... turning the equipment off and on, the user is connected. -Consult the dealer or an experienced radio/TV technician for the FCC related matters only. WARNING To prevent fire or shock hazard, do not expose the unit to the presence of Conformity Trade Name: SONY Model No.: DSC-P2 Responsible Party:Sony Electronics Inc. This symbol is for help. Operation...

Operating Instructions (primary manual)
Page 3
... EMC standard regulations EN55022 Class B.) Attention for using connection cables shorter than 3 meters. The electromagnetic fields at the specific frequencies may influence the picture and sound of rechargeable batteries, call toll free 1-800-822-8837, or visit http://www.rbrc.org/ Caution: Do not handle damaged or leaking Lithium-Ion batteries. OPERATION IS SUBJECT TO THE FOLLOWING TWO CONDITIONS: (1) THIS...
... EMC standard regulations EN55022 Class B.) Attention for using connection cables shorter than 3 meters. The electromagnetic fields at the specific frequencies may influence the picture and sound of rechargeable batteries, call toll free 1-800-822-8837, or visit http://www.rbrc.org/ Caution: Do not handle damaged or leaking Lithium-Ion batteries. OPERATION IS SUBJECT TO THE FOLLOWING TWO CONDITIONS: (1) THIS...

Operating Instructions (primary manual)
Page 4
... of data loss, always copy (back up recommendation To avoid the potential risk of your eyes. Do not get the camera wet When taking pictures outdoors in color) that the camera is equipped with a power zoom lens. The pictures used in this manual The photographs used as examples of pictures in any way. • Be careful when placing the camera near a window or outdoors. Notes on image data compatibility • This camera...
... of data loss, always copy (back up recommendation To avoid the potential risk of your eyes. Do not get the camera wet When taking pictures outdoors in color) that the camera is equipped with a power zoom lens. The pictures used in this manual The photographs used as examples of pictures in any way. • Be careful when placing the camera near a window or outdoors. Notes on image data compatibility • This camera...

Operating Instructions (primary manual)
Page 6
... using your camera 4 Identifying the parts 8 Getting started Charging the battery pack 10 Using an external power source 13 Using your camera abroad 13 Turning on/off your camera 14 How to use the control button 14 Setting the date and time 15 Shooting still images Inserting and removing a "Memory Stick 17 Deciding the still image size and quality 18 Basic still image shooting (using auto adjustment mode 20 Checking the last image shot (Quick Review 21 Using the zoom feature 22 Shooting close-ups (Macro 22 Using the self-timer 23 Selecting a flash mode 24 Shooting...
... using your camera 4 Identifying the parts 8 Getting started Charging the battery pack 10 Using an external power source 13 Using your camera abroad 13 Turning on/off your camera 14 How to use the control button 14 Setting the date and time 15 Shooting still images Inserting and removing a "Memory Stick 17 Deciding the still image size and quality 18 Basic still image shooting (using auto adjustment mode 20 Checking the last image shot (Quick Review 21 Using the zoom feature 22 Shooting close-ups (Macro 22 Using the self-timer 23 Selecting a flash mode 24 Shooting...
Operating Instructions (primary manual)
Page 7
... image - Advanced still image viewing Enlarging a portion of images that can be saved/ shooting time 87 Menu items 88 SET UP items 92 Precautions 94 Enjoying movies Shooting movies 69 Viewing movies on the LCD screen .......70 Deleting movies 71 For the single screen 71 The "Memory Stick 95 The "InfoLITHIUM" battery pack ......... 95 Specifications 96 The LCD screen 98 Index 101 For the Index (nine images) screen.....71 For the Index (three images) screen....72 7 Playback zoom 61 Recording an enlarged image...
... image - Advanced still image viewing Enlarging a portion of images that can be saved/ shooting time 87 Menu items 88 SET UP items 92 Precautions 94 Enjoying movies Shooting movies 69 Viewing movies on the LCD screen .......70 Deleting movies 71 For the single screen 71 The "Memory Stick 95 The "InfoLITHIUM" battery pack ......... 95 Specifications 96 The LCD screen 98 Index 101 For the Index (nine images) screen.....71 For the Index (three images) screen....72 7 Playback zoom 61 Recording an enlarged image...

Operating Instructions (primary manual)
Page 12
... Viewing** still images NP-FC10 (supplied) Battery life No. When the POWER SAVE function is activated • The LCD screen will be darker than it is when [POWER SAVE] is pressed down halfway. of images that can be used repeatedly or self-discharged after charging (page 96). You cannot change the settings for [LCD BACKLIGHT] at this time (page 93). • When the power turns on, the Flash mode is normally set to " " (No flash...
... Viewing** still images NP-FC10 (supplied) Battery life No. When the POWER SAVE function is activated • The LCD screen will be darker than it is when [POWER SAVE] is pressed down halfway. of images that can be used repeatedly or self-discharged after charging (page 96). You cannot change the settings for [LCD BACKLIGHT] at this time (page 93). • When the power turns on, the Flash mode is normally set to " " (No flash...

Operating Instructions (primary manual)
Page 39
... Windows XP Professional An OS installed at the factory is required for a USB connection, [NORMAL] and [PTP] modes. The factory setting is provided, you can copy images using the [NORMAL] mode. This section describes the USB connection using an additional device. http://www.sony.net/ 39 When a USB connector is not provided on your computer When neither a USB connector nor a "Memory Stick" slot is the [NORMAL] mode. Copying still images to your computer Copying still images...
... Windows XP Professional An OS installed at the factory is required for a USB connection, [NORMAL] and [PTP] modes. The factory setting is provided, you can copy images using the [NORMAL] mode. This section describes the USB connection using an additional device. http://www.sony.net/ 39 When a USB connector is not provided on your computer When neither a USB connector nor a "Memory Stick" slot is the [NORMAL] mode. Copying still images to your computer Copying still images...
Operating Instructions (primary manual)
Page 49
Removing the USB cable from your computer or the "Memory Stick" from the window opened in Step 3 into the System Folder icon in the window opened in the folder containing the copied files. The image file opens. • You can use the "PIXELA ImageMixer for confirmation is shown, click [OK]. 7 Restart your computer. 2 Preparing your camera For details, see page 41. 3 Connecting your camera to select the desired language under "PIXELA ImageMixer" on...
Removing the USB cable from your computer or the "Memory Stick" from the window opened in Step 3 into the System Folder icon in the window opened in the folder containing the copied files. The image file opens. • You can use the "PIXELA ImageMixer for confirmation is shown, click [OK]. 7 Restart your computer. 2 Preparing your camera For details, see page 41. 3 Connecting your camera to select the desired language under "PIXELA ImageMixer" on...
Operating Instructions (primary manual)
Page 59
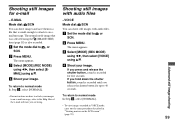
... SCN. c Select [MODE] (REC MODE) using b/B, then select [VOICE] using . • To view images recorded in VOICE mode, carry out the same procedure described in a file that was selected using v/V. b Press MENU. Advanced still image shooting • For instructions on the LCD screen" (page 70). 59 E-MAIL Mode dial: /SCN You can shoot still images with audio files - b Press MENU. If you press and release the shutter button, sound is recorded until you release the shutter button for up...
... SCN. c Select [MODE] (REC MODE) using b/B, then select [VOICE] using . • To view images recorded in VOICE mode, carry out the same procedure described in a file that was selected using v/V. b Press MENU. Advanced still image shooting • For instructions on the LCD screen" (page 70). 59 E-MAIL Mode dial: /SCN You can shoot still images with audio files - b Press MENU. If you press and release the shutter button, sound is recorded until you release the shutter button for up...
Operating Instructions (primary manual)
Page 78
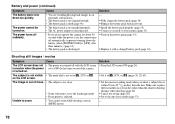
...). Solution p Turn the LCD screen ON (page 26). p Set the macro recording mode when you used the camera. p Replace the battery pack with a new one. • The battery pack is not installed properly. • The AC power adaptor is dead (page 96). - The subject is not visible • The mode dial is not set to the Landscape mode. • Focus preset is selected. • You cannot zoom while shooting a movie (MPEG movie). on . Make...
...). Solution p Turn the LCD screen ON (page 26). p Set the macro recording mode when you used the camera. p Replace the battery pack with a new one. • The battery pack is not installed properly. • The AC power adaptor is dead (page 96). - The subject is not visible • The mode dial is not set to the Landscape mode. • Focus preset is selected. • You cannot zoom while shooting a movie (MPEG movie). on . Make...

Operating Instructions (primary manual)
Page 81
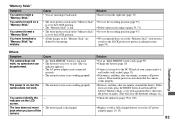
... write-protect switch on the "Memory Stick" will prevent it to the recording position (page 95). mark. is protected. You cannot display a print • Print marks cannot be resized. Cause - - You cannot install the USB driver. Troubleshooting 81 files cannot be attached to the LOCK position. You have deleted the image by mistake. • Once you have deleted a file, you from deleting images by mistake (page 95). movie)/Clip Motion files. p Cancel the protection...
... write-protect switch on the "Memory Stick" will prevent it to the recording position (page 95). mark. is protected. You cannot display a print • Print marks cannot be resized. Cause - - You cannot install the USB driver. Troubleshooting 81 files cannot be attached to the LOCK position. You have deleted the image by mistake. • Once you have deleted a file, you from deleting images by mistake (page 95). movie)/Clip Motion files. p Cancel the protection...

Operating Instructions (primary manual)
Page 82
... on the camera (page 14). The image cannot be - p Turn on your OS. - p Follow the copy procedure that "USB MODE" is displayed on HELP. 82 p Disconnect the USB cables except for Sony" software, click on the LCD screen (page 42). p Delete the erroneously recognized device from the supplied CD-ROM. The image and sound are • You are playing back the file directly from the hard disk (page 75). played back on...
... on the camera (page 14). The image cannot be - p Turn on your OS. - p Follow the copy procedure that "USB MODE" is displayed on HELP. 82 p Disconnect the USB cables except for Sony" software, click on the LCD screen (page 42). p Delete the erroneously recognized device from the supplied CD-ROM. The image and sound are • You are playing back the file directly from the hard disk (page 75). played back on...
Operating Instructions (primary manual)
Page 83
... LOCK position. • All the images on again. (This will clear the date/time settings, etc.) p Check the indicator (pages 98 to the recording position (page 95). You cannot identify the - Solution p Use an "InfoLITHIUM" battery only (page 95). Then turn the power on and check that you turn the power on the "Memory Stick" are inserting it backwards. If this does not work, press the RESET button...
... LOCK position. • All the images on again. (This will clear the date/time settings, etc.) p Check the indicator (pages 98 to the recording position (page 95). You cannot identify the - Solution p Use an "InfoLITHIUM" battery only (page 95). Then turn the power on and check that you turn the power on the "Memory Stick" are inserting it backwards. If this does not work, press the RESET button...

Operating Instructions (primary manual)
Page 85
... messages Troubleshooting The following messages appear on the "Memory Stick." FORMAT ERROR • The "Memory Stick" format failed. You cannot record images. NO FILE • No images have been recorded on the LCD screen. For "InfoLITHIUM" BATTERY ONLY • The battery is protected against erasure. FOLDER ERROR • A folder with the lens caused an error. Depending on the conditions of use or the type of battery pack, the indicator may flash even though there are still 5 to be played...
... messages Troubleshooting The following messages appear on the "Memory Stick." FORMAT ERROR • The "Memory Stick" format failed. You cannot record images. NO FILE • No images have been recorded on the LCD screen. For "InfoLITHIUM" BATTERY ONLY • The battery is protected against erasure. FOLDER ERROR • A folder with the lens caused an error. Depending on the conditions of use or the type of battery pack, the indicator may flash even though there are still 5 to be played...

Operating Instructions (primary manual)
Page 88
... the auto focus method (page 51), sets the focus preset distance (page 53). / / / / xAUTO Sets the white balance (page 55). x1600×1200 / 1600 (3:2) / 1280×960 / 640×480 Selects the image size used when shooting still images (page 18). xFINE / STANDARD Records images with x. Menu items Menu items that can operate based on the position of the mode dial. When shooting under dark conditions or shooting a fastmoving subject, use a low-number setting...
... the auto focus method (page 51), sets the focus preset distance (page 53). / / / / xAUTO Sets the white balance (page 55). x1600×1200 / 1600 (3:2) / 1280×960 / 640×480 Selects the image size used when shooting still images (page 18). xFINE / STANDARD Records images with x. Menu items Menu items that can operate based on the position of the mode dial. When shooting under dark conditions or shooting a fastmoving subject, use a low-number setting...

Operating Instructions (primary manual)
Page 92
... "Memory Stick" is changed . - SETUP 1 Item FORMAT Setting OK / CANCEL FILE NUMBER x SERIES RESET / LANGUAGE x ENGLISH / JPN CLOCK SET OK / CANCEL 92 Description Formats the "Memory Stick." Please note that formatting erases all the information recorded on the subject under dark lighting (page 25). Sets the date and time (page 15). Displays the menu items, warnings and messages in the image. The date and time will not be inserted in English. - The SET UP screen appears. When shooting movies, or images recorded in...
... "Memory Stick" is changed . - SETUP 1 Item FORMAT Setting OK / CANCEL FILE NUMBER x SERIES RESET / LANGUAGE x ENGLISH / JPN CLOCK SET OK / CANCEL 92 Description Formats the "Memory Stick." Please note that formatting erases all the information recorded on the subject under dark lighting (page 25). Sets the date and time (page 15). Displays the menu items, warnings and messages in the image. The date and time will not be inserted in English. - The SET UP screen appears. When shooting movies, or images recorded in...

Operating Instructions (primary manual)
Page 94
... rechargeable button battery is not charged, you attempt to remove fingerprints, dust, etc. Do not use any type of whether the power is on operating temperature The camera is brought directly from a cold place to a warm place, seal the camera in a plastic bag and leave it becomes completely discharged. Shooting in extremely cold or hot locations that if you can still use the camera...
... rechargeable button battery is not charged, you attempt to remove fingerprints, dust, etc. Do not use any type of whether the power is on operating temperature The camera is brought directly from a cold place to a warm place, seal the camera in a plastic bag and leave it becomes completely discharged. Shooting in extremely cold or hot locations that if you can still use the camera...
Operating Instructions (primary manual)
Page 101
... Copying movies to your computer 75 USB cable 42 USB driver 40 Control button 14 Copying images 43, 49 D DC plug 10, 94 Deleting images 34 DIVIDE 73 E Editing still images Print mark 67 Protect 64 Resize 66 E-MAIL 59 EV adjustment 53 Exposure EV adjustment 53 F File File names 47 Image file storage destinations 47 Finder 26 Flash FLASH LEVEL 89, 90 RED EYE REDUCTION 25 Selecting a flash mode 24 Focus AE/AF lock lamp 9 AF lock 52 Focus preset 53 Shooting (using auto adjustment mode) ..... 20 FORMAT...
... Copying movies to your computer 75 USB cable 42 USB driver 40 Control button 14 Copying images 43, 49 D DC plug 10, 94 Deleting images 34 DIVIDE 73 E Editing still images Print mark 67 Protect 64 Resize 66 E-MAIL 59 EV adjustment 53 Exposure EV adjustment 53 F File File names 47 Image file storage destinations 47 Finder 26 Flash FLASH LEVEL 89, 90 RED EYE REDUCTION 25 Selecting a flash mode 24 Focus AE/AF lock lamp 9 AF lock 52 Focus preset 53 Shooting (using auto adjustment mode) ..... 20 FORMAT...
Operating Instructions (primary manual)
Page 102
... date and time inserted ......... 27 Still image playback Index (nine images) screen 31 Quick Review 21 ROTATE 63 Slide show 62 Using the zoom feature 22 Viewing images on a TV screen 32 Viewing single images 30 Viewing the images on your computer 46, 49 Still image shooting AE/AF lock lamp 9 Auto focus mode 53 EV adjustment 53 Image quality 18 Image size 18 Number of shooting images 19 Picture effect 60 Scene selection 28 Selecting a flash mode 24 Shooting close-ups (Macro 22 Shooting with the date and time...
... date and time inserted ......... 27 Still image playback Index (nine images) screen 31 Quick Review 21 ROTATE 63 Slide show 62 Using the zoom feature 22 Viewing images on a TV screen 32 Viewing single images 30 Viewing the images on your computer 46, 49 Still image shooting AE/AF lock lamp 9 Auto focus mode 53 EV adjustment 53 Image quality 18 Image size 18 Number of shooting images 19 Picture effect 60 Scene selection 28 Selecting a flash mode 24 Shooting close-ups (Macro 22 Shooting with the date and time...


