
Operating Instructions
Page 1
... Still image printing PictBridge printer) Enjoying movies Enjoying images on the bottom. Digital Still Camera Operating Instructions Before operating the unit, please read this product. DSC-P100/P120/P150 Serial No. Owner's Record The model and serial numbers are located on your Sony dealer regarding this manual thoroughly, and retain it for future reference. Refer...
... Still image printing PictBridge printer) Enjoying movies Enjoying images on the bottom. Digital Still Camera Operating Instructions Before operating the unit, please read this product. DSC-P100/P120/P150 Serial No. Owner's Record The model and serial numbers are located on your Sony dealer regarding this manual thoroughly, and retain it for future reference. Refer...
Operating Instructions
Page 3
...application or disconnect and connect the cable for your safety and convenience. THIS CLASS B DIGITAL APPARATUS COMPLIES WITH CANADIAN ICES-003. For more information regarding recycling of rechargeable batteries, ...Directive for the Customers in Europe This product has been tested and found compliant with this camera. You can help preserve our environment by ASTA or BSI to BS 1362, (i.e., marked...your local authority. 3 If you should lose the fuse cover, please contact your nearest Sony service station. Notice Certain countries and regions may influence the picture and sound of this ...
...application or disconnect and connect the cable for your safety and convenience. THIS CLASS B DIGITAL APPARATUS COMPLIES WITH CANADIAN ICES-003. For more information regarding recycling of rechargeable batteries, ...Directive for the Customers in Europe This product has been tested and found compliant with this camera. You can help preserve our environment by ASTA or BSI to BS 1362, (i.e., marked...your local authority. 3 If you should lose the fuse cover, please contact your nearest Sony service station. Notice Certain countries and regions may influence the picture and sound of this ...

Operating Instructions
Page 4
...light emission. Unauthorized recording of such materials may be contrary to the provision of the copyright laws. 4 Do not shake or strike the camera In addition to malfunctions and inability to record images, this first Trial recording Before you record one-time events, you may want to make.... Precaution on copyright Television programs, films, video tapes, and other bright light This may not be repairable. No compensation for effective use the camera near a window or outdoors. This is equipped with an LCD finder) and lens • The LCD screen and the LCD finder are manufactured...
...light emission. Unauthorized recording of such materials may be contrary to the provision of the copyright laws. 4 Do not shake or strike the camera In addition to malfunctions and inability to record images, this first Trial recording Before you record one-time events, you may want to make.... Precaution on copyright Television programs, films, video tapes, and other bright light This may not be repairable. No compensation for effective use the camera near a window or outdoors. This is equipped with an LCD finder) and lens • The LCD screen and the LCD finder are manufactured...
Operating Instructions
Page 5
Carl Zeiss lens This camera is equipped with a Carl Zeiss lens which is a trademark of Sony Corporation. • Microsoft, Windows, Windows Media, and DirectX are either registered trademarks or trademarks of Microsoft Corporation in the United States and/or..., system and product names used as examples of pictures in this manual are reproduced images, and are not actual images shot using this camera. Trademarks • is a trademark of Sony Corporation. • "Memory Stick," , "Memory Stick PRO", , "Memory Stick Duo", , "Memory Stick PRO Duo", , "MagicGate" and are of ...
Carl Zeiss lens This camera is equipped with a Carl Zeiss lens which is a trademark of Sony Corporation. • Microsoft, Windows, Windows Media, and DirectX are either registered trademarks or trademarks of Microsoft Corporation in the United States and/or..., system and product names used as examples of pictures in this manual are reproduced images, and are not actual images shot using this camera. Trademarks • is a trademark of Sony Corporation. • "Memory Stick," , "Memory Stick PRO", , "Memory Stick Duo", , "Memory Stick PRO Duo", , "MagicGate" and are of ...
Operating Instructions
Page 6
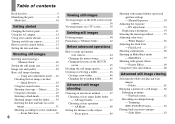
... TV screen 38 Deleting still images Deleting images 40 Formatting a "Memory Stick 42 Before advanced operations How to setup and operate your camera 44 Changing the menu settings 44 Changing the items in Multi Burst mode - Scene Selection 32 6 Viewing still images Viewing images on ... Identifying the parts 8 Mode dial 10 Getting started Charging the battery pack 11 Using the AC adaptor 14 Using your camera 15 How to the subject - Trimming (DSC-P100/P120 only 63 Playing back successive images - AF range finder 47 Choosing a focus operation - Picture Effect 60 Using...
... TV screen 38 Deleting still images Deleting images 40 Formatting a "Memory Stick 42 Before advanced operations How to setup and operate your camera 44 Changing the menu settings 44 Changing the items in Multi Burst mode - Scene Selection 32 6 Viewing still images Viewing images on ... Identifying the parts 8 Mode dial 10 Getting started Charging the battery pack 11 Using the AC adaptor 14 Using your camera 15 How to the subject - Trimming (DSC-P100/P120 only 63 Playing back successive images - AF range finder 47 Choosing a focus operation - Picture Effect 60 Using...
Operating Instructions
Page 7
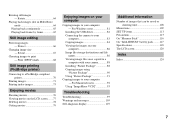
...movies 79 Enjoying images on your computer 86 Image file storage destinations and file names 86 Viewing image files once copied to a computer with your camera 88 Installing "Picture Package 88 Copying images using "Picture Package 90 Using "Picture Package 91 Copying images to your computer - For Macintosh users 92... - Resize 67 Choosing images to your computer - Protect 66 Changing image size - For Windows users 81 Installing the USB driver 82 Connecting the camera to your computer 83 Copying images 84 Viewing the images on your computer Copying images to print -
...movies 79 Enjoying images on your computer 86 Image file storage destinations and file names 86 Viewing image files once copied to a computer with your camera 88 Installing "Picture Package 88 Copying images using "Picture Package 90 Using "Picture Package 91 Copying images to your computer - For Macintosh users 92... - Resize 67 Choosing images to your computer - Protect 66 Changing image size - For Windows users 81 Installing the USB driver 82 Connecting the camera to your computer 83 Copying images 84 Viewing the images on your computer Copying images to print -

Operating Instructions
Page 8
... receptacle (bottom surface) G POWER lamp (15) H Finder window I Self-timer lamp (27)/ AF illuminator (29, 113) 8 J Microphone q; You will be unable to firmly secure the camera to tripods having longer screws, and may damage the camera. Identifying the parts See the pages in parentheses for details of less than 5.5 mm (7/32 inch).
... receptacle (bottom surface) G POWER lamp (15) H Finder window I Self-timer lamp (27)/ AF illuminator (29, 113) 8 J Microphone q; You will be unable to firmly secure the camera to tripods having longer screws, and may damage the camera. Identifying the parts See the pages in parentheses for details of less than 5.5 mm (7/32 inch).

Operating Instructions
Page 10
... SCN (Scene Selection) You can set various shooting functions using menus (pages 44 and 109). In addition, you can also change the settings of the camera (pages 45 and 113). (Movie shooting) You can shoot movies (page 76). (Playback/Edit) You can manually adjust the aperture value and the shutter speed... other adjustments as in the auto adjustment mode, but you can shoot effective pictures according to the scene (page 32). Mode dial Before using your camera, set to [Fine] (page 45).
... SCN (Scene Selection) You can set various shooting functions using menus (pages 44 and 109). In addition, you can also change the settings of the camera (pages 45 and 113). (Movie shooting) You can shoot movies (page 76). (Playback/Edit) You can manually adjust the aperture value and the shutter speed... other adjustments as in the auto adjustment mode, but you can shoot effective pictures according to the scene (page 32). Mode dial Before using your camera, set to [Fine] (page 45).

Operating Instructions
Page 11
... Surface with a dry cotton bud. AC Adaptor 3 DC plug , Open the DC IN jack cover and connect the AC Adaptor (supplied) to turn off your camera. Slide the cover in the arrow direction as this may not properly charge the battery pack. 11 Use of the dirty plug may cause malfunction.... • Clean the DC plug of the camera. Make sure the battery pack is easily inserted by pushing the battery eject lever at the front of the battery compartment toward the front of...
... Surface with a dry cotton bud. AC Adaptor 3 DC plug , Open the DC IN jack cover and connect the AC Adaptor (supplied) to turn off your camera. Slide the cover in the arrow direction as this may not properly charge the battery pack. 11 Use of the dirty plug may cause malfunction.... • Clean the DC plug of the camera. Make sure the battery pack is easily inserted by pushing the battery eject lever at the front of the battery compartment toward the front of...

Operating Instructions
Page 12
... on /off when charging is completed. /CHG lamp • After charging the battery pack, disconnect the AC Adaptor from the DC IN jack of your camera. The /CHG lamp lights up when charging begins, and goes off , it . Remaining indicator 60min Remaining time • When you switch the LCD screen on...
... on /off when charging is completed. /CHG lamp • After charging the battery pack, disconnect the AC Adaptor from the DC IN jack of your camera. The /CHG lamp lights up when charging begins, and goes off , it . Remaining indicator 60min Remaining time • When you switch the LCD screen on...

Operating Instructions
Page 13
...battery pack (supplied) at about three second intervals Shooting movies3) NP-FR1 (supplied) LCD screen LCD screen On Off DSC-P150 Approx. 130 min. Approx. 170 min. The camera has been turned on and off once every ten times - [AF Mode] is set to [Single] in the ... less than indicated depending on CIPA standard. (CIPA: Camera & Imaging Products Association) Viewing still images2) Image size NP-FR1 (supplied) No. of images Battery life (min.) DSC-P150 7M Approx. 7200 Approx. 360 VGA (E-Mail) Approx. 7200 Approx. 360 DSC-P100/P120 5M Approx. 7200 Approx. 360 VGA ...
...battery pack (supplied) at about three second intervals Shooting movies3) NP-FR1 (supplied) LCD screen LCD screen On Off DSC-P150 Approx. 130 min. Approx. 170 min. The camera has been turned on and off once every ten times - [AF Mode] is set to [Single] in the ... less than indicated depending on CIPA standard. (CIPA: Camera & Imaging Products Association) Viewing still images2) Image size NP-FR1 (supplied) No. of images Battery life (min.) DSC-P150 7M Approx. 7200 Approx. 360 VGA (E-Mail) Approx. 7200 Approx. 360 DSC-P100/P120 5M Approx. 7200 Approx. 360 VGA ...

Operating Instructions
Page 14
... Power sources You can use an electronic transformer (travel converter), as illustrated above. AC-LS5/LS5B • Do not use your camera. If any country or region with the v mark facing the LCD screen side. • Connect the AC Adaptor to the DC IN jack of the ... AC Adaptor and then to a wall outlet (wall socket). • After using the AC Adaptor, disconnect it both from the DC IN jack of the camera and from a wall outlet (wall socket). • The set is not disconnected from the AC power source (mains) as long as it is connected to...
... Power sources You can use an electronic transformer (travel converter), as illustrated above. AC-LS5/LS5B • Do not use your camera. If any country or region with the v mark facing the LCD screen side. • Connect the AC Adaptor to the DC IN jack of the ... AC Adaptor and then to a wall outlet (wall socket). • After using the AC Adaptor, disconnect it both from the DC IN jack of the camera and from a wall outlet (wall socket). • The set is not disconnected from the AC power source (mains) as long as it is connected to...
Operating Instructions
Page 15
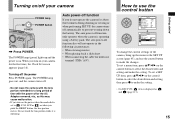
... is displayed as this may cause malfunction. • If you push the RESET button, the lens portion moves. How to use the control button Camera AF Mode: Digital Zoom: Date/Time: 1 Red Eye Reduction: 2 AF Illuminator: Auto Review: Single Smart Off Off Auto Off SELECT Setup 2 File Number: USB ... back a slide show • When connecting the cable for a long period of the camera, bring up and the power is on the control button to select the desired item and setting and make the setting. • On DSC-P150, item is set a menu item, press v/V/b/B on . The POWER lamp (green) ...
... is displayed as this may cause malfunction. • If you push the RESET button, the lens portion moves. How to use the control button Camera AF Mode: Digital Zoom: Date/Time: 1 Red Eye Reduction: 2 AF Illuminator: Auto Review: Single Smart Off Off Auto Off SELECT Setup 2 File Number: USB ... back a slide show • When connecting the cable for a long period of the camera, bring up and the power is on the control button to select the desired item and setting and make the setting. • On DSC-P150, item is set a menu item, press v/V/b/B on . The POWER lamp (green) ...
Operating Instructions
Page 18
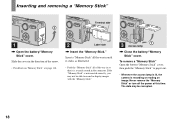
... the power at this time. If the "Memory Stick" is securely seated in so that it out. • Whenever the access lamp is lit, the camera is recording or reading an image. Slide the cover in the direction of the way in the connector. To remove a "Memory Stick" Open the battery...
... the power at this time. If the "Memory Stick" is securely seated in so that it out. • Whenever the access lamp is lit, the camera is recording or reading an image. Slide the cover in the direction of the way in the connector. To remove a "Memory Stick" Open the battery...

Operating Instructions
Page 20
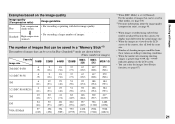
...on the kind of images you want to shoot. 1) The factory setting is [7M] (DSC-P150) or [5M] (DSC-P100/P120). Each uses a different compression ratio. It is the highest image quality on this camera. 2) Images are 2592 pixels horizontally and 1944 pixels vertically. For example, a 5M (2592&#...215;1944) size image indicates that can be recorded on the image size Image size Usage guidelines 7M1) (3072×2304) (DSC-P150) Larger • For saving ...
...on the kind of images you want to shoot. 1) The factory setting is [7M] (DSC-P150) or [5M] (DSC-P100/P120). Each uses a different compression ratio. It is the highest image quality on this camera. 2) Images are 2592 pixels horizontally and 1944 pixels vertically. For example, a 5M (2592&#...215;1944) size image indicates that can be recorded on the image size Image size Usage guidelines 7M1) (3072×2304) (DSC-P150) Larger • For saving ...
Operating Instructions
Page 21
... function, see page 45. • When images recorded using earlier Sony models are played back on this camera, the display may differ from the actual image size. • When the images are shown below. (Units: number of images) Capacity Image size 7M (DSC-P150) 16MB 4 (9) 32MB 9 (18) 64MB 18 (36) 128MB 37 (73) MSX256...
... function, see page 45. • When images recorded using earlier Sony models are played back on this camera, the display may differ from the actual image size. • When the images are shown below. (Units: number of images) Capacity Image size 7M (DSC-P150) 16MB 4 (9) 32MB 9 (18) 64MB 18 (36) 128MB 37 (73) MSX256...

Operating Instructions
Page 22
... on the power or when the zoom function is working (page 24). • This camera can create new folders and select folders to be stored in the "Memory Stick" (page 46). 2 , Hold the camera steadily with both hands and position the subject in the center of the focus frame. &#...8226; The minimum focal distance to a subject is approx. 50 cm (19 3/4 inches). Using auto adjustment mode Holding the camera correctly Mode dial When shooting pictures with the camera, be careful so that your fingers do not block the lens portion, finder window, flash emitter or speaker (page 8). 1 , Set...
... on the power or when the zoom function is working (page 24). • This camera can create new folders and select folders to be stored in the "Memory Stick" (page 46). 2 , Hold the camera steadily with both hands and position the subject in the center of the focus frame. &#...8226; The minimum focal distance to a subject is approx. 50 cm (19 3/4 inches). Using auto adjustment mode Holding the camera correctly Mode dial When shooting pictures with the camera, be careful so that your fingers do not block the lens portion, finder window, flash emitter or speaker (page 8). 1 , Set...

Operating Instructions
Page 23
... lamp (page 9) goes out, you can continue and shoot even when the camera does not beep, but the image is not yet recorded. When the AE/AF lock indicator changes from the... camera and dark. • The contrast between the subject and its background is poor. • ... If you release the shutter button, shooting will be canceled. • You can shoot the next image. • When operating the camera using a battery pack, if you try to shoot a subject that is seen through glass, such as a window. • A...
... lamp (page 9) goes out, you can continue and shoot even when the camera does not beep, but the image is not yet recorded. When the AE/AF lock indicator changes from the... camera and dark. • The contrast between the subject and its background is poor. • ... If you release the shutter button, shooting will be canceled. • You can shoot the next image. • When operating the camera using a battery pack, if you try to shoot a subject that is seen through glass, such as a window. • A...

Operating Instructions
Page 24
... the image displayed on the LCD screen 1 Press (Delete). 2 Select [Delete] with zoom functions that enlarge the image using optical zoom and two types of digital processing. Using the zoom feature W (wide-angle) T (telephoto) 60min VGA 101 W T 96 1.1 60min VGA 101 W T 96 5.0 S AF S AF... , Press the zoom buttons to match the shooting purpose. Zoom Your camera is equipped with v on the control button, then press z. Digital zoom can be selected from the lens surface • The lens portion moves during zoom operation. To use only the ...
... the image displayed on the LCD screen 1 Press (Delete). 2 Select [Delete] with zoom functions that enlarge the image using optical zoom and two types of digital processing. Using the zoom feature W (wide-angle) T (telephoto) 60min VGA 101 W T 96 1.1 60min VGA 101 W T 96 5.0 S AF S AF... , Press the zoom buttons to match the shooting purpose. Zoom Your camera is equipped with v on the control button, then press z. Digital zoom can be selected from the lens surface • The lens portion moves during zoom operation. To use only the ...

Operating Instructions
Page 25
... same feeling as follows. The or indicators flashes, and AF operates with almost no effect on the LCD screen may look rough. DSC-P150 Image size Maximum zoom scale 5M Approx. 3.6× 3M Approx. 4.5× 1M Approx. 7.2× VGA (E-Mail) Approx. 14×... and enlarges a certain portion of this phenomenon has no distortion. When you purchase your camera, it is set to [Precision] in the SET UP settings (page 113). Smart zoom: - Precision digital zoom Optical zoom Precision digital zoom All image sizes are enlarged up to the zoom type. - When you purchase...
... same feeling as follows. The or indicators flashes, and AF operates with almost no effect on the LCD screen may look rough. DSC-P150 Image size Maximum zoom scale 5M Approx. 3.6× 3M Approx. 4.5× 1M Approx. 7.2× VGA (E-Mail) Approx. 14×... and enlarges a certain portion of this phenomenon has no distortion. When you purchase your camera, it is set to [Precision] in the SET UP settings (page 113). Smart zoom: - Precision digital zoom Optical zoom Precision digital zoom All image sizes are enlarged up to the zoom type. - When you purchase...


