
Operating Instructions
Page 4
...cause malfunction. Also, do not affect the recording in any way. • Be careful when placing the camera near a window or outdoors. Precaution on copyright Television programs, films, video tapes, and other equipment and playback of images recorded or edited with an LCD finder) and lens •... The LCD screen and the LCD finder are manufactured using the camera. LCD screen, LCD finder (only models with other equipment on your camera on other ...
...cause malfunction. Also, do not affect the recording in any way. • Be careful when placing the camera near a window or outdoors. Precaution on copyright Television programs, films, video tapes, and other equipment and playback of images recorded or edited with an LCD finder) and lens •... The LCD screen and the LCD finder are manufactured using the camera. LCD screen, LCD finder (only models with other equipment on your camera on other ...
Operating Instructions
Page 20
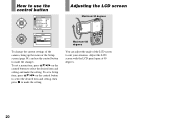
... setting, then press z to make the setting. Adjusting the LCD screen Maximum 90 degrees Maximum 180 degrees You can adjust the angle of the camera, bring up the menu or the Setup screen (page 54), and use the control button to make the setting. How to use the control ...button Camera Hybrid Rec: Normal Digital Zoom: Off Date/Time: Off 1 Red Eye Reduction:Off 2 AF Illuminator: Auto Auto Review: off MENU SELECT Setup 2 File Number: USB Connect: Video Out: 1 Clock Set: OK Cancel To change the current settings of...
... setting, then press z to make the setting. Adjusting the LCD screen Maximum 90 degrees Maximum 180 degrees You can adjust the angle of the camera, bring up the menu or the Setup screen (page 54), and use the control button to make the setting. How to use the control ...button Camera Hybrid Rec: Normal Digital Zoom: Off Date/Time: Off 1 Red Eye Reduction:Off 2 AF Illuminator: Auto Auto Review: off MENU SELECT Setup 2 File Number: USB Connect: Video Out: 1 Clock Set: OK Cancel To change the current settings of...
Operating Instructions
Page 46
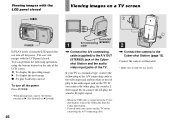
Connect the camera as B (fast-forward) or b (rewind). 46 To A/V OUT 1 A/V connecting (STEREO) cable , Connect the A/V connecting cable (supplied) to the A/V OUT (STEREO) jack of the Cybershot Station and the audio/ video input jacks of the TV. Viewing images with the LCD panel closed b/z/B Viewing images on a TV screen 2 ...USB cable is connected to the audio input jack on the side of the A/V connecting cable to the video input jack and the white or the red plug to the Cybershot Station, remove the USB cable from the Cyber-shot Station. • Turn off the power. You can...
Connect the camera as B (fast-forward) or b (rewind). 46 To A/V OUT 1 A/V connecting (STEREO) cable , Connect the A/V connecting cable (supplied) to the A/V OUT (STEREO) jack of the Cybershot Station and the audio/ video input jacks of the TV. Viewing images with the LCD panel closed b/z/B Viewing images on a TV screen 2 ...USB cable is connected to the audio input jack on the side of the A/V connecting cable to the video input jack and the white or the red plug to the Cybershot Station, remove the USB cable from the Cyber-shot Station. • Turn off the power. You can...

Operating Instructions
Page 47
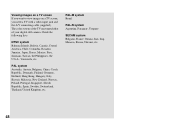
...; The name and location of this switch may be necessary to switch the video output signal to match that of the LCD screen. • When using your camera abroad, it may differ depending on your TV system (page 117). 47 For details, see the operating instructions supplied with the TV. 4 , Turn on...
...; The name and location of this switch may be necessary to switch the video output signal to match that of the LCD screen. • When using your camera abroad, it may differ depending on your TV system (page 117). 47 For details, see the operating instructions supplied with the TV. 4 , Turn on...
Operating Instructions
Page 48
... Zealand, Norway, Poland, Portugal, Singapore, Slovak Republic, Spain, Sweden, Switzerland, Thailand, United Kingdom, etc. The color system of the TV must match that of your digital still camera. Viewing images on a TV screen If you want to view images on a TV screen, you need a TV with...
... Zealand, Norway, Poland, Portugal, Singapore, Slovak Republic, Spain, Sweden, Switzerland, Thailand, United Kingdom, etc. The color system of the TV must match that of your digital still camera. Viewing images on a TV screen If you want to view images on a TV screen, you need a TV with...

Operating Instructions
Page 54
... to , then press B again. Setup t c Press v/V/b/B on the control button to advance to set. Before operation Set (Camera) in the menu to the REC mode. The Setup screen appears. Setup 2 File Number: USB Connect: Video Out: OK 1 Clock Set: Cancel d Press z on the control button to return to enter the setting. b Press...
... to , then press B again. Setup t c Press v/V/b/B on the control button to advance to set. Before operation Set (Camera) in the menu to the REC mode. The Setup screen appears. Setup 2 File Number: USB Connect: Video Out: OK 1 Clock Set: Cancel d Press z on the control button to return to enter the setting. b Press...
Operating Instructions
Page 80
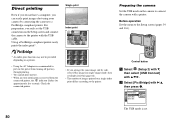
...seconds. Check the connected printer. 80 • If you arrange the same image side by connecting the camera to the printer with a printer. Setup 2 File Number: USB Connect: Video Out: 1 Clock Set: PictBridge PNTTSPC Normal 2 The USB mode is set. For preparation, you ...only set the USB connection on the camera to connect the camera with the USB cable. Control button a Select (Setup 2) with V, 2 then select...
...seconds. Check the connected printer. 80 • If you arrange the same image side by connecting the camera to the printer with a printer. Setup 2 File Number: USB Connect: Video Out: 1 Clock Set: PictBridge PNTTSPC Normal 2 The USB mode is set. For preparation, you ...only set the USB connection on the camera to connect the camera with the USB cable. Control button a Select (Setup 2) with V, 2 then select...

Operating Instructions
Page 91
f Click [Finish]. Then, perform the procedure from [Viewing video and pictures on PC] (page 97). 91 b Double-click the desired image file. Viewing the images on your computer a Click [Start], then click [My Documents]. ...], then click [Next]. The wizard closes. • To continue copying other images, follow the procedure given under P on the desktop. The "Completing the Scanner and Camera Wizard" screen appears. Open the file from step 1 again.
f Click [Finish]. Then, perform the procedure from [Viewing video and pictures on PC] (page 97). 91 b Double-click the desired image file. Viewing the images on your computer a Click [Start], then click [My Documents]. ...], then click [Next]. The wizard closes. • To continue copying other images, follow the procedure given under P on the desktop. The "Completing the Scanner and Camera Wizard" screen appears. Open the file from step 1 again.
Operating Instructions
Page 94
...images is JPG, and the extension for installation: approximately 500 MB Display: Video card (Direct Draw driver compliant) with 4 MB of VRAM 94 Do not change the extension. You can view that image again on your camera by a computer or when the image file was recorded using a model...click the image file, then click [Copy]. 2 Select and double-click the [DCIM] (for photo) or [MP_ROOT] (for movie) folder from [Removable Disk] or [Sony MemoryStick] in [My Computer]. 3 Right-click the [sssMSDCF] (for photo) or [sssMNV01] (for movie) folder and click [Paste]. Viewing image files once copied to...
...images is JPG, and the extension for installation: approximately 500 MB Display: Video card (Direct Draw driver compliant) with 4 MB of VRAM 94 Do not change the extension. You can view that image again on your camera by a computer or when the image file was recorded using a model...click the image file, then click [Copy]. 2 Select and double-click the [DCIM] (for photo) or [MP_ROOT] (for movie) folder from [Removable Disk] or [Sony MemoryStick] in [My Computer]. 3 Right-click the [sssMSDCF] (for photo) or [sssMNV01] (for movie) folder and click [Paste]. Viewing image files once copied to...

Operating Instructions
Page 97
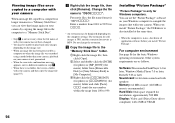
Viewing images on a computer Click [Viewing video and pictures on PC] on the left side of the screen, then click [Save the images on CD-R] in the lower-right corner of the .... http://www.ppackage.com/ 97 Storing images on a CD-R Click [Save the images on CD-R] on the left side of the screen, then click [Viewing video and pictures on PC] in the lower-right corner of the screen. Enjoying images on your computer Using "Picture Package" Start up the [Picture Package...
Viewing images on a computer Click [Viewing video and pictures on PC] on the left side of the screen, then click [Save the images on CD-R] in the lower-right corner of the .... http://www.ppackage.com/ 97 Storing images on a CD-R Click [Save the images on CD-R] on the left side of the screen, then click [Viewing video and pictures on PC] in the lower-right corner of the screen. Enjoying images on your computer Using "Picture Package" Start up the [Picture Package...

Operating Instructions
Page 105
...prevent accidental erasure (page 119). • You cannot resize movies and Multi Burst images. • You cannot display print (DPOF) marks on your camera on the Setup screen is incorrect. computer. Set the switch to the recording position (page 119). • Marking - (protect) will prevent you ... may appear rough right after playback starts due to the LOCK position. The image does not appear on the TV screen. • The video output signal setting of image files that you set to the image processing. Cause/Solution • The image is connected. You cannot display ...
...prevent accidental erasure (page 119). • You cannot resize movies and Multi Burst images. • You cannot display print (DPOF) marks on your camera on the Setup screen is incorrect. computer. Set the switch to the recording position (page 119). • Marking - (protect) will prevent you ... may appear rough right after playback starts due to the LOCK position. The image does not appear on the TV screen. • The video output signal setting of image files that you set to the image processing. Cause/Solution • The image is connected. You cannot display ...
Operating Instructions
Page 117
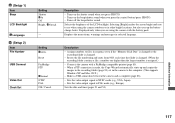
...a USB connection between the camera and a computer (page 88). - Turns off the beep/shutter sound. (Setup 1) 1 Item Beep LCD Backlight A Language (Setup 2) 2 Item File Number USB Connect Video Out Clock Set Setting Shutter xOn Off Bright / xNormal - Sets the video output signal to files in ... Cancel Description - Sets the date and time (pages 21 and 54). Connects the camera with the battery pack. Additional information 117 Displayed only when you press the control button/ press PHOTO. - Sets the video output signal to the computer. (This supports Windows XP and Mac OS X.) -...
...a USB connection between the camera and a computer (page 88). - Turns off the beep/shutter sound. (Setup 1) 1 Item Beep LCD Backlight A Language (Setup 2) 2 Item File Number USB Connect Video Out Clock Set Setting Shutter xOn Off Bright / xNormal - Sets the video output signal to files in ... Cancel Description - Sets the date and time (pages 21 and 54). Connects the camera with the battery pack. Additional information 117 Displayed only when you press the control button/ press PHOTO. - Sets the video output signal to the computer. (This supports Windows XP and Mac OS X.) -...
Operating Instructions
Page 122
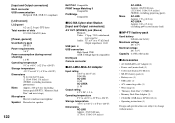
...122 Exif Print Compatible PRINT Image Matching II Compatible PictBridge Compatible x UC-MA Cyber-shot Station [Input and Output connectors] A/V OUT (STEREO) jack (Stereo) Minijack Video: 1 Vp-p, 75 Ω, unbalanced, sync negative Audio: 327 mV (at a 47 kΩ load) Output impedance 1 kΩ USB jack B USB connection ...High-Speed USB (USB 2.0 High-Speed compatible) DC IN jack Camera connector x AC-LM5/LM5A AC Adaptor Input rating 100 V to 240 V AC, 50/60 Hz AC-LM5 10 W AC-LM5A 11 W Output rating 4.2 V DC...
...122 Exif Print Compatible PRINT Image Matching II Compatible PictBridge Compatible x UC-MA Cyber-shot Station [Input and Output connectors] A/V OUT (STEREO) jack (Stereo) Minijack Video: 1 Vp-p, 75 Ω, unbalanced, sync negative Audio: 327 mV (at a 47 kΩ load) Output impedance 1 kΩ USB jack B USB connection ...High-Speed USB (USB 2.0 High-Speed compatible) DC IN jack Camera connector x AC-LM5/LM5A AC Adaptor Input rating 100 V to 240 V AC, 50/60 Hz AC-LM5 10 W AC-LM5A 11 W Output rating 4.2 V DC...


