
Operating Instructions
Page 1
Record the serial number in the space provided below. DSC-M1 © 2004 Sony Corporation 2-349-242-11(1) Getting started Shooting images Viewing images Deleting images Before advanced operations Advanced shooting Advanced viewing Still image printing Enjoying images on the side. Model No. Digital Still Camera Operating Instructions Before operating the unit, please read this product. Owner's Record The model and serial numbers are located on your Sony dealer regarding this manual thoroughly, and retain it for future reference. Refer to...
Record the serial number in the space provided below. DSC-M1 © 2004 Sony Corporation 2-349-242-11(1) Getting started Shooting images Viewing images Deleting images Before advanced operations Advanced shooting Advanced viewing Still image printing Enjoying images on the side. Model No. Digital Still Camera Operating Instructions Before operating the unit, please read this product. Owner's Record The model and serial numbers are located on your Sony dealer regarding this manual thoroughly, and retain it for future reference. Refer to...
Operating Instructions
Page 4
... lens to direct sunlight for Camera File system universal standard established by the JEITA (Japan Electronics and Information Technology Industries Association). • Playback of your camera are manufactured using the camera. Lens cover The lens cover of this camera opens and closes automatically when the camera is not possible due to a malfunction of images recorded with your finger when the lens cover opens and closes. LCD screen, LCD finder (only models...
... lens to direct sunlight for Camera File system universal standard established by the JEITA (Japan Electronics and Information Technology Industries Association). • Playback of your camera are manufactured using the camera. Lens cover The lens cover of this camera opens and closes automatically when the camera is not possible due to a malfunction of images recorded with your finger when the lens cover opens and closes. LCD screen, LCD finder (only models...
Operating Instructions
Page 8
...Mirror mode 39 Selecting a flash mode 39 Inserting the date and time on a still image 41 Viewing images Viewing images on the LCD screen of your camera 43 Viewing images on a TV screen 46 Deleting images Deleting images 49 Formatting a "Memory Stick Duo" ........ 51 Before advanced operations How to setup and operate your camera 19 How to use the control button 20 Adjusting the LCD screen 20 Setting the date and time 21 Changing the language setting 22 Shooting images Inserting and removing a "Memory Stick Duo 23 Setting the image size 24 Image size and quality 25 Number...
...Mirror mode 39 Selecting a flash mode 39 Inserting the date and time on a still image 41 Viewing images Viewing images on the LCD screen of your camera 43 Viewing images on a TV screen 46 Deleting images Deleting images 49 Formatting a "Memory Stick Duo" ........ 51 Before advanced operations How to setup and operate your camera 19 How to use the control button 20 Adjusting the LCD screen 20 Setting the date and time 21 Changing the language setting 22 Shooting images Inserting and removing a "Memory Stick Duo 23 Setting the image size 24 Image size and quality 25 Number...
Operating Instructions
Page 9
... Recording an enlarged image - For Macintosh users 99 Troubleshooting Troubleshooting 101 Warnings and messages 110 Self-diagnosis display 112 Additional information Menu items 113 Setup items 116 Precautions 118 On "Memory Stick 119 On "InfoLITHIUM" battery pack .........120 Specifications 121 The LCD screen 123 Index Index 127 9 Advanced viewing Selecting the folder and playing back images 71 Enlarging a portion of a still image.........72 Enlarging an image - Rotate 74 Playing back images shot in index mode...
... Recording an enlarged image - For Macintosh users 99 Troubleshooting Troubleshooting 101 Warnings and messages 110 Self-diagnosis display 112 Additional information Menu items 113 Setup items 116 Precautions 118 On "Memory Stick 119 On "InfoLITHIUM" battery pack .........120 Specifications 121 The LCD screen 123 Index Index 127 9 Advanced viewing Selecting the folder and playing back images 71 Enlarging a portion of a still image.........72 Enlarging an image - Rotate 74 Playing back images shot in index mode...
Operating Instructions
Page 20
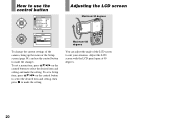
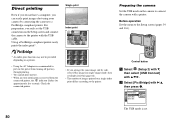
... set a Setup item, press v/V/b/B on the control button to select the desired item and setting and make the setting. Adjusting the LCD screen Maximum 90 degrees Maximum 180 degrees You can adjust the angle of the camera, bring up the menu or the Setup screen (page 54), and use the control button Camera Hybrid Rec: Normal Digital Zoom: Off Date/Time: Off 1 Red Eye Reduction:Off 2 AF Illuminator: Auto Auto Review: off MENU SELECT Setup 2 File Number: USB Connect: Video Out: 1 Clock Set: OK Cancel To change...
... set a Setup item, press v/V/b/B on the control button to select the desired item and setting and make the setting. Adjusting the LCD screen Maximum 90 degrees Maximum 180 degrees You can adjust the angle of the camera, bring up the menu or the Setup screen (page 54), and use the control button Camera Hybrid Rec: Normal Digital Zoom: Off Date/Time: Off 1 Red Eye Reduction:Off 2 AF Illuminator: Auto Auto Review: off MENU SELECT Setup 2 File Number: USB Connect: Video Out: 1 Clock Set: OK Cancel To change...
Operating Instructions
Page 27
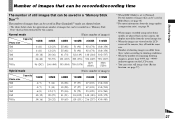
... formatted by this camera, the display may differ from the actual image size. • When the images are viewed on the LCD screen of the camera, they all look the same size. • Number of shooting images can differ from these values according to shooting conditions. • When the number of remaining shooting images is set to [Normal]. Shooting images Number of images that can be recorded/recording time The number of still images that can be saved in a "Memory...
... formatted by this camera, the display may differ from the actual image size. • When the images are viewed on the LCD screen of the camera, they all look the same size. • Number of shooting images can differ from these values according to shooting conditions. • When the number of remaining shooting images is set to [Normal]. Shooting images Number of images that can be recorded/recording time The number of still images that can be saved in a "Memory...
Operating Instructions
Page 30
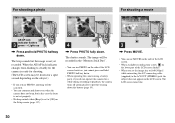
... "Memory Stick Duo". • You can use MOVIE on the side of the LCD screen. • When available recording time is low, on the lower part of the LCD screen, however, you cannot press and hold PHOTO halfway down. When the AE/AF lock indicator changes from flashing to steadily lit, the camera is ready for shooting. (The LCD screen may be frozen for a while during recording or playback, the camera turns off...
... "Memory Stick Duo". • You can use MOVIE on the side of the LCD screen. • When available recording time is low, on the lower part of the LCD screen, however, you cannot press and hold PHOTO halfway down. When the AE/AF lock indicator changes from flashing to steadily lit, the camera is ready for shooting. (The LCD screen may be frozen for a while during recording or playback, the camera turns off...

Operating Instructions
Page 36
... indicators flashes, and AF operates with priority on subjects located near the center. • The zoom may stop momentarily on the LCD screen as follows. However, the minimum focus distance varies according to [Off].) When you shoot subjects at distances as close as approximately 8 cm (3 1/4 inches). Therefore, shooting with the following zoom functions. Shooting close -ups (Macro) recording mode is used when zooming up to match the shooting...
... indicators flashes, and AF operates with priority on subjects located near the center. • The zoom may stop momentarily on the LCD screen as follows. However, the minimum focus distance varies according to [Off].) When you shoot subjects at distances as close as approximately 8 cm (3 1/4 inches). Therefore, shooting with the following zoom functions. Shooting close -ups (Macro) recording mode is used when zooming up to match the shooting...
Operating Instructions
Page 57
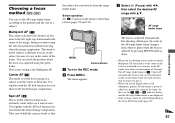
... the image, letting you use the digital zoom or AF illuminator, priority AF movement is estimated as an average, so the AF works even with the AF lock function lets you shoot in the center of the frame. The factory setting is . the subject does not deviate from white to green when the focus is adjusted by pressing PHOTO halfway down. • When you are shooting movies...
... the image, letting you use the digital zoom or AF illuminator, priority AF movement is estimated as an average, so the AF works even with the AF lock function lets you shoot in the center of the frame. The factory setting is . the subject does not deviate from white to green when the focus is adjusted by pressing PHOTO halfway down. • When you are shooting movies...
Operating Instructions
Page 80
... a printer. • Using the AC Adaptor is recommended to connect the camera with the USB cable. Setup 2 File Number: USB Connect: Video Out: 1 Clock Set: PictBridge PNTTSPC Normal 2 The USB mode is received from the connected printer, the indicator flashes for approximately five seconds. Single print Index print Preparing the camera Set the USB mode on the camera to prevent the power from turning off partway through printing. • You cannot print movies. • When an error notification is set the USB connection on the Setup screen...
... a printer. • Using the AC Adaptor is recommended to connect the camera with the USB cable. Setup 2 File Number: USB Connect: Video Out: 1 Clock Set: PictBridge PNTTSPC Normal 2 The USB mode is received from the connected printer, the indicator flashes for approximately five seconds. Single print Index print Preparing the camera Set the USB mode on the camera to prevent the power from turning off partway through printing. • You cannot print movies. • When an error notification is set the USB connection on the Setup screen...

Operating Instructions
Page 90
... Options" screen appears. Click the [Device Manager] tab. 3 If [ Sony DSC] is not shown 1 Right-click [My Computer] to remove the checkmark, then click [Next]. To play back that you overwrite the existing image with the same file name exists in the copy destination folder The overwrite confirmation message appears. Try the USB driver installation again using the Windows XP AutoPlay wizard a Make a USB connection (page 88). Image copying starts. The...
... Options" screen appears. Click the [Device Manager] tab. 3 If [ Sony DSC] is not shown 1 Right-click [My Computer] to remove the checkmark, then click [Next]. To play back that you overwrite the existing image with the same file name exists in the copy destination folder The overwrite confirmation message appears. Try the USB driver installation again using the Windows XP AutoPlay wizard a Make a USB connection (page 88). Image copying starts. The...
Operating Instructions
Page 94
... a number from [Removable Disk] or [Sony MemoryStick] in the computer to a "Memory Stick Duo". • Step 1 is not necessary when the file name set with your camera has not been changed. • You may be unable to play back some images depending on the image size. • When an image file has been processed by a computer or when the image file was recorded using a model other than your camera, playback on your camera...
... a number from [Removable Disk] or [Sony MemoryStick] in the computer to a "Memory Stick Duo". • Step 1 is not necessary when the file name set with your camera has not been changed. • You may be unable to play back some images depending on the image size. • When an image file has been processed by a computer or when the image file was recorded using a model other than your camera, playback on your camera...
Operating Instructions
Page 95
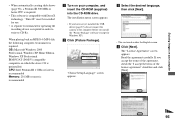
... "License Agreement" screen appears. b Click [Picture Package]. d Click [Next]. "Choose Setup Language" screen appears. The installation menu screen appears. • If you have not yet installed the USB driver (page 87), do not connect the camera to CD-Rs. OS: Microsoft Windows 2000 Professional, Windows XP Home Edition, Windows XP Professional IBM PC/AT (DOS/V) compatible computers on which the above OS is recommended a Turn on your computer...
... "License Agreement" screen appears. b Click [Picture Package]. d Click [Next]. "Choose Setup Language" screen appears. The installation menu screen appears. • If you have not yet installed the USB driver (page 87), do not connect the camera to CD-Rs. OS: Microsoft Windows 2000 Professional, Windows XP Home Edition, Windows XP Professional IBM PC/AT (DOS/V) compatible computers on which the above OS is recommended a Turn on your computer...
Operating Instructions
Page 103
...; The camera is activated (page 70). Adjust the brightness of 1 cm to 20 cm from flashing to the LOCK position. Optical zoom does not work. Digital zoom does not function. Vertical streaks appear when you view the LCD screen in a dark location such as on the LCD backlight with MODE (page 29). • NR slow shutter function is functioning to the close . Recording takes a long time. Troubleshooting 103 Insert a "Memory Stick Duo...
...; The camera is activated (page 70). Adjust the brightness of 1 cm to 20 cm from flashing to the LOCK position. Optical zoom does not work. Digital zoom does not function. Vertical streaks appear when you view the LCD screen in a dark location such as on the LCD backlight with MODE (page 29). • NR slow shutter function is functioning to the close . Recording takes a long time. Troubleshooting 103 Insert a "Memory Stick Duo...
Operating Instructions
Page 106
.... Connect the camera directly to shoot using a "Memory Stick Duo" formatted by your camera. • Start up the "Picture Package Menu" and check [Settings]. • Make a USB connection when the computer is compatible. Shoot using a "Memory Stick Duo" formatted by a computer. Delete the erroneously recognized device from both the computer and the Cyber-shot Station, and connect it again firmly. Computers 106 Symptom You do not know if the OS of your computer is turned...
.... Connect the camera directly to shoot using a "Memory Stick Duo" formatted by your camera. • Start up the "Picture Package Menu" and check [Settings]. • Make a USB connection when the computer is compatible. Shoot using a "Memory Stick Duo" formatted by a computer. Delete the erroneously recognized device from both the computer and the Cyber-shot Station, and connect it again firmly. Computers 106 Symptom You do not know if the OS of your computer is turned...
Operating Instructions
Page 110
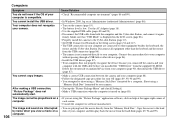
... camera cannot record or delete images to the LOCK position. For "InfoLITHIUM" battery • The battery pack is protected against erasure. Memory Stick type error • The inserted "Memory Stick Duo" cannot be played back on your camera (page 119). • The "Memory Stick Duo" is damaged. • The terminal section of the "Memory Stick Duo" is "999" exists in the selected folder. Set the switch to format the "Memory...
... camera cannot record or delete images to the LOCK position. For "InfoLITHIUM" battery • The battery pack is protected against erasure. Memory Stick type error • The inserted "Memory Stick Duo" cannot be played back on your camera (page 119). • The "Memory Stick Duo" is damaged. • The terminal section of the "Memory Stick Duo" is "999" exists in the selected folder. Set the switch to format the "Memory...
Operating Instructions
Page 116
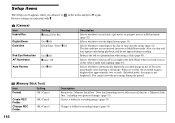
... assist light in Hybrid mode (page 32). Selects whether to superimpose the date or time onto the image (page 41). The date and time are indicated with x. Helps when it is not displayed.) You cannot shoot the next image during recording. Folder Change REC. Folder OK / Cancel OK / Cancel 116 Description Formats the "Memory Stick Duo." Changes a folder for recording images (page 55). Reduces the red-eye phenomenon when using a flash (page 40). When set to record only a pre movie...
... assist light in Hybrid mode (page 32). Selects whether to superimpose the date or time onto the image (page 41). The date and time are indicated with x. Helps when it is not displayed.) You cannot shoot the next image during recording. Folder Change REC. Folder OK / Cancel OK / Cancel 116 Description Formats the "Memory Stick Duo." Changes a folder for recording images (page 55). Reduces the red-eye phenomenon when using a flash (page 40). When set to record only a pre movie...
Operating Instructions
Page 117
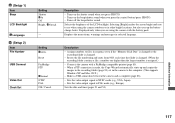
... "Memory Stick Duo" is changed or the recording folder is changed . (When the recording folder contains a file, a number one higher than the largest number is made, the Copy Wizard automatically starts up the battery charge faster. Assigns numbers to see when using the camera with a PictBridge compatible printer (page 80). - Sets the video output signal to the computer. (This supports Windows XP and Mac OS X.) - Turns on the shutter sound when you press the control button/ press PHOTO. - When a PTP connection...
... "Memory Stick Duo" is changed or the recording folder is changed . (When the recording folder contains a file, a number one higher than the largest number is made, the Copy Wizard automatically starts up the battery charge faster. Assigns numbers to see when using the camera with a PictBridge compatible printer (page 80). - Sets the video output signal to the computer. (This supports Windows XP and Mac OS X.) - Turns on the shutter sound when you press the control button/ press PHOTO. - When a PTP connection...
Operating Instructions
Page 125
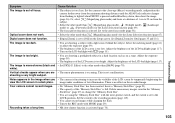
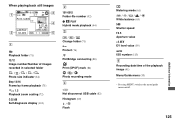
... Frame by frame playback (75) 1.3 Playback zoom scaling (72) C:32:00 Self-diagnosis display (112) 2 101-0012 Folder-file number (92) z PLAY Hybrid mode playback (44) 3 / / Change folder (71) Protect (76) PictBridge connecting (80) Print (DPOF) mark (84) /M / Photo recording mode 4 Not disconnect USB cable (82) Histogram (60) / Flash Metering mode (61) WB / / / / White balance (63) 500 Shutter speed F4.5 Aperture value +2.0EV EV level value (59) ISO number (113) 5 Recording date/time of the playback image (41) Menu/Guide menu (53) • Pressing MENU switches the menu/guide menu on/off. 125...
... Frame by frame playback (75) 1.3 Playback zoom scaling (72) C:32:00 Self-diagnosis display (112) 2 101-0012 Folder-file number (92) z PLAY Hybrid mode playback (44) 3 / / Change folder (71) Protect (76) PictBridge connecting (80) Print (DPOF) mark (84) /M / Photo recording mode 4 Not disconnect USB cable (82) Histogram (60) / Flash Metering mode (61) WB / / / / White balance (63) 500 Shutter speed F4.5 Aperture value +2.0EV EV level value (59) ISO number (113) 5 Recording date/time of the playback image (41) Menu/Guide menu (53) • Pressing MENU switches the menu/guide menu on/off. 125...
Operating Instructions
Page 127
..., 116 AF lock 58 Auto adjustment mode 29 Auto Focus 32, 57 Auto power-off function 19 Auto Review 116 Available recording or playback time of movies 17, 28 A/V connecting cable 46 B Battery life 17, 121 Battery remaining indicator 16, 121 Beach mode 68 Beep/shutter sound 117 Burst 65 B&W 70 C Candle mode 68 CD-ROM 87, 95 Center AF 57 Charging battery pack 14, 120 Charging time 16 Cleaning 118 Clock Set 21, 117 Close-ups (Macro) shooting 36 Cloudy...
..., 116 AF lock 58 Auto adjustment mode 29 Auto Focus 32, 57 Auto power-off function 19 Auto Review 116 Available recording or playback time of movies 17, 28 A/V connecting cable 46 B Battery life 17, 121 Battery remaining indicator 16, 121 Beach mode 68 Beep/shutter sound 117 Burst 65 B&W 70 C Candle mode 68 CD-ROM 87, 95 Center AF 57 Charging battery pack 14, 120 Charging time 16 Cleaning 118 Clock Set 21, 117 Close-ups (Macro) shooting 36 Cloudy...


