
Operating Instructions
Page 1
... for future reference. Refer to these numbers whenever you call upon your computer_________ Troubleshooting Additional information Index Digital Still Camera Operating Instructions Before operating the unit, please read this product. Model No. DSC-M1 Serial No. DSC-M1 © 2004 Sony Corporation 2-349-242-11(1) Getting started Shooting images Viewing images Deleting images Before advanced operations Advanced...
... for future reference. Refer to these numbers whenever you call upon your computer_________ Troubleshooting Additional information Index Digital Still Camera Operating Instructions Before operating the unit, please read this product. Model No. DSC-M1 Serial No. DSC-M1 © 2004 Sony Corporation 2-349-242-11(1) Getting started Shooting images Viewing images Deleting images Before advanced operations Advanced...
Operating Instructions
Page 4
...may be contrary to the provision of the recording cannot be compensated for effective use The heat of the pixels are manufactured using the camera. These points are not guaranteed. Also, do not affect the recording in the rain or under similar conditions, be copyrighted. If...for long periods may be some cases may cause malfunction. Exposing the LCD screen, the finder or the lens to direct sunlight for Camera File system universal standard established by the JEITA (Japan Electronics and Information Technology Industries Association). • Playback of images recorded with an...
...may be contrary to the provision of the recording cannot be compensated for effective use The heat of the pixels are manufactured using the camera. These points are not guaranteed. Also, do not affect the recording in the rain or under similar conditions, be copyrighted. If...for long periods may be some cases may cause malfunction. Exposing the LCD screen, the finder or the lens to direct sunlight for Camera File system universal standard established by the JEITA (Japan Electronics and Information Technology Industries Association). • Playback of images recorded with an...

Operating Instructions
Page 5
... a location that generates strong radio waves or emits radiation, or a location with excellent contrast. The lens for this camera has been produced under a quality assurance system certified by Carl Zeiss in accordance with a Carl Zeiss lens which is equipped with the quality ... shot using this manual The photographs used as examples of Carl Zeiss in this camera. 5 The pictures used in Germany. The camera may cause irrecoverable damage to record or play back properly. Carl Zeiss lens This camera is capable of your eyes. Or it may cause the malfunction of reproducing sharp...
... a location that generates strong radio waves or emits radiation, or a location with excellent contrast. The lens for this camera has been produced under a quality assurance system certified by Carl Zeiss in accordance with a Carl Zeiss lens which is equipped with the quality ... shot using this manual The photographs used as examples of Carl Zeiss in this camera. 5 The pictures used in Germany. The camera may cause irrecoverable damage to record or play back properly. Carl Zeiss lens This camera is capable of your eyes. Or it may cause the malfunction of reproducing sharp...
Operating Instructions
Page 6
...Stick PRO" compatible equipment. • For the number of "Memory Stick". There are two sizes of images that matches your camera "Memory Stick" compatible with this camera The IC recording medium used with "Memory Stick" compatible equipment Be sure to insert the "Memory Stick Duo" into the supplied ...PRO Duo" can be used even if it has only been charged partway. Before using your camera. On "InfoLITHIUM" battery pack When using the battery pack for a long time, turn off the camera, remove the battery pack and store it has not been completely discharged. Memory Stick Duo ...
...Stick PRO" compatible equipment. • For the number of "Memory Stick". There are two sizes of images that matches your camera "Memory Stick" compatible with this camera The IC recording medium used with "Memory Stick" compatible equipment Be sure to insert the "Memory Stick Duo" into the supplied ...PRO Duo" can be used even if it has only been charged partway. Before using your camera. On "InfoLITHIUM" battery pack When using the battery pack for a long time, turn off the camera, remove the battery pack and store it has not been completely discharged. Memory Stick Duo ...
Operating Instructions
Page 8
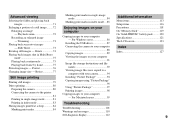
... 22 Shooting images Inserting and removing a "Memory Stick Duo 23 Setting the image size 24 Image size and quality 25 Number of your camera 43 Viewing images on a TV screen 46 Deleting images Deleting images 49 Formatting a "Memory Stick Duo" ........ 51 Before advanced operations How... to setup and operate your camera .. 53 Changing the menu settings 53 Changing the items in succession - Macro 36 Using the self-timer 38 Rotating the LCD screen - Multi...
... 22 Shooting images Inserting and removing a "Memory Stick Duo 23 Setting the image size 24 Image size and quality 25 Number of your camera 43 Viewing images on a TV screen 46 Deleting images Deleting images 49 Formatting a "Memory Stick Duo" ........ 51 Before advanced operations How... to setup and operate your camera .. 53 Changing the menu settings 53 Changing the items in succession - Macro 36 Using the self-timer 38 Rotating the LCD screen - Multi...
Operating Instructions
Page 9
...85 Enjoying images on your computer 91 Image file storage destinations and file names 92 Viewing image files once copied to a computer with your camera 94 Installing "Picture Package 94 Copying images using "Picture Package" 96 Using "Picture Package 97 Printing images 98 Copying images to your ... a still image.........72 Enlarging an image - Resize 77 Still image printing Printing still images 79 Direct printing 80 Preparing the camera 80 Connecting the camera to the printer 81 Printing in single-image mode 81 Printing in index mode 83 Having images printed at a shop 84 ...
...85 Enjoying images on your computer 91 Image file storage destinations and file names 92 Viewing image files once copied to a computer with your camera 94 Installing "Picture Package 94 Copying images using "Picture Package" 96 Using "Picture Package 97 Printing images 98 Copying images to your ... a still image.........72 Enlarging an image - Resize 77 Still image printing Printing still images 79 Direct printing 80 Preparing the camera 80 Connecting the camera to the printer 81 Printing in single-image mode 81 Printing in index mode 83 Having images printed at a shop 84 ...

Operating Instructions
Page 10
Camera 1 2 3 4 qa qs 5 qd qf 6 qg 7 qh 8 qj 9 qk q; E For shooting: PHOTO/MOVIE buttons (30) For viewing: b/z/B (43) F PHOTO button (30) G HYBRID switch (32) H MENU button (...
Camera 1 2 3 4 qa qs 5 qd qf 6 qg 7 qh 8 qj 9 qk q; E For shooting: PHOTO/MOVIE buttons (30) For viewing: b/z/B (43) F PHOTO button (30) G HYBRID switch (32) H MENU button (...
Operating Instructions
Page 11
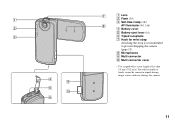
7 A Lens 1 B Flash (39) C Self-timer lamp (38)/ 8 AF illuminator (40, 116) 2 D Battery cover E Battery eject lever (16) 3 F Tripod receptacle G Hook for wrist strap Attaching the strap is recommended to tripods having longer screws, and may damage the camera. 5 q; 6 11 You will be unable to firmly secure the camera to prevent dropping the camera (page 13). H Microphones I Multi connector J Multi connector cover 4 9 • Use a tripod with a screw length of less than 5.5 mm (7/32 inch).
7 A Lens 1 B Flash (39) C Self-timer lamp (38)/ 8 AF illuminator (40, 116) 2 D Battery cover E Battery eject lever (16) 3 F Tripod receptacle G Hook for wrist strap Attaching the strap is recommended to tripods having longer screws, and may damage the camera. 5 q; 6 11 You will be unable to firmly secure the camera to prevent dropping the camera (page 13). H Microphones I Multi connector J Multi connector cover 4 9 • Use a tripod with a screw length of less than 5.5 mm (7/32 inch).
Operating Instructions
Page 12
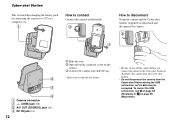
... the tray. • Make sure to slide the tray firmly. • Be sure to turn off the camera before you connect the camera to disconnect Grasp the camera and the Cyber-shot Station (supplied) as the data may be corrupted. Cyber-shot Station This is used when... illustrated. 2 1 3 How to the Cyber-shot Station or disconnect the camera from the Cyber-shot Station. • Do not disconnect the camera from the Cyber-shot Station during the USB connection, as illustrated and disconnect the camera. 2 1 2 3 4 A Camera connector B (USB) jack (88) C A/V OUT (STEREO) jack (46) D DC IN jack (...
... the tray. • Make sure to slide the tray firmly. • Be sure to turn off the camera before you connect the camera to disconnect Grasp the camera and the Cyber-shot Station (supplied) as the data may be corrupted. Cyber-shot Station This is used when... illustrated. 2 1 3 How to the Cyber-shot Station or disconnect the camera from the Cyber-shot Station. • Do not disconnect the camera from the Cyber-shot Station during the USB connection, as illustrated and disconnect the camera. 2 1 2 3 4 A Camera connector B (USB) jack (88) C A/V OUT (STEREO) jack (46) D DC IN jack (...
Operating Instructions
Page 13
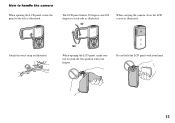
Do not hold the LCD panel with your hand. 13 Attach the wrist strap as illustrated. The LCD panel rotates 90 degrees and 180 degrees to each side as illustrated. 90° When carrying the camera, close the LCD screen as illustrated. 180° When opening the LCD panel, rotate the panel to touch the lens portion with your fingers. How to handle the camera When opening the LCD panel, make sure not to the left as illustrated.
Do not hold the LCD panel with your hand. 13 Attach the wrist strap as illustrated. The LCD panel rotates 90 degrees and 180 degrees to each side as illustrated. 90° When carrying the camera, close the LCD screen as illustrated. 180° When opening the LCD panel, rotate the panel to touch the lens portion with your fingers. How to handle the camera When opening the LCD panel, make sure not to the left as illustrated.
Operating Instructions
Page 14
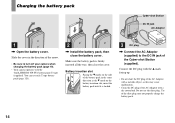
... cotton bud. Make sure the battery pack is locked. 3 DC plug , Connect the AC Adaptor (supplied) to turn off your camera when charging the battery pack (page 19). • Your camera operates with the "InfoLITHIUM" NP-FT1 battery pack (T type) (supplied). Getting started Charging the battery pack Cyber-shot Station DC IN...
... cotton bud. Make sure the battery pack is locked. 3 DC plug , Connect the AC Adaptor (supplied) to turn off your camera when charging the battery pack (page 19). • Your camera operates with the "InfoLITHIUM" NP-FT1 battery pack (T type) (supplied). Getting started Charging the battery pack Cyber-shot Station DC IN...
Operating Instructions
Page 15
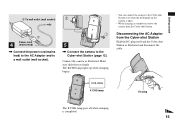
... illustrated and disconnect the cable. /CHG /CHG lamp DC plug The /CHG lamp goes off when charging is completed, remove the camera from the Cyber-shot Station Hold the DC plug itself and the Cyber-shot Station as illustrated. The /CHG lamp lights up when charging begins. &#...8226; You can connect the camera to the Cyber-shot Station (page 12). Getting started 2 To wall outlet (wall socket) 1 Power cord 4 (mains lead) , Connect the power cord (mains lead) to...
... illustrated and disconnect the cable. /CHG /CHG lamp DC plug The /CHG lamp goes off when charging is completed, remove the camera from the Cyber-shot Station Hold the DC plug itself and the Cyber-shot Station as illustrated. The /CHG lamp lights up when charging begins. &#...8226; You can connect the camera to the Cyber-shot Station (page 12). Getting started 2 To wall outlet (wall socket) 1 Power cord 4 (mains lead) , Connect the power cord (mains lead) to...
Operating Instructions
Page 16
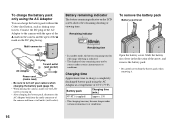
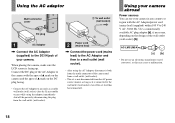
...using the AC Adaptor You can charge the battery pack without the Cyber-shot Station, such as during your camera when charging the battery pack (page 19). • When placing the camera, make sure the LCD screen is indicated. • The displayed time remaining may become longer under certain ...for still image shooting is facing up. • After charging the battery pack, disconnect the AC Adaptor both from the multi connector of the camera and from a wall outlet (wall socket). To remove the battery pack Battery eject lever Open the battery cover. Slide the battery eject lever ...
...using the AC Adaptor You can charge the battery pack without the Cyber-shot Station, such as during your camera when charging the battery pack (page 19). • When placing the camera, make sure the LCD screen is indicated. • The displayed time remaining may become longer under certain ...for still image shooting is facing up. • After charging the battery pack, disconnect the AC Adaptor both from the multi connector of the camera and from a wall outlet (wall socket). To remove the battery pack Battery eject lever Open the battery cover. Slide the battery eject lever ...
Operating Instructions
Page 17
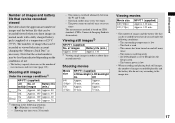
...: - Approx. 120 min. • The number of 25°C (77°F). The flash is used frequently - [LCD Backlight] is based on the Setup screen - The camera has been turned on and off once every ten times The measurement method is set to [Bright] on CIPA standard. (CIPA...
...: - Approx. 120 min. • The number of 25°C (77°F). The flash is used frequently - [LCD Backlight] is based on the Setup screen - The camera has been turned on and off once every ten times The measurement method is set to [Bright] on CIPA standard. (CIPA...
Operating Instructions
Page 18
... V AC, 50/60 Hz. Use a commercially available AC plug adaptor [a], if necessary, depending on the design of your camera. AC-LM5/LM5A • Do not use your camera abroad Power sources You can use an electronic transformer (travel converter), as it is connected to a wall outlet (wall socket).... (wall socket) close by disconnecting the plug from the AC power source (mains) as long as this may cause a malfunction. 18 When placing the camera, make sure the LCD screen is not disconnected from the wall outlet (wall socket). 1 2 Power cord (mains lead) , Connect the power cord...
... V AC, 50/60 Hz. Use a commercially available AC plug adaptor [a], if necessary, depending on the design of your camera. AC-LM5/LM5A • Do not use your camera abroad Power sources You can use an electronic transformer (travel converter), as it is connected to a wall outlet (wall socket).... (wall socket) close by disconnecting the plug from the AC power source (mains) as long as this may cause a malfunction. 18 When placing the camera, make sure the LCD screen is not disconnected from the wall outlet (wall socket). 1 2 Power cord (mains lead) , Connect the power cord...
Operating Instructions
Page 19
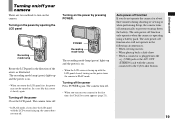
.... Turning on the power by pressing POWER. Auto power-off function If you turn on the camera. Turning on/off your camera for about three minutes during shooting or viewing or when performing Setup, the camera turns off automatically to the Cyber-shot Station 19 Getting started The auto power-off function only... operates when the camera is plugged into the (USB) jack or the A/V OUT (STEREO) jack with the LCD panel closed, turning on the power by opening the LCD panel ...
.... Turning on the power by pressing POWER. Auto power-off function If you turn on the camera. Turning on/off your camera for about three minutes during shooting or viewing or when performing Setup, the camera turns off automatically to the Cyber-shot Station 19 Getting started The auto power-off function only... operates when the camera is plugged into the (USB) jack or the A/V OUT (STEREO) jack with the LCD panel closed, turning on the power by opening the LCD panel ...
Operating Instructions
Page 20
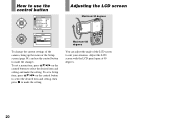
... the LCD screen Maximum 90 degrees Maximum 180 degrees You can adjust the angle of the camera, bring up the menu or the Setup screen (page 54), and use the control button Camera Hybrid Rec: Normal Digital Zoom: Off Date/Time: Off 1 Red Eye Reduction:Off 2 AF Illuminator: Auto Auto Review: off MENU...
... the LCD screen Maximum 90 degrees Maximum 180 degrees You can adjust the angle of the camera, bring up the menu or the Setup screen (page 54), and use the control button Camera Hybrid Rec: Normal Digital Zoom: Off Date/Time: Off 1 Red Eye Reduction:Off 2 AF Illuminator: Auto Auto Review: off MENU...
Operating Instructions
Page 23
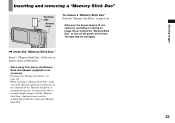
... result in until it clicks as illustrated. • When using this time. Never remove the "Memory Stick Duo" or turn off the power at this camera, the Memory Stick Duo Adaptor (supplied) is recording or reading an image. Shooting images Inserting and removing a "Memory Stick Duo" Terminal side Access lamp ...To remove a "Memory Stick Duo" Push the "Memory Stick Duo" to pop it out. • Whenever the access lamp is lit, the camera is not necessary. • For details on "Memory Stick Duo", see page 119. • When inserting a "Memory Stick Duo", make sure of both the...
... result in until it clicks as illustrated. • When using this time. Never remove the "Memory Stick Duo" or turn off the power at this camera, the Memory Stick Duo Adaptor (supplied) is recording or reading an image. Shooting images Inserting and removing a "Memory Stick Duo" Terminal side Access lamp ...To remove a "Memory Stick Duo" Push the "Memory Stick Duo" to pop it out. • Whenever the access lamp is lit, the camera is not necessary. • For details on "Memory Stick Duo", see page 119. • When inserting a "Memory Stick Duo", make sure of both the...
Operating Instructions
Page 24
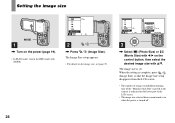
... when the power is turned off. 24 Setting the image size MODE 1 , Turn on the lower part of the "Memory Stick Duo" inserted in the camera is indicated on the power (page 19). • In PLAY mode, turn to the REC mode with v/V. The Image Size setup appears. • For details...
... when the power is turned off. 24 Setting the image size MODE 1 , Turn on the lower part of the "Memory Stick Duo" inserted in the camera is indicated on the power (page 19). • In PLAY mode, turn to the REC mode with v/V. The Image Size setup appears. • For details...
Operating Instructions
Page 25
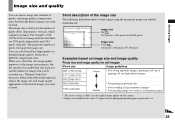
... you select Fine, the image quality improves as photograph printing paper or postcards, etc. 25 The image size is the highest image quality on this camera. 2) Images are 2592 pixels horizontally and 1944 pixels vertically. Refer to the table on the right and choose the image size and image quality appropriate...
... you select Fine, the image quality improves as photograph printing paper or postcards, etc. 25 The image size is the highest image quality on this camera. 2) Images are 2592 pixels horizontally and 1944 pixels vertically. Refer to the table on the right and choose the image size and image quality appropriate...


