
Operating Instructions
Page 15
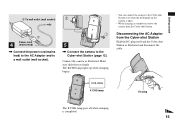
... started 2 To wall outlet (wall socket) 1 Power cord 4 (mains lead) , Connect the power cord (mains lead) to the AC Adaptor and to a wall outlet (wall socket). 2 1 3 5 , Connect the camera to the Cyber-shot Station even when the LCD panel on the camera is open. • When charging is completed. ...-shot Station as illustrated. Make sure slide the tray firmly. Connect the camera as illustrated and disconnect the cable. /CHG /CHG lamp DC plug The /CHG lamp goes off when charging is completed, remove the camera from the Cyber-shot Station. The /CHG lamp lights up when charging ...
... started 2 To wall outlet (wall socket) 1 Power cord 4 (mains lead) , Connect the power cord (mains lead) to the AC Adaptor and to a wall outlet (wall socket). 2 1 3 5 , Connect the camera to the Cyber-shot Station even when the LCD panel on the camera is open. • When charging is completed. ...-shot Station as illustrated. Make sure slide the tray firmly. Connect the camera as illustrated and disconnect the cable. /CHG /CHG lamp DC plug The /CHG lamp goes off when charging is completed, remove the camera from the Cyber-shot Station. The /CHG lamp lights up when charging ...
Operating Instructions
Page 46
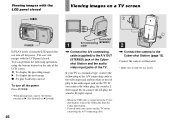
... plug, the sound is a monaural type, connect the yellow plug of the LCD screen. Connect the camera as B (fast-forward) or b (rewind). 46 To A/V OUT 1 A/V connecting (STEREO) cable , Connect the A/V connecting cable (supplied) to slide the tray firmly. b : To display the preceding image B : To display ... connect the red plug, the sound is R (right) signal. • When the USB cable is connected to the Cybershot Station, remove the USB cable from the Cyber-shot Station. • Turn off the power. You can perform the following operations using the buttons located on a TV screen...
... plug, the sound is a monaural type, connect the yellow plug of the LCD screen. Connect the camera as B (fast-forward) or b (rewind). 46 To A/V OUT 1 A/V connecting (STEREO) cable , Connect the A/V connecting cable (supplied) to slide the tray firmly. b : To display the preceding image B : To display ... connect the red plug, the sound is R (right) signal. • When the USB cable is connected to the Cybershot Station, remove the USB cable from the Cyber-shot Station. • Turn off the power. You can perform the following operations using the buttons located on a TV screen...
Operating Instructions
Page 80
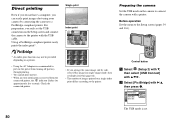
... not be provided depending on the Setup screen and connect the camera to the printer with a printer. For preparation, you only set...printer. • Using the AC Adaptor is recommended to prevent the power from turning off partway through printing. • You cannot print movies....with B/v, then press z. b Select [PictBridge] with v/V/B. Single print Index print Preparing the camera Set the USB mode on a single index print differs according to the printer. Setup 2...have a computer, you can easily print images shot using your camera by side, select [This image] in single-image mode, then ...
... not be provided depending on the Setup screen and connect the camera to the printer with a printer. For preparation, you only set...printer. • Using the AC Adaptor is recommended to prevent the power from turning off partway through printing. • You cannot print movies....with B/v, then press z. b Select [PictBridge] with v/V/B. Single print Index print Preparing the camera Set the USB mode on a single index print differs according to the printer. Setup 2...have a computer, you can easily print images shot using your camera by side, select [This image] in single-image mode, then ...

Operating Instructions
Page 88
... page 90. We recommend that you want to recognize the camera. USB cable e Connect the USB cable to your computer using Windows XP, the AutoPlay wizard automatically appears on your computer automatically runs the used program to copy into a wall outlet (wall ... of the Cyber- b Insert the "Memory Stick Duo" with the images you use the AC Adaptor. d Connect the USB cable to slide the tray firmly. POWER • Make sure to the (USB) jack of the camera. c Connect the Cyber-shot Station (supplied) and the AC Adaptor (supplied), and plug the adaptor into the...
... page 90. We recommend that you want to recognize the camera. USB cable e Connect the USB cable to your computer using Windows XP, the AutoPlay wizard automatically appears on your computer automatically runs the used program to copy into a wall outlet (wall ... of the Cyber- b Insert the "Memory Stick Duo" with the images you use the AC Adaptor. d Connect the USB cable to slide the tray firmly. POWER • Make sure to the (USB) jack of the camera. c Connect the Cyber-shot Station (supplied) and the AC Adaptor (supplied), and plug the adaptor into the...

Operating Instructions
Page 99
... at the same time. Disconnecting the USB cable, removing the "Memory Stick Duo" from the suspend or sleep mode, communication between your camera and your computer may not operate depending on your camera or turning off the power during USB connection Drag and drop the drive...computer For details, see page 117. See the Sony Website for all the recommended computer environments mentioned above OS must be installed at the same time, some equipment, including your computer - http://www.sony.net/ a Connecting your camera to a single computer at the factory. Enjoying images...
... at the same time. Disconnecting the USB cable, removing the "Memory Stick Duo" from the suspend or sleep mode, communication between your camera and your computer may not operate depending on your camera or turning off the power during USB connection Drag and drop the drive...computer For details, see page 117. See the Sony Website for all the recommended computer environments mentioned above OS must be installed at the same time, some equipment, including your computer - http://www.sony.net/ a Connecting your camera to a single computer at the factory. Enjoying images...

Operating Instructions
Page 102
...pack. • After charging the battery pack, disconnect the DC plug from your Sony dealer or local authorized Sony service facility. • The battery pack is discharged. Clean the battery terminal .../movies 102 Symptom The LCD screen is not turned on even when the power is disconnected. Consult your camera. • Install the battery pack correctly (page 14). • The...connecting cable or set to [640 (30fps)] while an A/V connecting cable is due to the Cyber-shot Station (page 12). Replace the battery pack with a new one. • Properly install the camera ...
...pack. • After charging the battery pack, disconnect the DC plug from your Sony dealer or local authorized Sony service facility. • The battery pack is discharged. Clean the battery terminal .../movies 102 Symptom The LCD screen is not turned on even when the power is disconnected. Consult your camera. • Install the battery pack correctly (page 14). • The...connecting cable or set to [640 (30fps)] while an A/V connecting cable is due to the Cyber-shot Station (page 12). Replace the battery pack with a new one. • Properly install the camera ...

Operating Instructions
Page 111
... on equipment other than this processing is performing the printing stop processing. Do not disconnect the USB cable. • The printer is completed. Printing is not possible until this camera. • The battery level is indicated on the printer, refer to the operating instructions supplied with...otherwise secure the camera in the connected printer, or the ink level is busy, it cannot receive print requests. Check the printer. • A paper error occurred, such as paper-out, paper-jam, etc. Charge the battery pack (page 14). Message Invalid operation Turn the power off and on...
... on equipment other than this processing is performing the printing stop processing. Do not disconnect the USB cable. • The printer is completed. Printing is not possible until this camera. • The battery level is indicated on the printer, refer to the operating instructions supplied with...otherwise secure the camera in the connected printer, or the ink level is busy, it cannot receive print requests. Check the printer. • A paper error occurred, such as paper-out, paper-jam, etc. Charge the battery pack (page 14). Message Invalid operation Turn the power off and on...
Operating Instructions
Page 122
... (at a 47 kΩ load) Output impedance 1 kΩ USB jack B USB connection High-Speed USB (USB 2.0 High-Speed compatible) DC IN jack Camera connector x AC-LM5/LM5A AC Adaptor Input rating 100 V to 240 V AC, 50/60 Hz AC-LM5 10 W AC-LM5A 11 W Output rating 4.2... Capacity 2.4 Wh (680 mAh) x Accessories • AC-LM5/LM5A AC Adaptor (1) • Power cord (mains lead) (1) • Cyber-shot Station UC-MA (1) • NP-FT1 battery pack (1) • Battery case (1) • USB cable (1) • A/V connecting cable (1) • Wrist strap (1) • "Memory Stick Duo" (32 MB) (1) • ...
... (at a 47 kΩ load) Output impedance 1 kΩ USB jack B USB connection High-Speed USB (USB 2.0 High-Speed compatible) DC IN jack Camera connector x AC-LM5/LM5A AC Adaptor Input rating 100 V to 240 V AC, 50/60 Hz AC-LM5 10 W AC-LM5A 11 W Output rating 4.2... Capacity 2.4 Wh (680 mAh) x Accessories • AC-LM5/LM5A AC Adaptor (1) • Power cord (mains lead) (1) • Cyber-shot Station UC-MA (1) • NP-FT1 battery pack (1) • Battery case (1) • USB cable (1) • A/V connecting cable (1) • Wrist strap (1) • "Memory Stick Duo" (32 MB) (1) • ...
Operating Instructions
Page 127
...58 AF illuminator 40, 116 AF lock 58 Auto adjustment mode 29 Auto Focus 32, 57 Auto power-off function 19 Auto Review 116 Available recording or playback time of movies 17, 28 A/V connecting cable 46 B Battery life 17, 121 Battery remaining indicator 16, 121 Beach mode 68 Beep/shutter sound ...button 20 Copying images to your computer 89, 90, 96, 99 Cyber-shot Station 12 D Daylight 63 DC plug 14, 18 Deleting images 49 Digital zoom 36 DPOF 84 E Enlarging an image 72 EV adjustment 59 Exposure Bracket 62 F File names 92 File storage destinations 92 Fireworks mode 68 ...
...58 AF illuminator 40, 116 AF lock 58 Auto adjustment mode 29 Auto Focus 32, 57 Auto power-off function 19 Auto Review 116 Available recording or playback time of movies 17, 28 A/V connecting cable 46 B Battery life 17, 121 Battery remaining indicator 16, 121 Beach mode 68 Beep/shutter sound ...button 20 Copying images to your computer 89, 90, 96, 99 Cyber-shot Station 12 D Daylight 63 DC plug 14, 18 Deleting images 49 Digital zoom 36 DPOF 84 E Enlarging an image 72 EV adjustment 59 Exposure Bracket 62 F File names 92 File storage destinations 92 Fireworks mode 68 ...


