Help Guide (Printable PDF)
Page 1
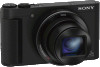
Digital Still Camera DSC-HX90V/DSC-HX90 How to Use Before Use Names of parts Checking the camera and the supplied items [1] Identifying parts [2] Icons and indicators List of icons on the screen [3] Using the strap Using the wrist strap [4] Adjusting the viewfinder Adjusting the viewfinder (diopter-adjustment) [5] In-Camera guide About the [In-Camera Guide] [6] About the shooting advice [7] Preparing the camera Charging the battery pack
Digital Still Camera DSC-HX90V/DSC-HX90 How to Use Before Use Names of parts Checking the camera and the supplied items [1] Identifying parts [2] Icons and indicators List of icons on the screen [3] Using the strap Using the wrist strap [4] Adjusting the viewfinder Adjusting the viewfinder (diopter-adjustment) [5] In-Camera guide About the [In-Camera Guide] [6] About the shooting advice [7] Preparing the camera Charging the battery pack

Help Guide (Printable PDF)
Page 2
Charging the battery pack while it is inserted in the camera [8] Charging by connecting to a computer [9] Inserting the battery pack into the camera [10] Battery life and the number of images that can be recorded/played back using a battery pack [11] Supplying power from a wall outlet (wall socket) [...
Charging the battery pack while it is inserted in the camera [8] Charging by connecting to a computer [9] Inserting the battery pack into the camera [10] Battery life and the number of images that can be recorded/played back using a battery pack [11] Supplying power from a wall outlet (wall socket) [...

Help Guide (Printable PDF)
Page 10
... Set. [195] Edit Device Name [196] Disp MAC Address [197] SSID/PW Reset [198] Reset Network Set. [199] Adding applications to the product PlayMemories Camera Apps PlayMemories Camera Apps [200] Recommended computer environment [201] Installing the applications Opening a service account [202] Downloading applications [203] Downloading applications directly to the product using the...
... Set. [195] Edit Device Name [196] Disp MAC Address [197] SSID/PW Reset [198] Reset Network Set. [199] Adding applications to the product PlayMemories Camera Apps PlayMemories Camera Apps [200] Recommended computer environment [201] Installing the applications Opening a service account [202] Downloading applications [203] Downloading applications directly to the product using the...

Help Guide (Printable PDF)
Page 11
... the applications Launching the downloaded application [205] Managing the applications Uninstalling applications [206] Changing the order of applications [207] Confirming the account information of PlayMemories Camera Apps [208] Viewing on computers Recommended computer environment Recommended computer environment [209] Using the software PlayMemories Home [210] Installing PlayMemories Home [211] Software for Mac...
... the applications Launching the downloaded application [205] Managing the applications Uninstalling applications [206] Changing the order of applications [207] Confirming the account information of PlayMemories Camera Apps [208] Viewing on computers Recommended computer environment Recommended computer environment [209] Using the software PlayMemories Home [210] Installing PlayMemories Home [211] Software for Mac...
Help Guide (Printable PDF)
Page 16
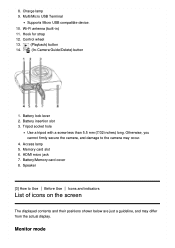
Use the appropriate one that matches your camera. Situations this product has difficulty handling Situations this product has difficulty handling [298] [1] How to Use Before Use Names of parts Checking the camera and the supplied items The number in the U.S.A. Camera (1) NP-BX1 Rechargeable battery pack (1) Micro USB Cable (1) AC-UB10C/UB10D AC Adaptor (1) Power cord (mains lead) (1)* (not supplied in parentheses indicates the number of pieces. and Canada) *Multiple power cords may be supplied with your country/region. Wrist Strap (1)
Use the appropriate one that matches your camera. Situations this product has difficulty handling Situations this product has difficulty handling [298] [1] How to Use Before Use Names of parts Checking the camera and the supplied items The number in the U.S.A. Camera (1) NP-BX1 Rechargeable battery pack (1) Micro USB Cable (1) AC-UB10C/UB10D AC Adaptor (1) Power cord (mains lead) (1)* (not supplied in parentheses indicates the number of pieces. and Canada) *Multiple power cords may be supplied with your country/region. Wrist Strap (1)

Help Guide (Printable PDF)
Page 18
... communication technology. 12. Microphone 2. (Flash pop-up) switch When using the flash, slide the (Flash pop-up) switch. 3. Align this mark when you connect the camera to a smartphone with your smartphone. MENU button
... communication technology. 12. Microphone 2. (Flash pop-up) switch When using the flash, slide the (Flash pop-up) switch. 3. Align this mark when you connect the camera to a smartphone with your smartphone. MENU button
Help Guide (Printable PDF)
Page 19
.../Delete) button 1. Battery lock lever 2. Monitor mode Battery insertion slot 3. Otherwise, you cannot firmly secure the camera, and damage to Use Before Use Icons and indicators List of icons on the screen The displayed contents and their positions shown below are just a ...
.../Delete) button 1. Battery lock lever 2. Monitor mode Battery insertion slot 3. Otherwise, you cannot firmly secure the camera, and damage to Use Before Use Icons and indicators List of icons on the screen The displayed contents and their positions shown below are just a ...
Help Guide (Printable PDF)
Page 22
Remaining battery warning USB power supply Flash charge in progress AF Illuminator SteadyShot/Camera shake warning Airplane mode GPS Log REC (DSC-HX90V) GPS position information (DSC-HX90V) Overlay icon Micref Level Low Wind Noise reduction Database file full/Database file error Overheating warning Smart Zoom/ Clear Image Zoom/Digital Zoom Spot metering area C:32:00 Self-diagnosis display Digital level gauge
Remaining battery warning USB power supply Flash charge in progress AF Illuminator SteadyShot/Camera shake warning Airplane mode GPS Log REC (DSC-HX90V) GPS position information (DSC-HX90V) Overlay icon Micref Level Low Wind Noise reduction Database file full/Database file error Overheating warning Smart Zoom/ Clear Image Zoom/Digital Zoom Spot metering area C:32:00 Self-diagnosis display Digital level gauge

Help Guide (Printable PDF)
Page 26
If you slide the Viewfinder pop-up switch (A) down to your eyesight until it clicks. 3. [5] How to Use Before Use Adjusting the viewfinder Adjusting the viewfinder (diopter-adjustment) Adjust the diopter scale to raise the viewfinder. Grasp both sides of the eyepiece (B) and pull it towards the monitor side until the display appears clearly in the viewfinder. 1. Slide the Viewfinder pop-up switch when the camera is off, the camera will turn on. Slide the diopter-adjustment lever. If you stow the viewfinder inside the camera, the camera will turn off. 2.
If you slide the Viewfinder pop-up switch (A) down to your eyesight until it clicks. 3. [5] How to Use Before Use Adjusting the viewfinder Adjusting the viewfinder (diopter-adjustment) Adjust the diopter scale to raise the viewfinder. Grasp both sides of the eyepiece (B) and pull it towards the monitor side until the display appears clearly in the viewfinder. 1. Slide the Viewfinder pop-up switch when the camera is off, the camera will turn on. Slide the diopter-adjustment lever. If you stow the viewfinder inside the camera, the camera will turn off. 2.

Help Guide (Printable PDF)
Page 27
...selected in the viewfinder unit before attempting to push down on the control wheel. 3. Press the MENU or Fn button. 2. Press the / (In-Camera Guide/Delete) button. Then push down the viewfinder. Be sure that the eyepiece is stored in step 2 is being raised. Select the desired MENU... viewfinder until it is displayed. If it clicks. The operation guide for the MENU item you try to Use Before Use In-Camera guide About the [In-Camera Guide] The [In-Camera Guide] displays descriptions of MENU items, Fn (Function) button, and settings, and if a function cannot be set , the reason...
...selected in the viewfinder unit before attempting to push down on the control wheel. 3. Press the MENU or Fn button. 2. Press the / (In-Camera Guide/Delete) button. Then push down the viewfinder. Be sure that the eyepiece is stored in step 2 is being raised. Select the desired MENU... viewfinder until it is displayed. If it clicks. The operation guide for the MENU item you try to Use Before Use In-Camera guide About the [In-Camera Guide] The [In-Camera Guide] displays descriptions of MENU items, Fn (Function) button, and settings, and if a function cannot be set , the reason...
Help Guide (Printable PDF)
Page 28
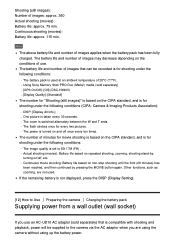
... side of the control wheel to select the desired shooting advice, then press on the center. Connect the camera with the battery pack inserted to the AC Adaptor (supplied) using the camera for the first time, be sure to the wall outlet (wall socket). For customers in the... pack before shooting. 1. Turn the power OFF. 2. Hint To view all the shooting advice, select MENU → List]. (Camera Settings) → [Shooting Tip [8] How to the selected shooting mode. 1. Press the / (In-Camera Guide/Delete) button while the shooting screen is displayed. 2. [7] How to Use Before Use In...
... side of the control wheel to select the desired shooting advice, then press on the center. Connect the camera with the battery pack inserted to the AC Adaptor (supplied) using the camera for the first time, be sure to the wall outlet (wall socket). For customers in the... pack before shooting. 1. Turn the power OFF. 2. Hint To view all the shooting advice, select MENU → List]. (Camera Settings) → [Shooting Tip [8] How to the selected shooting mode. 1. Press the / (In-Camera Guide/Delete) button while the shooting screen is displayed. 2. [7] How to Use Before Use In...
Help Guide (Printable PDF)
Page 29
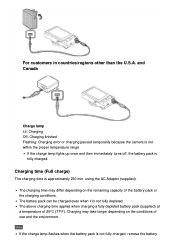
... the conditions of 25°C (77°F). and Canada Charge lamp Lit: Charging Off: Charging finished Flashing: Charging error or charging paused temporarily because the camera is not within the proper temperature range If the charge lamp lights up once and then immediately turns off, the battery pack is not fully...
... the conditions of 25°C (77°F). and Canada Charge lamp Lit: Charging Off: Charging finished Flashing: Charging error or charging paused temporarily because the camera is not within the proper temperature range If the charge lamp lights up once and then immediately turns off, the battery pack is not fully...
Help Guide (Printable PDF)
Page 30
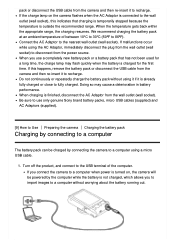
...to the nearest wall outlet (wall socket). pack or disconnect the USB cable from the power source. If the charge lamp on , the camera will be charged by the computer while the battery is outside the recommended range. When the temperature gets back within the appropriate range, the ...this indicates that has not been used for the first time. If you use only genuine Sony brand battery packs, micro USB cables (supplied) and AC Adaptors (supplied). [9] How to Use Preparing the camera Charging the battery pack Charging by connecting to a computer The battery pack can be powered by...
...to the nearest wall outlet (wall socket). pack or disconnect the USB cable from the power source. If the charge lamp on , the camera will be charged by the computer while the battery is outside the recommended range. When the temperature gets back within the appropriate range, the ...this indicates that has not been used for the first time. If you use only genuine Sony brand battery packs, micro USB cables (supplied) and AC Adaptors (supplied). [9] How to Use Preparing the camera Charging the battery pack Charging by connecting to a computer The battery pack can be powered by...
Help Guide (Printable PDF)
Page 31
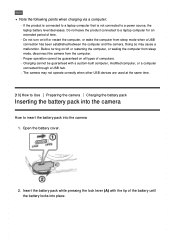
.... Doing so may not operate correctly when other USB devices are used at the same time. [10] How to Use Preparing the camera Charging the battery pack Inserting the battery pack into the camera How to a laptop computer for an extended period of time. Open the battery cover. 2. The... turning on /off or restarting the computer, or waking the computer from sleep mode, disconnect the camera from sleep mode when a USB connection has been established between the computer and the camera. Do not leave the product connected to insert the battery pack into place. Proper operation cannot be ...
.... Doing so may not operate correctly when other USB devices are used at the same time. [10] How to Use Preparing the camera Charging the battery pack Inserting the battery pack into the camera How to a laptop computer for an extended period of time. Open the battery cover. 2. The... turning on /off or restarting the computer, or waking the computer from sleep mode, disconnect the camera from sleep mode when a USB connection has been established between the computer and the camera. Do not leave the product connected to insert the battery pack into place. Proper operation cannot be ...
Help Guide (Printable PDF)
Page 32
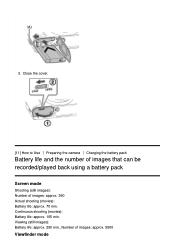
3. Close the cover. [11] How to Use Preparing the camera Charging the battery pack Battery life and the number of images that can be recorded/played back using a battery pack Screen mode Shooting (still images): Number of images: approx. 5800 Viewfinder mode Continuous shooting (movies): Battery life: approx. 105 min. Viewing (still images): Battery life: approx. 290 min., Number of images: approx. 390 Actual shooting (movies): Battery life: approx. 70 min.
3. Close the cover. [11] How to Use Preparing the camera Charging the battery pack Battery life and the number of images that can be recorded/played back using a battery pack Screen mode Shooting (still images): Number of images: approx. 5800 Viewfinder mode Continuous shooting (movies): Battery life: approx. 105 min. Viewing (still images): Battery life: approx. 290 min., Number of images: approx. 390 Actual shooting (movies): Battery life: approx. 70 min.
Help Guide (Printable PDF)
Page 33
...] (DSC-HX90V) [Display Quality]: [Standard] The number for shooting under the following conditions: The image quality is based on /off once every ten times. The battery life and number of 25°C (77°F). Using Sony Memory Stick PRO Duo (Mark2) media (sold separately) that can be supplied to Use Preparing the camera Charging...
...] (DSC-HX90V) [Display Quality]: [Standard] The number for shooting under the following conditions: The image quality is based on /off once every ten times. The battery life and number of 25°C (77°F). Using Sony Memory Stick PRO Duo (Mark2) media (sold separately) that can be supplied to Use Preparing the camera Charging...
Help Guide (Printable PDF)
Page 34
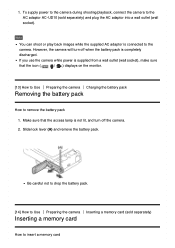
... Note You can shoot or play back images while the supplied AC adaptor is not lit, and turn off the camera. 2. To supply power to the camera during shooting/playback, connect the camera to the AC adaptor AC-UD10 (sold separately) Inserting a memory card How to remove the battery pack 1. Make... sure that the icon ( / ) displays on the monitor. [13] How to Use Preparing the camera Charging the battery pack Removing the battery pack How to insert a memory card Slide lock lever (A) and remove the battery pack. Be careful not to...
... Note You can shoot or play back images while the supplied AC adaptor is not lit, and turn off the camera. 2. To supply power to the camera during shooting/playback, connect the camera to the AC adaptor AC-UD10 (sold separately) Inserting a memory card How to remove the battery pack 1. Make... sure that the icon ( / ) displays on the monitor. [13] How to Use Preparing the camera Charging the battery pack Removing the battery pack How to insert a memory card Slide lock lever (A) and remove the battery pack. Be careful not to...

Help Guide (Printable PDF)
Page 36
Close the memory card cover. [16] How to remove it. 4. Push in on the memory card once to Use Preparing the camera Setting the language, date and time Setting language, date and time Make sure that the access lamp (A) is not lit. 3. Open the memory card cover. 2. [15] How to Use Preparing the camera Inserting a memory card (sold separately) Removing the memory card How to remove the memory card 1.
Close the memory card cover. [16] How to remove it. 4. Push in on the memory card once to Use Preparing the camera Setting the language, date and time Setting language, date and time Make sure that the access lamp (A) is not lit. 3. Open the memory card cover. 2. [15] How to Use Preparing the camera Inserting a memory card (sold separately) Removing the memory card How to remove the memory card 1.

Help Guide (Printable PDF)
Page 37
..., date and time will appear. 2. Select a setting item using the up /down /left/right sides, then press in the center. When you turn on the camera. [17] How to set other items, then select [Enter] and press in the center. Turn on the... camera for the first time or after you turn on the camera. To cancel the date and time setting procedure, press the MENU button. Check that [Enter] is indicated as 12:00 AM, and noon as...
..., date and time will appear. 2. Select a setting item using the up /down /left/right sides, then press in the center. When you turn on the camera. [17] How to set other items, then select [Enter] and press in the center. Turn on the... camera for the first time or after you turn on the camera. To cancel the date and time setting procedure, press the MENU button. Check that [Enter] is indicated as 12:00 AM, and noon as...

Help Guide (Printable PDF)
Page 38
... Use Confirming the operation method Confirming the operation method Using the control ring By turning the control ring (A), you can change settings related to all camera operations and
... Use Confirming the operation method Confirming the operation method Using the control ring By turning the control ring (A), you can change settings related to all camera operations and


