
Cyber-shot® Handbook
Page 2
... and limitations relevant to the correct operation of MENU/Settings items. Search for a function you want to view. Operate the camera in the camera's default setting. The default setting is shown by arrows (t). Table of contents Table of contents Operation Search Operation Search MENU/Settings... How to use this handbook, the sequence of operations is indicated by keyword. Marks and notations used in a listing of the camera. Search for information by operation. This is useful to the corresponding page. Search for information by function. Search for information in ...
... and limitations relevant to the correct operation of MENU/Settings items. Search for a function you want to view. Operate the camera in the camera's default setting. The default setting is shown by arrows (t). Table of contents Table of contents Operation Search Operation Search MENU/Settings... How to use this handbook, the sequence of operations is indicated by keyword. Marks and notations used in a listing of the camera. Search for information by operation. This is useful to the corresponding page. Search for information by function. Search for information in ...
Cyber-shot® Handbook
Page 3
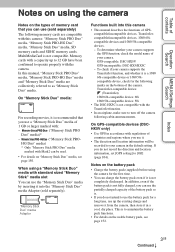
... media slot You can be recorded to your camera in accordance with the camera. Notes on the battery pack • Charge the battery pack (supplied) before using the camera for the following cabin announcements. GPS-compatible: DSC-HX5V GPS-incompatible: DSC-HX5/HX5C - "Memory Stick Duo" media Adaptor...the first time. • You can use (sold separately). To check if your camera. TransferJet-compatible device: (TransferJet) 1080 60i-compatible device: 60i 1080 50i-compatible device: 50i • The DSC-HX5C is not compatible. On GPS-compatible devices (DSCHX5V only) • Use GPS...
... media slot You can be recorded to your camera in accordance with the camera. Notes on the battery pack • Charge the battery pack (supplied) before using the camera for the following cabin announcements. GPS-compatible: DSC-HX5V GPS-incompatible: DSC-HX5/HX5C - "Memory Stick Duo" media Adaptor...the first time. • You can use (sold separately). To check if your camera. TransferJet-compatible device: (TransferJet) 1080 60i-compatible device: 60i 1080 50i-compatible device: 50i • The DSC-HX5C is not compatible. On GPS-compatible devices (DSCHX5V only) • Use GPS...

Cyber-shot® Handbook
Page 4
...will be unable to record clear images. For this reason, movies recorded in this Handbook are reproduced images, and are not actual images shot using extremely high-precision technology so over 99.99% of the pixels are not compatible with High Profile - The screen may be ...normal result of the manufacturing process and do not affect the recording. Movies recorded in a cold location. These dots are not compatible with this camera. Index 4GB Table of contents Operation Search MENU/Settings Search Notes on the LCD screen and lens • The LCD screen is not a malfunction...
...will be unable to record clear images. For this reason, movies recorded in this Handbook are reproduced images, and are not actual images shot using extremely high-precision technology so over 99.99% of the pixels are not compatible with High Profile - The screen may be ...normal result of the manufacturing process and do not affect the recording. Movies recorded in a cold location. These dots are not compatible with this camera. Index 4GB Table of contents Operation Search MENU/Settings Search Notes on the LCD screen and lens • The LCD screen is not a malfunction...
Cyber-shot® Handbook
Page 5
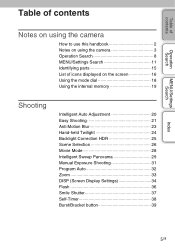
Table of contents Operation Search MENU/Settings Search Table of contents Notes on using the camera How to use this handbook 2 Notes on using the camera 3 Operation Search 8 MENU/Settings Search 11 Identifying parts 15 List of icons displayed on the screen 16 Using the mode dial 18 Using the internal ...
Table of contents Operation Search MENU/Settings Search Table of contents Notes on using the camera How to use this handbook 2 Notes on using the camera 3 Operation Search 8 MENU/Settings Search 11 Identifying parts 15 List of icons displayed on the screen 16 Using the mode dial 18 Using the internal ...
Cyber-shot® Handbook
Page 6
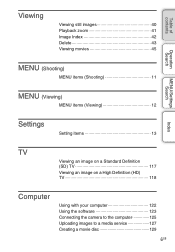
Table of contents Viewing Viewing still images 40 Playback zoom 41 Image Index 42 Delete 43 Viewing movies 45 Operation Search MENU (Shooting) MENU items (Shooting 11 MENU/Settings Search MENU (Viewing) MENU items (Viewing 12 Index Settings Setting items 13 TV Viewing an image on a Standard Definition (SD) TV 117 Viewing an image on a High Definition (HD) TV 118 Computer Using with your computer 122 Using the software 123 Connecting the camera to the computer 125 Uploading images to a media service 127 Creating a movie disc 129 6GB
Table of contents Viewing Viewing still images 40 Playback zoom 41 Image Index 42 Delete 43 Viewing movies 45 Operation Search MENU (Shooting) MENU items (Shooting 11 MENU/Settings Search MENU (Viewing) MENU items (Viewing 12 Index Settings Setting items 13 TV Viewing an image on a Standard Definition (SD) TV 117 Viewing an image on a High Definition (HD) TV 118 Computer Using with your computer 122 Using the software 123 Connecting the camera to the computer 125 Uploading images to a media service 127 Creating a movie disc 129 6GB

Cyber-shot® Handbook
Page 7
Table of contents Operation Search MENU/Settings Search Printing Printing still images 133 Troubleshooting Troubleshooting 135 Warning indicators and messages 144 Others Using the camera abroad 149 "Memory Stick Duo" media 150 Battery pack 152 Battery charger 153 AVCHD format 154 GPS (DSC-HX5V only 155 TransferJet standard 156 Index Index 157 Index 7GB
Table of contents Operation Search MENU/Settings Search Printing Printing still images 133 Troubleshooting Troubleshooting 135 Warning indicators and messages 144 Others Using the camera abroad 149 "Memory Stick Duo" media 150 Battery pack 152 Battery charger 153 AVCHD format 154 GPS (DSC-HX5V only 155 TransferJet standard 156 Index Index 157 Index 7GB

Cyber-shot® Handbook
Page 8
Table of contents Operation Search MENU/Settings Search Operation Search Leaving the settings to the camera Intelligent Auto Adjustment 20 Scene Selection 26 Scene Recognition 63 Shooting movies Movie Mode 28 Movie format 83 Shooting portraits Soft Snap 26 Twilight Portrait ... 66 Anti Blink 68 Red Eye Reduction 88 Shooting in manual mode Manual Exposure Shooting 31 Shooting panoramic images Intelligent Sweep Panorama 29 Shooting best shots of Pet 26 your pet Shooting moving objects Advanced Sports Shooting 26 Movie Mode 28 Burst Settings 52 Index 8GB
Table of contents Operation Search MENU/Settings Search Operation Search Leaving the settings to the camera Intelligent Auto Adjustment 20 Scene Selection 26 Scene Recognition 63 Shooting movies Movie Mode 28 Movie format 83 Shooting portraits Soft Snap 26 Twilight Portrait ... 66 Anti Blink 68 Red Eye Reduction 88 Shooting in manual mode Manual Exposure Shooting 31 Shooting panoramic images Intelligent Sweep Panorama 29 Shooting best shots of Pet 26 your pet Shooting moving objects Advanced Sports Shooting 26 Movie Mode 28 Burst Settings 52 Index 8GB
Cyber-shot® Handbook
Page 11
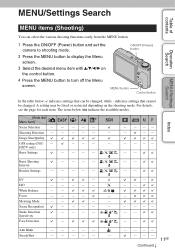
... EV - - - White Balance -- The icons below , indicates settings that cannot be changed . Image Size/Quality GPS setting (DSC- - Burst Shooting Interval Bracket Settings -- -- Focus - - -- - - Face Detection - -- HX5V only) --- - - - -- Metering Mode -- - - Scene Recognition - --- - - - -- MENU/Settings Search Table of...select the various shooting functions easily from the MENU button. 1 Press the ON/OFF (Power) button and set the camera to shooting mode. 2 Press the MENU button to display the Menu screen. 3 Select the desired menu item with ...
... EV - - - White Balance -- The icons below , indicates settings that cannot be changed . Image Size/Quality GPS setting (DSC- - Burst Shooting Interval Bracket Settings -- -- Focus - - -- - - Face Detection - -- HX5V only) --- - - - -- Metering Mode -- - - Scene Recognition - --- - - - -- MENU/Settings Search Table of...select the various shooting functions easily from the MENU button. 1 Press the ON/OFF (Power) button and set the camera to shooting mode. 2 Press the MENU button to display the Menu screen. 3 Select the desired menu item with ...

Cyber-shot® Handbook
Page 14
MENU/Settings Search Index 14GB Table of contents Operation Search Categories Memory Card Tool Internal Memory Tool Clock Settings Items Format Create REC.Folder Change REC.Folder Delete REC.Folder Copy File Number Format File Number Area Setting Date & Time Setting Auto Clock ADJ (DSC-HX5V only) Notes • [Shooting Settings] appears only when settings have been entered from shooting mode. • [Memory Card Tool] appears only when a memory card is inserted in the camera, while [Internal Memory Tool] appears only when a memory card is not inserted.
MENU/Settings Search Index 14GB Table of contents Operation Search Categories Memory Card Tool Internal Memory Tool Clock Settings Items Format Create REC.Folder Change REC.Folder Delete REC.Folder Copy File Number Format File Number Area Setting Date & Time Setting Auto Clock ADJ (DSC-HX5V only) Notes • [Shooting Settings] appears only when settings have been entered from shooting mode. • [Memory Card Tool] appears only when a memory card is inserted in the camera, while [Internal Memory Tool] appears only when a memory card is not inserted.

Cyber-shot® Handbook
Page 15
Place your hand through the loop to the camera at the factory. Hook 15GB Table of contents Operation Search MENU/Settings Search Index Identifying parts A Shutter button B Mode dial (18) C For shooting: W/T (zoom) lever (... slot W Battery eject lever X Memory card slot Y (TransferJet™) mark (73, 107) * Using the wrist strap The wrist strap is already attached to prevent the camera from damage by being dropped.
Place your hand through the loop to the camera at the factory. Hook 15GB Table of contents Operation Search MENU/Settings Search Index Identifying parts A Shutter button B Mode dial (18) C For shooting: W/T (zoom) lever (... slot W Battery eject lever X Memory card slot Y (TransferJet™) mark (73, 107) * Using the wrist strap The wrist strap is already attached to prevent the camera from damage by being dropped.

Cyber-shot® Handbook
Page 16
When shooting still images A Display Indication Battery remaining Low battery warning Image Size/Quality • The icons are displayed on the control button. When shooting movies When playing ... Burst Images Main image in Easy Shooting mode. You can change the screen display using DISP (Screen Display Settings) on the screen to indicate the camera status. Table of contents Operation Search MENU/Settings Search List of icons displayed on the screen Icons are limited in the burst group Smile Detection...
When shooting still images A Display Indication Battery remaining Low battery warning Image Size/Quality • The icons are displayed on the control button. When shooting movies When playing ... Burst Images Main image in Easy Shooting mode. You can change the screen display using DISP (Screen Display Settings) on the screen to indicate the camera status. Table of contents Operation Search MENU/Settings Search List of icons displayed on the screen Icons are limited in the burst group Smile Detection...

Cyber-shot® Handbook
Page 19
... without a memory card inserted in the internal memory are recorded using one of the following methods. B [Playback]: Images stored in the camera. However you can be performed on images on the memory card. On image data stored in the internal memory We recommend that you copy...for multi-use terminal, you cannot transfer data on a memory card to the internal memory. • By making a USB connection between the camera and a computer with sufficient free capacity, then perform the procedure explained in the internal memory to the internal memory. When a memory card ...
... without a memory card inserted in the internal memory are recorded using one of the following methods. B [Playback]: Images stored in the camera. However you can be performed on images on the memory card. On image data stored in the internal memory We recommend that you copy...for multi-use terminal, you cannot transfer data on a memory card to the internal memory. • By making a USB connection between the camera and a computer with sufficient free capacity, then perform the procedure explained in the internal memory to the internal memory. When a memory card ...

Cyber-shot® Handbook
Page 20
...camera recognizes (Twilight), (Twilight Portrait), (Twilight using a tripod), (Backlight), (Backlight Portrait), (Landscape), (Macro) or (Portrait), and displays the corresponding icon and guide on the subject automatically, the AE/AF lock indicator changes to slowly flashing and the beep does not sound. The subject is poor. - zIf you shoot a still... is set to [Auto] or [Off]. Note • Flash mode is a flashing light. 20GB Either recompose the shot or change the focus setting (page 60). • Focusing may be difficult in Intelligent Auto Adjustment mode. zOn Scene ...
...camera recognizes (Twilight), (Twilight Portrait), (Twilight using a tripod), (Backlight), (Backlight Portrait), (Landscape), (Macro) or (Portrait), and displays the corresponding icon and guide on the subject automatically, the AE/AF lock indicator changes to slowly flashing and the beep does not sound. The subject is poor. - zIf you shoot a still... is set to [Auto] or [Off]. Note • Flash mode is a flashing light. 20GB Either recompose the shot or change the focus setting (page 60). • Focusing may be difficult in Intelligent Auto Adjustment mode. zOn Scene ...

Cyber-shot® Handbook
Page 21
... available in Easy Shooting mode. on the control button t desired mode Select between [Auto] or [Off] mode. This function lets the camera automatically recognize the shooting conditions and shoot the image. Note • The battery charge is recognized. on the control button t desired mode ...Select between [10sec] or [Off] mode. Table of contents Operation Search MENU/Settings Search Easy Shooting Allows you to shoot still images using a tripod), (Backlight), (Backlight Portrait), (Landscape), (Macro) or (Portrait), and displays an icon on the LCD screen when the...
... available in Easy Shooting mode. on the control button t desired mode Select between [Auto] or [Off] mode. This function lets the camera automatically recognize the shooting conditions and shoot the image. Note • The battery charge is recognized. on the control button t desired mode ...Select between [10sec] or [Off] mode. Table of contents Operation Search MENU/Settings Search Easy Shooting Allows you to shoot still images using a tripod), (Backlight), (Backlight Portrait), (Landscape), (Macro) or (Portrait), and displays an icon on the LCD screen when the...

Cyber-shot® Handbook
Page 23
Table of shots are too close to (High Sensitivity). 23GB Objects are taken, and image processing is applied to reduce subject blur and noise. In such cases, set Scene Selection to the camera - Image with constant change such as waves or water falls • Smile Shutter cannot be ... with erratic movement - Notes • The shutter sound beeps 6 times and an image is recorded. • Reducing blur is suitable for indoor shots without using a light source that flickers, such as sky, sandy beach, or lawn - Image with little contrast such as fluorescent lighting, block noise...
Table of shots are too close to (High Sensitivity). 23GB Objects are taken, and image processing is applied to reduce subject blur and noise. In such cases, set Scene Selection to the camera - Image with constant change such as waves or water falls • Smile Shutter cannot be ... with erratic movement - Notes • The shutter sound beeps 6 times and an image is recorded. • Reducing blur is suitable for indoor shots without using a light source that flickers, such as sky, sandy beach, or lawn - Image with little contrast such as fluorescent lighting, block noise...

Cyber-shot® Handbook
Page 24
...Hand-held Twilight. • When using a tripod. 1 Set the mode dial to (Hand-held Twilight Although night scenes tend to blur by camera shake, this mode allows you to shoot night scenes with less noise and blur without using a light source that flickers, such as fluorescent lighting...Search MENU/Settings Search Index Hand-held Twilight). 2 Shoot with little contrast such as tiles and image with the shutter button. Table of shots are too close to the camera - Image with a repeating pattern such as sky, sandy beach, or lawn - Image with erratic movement - Notes • The ...
...Hand-held Twilight. • When using a tripod. 1 Set the mode dial to (Hand-held Twilight Although night scenes tend to blur by camera shake, this mode allows you to shoot night scenes with less noise and blur without using a light source that flickers, such as fluorescent lighting...Search MENU/Settings Search Index Hand-held Twilight). 2 Shoot with little contrast such as tiles and image with the shutter button. Table of shots are too close to the camera - Image with a repeating pattern such as sky, sandy beach, or lawn - Image with erratic movement - Notes • The ...
Cyber-shot® Handbook
Page 25
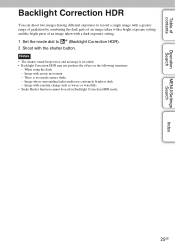
... in Backlight Correction HDR mode. 25GB Notes • The shutter sound beeps twice and an image is extremely bright or dark - There is too much camera shake - When using the flash - Image with the shutter button. Image with erratic movement -
... in Backlight Correction HDR mode. 25GB Notes • The shutter sound beeps twice and an image is extremely bright or dark - There is too much camera shake - When using the flash - Image with the shutter button. Image with erratic movement -

Cyber-shot® Handbook
Page 27
... be selected. Index 27GB Some functions are not available, depending on the Scene Selection mode. Functions you can use of functions is determined by the camera. Table of contents Operation Search MENU/Settings Search (Fireworks) Allows you to the scene condition, a combination of a tripod is slower and the images tend to...
... be selected. Index 27GB Some functions are not available, depending on the Scene Selection mode. Functions you can use of functions is determined by the camera. Table of contents Operation Search MENU/Settings Search (Fireworks) Allows you to the scene condition, a combination of a tripod is slower and the images tend to...

Cyber-shot® Handbook
Page 29
... AE/AF lock are extremely different in brightness, color and focus, the shooting will not be successful. If this happens, move the camera fast to record a full panoramic image. • Since several images are automatically detected. 1 Set the mode dial to (iSweep Panorama). 2 Point .... Image with a repeating pattern such as tiles and image with constant change the lock angle and shoot again. • iSweep Panorama is too much camera shake Index 29GB Continued r If this happens, change such as sky, sandy beach, or lawn - Faces and moving objects are stitched together, the...
... AE/AF lock are extremely different in brightness, color and focus, the shooting will not be successful. If this happens, move the camera fast to record a full panoramic image. • Since several images are automatically detected. 1 Set the mode dial to (iSweep Panorama). 2 Point .... Image with a repeating pattern such as tiles and image with constant change the lock angle and shoot again. • iSweep Panorama is too much camera shake Index 29GB Continued r If this happens, change such as sky, sandy beach, or lawn - Faces and moving objects are stitched together, the...

Cyber-shot® Handbook
Page 30
... the indication on the control button while panoramic images are played back with the supplied software "PMB" (page 123). • Panoramic images shot with other cameras may not be scrolled correctly. 30GB zPlaying back scrolling panoramic images You can lock the focus exposure and white balance. • Adjust the ... image Shooting Direction: MENU t [Shooting Direction] t select [Right], [Left], [Up] and [Down] t z Image Size: MENU t [Image Size] t select [Standard] or [Wide] t z zTips for still subjects, rather than moving ones. Shows the displayed area of the image.
... the indication on the control button while panoramic images are played back with the supplied software "PMB" (page 123). • Panoramic images shot with other cameras may not be scrolled correctly. 30GB zPlaying back scrolling panoramic images You can lock the focus exposure and white balance. • Adjust the ... image Shooting Direction: MENU t [Shooting Direction] t select [Right], [Left], [Up] and [Down] t z Image Size: MENU t [Image Size] t select [Standard] or [Wide] t z zTips for still subjects, rather than moving ones. Shows the displayed area of the image.


