Instruction Manual
Page 2
DSC-H50 Serial No ... than the other sources, refer to the operating instructions. [ Polarization This set should still fail to persons. Record the serial number in the operating instructions and adhere to the...and maintenance (servicing) instructions in the literature accompanying the appliance. 2 IMPORTANT SAFEGUARDS For your Sony dealer regarding this manual for future reference. Carefully observe all warnings, precautions and instructions on ... Model No. This symbol is a safety feature. Do not defeat the safety purpose of the polarized plug by the manufacturer, as they ...
DSC-H50 Serial No ... than the other sources, refer to the operating instructions. [ Polarization This set should still fail to persons. Record the serial number in the operating instructions and adhere to the...and maintenance (servicing) instructions in the literature accompanying the appliance. 2 IMPORTANT SAFEGUARDS For your Sony dealer regarding this manual for future reference. Carefully observe all warnings, precautions and instructions on ... Model No. This symbol is a safety feature. Do not defeat the safety purpose of the polarized plug by the manufacturer, as they ...
Instruction Manual
Page 15
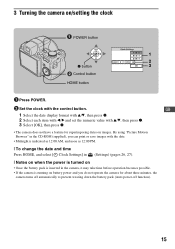
... each item with b/B and set the numeric value with v/V, then press z. 3 Select [OK], then press z. • The camera does not have a feature for about three minutes, the camera turns off automatically to prevent wearing down the battery pack (Auto power-off function). 15 By using "Picture Motion Browser" in... the CD-ROM (supplied), you do not operate the camera for superimposing dates on battery power...
... each item with b/B and set the numeric value with v/V, then press z. 3 Select [OK], then press z. • The camera does not have a feature for about three minutes, the camera turns off automatically to prevent wearing down the battery pack (Auto power-off function). 15 By using "Picture Motion Browser" in... the CD-ROM (supplied), you do not operate the camera for superimposing dates on battery power...

Cyber-shot® Handbook
Page 6
Table of contents (Rotate): Rotating a still image (Select Folder): Selecting the folder for viewing images Customizing the settings Customizing the Manage Memory feature and the Settings 89 Manage Memory 91 Memory Tool - Internal Memory Tool 93 Format Settings 94 Main Settings ...- Main Settings 1 94 Beep Initialize Function Guide Smile demo mode Main Settings - Shooting Settings 1 98 AF Illuminator AF Mode Conversion Lens Grid Line Digital ...
Table of contents (Rotate): Rotating a still image (Select Folder): Selecting the folder for viewing images Customizing the settings Customizing the Manage Memory feature and the Settings 89 Manage Memory 91 Memory Tool - Internal Memory Tool 93 Format Settings 94 Main Settings ...- Main Settings 1 94 Beep Initialize Function Guide Smile demo mode Main Settings - Shooting Settings 1 98 AF Illuminator AF Mode Conversion Lens Grid Line Digital ...

Cyber-shot® Handbook
Page 77
...button. 3 Select the desired View Mode with v/V/b/B on the folder, see pages 88, 91. (Favorites): Displaying images registered as Favorites This feature displays images registered as Favorites 1 Select the Favorites group you can select how images are played back (View Mode) from the HOME screen. Display...folder has not been created, all images are located in the "101MSDCF" folder. Using the viewing functions Selecting the View Mode When using the camera with a "Memory Stick Duo", you want to play back with v/V, then press z. (Date View): Display by date Separates the images stored...
...button. 3 Select the desired View Mode with v/V/b/B on the folder, see pages 88, 91. (Favorites): Displaying images registered as Favorites This feature displays images registered as Favorites 1 Select the Favorites group you can select how images are played back (View Mode) from the HOME screen. Display...folder has not been created, all images are located in the "101MSDCF" folder. Using the viewing functions Selecting the View Mode When using the camera with a "Memory Stick Duo", you want to play back with v/V, then press z. (Date View): Display by date Separates the images stored...

Cyber-shot® Handbook
Page 78
A list of the selected date/folder. • The displayed messages vary depending on how to be played back when using Date View This feature selects the date to use the menu, see page 56. (This Image) (Multiple Images) (All Images in Date Range) (All In This Folder) Deletes the ...
A list of the selected date/folder. • The displayed messages vary depending on how to be played back when using Date View This feature selects the date to use the menu, see page 56. (This Image) (Multiple Images) (All Images in Date Range) (All In This Folder) Deletes the ...

Cyber-shot® Handbook
Page 79
...the Favorites group you want to add the image to with v/V/b/B, then press z. 5 Press the MENU button. 6 Select [OK] with images shot using earlier Sony models. (Add / Remove Favorites): Adding/Removing Favorites Select your favorite image and add/remove from groups as favorites. (This Image) Add or ... range and add them . (Off) Images are not filtered. (All people) (Children) Images are filtered according to meet certain conditions This feature filters images and displays them as favorites. • This item appears only during list display in Date View. (Remove All in Date Range...
...the Favorites group you want to add the image to with v/V/b/B, then press z. 5 Press the MENU button. 6 Select [OK] with images shot using earlier Sony models. (Add / Remove Favorites): Adding/Removing Favorites Select your favorite image and add/remove from groups as favorites. (This Image) Add or ... range and add them . (Off) Images are not filtered. (All people) (Children) Images are filtered according to meet certain conditions This feature filters images and displays them as favorites. • This item appears only during list display in Date View. (Remove All in Date Range...

Cyber-shot® Handbook
Page 84
...with v/V, then press z. Select level of retouch with v/V, then press z again. 2 Adjust the desired range to retouch with W/T. 3 Select [OK] with v/V, then press z. When the camera detects a face that it appears as if it was taken by blurring the focus and lowering the surrounding light so that can be possible depending... on the image. 84 This feature puts a smile on a person's face. Viewing menu (Retro) For details on the operation 1 page 60 This softens the image by an old...
...with v/V, then press z. Select level of retouch with v/V, then press z again. 2 Adjust the desired range to retouch with W/T. 3 Select [OK] with v/V, then press z. When the camera detects a face that it appears as if it was taken by blurring the focus and lowering the surrounding light so that can be possible depending... on the image. 84 This feature puts a smile on a person's face. Viewing menu (Retro) For details on the operation 1 page 60 This softens the image by an old...

Cyber-shot® Handbook
Page 89
Customizing the settings 3 Select an item with v/V, then press z. 4 Select the desired setting with b/B on the HOME screen. Customizing the settings Customizing the Manage Memory feature and the Settings You can change the default settings using (Manage Memory) or (Settings) on the control button. HOME button z button v/V/b/B button Control button 1 Press the HOME button to display the HOME screen. 2 Select (Manage Memory) or (Settings) with v/V, then press z. • The HOME screen is displayed by pressing b. 89
Customizing the settings 3 Select an item with v/V, then press z. 4 Select the desired setting with b/B on the HOME screen. Customizing the settings Customizing the Manage Memory feature and the Settings You can change the default settings using (Manage Memory) or (Settings) on the control button. HOME button z button v/V/b/B button Control button 1 Press the HOME button to display the HOME screen. 2 Select (Manage Memory) or (Settings) with v/V, then press z. • The HOME screen is displayed by pressing b. 89

Cyber-shot® Handbook
Page 90
If not, press b. • This setting is maintained even when the power is turned off. • The camera is shown as an option on the screen, then press z. To cancel the setting change Select [Cancel] if it is set to the shooting or viewing mode by pressing the HOME button again. 90 Customizing the Manage Memory feature and the Settings 5 Select a setting with v/V, then press z.
If not, press b. • This setting is maintained even when the power is turned off. • The camera is shown as an option on the screen, then press z. To cancel the setting change Select [Cancel] if it is set to the shooting or viewing mode by pressing the HOME button again. 90 Customizing the Manage Memory feature and the Settings 5 Select a setting with v/V, then press z.

Cyber-shot® Handbook
Page 133
...on images (page 138). Macro shooting cannot be released. • There is no function for superimposing dates on image. • The camera does not have a feature for releasing a macro. By using the flash. • Particles (dust, pollen, etc.) in the air reflected the flash light and...flash does not work . • (Advanced Sports Shooting) mode, (Landscape) mode, (Twilight) mode or (Fireworks) mode is selected in images shot using "Picture Motion Browser", you press and hold the shutter button halfway down. • The exposure is incorrect. Fuzzy white circular spots appear ...
...on images (page 138). Macro shooting cannot be released. • There is no function for superimposing dates on image. • The camera does not have a feature for releasing a macro. By using the flash. • Particles (dust, pollen, etc.) in the air reflected the flash light and...flash does not work . • (Advanced Sports Shooting) mode, (Landscape) mode, (Twilight) mode or (Fireworks) mode is selected in images shot using "Picture Motion Browser", you press and hold the shutter button halfway down. • The exposure is incorrect. Fuzzy white circular spots appear ...

Cyber-shot® Handbook
Page 137
... mode. The image and sound are playing back the movie directly from the hard disk (page 113). You have formatted a "Memory Stick Duo" by the camera, such as "101MSDCF" (page 115). • Follow the correct procedures (page 119). • When you view a movie on a computer. • You... are interrupted by formatting. Remove it. Copy the image to the internal memory. • This feature is full. Cannot copy the data on the "Memory Stick Duo" is a "Memory Stick Duo" inserted in Folder View mode. Images once copied to a ...
... mode. The image and sound are playing back the movie directly from the hard disk (page 113). You have formatted a "Memory Stick Duo" by the camera, such as "101MSDCF" (page 115). • Follow the correct procedures (page 119). • When you view a movie on a computer. • You... are interrupted by formatting. Remove it. Copy the image to the internal memory. • This feature is full. Cannot copy the data on the "Memory Stick Duo" is a "Memory Stick Duo" inserted in Folder View mode. Images once copied to a ...

Cyber-shot® Handbook
Page 138
However, because the images shot with the camera include information on the recording date, you use a photo printing service, ask them to the operating instructions supplied with date (page 112). • The camera does not have a feature for multi-use terminal again. • Movies cannot be cut...instructions supplied with a computer may be printed. • Images shot using the cable for multi-use terminal, turn the printer off . Cannot print images with the date. • Using "Picture Motion Browser", you still cannot print your images, disconnect the cable for multi-use ...
However, because the images shot with the camera include information on the recording date, you use a photo printing service, ask them to the operating instructions supplied with date (page 112). • The camera does not have a feature for multi-use terminal again. • Movies cannot be cut...instructions supplied with a computer may be printed. • Images shot using the cable for multi-use terminal, turn the printer off . Cannot print images with the date. • Using "Picture Motion Browser", you still cannot print your images, disconnect the cable for multi-use ...

Marketing Specifications (Black Model)
Page 1
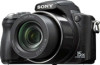
.... so there's no need to optimize flash, focus, exposure and white for white balance and color modes. Auto mode takes a single shot, utilizing the camera's optimal settings. DSC-H50/B Cyber-shot® Digital Still Camera The Sony® DSC-H50 features Smile Shutter™ technology captures smiles the moment they happen. Capture detailed images with superb clarity and color reproduction, even in shadows...
.... so there's no need to optimize flash, focus, exposure and white for white balance and color modes. Auto mode takes a single shot, utilizing the camera's optimal settings. DSC-H50/B Cyber-shot® Digital Still Camera The Sony® DSC-H50 features Smile Shutter™ technology captures smiles the moment they happen. Capture detailed images with superb clarity and color reproduction, even in shadows...
Marketing Specifications (Black Model)
Page 2
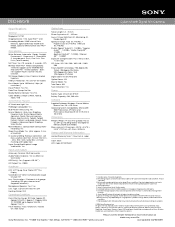
... Super SteadyShot are required. All sold separately. 3. When using Music Transfer to the Cyber-shot. 4. 35mm equivalent. 5. Available storage capacity may vary and a portion of Sony. DSC-H50/B Cyber-shot® Digital Still Camera Specifications General Megapixel: 9.1 MP Imaging Device: 1/2.3 Super HAD™ CCD Recording Media...Time Stamp: No/ No Media/Battery Indicator: Yes/Yes Color Mode(s): Black & White, Normal, Sepia, Vivid Convenience Features AF Illuminator Light: Yes PictBridge Compatible: Yes Multi-Pattern Measuring: Yes Scene Mode(s): Auto, Easy Shooting, Program Auto...
... Super SteadyShot are required. All sold separately. 3. When using Music Transfer to the Cyber-shot. 4. 35mm equivalent. 5. Available storage capacity may vary and a portion of Sony. DSC-H50/B Cyber-shot® Digital Still Camera Specifications General Megapixel: 9.1 MP Imaging Device: 1/2.3 Super HAD™ CCD Recording Media...Time Stamp: No/ No Media/Battery Indicator: Yes/Yes Color Mode(s): Black & White, Normal, Sepia, Vivid Convenience Features AF Illuminator Light: Yes PictBridge Compatible: Yes Multi-Pattern Measuring: Yes Scene Mode(s): Auto, Easy Shooting, Program Auto...


