
Instruction Manual
Page 3
... service personnel under the following the operating instructions. To ensure reliable operation of time, unplug it from the wall outlet and disconnect the antenna or cable system. Never block the slots and openings by being dropped, or the cabinet has been damaged. - If the set during a lightning storm, or when it...
... service personnel under the following the operating instructions. To ensure reliable operation of time, unplug it from the wall outlet and disconnect the antenna or cable system. Never block the slots and openings by being dropped, or the cabinet has been damaged. - If the set during a lightning storm, or when it...

Instruction Manual
Page 5
..., which can radiate radio frequency energy and, if not installed and used with the equipment in order to comply with the limits for a digital device pursuant to Subpart B of Part 15 of FCC Rules. Connect the equipment into an outlet on , the user is connected. -... information about recycling of this product. For more of the following measures: - Reorient or relocate the receiving antenna. - The supplied interface cable must be handed over to the applicable collection point for help. These limits are designed to provide reasonable protection against harmful interference in a...
..., which can radiate radio frequency energy and, if not installed and used with the equipment in order to comply with the limits for a digital device pursuant to Subpart B of Part 15 of FCC Rules. Connect the equipment into an outlet on , the user is connected. -... information about recycling of this product. For more of the following measures: - Reorient or relocate the receiving antenna. - The supplied interface cable must be handed over to the applicable collection point for help. These limits are designed to provide reasonable protection against harmful interference in a...

Instruction Manual
Page 9
Cyber-shot application software - "Cyber-shot Handbook" - "Cyber-shot Step-up Guide" • Instruction Manual (this manual) (1) Attaching the shoulder strap and the lens cap Attach the strap to prevent the camera from damage by being dropped. 9 Getting started Checking the accessories supplied • Battery charger BC-CSG/BC-CSGB/ BC-CSGC (1) • Shoulder strap ...8226; Lens hood (1)/Adaptor ring (1) • Lens cap (1)/Lens cap strap (1) • Rechargeable battery pack NP-BG1 (1)/ Battery case (1) GB • USB, A/V cable for multi-use terminal (1) • CD-ROM (1) -
Cyber-shot application software - "Cyber-shot Handbook" - "Cyber-shot Step-up Guide" • Instruction Manual (this manual) (1) Attaching the shoulder strap and the lens cap Attach the strap to prevent the camera from damage by being dropped. 9 Getting started Checking the accessories supplied • Battery charger BC-CSG/BC-CSGB/ BC-CSGC (1) • Shoulder strap ...8226; Lens hood (1)/Adaptor ring (1) • Lens cap (1)/Lens cap strap (1) • Rechargeable battery pack NP-BG1 (1)/ Battery case (1) GB • USB, A/V cable for multi-use terminal (1) • CD-ROM (1) -
Instruction Manual
Page 18
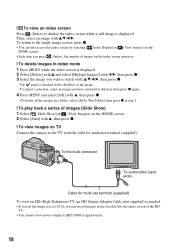
... [ Index Display] in [HD (1080i)] signal format. 18 To the multi connector To audio/video input jacks Cable for multi-use terminal (supplied) To view on HD (High Definition) TV, an HD Output Adaptor Cable (not supplied) is displayed. 2 Select [Delete] with v and select [Multiple Images] with b/B, then press z.... index screen Press (Index) to display the index screen while a still image is checked in the checkbox of images on TV Connect the camera to the TV with the cable for deletion, then press z again. 4 Press MENU and select [OK] with v, then press z. •To delete all the images ...
... [ Index Display] in [HD (1080i)] signal format. 18 To the multi connector To audio/video input jacks Cable for multi-use terminal (supplied) To view on HD (High Definition) TV, an HD Output Adaptor Cable (not supplied) is displayed. 2 Select [Delete] with v and select [Multiple Images] with b/B, then press z.... index screen Press (Index) to display the index screen while a still image is checked in the checkbox of images on TV Connect the camera to the TV with the cable for deletion, then press z again. 4 Press MENU and select [OK] with v, then press z. •To delete all the images ...


