Instruction Manual
Page 7
... memory capacity 27 Battery life and number of images you can record/view 27 Recordable number of still images and recordable time of contents IMPORTANT SAFEGUARDS 2 Read this first 4 Notes on using the camera 8 Getting started 9 Checking the accessories supplied 9 1 Preparing the battery pack 10 2 Inserting ...the battery pack/a "Memory Stick Duo" (not supplied) ........ 11 3 Turning the camera on/setting the clock 13 Shooting images easily 14 Mode dial/Zoom/Flash/Macro/Self-timer/Display/Lens hood 15 Viewing/deleting images 17 Learning...
... memory capacity 27 Battery life and number of images you can record/view 27 Recordable number of still images and recordable time of contents IMPORTANT SAFEGUARDS 2 Read this first 4 Notes on using the camera 8 Getting started 9 Checking the accessories supplied 9 1 Preparing the battery pack 10 2 Inserting ...the battery pack/a "Memory Stick Duo" (not supplied) ........ 11 3 Turning the camera on/setting the clock 13 Shooting images easily 14 Mode dial/Zoom/Flash/Macro/Self-timer/Display/Lens hood 15 Viewing/deleting images 17 Learning...
Instruction Manual
Page 8
... • Before you may be contrary to the provisions of the copyright laws. [ No compensation for damaged content or recording failure Sony cannot compensate for effective use. However, some cases, the camera cannot be able to record images. Otherwise, the internal memory data or "Memory Stick Duo" may cause malfunctions. • If...
... • Before you may be contrary to the provisions of the copyright laws. [ No compensation for damaged content or recording failure Sony cannot compensate for effective use. However, some cases, the camera cannot be able to record images. Otherwise, the internal memory data or "Memory Stick Duo" may cause malfunctions. • If...
Instruction Manual
Page 9
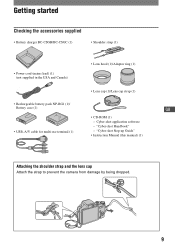
"Cyber-shot Step-up Guide" • Instruction Manual (this manual) (1) Attaching the shoulder strap and the lens cap Attach the strap to prevent the camera from damage by being dropped. 9 "Cyber-shot Handbook" - Cyber-shot application software - Getting started Checking the accessories supplied • Battery charger BC-CSGB/BC-CSGC (1) &#...
"Cyber-shot Step-up Guide" • Instruction Manual (this manual) (1) Attaching the shoulder strap and the lens cap Attach the strap to prevent the camera from damage by being dropped. 9 "Cyber-shot Handbook" - Cyber-shot application software - Getting started Checking the accessories supplied • Battery charger BC-CSGB/BC-CSGC (1) &#...
Instruction Manual
Page 11
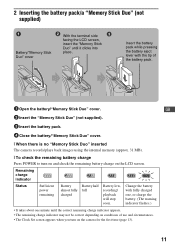
... "Memory Stick Duo" (not supplied). 3 Insert the battery pack. 4 Close the battery/"Memory Stick Duo" cover. [ When there is no "Memory Stick Duo" inserted The camera records/plays back images using the internal memory (approx. 31 MB). [ To check the remaining battery charge Press POWER to turn on the LCD screen... with the tip of use and circumstances. • The Clock Set screen appears when you turn on and check the remaining battery charge on the camera for the first time (page 13). 11
... "Memory Stick Duo" (not supplied). 3 Insert the battery pack. 4 Close the battery/"Memory Stick Duo" cover. [ When there is no "Memory Stick Duo" inserted The camera records/plays back images using the internal memory (approx. 31 MB). [ To check the remaining battery charge Press POWER to turn on the LCD screen... with the tip of use and circumstances. • The Clock Set screen appears when you turn on and check the remaining battery charge on the camera for the first time (page 13). 11

Instruction Manual
Page 13
..., 20). [ Notes on when the power is turned on • Once the battery is inserted in the camera, it may take time before operation becomes possible. • If the camera is running on /setting the clock POWER button HOME button z button ɟ Control button Clock Settings Y/M/D ...2 OK 3 1 Press POWER. 2 Set the clock with v/V, then press z. 3 Select [OK], then press z. • The camera does not have a feature for about three minutes, the camera turns off automatically to prevent wearing down the battery pack (Auto power-off function). 13 GB 1 Select the date display format...
..., 20). [ Notes on when the power is turned on • Once the battery is inserted in the camera, it may take time before operation becomes possible. • If the camera is running on /setting the clock POWER button HOME button z button ɟ Control button Clock Settings Y/M/D ...2 OK 3 1 Press POWER. 2 Set the clock with v/V, then press z. 3 Select [OK], then press z. • The camera does not have a feature for about three minutes, the camera turns off automatically to prevent wearing down the battery pack (Auto power-off function). 13 GB 1 Select the date display format...

Instruction Manual
Page 14
When shooting movies: Select . 2Hold the camera, with the shutter button. When shooting still images: 1 Press and hold the shutter button halfway down again. 14 Position the subject in the center of the focus frame. 3Shoot with your elbows ... receptacle (bottom) HOME button Macro button DISP (Screen display) button Flash button Self-timer button 1Select the desired function from the mode dial. When shooting still images (Auto Adjustment mode): Select .
When shooting movies: Select . 2Hold the camera, with the shutter button. When shooting still images: 1 Press and hold the shutter button halfway down again. 14 Position the subject in the center of the focus frame. 3Shoot with your elbows ... receptacle (bottom) HOME button Macro button DISP (Screen display) button Flash button Self-timer button 1Select the desired function from the mode dial. When shooting still images (Auto Adjustment mode): Select .
Instruction Manual
Page 17
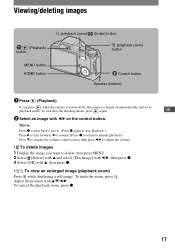
... V to display the volume control screen, then press b/B to adjust the volume. [ To delete images 1 Display the image you press when the camera is powered off, the camera is turned on the control button. If you want to delete, then press MENU. 2 Select [Delete] with v and select [This Image] with...Control button Speaker (bottom) 1 Press (Playback). GB 2 Select an image with v, then press z. [ To view an enlarged image (playback zoom) Press while displaying a still image. To cancel the playback zoom, press z. 17 To switch to playback mode. Adjust the position with v/V/b/B.
... V to display the volume control screen, then press b/B to adjust the volume. [ To delete images 1 Display the image you press when the camera is powered off, the camera is turned on the control button. If you want to delete, then press MENU. 2 Select [Delete] with v and select [This Image] with...Control button Speaker (bottom) 1 Press (Playback). GB 2 Select an image with v, then press z. [ To view an enlarged image (playback zoom) Press while displaying a still image. To cancel the playback zoom, press z. 17 To switch to playback mode. Adjust the position with v/V/b/B.

Instruction Manual
Page 18
... Folder], then press z in step 2. [ To play back a series of the image. [ To view an index screen Press (Index) to display the index screen while a still image is needed. • If you set the image size to [16:9], you can also transfer and change together with v/V/b/B. To return to the single... z. For details on changing the music, refer to Help of "Music Transfer" included on the CD-ROM (supplied). [ To view images on TV Connect the camera to [SD] when shooting movies. 18
... Folder], then press z in step 2. [ To play back a series of the image. [ To view an index screen Press (Index) to display the index screen while a still image is needed. • If you set the image size to [16:9], you can also transfer and change together with v/V/b/B. To return to the single... z. For details on changing the music, refer to Help of "Music Transfer" included on the CD-ROM (supplied). [ To view images on TV Connect the camera to [SD] when shooting movies. 18

Instruction Manual
Page 19
... v/V. • This is functional only when you select (Settings). 2 Press B and select the desired setting with v/V, then press z. 3 Select a setting with v/V, then press z. • The camera is the gateway screen for all the functions of the camera, and can be called up regardless of the mode setting (shooting/viewing).
... v/V. • This is functional only when you select (Settings). 2 Press B and select the desired setting with v/V, then press z. 3 Select a setting with v/V, then press z. • The camera is the gateway screen for all the functions of the camera, and can be called up regardless of the mode setting (shooting/viewing).
Instruction Manual
Page 23
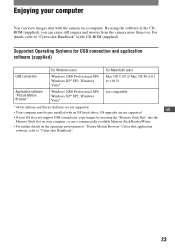
... shot with an OS listed above. By using the software in the CD-ROM (supplied). GB • Your computer must be pre-installed with the camera on a computer. Enjoying your computer, or use a commercially available Memory Stick Reader/Writer. • For further details on the operating environment of "Picture Motion Browser... OS does not support USB connections, copy images by inserting the "Memory Stick Duo" into the Memory Stick slot on your computer You can enjoy still images and movies from the camera more than ever.
... shot with an OS listed above. By using the software in the CD-ROM (supplied). GB • Your computer must be pre-installed with the camera on a computer. Enjoying your computer, or use a commercially available Memory Stick Reader/Writer. • For further details on the operating environment of "Picture Motion Browser... OS does not support USB connections, copy images by inserting the "Memory Stick Duo" into the Memory Stick slot on your computer You can enjoy still images and movies from the camera more than ever.
Instruction Manual
Page 24
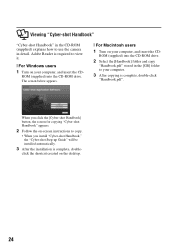
... CD- ROM (supplied) into the CD-ROM drive. Viewing "Cyber-shot Handbook" "Cyber-shot Handbook" in the CD-ROM (supplied) explains how to use the camera in the [GB] folder to view it. [ For Windows users 1 Turn on the desktop. 24
... CD- ROM (supplied) into the CD-ROM drive. Viewing "Cyber-shot Handbook" "Cyber-shot Handbook" in the CD-ROM (supplied) explains how to use the camera in the [GB] folder to view it. [ For Windows users 1 Turn on the desktop. 24

Instruction Manual
Page 27
... W and T ends. - Note that the actual numbers may be less than those indicated in the table depending on the CIPA standard. (CIPA: Camera & Imaging Products Association) • The battery life and the number of images do not change, regardless of use . • The battery life... changing of images you can record/view are decreased under the following conditions: - The camera has been turned on the battery pack • Battery capacity decreases over time and through repeated use . [ When shooting still images Battery life (min.) Approx. 155 No. The battery power is low. - ...
... W and T ends. - Note that the actual numbers may be less than those indicated in the table depending on the CIPA standard. (CIPA: Camera & Imaging Products Association) • The battery life and the number of images do not change, regardless of use . • The battery life... changing of images you can record/view are decreased under the following conditions: - The camera has been turned on the battery pack • Battery capacity decreases over time and through repeated use . [ When shooting still images Battery life (min.) Approx. 155 No. The battery power is low. - ...

Instruction Manual
Page 28
...the capacity of your recording media is the same as the one in the table below, the number of still images and the length of time for movies may be different. • You can select the image ...size from the menu (pages 21, 22). [ The approximate recordable number of still images (Units: Images) Internal Capacity memory "Memory Stick Duo" formatted with the camera Size Approx. 31 MB 128 MB 256 MB 512 MB 1 GB 2 GB ... indicator appears. • When an image was recorded using an earlier Sony model and is played back on the camera, the image may not appear in the actual image size. 28
...the capacity of your recording media is the same as the one in the table below, the number of still images and the length of time for movies may be different. • You can select the image ...size from the menu (pages 21, 22). [ The approximate recordable number of still images (Units: Images) Internal Capacity memory "Memory Stick Duo" formatted with the camera Size Approx. 31 MB 128 MB 256 MB 512 MB 1 GB 2 GB ... indicator appears. • When an image was recorded using an earlier Sony model and is played back on the camera, the image may not appear in the actual image size. 28

Instruction Manual
Page 29
... recordable time of time you can shoot continuously is about 10 minutes. (Units: hour : minute : second) Internal Capacity memory "Memory Stick Duo" formatted with the camera Size Approx. 31 MB 128 MB 256 MB 512 MB 1 GB 2 GB 4 GB 8 GB 640(Fine) - - 0:02:50 0:06:00 0:12:30 0:25:10 0:49...:59:30 24:04:50 • Movies with the size set to [640(Fine)] can only be recorded on a "Memory Stick PRO Duo". • The camera does not support HD recordings or playbacks for movies. The maximum length of movies The numbers in the table below show the approximate maximum recordable...
... recordable time of time you can shoot continuously is about 10 minutes. (Units: hour : minute : second) Internal Capacity memory "Memory Stick Duo" formatted with the camera Size Approx. 31 MB 128 MB 256 MB 512 MB 1 GB 2 GB 4 GB 8 GB 640(Fine) - - 0:02:50 0:06:00 0:12:30 0:25:10 0:49...:59:30 24:04:50 • Movies with the size set to [640(Fine)] can only be recorded on a "Memory Stick PRO Duo". • The camera does not support HD recordings or playbacks for movies. The maximum length of movies The numbers in the table below show the approximate maximum recordable...
Instruction Manual
Page 30
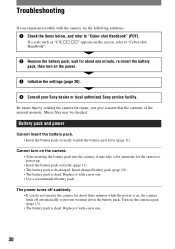
...suddenly. • If you do not operate the camera for about three minutes while the power is discharged. Turn on the power. 3 Initialize the settings (page 20). 4 Consult your Sony dealer or local authorized Sony service facility. Troubleshooting If you experience trouble with ...a new one. 30 Replace it with a new one. • Use a recommended battery pack. Replace it with the camera, try the following solutions. 1 Check...
...suddenly. • If you do not operate the camera for about three minutes while the power is discharged. Turn on the power. 3 Initialize the settings (page 20). 4 Consult your Sony dealer or local authorized Sony service facility. Troubleshooting If you experience trouble with ...a new one. 30 Replace it with a new one. • Use a recommended battery pack. Replace it with the camera, try the following solutions. 1 Check...
Instruction Manual
Page 31
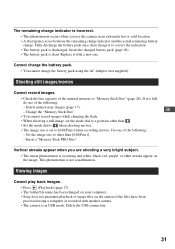
... GB • You cannot record images while charging the flash. • When shooting a still image, set to [640(Fine)] when recording movies. Vertical streaks appear when you use the camera in USB mode. The remaining charge indicator is set the mode dial to a position other streaks...If it with another camera. • The camera is occurring and white, black, red, purple, or other than [640(Fine)]. - Viewing images Cannot play back images. • Press (Playback) (page 17). • The folder/file name has been changed on your computer. • Sony does not guarantee ...
... GB • You cannot record images while charging the flash. • When shooting a still image, set to [640(Fine)] when recording movies. Vertical streaks appear when you use the camera in USB mode. The remaining charge indicator is set the mode dial to a position other streaks...If it with another camera. • The camera is occurring and white, black, red, purple, or other than [640(Fine)]. - Viewing images Cannot play back images. • Press (Playback) (page 17). • The folder/file name has been changed on your computer. • Sony does not guarantee ...
Instruction Manual
Page 32
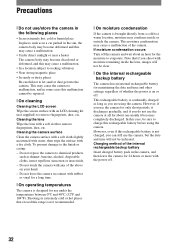
... car parked in the sun, the camera body may become deformed and this may cause a malfunction. • Under direct sunlight or near a heater The camera body may become discolored or deformed, and this rechargeable battery is not charged, you can still use the camera, but the date and time will ...not be clear. [ On the internal rechargeable backup battery The camera has an internal rechargeable battery for maintaining the date and time and other settings ...
... car parked in the sun, the camera body may become deformed and this may cause a malfunction. • Under direct sunlight or near a heater The camera body may become discolored or deformed, and this rechargeable battery is not charged, you can still use the camera, but the date and time will ...not be clear. [ On the internal rechargeable backup battery The camera has an internal rechargeable battery for maintaining the date and time and other settings ...

Instruction Manual
Page 33
...] Image device: 7.18 mm (1/2.5 type) color CCD, Primary color filter Total pixel number of camera: Approx. 8 286 000 pixels Effective pixel number of camera: Approx. 8 083 000 pixels Lens: Carl Zeiss Vario-Tessar 10× zoom lens f = 6.3 - 63 mm (38 - 380 mm (35... mm film equivalent)) F3.5 (W) - 4.4 (T) Exposure control: Automatic exposure, Scene Selection (9 modes) White balance: Automatic, Daylight, Cloudy, Fluorescent 1,2,3, Incandescent, Flash File format (DCF compliant): Still...
...] Image device: 7.18 mm (1/2.5 type) color CCD, Primary color filter Total pixel number of camera: Approx. 8 286 000 pixels Effective pixel number of camera: Approx. 8 083 000 pixels Lens: Carl Zeiss Vario-Tessar 10× zoom lens f = 6.3 - 63 mm (38 - 380 mm (35... mm film equivalent)) F3.5 (W) - 4.4 (T) Exposure control: Automatic exposure, Scene Selection (9 modes) White balance: Automatic, Daylight, Cloudy, Fluorescent 1,2,3, Incandescent, Flash File format (DCF compliant): Still...


