
Operating Instructions
Page 3
...Canada THIS CLASS B DIGITAL APPARATUS COMPLIES WITH CANADIAN...static electricity or electromagnetism causes data transfer to be sure to power this camera. Notice Certain countries and regions may influence the picture and sound of ... handle damaged or leaking Lithium-Ion batteries. If the plug supplied with your nearest Sony service station. THIS DEVICE COMPLIES WITH PART 15 OF THE FCC RULES. Please consult... connection cables shorter than 3 meters (9.8 feet). Should the fuse in the U.S.A. "Memory Stick" N50 For the Customers in the plug supplied need to discontinue midway (fail),...
...Canada THIS CLASS B DIGITAL APPARATUS COMPLIES WITH CANADIAN...static electricity or electromagnetism causes data transfer to be sure to power this camera. Notice Certain countries and regions may influence the picture and sound of ... handle damaged or leaking Lithium-Ion batteries. If the plug supplied with your nearest Sony service station. THIS DEVICE COMPLIES WITH PART 15 OF THE FCC RULES. Please consult... connection cables shorter than 3 meters (9.8 feet). Should the fuse in the U.S.A. "Memory Stick" N50 For the Customers in the plug supplied need to discontinue midway (fail),...
Operating Instructions
Page 4
... bright points (white, red, blue or green in color) that generates strong radio waves or emits radiation. Read this may render the "Memory Stick" unusable or image data breakdown, damage or loss may occur. Notes on locations where you may want to make a trial recording to...or under a quality assurance system certified by the JEITA (Japan Electronics and Information Technology Industries Association). • Playback of images recorded with your camera on other bright light This may cause irrecoverable damage to a malfunction of data loss, always copy (back up) data to record or play...
... bright points (white, red, blue or green in color) that generates strong radio waves or emits radiation. Read this may render the "Memory Stick" unusable or image data breakdown, damage or loss may occur. Notes on locations where you may want to make a trial recording to...or under a quality assurance system certified by the JEITA (Japan Electronics and Information Technology Industries Association). • Playback of images recorded with your camera on other bright light This may cause irrecoverable damage to a malfunction of data loss, always copy (back up) data to record or play...

Operating Instructions
Page 5
.... 5 Trademarks • is a trademark of Sony Corporation. • "Memory Stick," , "Memory Stick PRO," , "Memory Stick Duo," , "Memory Stick PRO Duo," , "MagicGate," are trademarks of Sony Corporation. • "InfoLITHIUM" is a trademark of Sony Corporation. • Picture Package is a trademark of Sony Corporation. • Microsoft, Windows, Windows Media,...States and/or other countries. • Intel, MMX, and Pentium are not actual images shot using this camera. in general, trademarks or registered trademarks of their respective developers or manufacturers.
.... 5 Trademarks • is a trademark of Sony Corporation. • "Memory Stick," , "Memory Stick PRO," , "Memory Stick Duo," , "Memory Stick PRO Duo," , "MagicGate," are trademarks of Sony Corporation. • "InfoLITHIUM" is a trademark of Sony Corporation. • Picture Package is a trademark of Sony Corporation. • Microsoft, Windows, Windows Media,...States and/or other countries. • Intel, MMX, and Pentium are not actual images shot using this camera. in general, trademarks or registered trademarks of their respective developers or manufacturers.
Operating Instructions
Page 6
... auto focus method 49 Choosing a focus range finder frame - Picture Effect 62 Using the Cyber-shot Station 62 Using auto mode 23 Checking the last image shot - Scene Selection 34 Viewing still images Viewing images on the LCD screen of contents Read this first 4 Identifying the parts... items in Multi Burst mode - Table of your camera 38 Viewing images on a TV screen 40 Deleting still images Deleting images 42 Formatting a "Memory Stick 44 Before advanced operations How to setup and operate your camera on a still image 33 Shooting according to the subject - White ...
... auto focus method 49 Choosing a focus range finder frame - Picture Effect 62 Using the Cyber-shot Station 62 Using auto mode 23 Checking the last image shot - Scene Selection 34 Viewing still images Viewing images on the LCD screen of contents Read this first 4 Identifying the parts... items in Multi Burst mode - Table of your camera 38 Viewing images on a TV screen 40 Deleting still images Deleting images 42 Formatting a "Memory Stick 44 Before advanced operations How to setup and operate your camera on a still image 33 Shooting according to the subject - White ...

Operating Instructions
Page 7
...Rotate 66 Playing back images shot in Multi Burst mode 67 Playing back continuously 67 Playing back frame by frame 67 Still image editing Protecting images - Slide show 65 Rotating still images - For Windows users 85 Installing the USB driver 86 Connecting the camera to your computer 87 ... Folder 63 Enlarging a portion of images that can be saved/shooting time 113 Menu items 114 SET UP items 117 Precautions 119 The "Memory Stick 120 The "InfoLITHIUM" battery pack ........121 Specifications 122 The LCD screen 124 Index Index 128 7 If a code starting with an...
...Rotate 66 Playing back images shot in Multi Burst mode 67 Playing back continuously 67 Playing back frame by frame 67 Still image editing Protecting images - Slide show 65 Rotating still images - For Windows users 85 Installing the USB driver 86 Connecting the camera to your computer 87 ... Folder 63 Enlarging a portion of images that can be saved/shooting time 113 Menu items 114 SET UP items 117 Precautions 119 The "Memory Stick 120 The "InfoLITHIUM" battery pack ........121 Specifications 122 The LCD screen 124 Index Index 128 7 If a code starting with an...

Operating Instructions
Page 9
...) G For shooting: Zoom (W/T) buttons (25) For viewing: / (Playback zoom) buttons (64)/ (Index) button (39) H POWER lamp (15) I Mode dial (10, 114) J POWER button (15) K Battery/"Memory Stick" cover L Access lamp (19) M RESET button (100) N Battery eject lever (11) O Hook for wrist strap Attaching the wrist strap 9 D (Display/LCD on the LCD...
...) G For shooting: Zoom (W/T) buttons (25) For viewing: / (Playback zoom) buttons (64)/ (Index) button (39) H POWER lamp (15) I Mode dial (10, 114) J POWER button (15) K Battery/"Memory Stick" cover L Access lamp (19) M RESET button (100) N Battery eject lever (11) O Hook for wrist strap Attaching the wrist strap 9 D (Display/LCD on the LCD...

Operating Instructions
Page 11
... , Open the DC IN jack cover and connect the AC Adaptor (supplied) to turn off your camera. Charging the battery pack Getting started DC IN jack cover Getting started 1 , Open the battery/"Memory Stick" cover. Slide the cover in the arrow direction as this may not properly charge the battery ...that tip of the v marks on the battery insertion slot. • The battery pack is firmly inserted all the way, then close the battery/"Memory Stick" cover. You can use the dirty plug. Make sure the battery pack is easily inserted by pushing the battery eject lever at the front...
... , Open the DC IN jack cover and connect the AC Adaptor (supplied) to turn off your camera. Charging the battery pack Getting started DC IN jack cover Getting started 1 , Open the battery/"Memory Stick" cover. Slide the cover in the arrow direction as this may not properly charge the battery ...that tip of the v marks on the battery insertion slot. • The battery pack is firmly inserted all the way, then close the battery/"Memory Stick" cover. You can use the dirty plug. Make sure the battery pack is easily inserted by pushing the battery eject lever at the front...

Operating Instructions
Page 12
... pack. • Be careful not to charge a completely discharged battery pack using the AC Adaptor at a temperature of your camera. 12 To remove the battery pack Battery eject lever Open the battery/"Memory Stick" cover. The /CHG lamp lights up when charging begins, and goes off , it . Battery remaining indicator The battery...
... pack. • Be careful not to charge a completely discharged battery pack using the AC Adaptor at a temperature of your camera. 12 To remove the battery pack Battery eject lever Open the battery/"Memory Stick" cover. The /CHG lamp lights up when charging begins, and goes off , it . Battery remaining indicator The battery...

Operating Instructions
Page 13
... power turns on and off once every ten times - [AF Mode] is based on and off many times - The camera has been turned on CIPA standard. (CIPA: Camera & Imaging Products Association) Viewing still images2) Image size 5M VGA (E-Mail) NP-FR1 (supplied) No. Quality) is set to [Monitor] - of images... when you use it more and more, and as necessary. Note that the actual numbers may be recorded or viewed take into account changing the "Memory Stick" as time passes (page 121). Shooting one time every 30 seconds - The zoom is used - The zoom is switched alternately between the...
... power turns on and off once every ten times - [AF Mode] is based on and off many times - The camera has been turned on CIPA standard. (CIPA: Camera & Imaging Products Association) Viewing still images2) Image size 5M VGA (E-Mail) NP-FR1 (supplied) No. Quality) is set to [Monitor] - of images... when you use it more and more, and as necessary. Note that the actual numbers may be recorded or viewed take into account changing the "Memory Stick" as time passes (page 121). Shooting one time every 30 seconds - The zoom is used - The zoom is switched alternately between the...

Operating Instructions
Page 19
...of the arrow. • For details on "Memory Stick," see page 120. 2 Label side , Insert the "Memory Stick." Shooting still images Inserting and removing a "Memory Stick" Terminal side Shooting still images Access lamp 1 , Open the battery/"Memory Stick" cover. Insert the "Memory Stick" all the way in until it correctly...or playback may be carried out. 3 , Close the battery/"Memory Stick" cover. Slide the cover in the illustration. • Whenever you do not insert it clicks as it out. • Whenever the access lamp is lit, the camera is recording or reading out an image.
...of the arrow. • For details on "Memory Stick," see page 120. 2 Label side , Insert the "Memory Stick." Shooting still images Inserting and removing a "Memory Stick" Terminal side Shooting still images Access lamp 1 , Open the battery/"Memory Stick" cover. Insert the "Memory Stick" all the way in until it correctly...or playback may be carried out. 3 , Close the battery/"Memory Stick" cover. Slide the cover in the illustration. • Whenever you do not insert it clicks as it out. • Whenever the access lamp is lit, the camera is recording or reading out an image.

Operating Instructions
Page 21
Shooting still images 1944 480 Image size and quality You can choose image size (number of pixels) and image quality (compression ratio) based on the image size ... the kind of images you get better quality. Short description of the image size The following illustration shows a brief image using the camera. 2) This option records images in the "Memory Stick" is [5M]. The image size is shown by the number of images. • For attaching images to shoot by checking the...
Shooting still images 1944 480 Image size and quality You can choose image size (number of pixels) and image quality (compression ratio) based on the image size ... the kind of images you get better quality. Short description of the image size The following illustration shows a brief image using the camera. 2) This option records images in the "Memory Stick" is [5M]. The image size is shown by the number of images. • For attaching images to shoot by checking the...

Operating Instructions
Page 22
...compression • To shoot more images. (normal) The number of images that can be saved in a "Memory Stick"3) The number of images that can be saved in Fine (Standard)4) mode are shown below. (Units:...the image quality (compression ratio) setup, see page 47. • When the images recorded using other Sony devices are played back, the image size indication may be different from the actual image size. •...; When the images are viewed on the LCD screen of the camera, they all look the same size. • Number of shooting images can differ from these values...
...compression • To shoot more images. (normal) The number of images that can be saved in a "Memory Stick"3) The number of images that can be saved in Fine (Standard)4) mode are shown below. (Units:...the image quality (compression ratio) setup, see page 47. • When the images recorded using other Sony devices are played back, the image size indication may be different from the actual image size. •...; When the images are viewed on the LCD screen of the camera, they all look the same size. • Number of shooting images can differ from these values...

Operating Instructions
Page 23
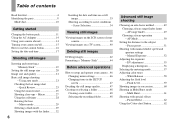
...use the macro mode (page 27). • The frame indicated on your camera. • You can create a new folder in the "Memory Stick" and select the folder for storing images (page 48). 2 , Hold the camera steadily with the camera, be careful so that your fingers do not block the lens, finder window... 1 , Set the mode dial to , and rotate the lens portion to a subject is approx. 50 cm (19 3/4 inches). Using auto mode Holding the camera correctly Mode dial When shooting pictures with both hands and position a subject in the center of the focus frame. • The minimum focal distance to...
...use the macro mode (page 27). • The frame indicated on your camera. • You can create a new folder in the "Memory Stick" and select the folder for storing images (page 48). 2 , Hold the camera steadily with the camera, be careful so that your fingers do not block the lens, finder window... 1 , Set the mode dial to , and rotate the lens portion to a subject is approx. 50 cm (19 3/4 inches). Using auto mode Holding the camera correctly Mode dial When shooting pictures with both hands and position a subject in the center of the focus frame. • The minimum focal distance to...
Operating Instructions
Page 24
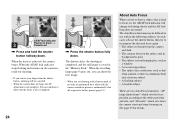
.../AF lock indicator stops flashing and remains on, the camera is ready for details. The shutter clicks, the shooting is completed, and the still image is hard to focus on, the AE/AF ...you try to shoot, but the focus is achieved, the camera beeps. When the recording lamp (page 9) goes out, you can continue to recompose the shot and focus again. • The subject is distant from ...the camera starts and stops focusing on , Press and hold the shutter button halfway down . 60min VGA FINE 101 96 60min VGA 101 95 S AF 30 F3.5 AE/AF lock indicator 3 Flashes in the "Memory ...
.../AF lock indicator stops flashing and remains on, the camera is ready for details. The shutter clicks, the shooting is completed, and the still image is hard to focus on, the AE/AF ...you try to shoot, but the focus is achieved, the camera beeps. When the recording lamp (page 9) goes out, you can continue to recompose the shot and focus again. • The subject is distant from ...the camera starts and stops focusing on , Press and hold the shutter button halfway down . 60min VGA FINE 101 96 60min VGA 101 95 S AF 30 F3.5 AE/AF lock indicator 3 Flashes in the "Memory ...

Operating Instructions
Page 44
... images with B on the control button, then press z. 1 , Insert the "Memory Stick" you want to format into the camera. • The term "formatting" means preparing a "Memory Stick" to record images; Formatting a "Memory Stick" 4 , Press (delete). this process is also called "initialization." • The supplied "Memory Stick" and those available commercially, are also erased. 44 To...
... images with B on the control button, then press z. 1 , Insert the "Memory Stick" you want to format into the camera. • The term "formatting" means preparing a "Memory Stick" to record images; Formatting a "Memory Stick" 4 , Press (delete). this process is also called "initialization." • The supplied "Memory Stick" and those available commercially, are also erased. 44 To...

Operating Instructions
Page 45
... the control button, then press z. folder: 1 2 60min Format All data will be erased Ready? The "Formatting" message appears on the camera. Memory Stick Tool Format: OK Create REC. folder: Cancel Change REC. Select [Format] with v on the control button, then press B. OK Cancel 3 , Select... (Memory Stick Tool) with v on the control button. Select [OK] with v/V on the control button, then press z. When this message disappears, the format is complete. 45 Deleting still images 2 , Set the mode dial to SET UP, and...
... the control button, then press z. folder: 1 2 60min Format All data will be erased Ready? The "Formatting" message appears on the camera. Memory Stick Tool Format: OK Create REC. folder: Cancel Change REC. Select [Format] with v on the control button, then press B. OK Cancel 3 , Select... (Memory Stick Tool) with v on the control button. Select [OK] with v/V on the control button, then press z. When this message disappears, the format is complete. 45 Deleting still images 2 , Set the mode dial to SET UP, and...

Operating Instructions
Page 48
... you create a new folder, you cannot delete the new folder with the camera. • Images are recorded in the newly created folder until a different folder is created with a number one folder. b Select (Memory Stick Tool) with B/v , then press z. Select REC. When the folder... creating folder screen appears. 60min Create REC. You can create multiple folders within a "Memory Stick." OK Cancel c Select [OK] with v/V, [Create REC. Creating or selecting a folder Your camera can create folders up to store images. To cancel changing the recording folder In Step ...
... you create a new folder, you cannot delete the new folder with the camera. • Images are recorded in the newly created folder until a different folder is created with a number one folder. b Select (Memory Stick Tool) with B/v , then press z. Select REC. When the folder... creating folder screen appears. 60min Create REC. You can create multiple folders within a "Memory Stick." OK Cancel c Select [OK] with v/V, [Create REC. Creating or selecting a folder Your camera can create folders up to store images. To cancel changing the recording folder In Step ...

Operating Instructions
Page 60
...press and hold the shutter button. Mode dial Shutter button MENU Control button • When the battery level is insufficient or the capacity of the "Memory Stick" is used up, recording stops even if you release the shutter button in succession Used to , P, M or SCN. The menu appears... the image. The maxium number of images you press and hold the shutter button. You can shoot images until the maximum number of images are shot when you can do the next shooting after "Recording" disappears from the LCD screen. c Select [ ] (Flash Level) with b/B, then select the desired ...
...press and hold the shutter button. Mode dial Shutter button MENU Control button • When the battery level is insufficient or the capacity of the "Memory Stick" is used up, recording stops even if you release the shutter button in succession Used to , P, M or SCN. The menu appears... the image. The maxium number of images you press and hold the shutter button. You can shoot images until the maximum number of images are shot when you can do the next shooting after "Recording" disappears from the LCD screen. c Select [ ] (Flash Level) with b/B, then select the desired ...

Operating Instructions
Page 63
... the mode dial to both the previous and next folders. When multiple folders are created in the "Memory Stick" When the first or last image in this folder" appears. Advanced still image viewing 63 Advanced still image viewing On the single screen 60min VGA 101 9/9 101-0009 2005 1 1 10:30PM BACK/NEXT VOLUME...
... the mode dial to both the previous and next folders. When multiple folders are created in the "Memory Stick" When the first or last image in this folder" appears. Advanced still image viewing 63 Advanced still image viewing On the single screen 60min VGA 101 9/9 101-0009 2005 1 1 10:30PM BACK/NEXT VOLUME...

Operating Instructions
Page 65
... cannot trim images displayed with Quick Review. The menu appears. Set the following items with B, then press z. All: Plays back all the images in the "Memory Stick." b Select [Trimming] with v/V/b/B. The image is recorded, and the image on the LCD screen returns to . c Select (Slide) with V/B, then press z. Repeat On: Plays... folder, and the original image is useful for checking your images, or for giving a presentation. Off: Plays through the images one after playback zoom. Advanced still image viewing 65 Trimming a Press MENU after another.
... cannot trim images displayed with Quick Review. The menu appears. Set the following items with B, then press z. All: Plays back all the images in the "Memory Stick." b Select [Trimming] with v/V/b/B. The image is recorded, and the image on the LCD screen returns to . c Select (Slide) with V/B, then press z. Repeat On: Plays... folder, and the original image is useful for checking your images, or for giving a presentation. Off: Plays through the images one after playback zoom. Advanced still image viewing 65 Trimming a Press MENU after another.

