

Operating Instructions
Page 1
...started Shooting still images Viewing still images Deleting still images Before advanced operations Advanced still image shooting Advanced still image viewing Still image editing Still image printing PictBridge printer) Enjoying movies Enjoying images on the bottom. Owner's Record The model and serial numbers are located on your Sony dealer regarding this manual thoroughly, and retain it for future reference. Refer to these numbers whenever you call upon your computer _______ Troubleshooting Additional information Index Model No. Digital Still Camera Operating Instructions...
...started Shooting still images Viewing still images Deleting still images Before advanced operations Advanced still image shooting Advanced still image viewing Still image editing Still image printing PictBridge printer) Enjoying movies Enjoying images on the bottom. Owner's Record The model and serial numbers are located on your Sony dealer regarding this manual thoroughly, and retain it for future reference. Refer to these numbers whenever you call upon your computer _______ Troubleshooting Additional information Index Model No. Digital Still Camera Operating Instructions...
Operating Instructions
Page 3
... electromagnetism causes data transfer to attach the fuse cover after you change the fuse. Notice for your nearest Sony service station. If you . For the Customers in the United Kingdom A moulded plug complying with BS 1363 is fitted to this camera. Attention The electromagnetic field at the specific frequencies may regulate disposal of the battery used rechargeable batteries to the...
... electromagnetism causes data transfer to attach the fuse cover after you change the fuse. Notice for your nearest Sony service station. If you . For the Customers in the United Kingdom A moulded plug complying with BS 1363 is fitted to this camera. Attention The electromagnetic field at the specific frequencies may regulate disposal of the battery used rechargeable batteries to the...
Operating Instructions
Page 4
... repair. Notes on image data compatibility • This camera conforms with other equipment on your camera on copyright Television programs, films, video tapes, and other equipment and playback of your camera or recording medium, etc. This is working correctly. Carl Zeiss lens This camera is equipped with a Carl Zeiss lens which is not possible due to a disk. Exposing the LCD screen, the finder or the lens to your eyes...
... repair. Notes on image data compatibility • This camera conforms with other equipment on your camera on copyright Television programs, films, video tapes, and other equipment and playback of your camera or recording medium, etc. This is working correctly. Carl Zeiss lens This camera is equipped with a Carl Zeiss lens which is not possible due to a disk. Exposing the LCD screen, the finder or the lens to your eyes...
Operating Instructions
Page 6
... your camera 38 Viewing images on a TV screen 40 Deleting still images Deleting images 42 Formatting a "Memory Stick 44 Before advanced operations How to setup and operate your camera on/off 15 How to use the control button 16 Setting the date and time 17 Shooting still images Inserting and removing a "Memory Stick 19 Setting the still image size 20 Image size and quality 21 Basic still image shooting - White Balance 58 Adjusting the flash level - Using auto mode 23 Checking the last image shot - Manual Exposure 52 Adjusting the exposure - Quick Review 25 Using the zoom...
... your camera 38 Viewing images on a TV screen 40 Deleting still images Deleting images 42 Formatting a "Memory Stick 44 Before advanced operations How to setup and operate your camera on/off 15 How to use the control button 16 Setting the date and time 17 Shooting still images Inserting and removing a "Memory Stick 19 Setting the still image size 20 Image size and quality 21 Basic still image shooting - White Balance 58 Adjusting the flash level - Using auto mode 23 Checking the last image shot - Manual Exposure 52 Adjusting the exposure - Quick Review 25 Using the zoom...

Operating Instructions
Page 7
... printer) Connecting to a PictBridge compliant printer 73 Printing images 74 Printing index-images 76 Enjoying movies Shooting movies 80 Viewing movies on the LCD screen ....... 81 Deleting movies 82 Cutting movies 83 Enjoying images on your computer 90 Image file storage destinations and file names 91 Viewing an image previously copied to a computer 93 Installing "Picture Package 93 Copying images using "Picture Package 95 Using "Picture Package 96 Copying images to print - Folder 63 Enlarging a portion of images that can be saved/shooting time 113 Menu items 114 SET...
... printer) Connecting to a PictBridge compliant printer 73 Printing images 74 Printing index-images 76 Enjoying movies Shooting movies 80 Viewing movies on the LCD screen ....... 81 Deleting movies 82 Cutting movies 83 Enjoying images on your computer 90 Image file storage destinations and file names 91 Viewing an image previously copied to a computer 93 Installing "Picture Package 93 Copying images using "Picture Package 95 Using "Picture Package 96 Copying images to print - Folder 63 Enlarging a portion of images that can be saved/shooting time 113 Menu items 114 SET...

Operating Instructions
Page 12
... your camera. 12 To remove the battery pack Battery eject lever Open the battery/"Memory Stick" cover. Slide the battery eject lever in the direction of 25°C (77°F). Remaining indicator 60min Remaining time • When you switch the LCD screen on the LCD screen shows the remaining shooting or viewing time. The /CHG lamp lights up when charging begins, and goes off , it . Charging time Approximate time to charge a completely discharged battery pack using the...
... your camera. 12 To remove the battery pack Battery eject lever Open the battery/"Memory Stick" cover. Slide the battery eject lever in the direction of 25°C (77°F). Remaining indicator 60min Remaining time • When you switch the LCD screen on the LCD screen shows the remaining shooting or viewing time. The /CHG lamp lights up when charging begins, and goes off , it . Charging time Approximate time to charge a completely discharged battery pack using the...
Operating Instructions
Page 16
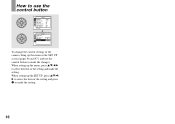
... menu or the SET UP screen (pages 46 and 47), and use the control button Camera AF Mode: Digital Zoom: Date/Time: 1 Red Eye Reduction: 2 AF Illuminator: Auto Review: Single Smart Off Off Auto Off SELECT Setup 2 File Number: USB Connect: Video Out: 1 Clock Set: OK Cancel To change the current settings of the camera, bring up the SET UP, press v/V/b/ B to select the item or the setting and press z to make the setting. 16 How to use the control button to make the changes. When setting...
... menu or the SET UP screen (pages 46 and 47), and use the control button Camera AF Mode: Digital Zoom: Date/Time: 1 Red Eye Reduction: 2 AF Illuminator: Auto Review: Single Smart Off Off Auto Off SELECT Setup 2 File Number: USB Connect: Video Out: 1 Clock Set: OK Cancel To change the current settings of the camera, bring up the SET UP, press v/V/b/ B to select the item or the setting and press z to make the setting. 16 How to use the control button to make the changes. When setting...
Operating Instructions
Page 47
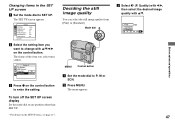
... SET UP screen a Set the mode dial to P, M or SCN. Camera AF Mode: Digital Zoom: Date/Time: 1 Red Eye Reduction: 2 AF Illuminator: Auto Review: Single Smart Off Off Auto Off SELECT b Select the setting item you select turns yellow. To turn off the SET UP screen display Set the mode dial to any position other than SET UP. • For details on the control button. c Select (P. The menu appears. Fine FINE Standard P.Quality WB ISO 47 Before advanced operations...
... SET UP screen a Set the mode dial to P, M or SCN. Camera AF Mode: Digital Zoom: Date/Time: 1 Red Eye Reduction: 2 AF Illuminator: Auto Review: Single Smart Off Off Auto Off SELECT b Select the setting item you select turns yellow. To turn off the SET UP screen display Set the mode dial to any position other than SET UP. • For details on the control button. c Select (P. The menu appears. Fine FINE Standard P.Quality WB ISO 47 Before advanced operations...
Operating Instructions
Page 73
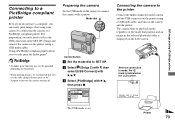
...the printer using a USB multi cable. The camera turns to playback mode regardless of the mode dial position and an image in the SET UP settings and connect the camera to a PictBridge compliant printer. Printer 73 Still image printing (PictBridge printer) Using a PictBridge compliant printer allows you to SET UP. Control button a Set the mode dial to easily print the Index prints*. * An Index print function may not be provided depending on the LCD screen. b Select (Setup 2) with V, then 2 select [USB Connect] with B/v, then press z. Setup 2 File Number: USB Connect...
...the printer using a USB multi cable. The camera turns to playback mode regardless of the mode dial position and an image in the SET UP settings and connect the camera to a PictBridge compliant printer. Printer 73 Still image printing (PictBridge printer) Using a PictBridge compliant printer allows you to SET UP. Control button a Set the mode dial to easily print the Index prints*. * An Index print function may not be provided depending on the LCD screen. b Select (Setup 2) with V, then 2 select [USB Connect] with B/v, then press z. Setup 2 File Number: USB Connect...

Operating Instructions
Page 85
... operations may not recover at the factory. See the Sony Website for a USB connection when connecting with Windows XP. When using Windows XP, you install "Picture Package," the USB driver will be installed at the same time. When you need not install the USB driver. Copying images to your computer To select the folder, follow the procedure on your computer - When connected to a computer, only the data in the folder selected by the camera is used to transfer images...
... operations may not recover at the factory. See the Sony Website for a USB connection when connecting with Windows XP. When using Windows XP, you install "Picture Package," the USB driver will be installed at the same time. When you need not install the USB driver. Copying images to your computer To select the folder, follow the procedure on your computer - When connected to a computer, only the data in the folder selected by the camera is used to transfer images...

Operating Instructions
Page 88
... turning off the camera. For Windows 98 or 98SE users Confirm that image with the new one, the original file data is unnecessary for Windows XP users. 5 Disconnect the USB multi cable, remove the "Memory Stick," or turn off the camera during a USB connection For Windows 2000, Me, or XP users 1 Double-click on page 93. 88 To play back that the access indicators (page 87) on the screen are copied to display the menu...
... turning off the camera. For Windows 98 or 98SE users Confirm that image with the new one, the original file data is unnecessary for Windows XP users. 5 Disconnect the USB multi cable, remove the "Memory Stick," or turn off the camera during a USB connection For Windows 2000, Me, or XP users 1 Double-click on page 93. 88 To play back that the access indicators (page 87) on the screen are copied to display the menu...

Operating Instructions
Page 93
... MB or more is recommended) Hard Disk: Disk space required for installation: approximately 200 MB Display: A video card equipped with a computer or images shot using the camera. Viewing an image previously copied to a computer This operation is required for viewing image files that of a movie is "MPG". For details on the setup of the computer. Change the file name to 999. ssss stands for any number within the range from 100 to...
... MB or more is recommended) Hard Disk: Disk space required for installation: approximately 200 MB Display: A video card equipped with a computer or images shot using the camera. Viewing an image previously copied to a computer This operation is required for viewing image files that of a movie is "MPG". For details on the setup of the computer. Change the file name to 999. ssss stands for any number within the range from 100 to...

Operating Instructions
Page 94
... for operating the recording device is compatible with the DirectX technology. c Select the desired language, then click [Next]. • This section describes the English screen. e Click [Next]. a Turn on your computer, and insert the supplied CD-ROM into the CD-ROM drive. If you have not yet installed the USB driver (page 86), do not connect the camera to CD-Rs. The installation menu screen...
... for operating the recording device is compatible with the DirectX technology. c Select the desired language, then click [Next]. • This section describes the English screen. e Click [Next]. a Turn on your computer, and insert the supplied CD-ROM into the CD-ROM drive. If you have not yet installed the USB driver (page 86), do not connect the camera to CD-Rs. The installation menu screen...

Operating Instructions
Page 99
... the disk name and its destination. Confirm the set up the menu background, buttons, titles, and so on, then click [Next]. The preparation for storing the file on a CD-R is required to the right frame. 2 Click [Next]. 99 a Installing "ImageMixer VCD2" 1 Turn on your computer 1 Open the [ImageMixer] folder in [Application]. 2 Click [ImageMixer VCD2]. 3 Click [Video CD]. The selected folder moves...
... the disk name and its destination. Confirm the set up the menu background, buttons, titles, and so on, then click [Next]. The preparation for storing the file on a CD-R is required to the right frame. 2 Click [Next]. 99 a Installing "ImageMixer VCD2" 1 Turn on your computer 1 Open the [ImageMixer] folder in [Application]. 2 Click [ImageMixer VCD2]. 3 Click [Video CD]. The selected folder moves...

Operating Instructions
Page 106
... your computer device because you installed the "USB Driver" from your camera. Cause - p Use the supplied USB multi cable (page 87). • The USB multi cable is too low. Make sure that was formatted using a computer. USB hub (page 85). • The USB driver is not set to [Normal] in the SET p Set it again. p Use a "Memory Stick" that "USB Mode" is displayed on the camera (page 15). • The battery level is not connected securely.
... your computer device because you installed the "USB Driver" from your camera. Cause - p Use the supplied USB multi cable (page 87). • The USB multi cable is too low. Make sure that was formatted using a computer. USB hub (page 85). • The USB driver is not set to [Normal] in the SET p Set it again. p Use a "Memory Stick" that "USB Mode" is displayed on the camera (page 15). • The battery level is not connected securely.
Operating Instructions
Page 110
... write-protect switch on the "Memory Stick." (For example: 123MSDCF and 123ABCDE) Select other folders (page 48). Set it to select the folder that cannot be used with your camera (page 120). • The "Memory Stick" is damaged. • The terminal section of the name is not the "InfoLITHIUM" type. File error • An error occurred while playing back the image. System error Memory Stick error • Turn the power...
... write-protect switch on the "Memory Stick." (For example: 123MSDCF and 123ABCDE) Select other folders (page 48). Set it to select the folder that cannot be used with your camera (page 120). • The "Memory Stick" is damaged. • The terminal section of the name is not the "InfoLITHIUM" type. File error • An error occurred while playing back the image. System error Memory Stick error • Turn the power...
Operating Instructions
Page 120
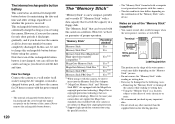
... delete images when the write-protect switch is not guaranteed to a wall outlet (wall socket) using the camera. MagicGate is copyright protection technology that can still use of whether the power is continually charged as long as you do not record the date and time. Using the "Memory Stick" in the following cases: - This rechargeable button battery is on or off. The internal rechargeable button battery This camera has an internal rechargeable button battery for maintaining the date...
... delete images when the write-protect switch is not guaranteed to a wall outlet (wall socket) using the camera. MagicGate is copyright protection technology that can still use of whether the power is continually charged as long as you do not record the date and time. Using the "Memory Stick" in the following cases: - This rechargeable button battery is on or off. The internal rechargeable button battery This camera has an internal rechargeable button battery for maintaining the date...

Operating Instructions
Page 128
..., 14 Deleting movies 82 Deleting still images 42 Digital zoom 25 Divide 83 DPOF 71 E EV adjustment 55 F File names 91 File storage destinations 91 Finder 32 Fireworks 35 Flash 29 Flash Level 59 Fluorescent 58 Focus preset 51 Folder 48, 63 Format 44 Index H High-speed shutter 35 Histogram 56 I Image quality 47 Image size 20, 21 ImageMixer VCD2 98 Incandescent 59 Index screen 38 "InfoLITHIUM" battery pack 121 Inserting a "Memory Stick...
..., 14 Deleting movies 82 Deleting still images 42 Digital zoom 25 Divide 83 DPOF 71 E EV adjustment 55 F File names 91 File storage destinations 91 Finder 32 Fireworks 35 Flash 29 Flash Level 59 Fluorescent 58 Focus preset 51 Folder 48, 63 Format 44 Index H High-speed shutter 35 Histogram 56 I Image quality 47 Image size 20, 21 ImageMixer VCD2 98 Incandescent 59 Index screen 38 "InfoLITHIUM" battery pack 121 Inserting a "Memory Stick...

Marketing Specifications
Page 1
..., date and index print. connecting a variety of hardware and software applications. 9 Shot Burst Mode Capture up to let you zoom into the portion of interest by cropping the image size - Perfect for USB Transfer. Selectable 1/7.5, 1/15, 1/30 second. It's especially helpful in the DSC-F88 not only improves picture quality and clarity but also improves camera response time, decreases shutter lag and improves battery stamina. The supplied AC-LS5 adapter/charger...
..., date and index print. connecting a variety of hardware and software applications. 9 Shot Burst Mode Capture up to let you zoom into the portion of interest by cropping the image size - Perfect for USB Transfer. Selectable 1/7.5, 1/15, 1/30 second. It's especially helpful in the DSC-F88 not only improves picture quality and clarity but also improves camera response time, decreases shutter lag and improves battery stamina. The supplied AC-LS5 adapter/charger...

Marketing Specifications
Page 2
... a trademark of Carl Zeiss. DSC-F88 Cyber-shot® Digital Still Camera ADDITIONAL FEATURES 14-Bit DXP A/D Conversion Auto Bright Monitoring Clear Color/Clear Luminance NR Eye-Level True Zoom Optical Viewfinder MPEG1 Cue, Review and Divide Multi-Use Terminal Playback Zoom Selectable Sharpness/Contrast/ Saturation Supports High Speed USB 2.0 S P E C I F I C AT I O N S Imaging Device: 1/2.4" 5.1 Megapixel Super HAD™ CCD Recording Media: Memory Stick® Media, Memory Stick PRO™ Media Lens Construction: 10 Elements in...
... a trademark of Carl Zeiss. DSC-F88 Cyber-shot® Digital Still Camera ADDITIONAL FEATURES 14-Bit DXP A/D Conversion Auto Bright Monitoring Clear Color/Clear Luminance NR Eye-Level True Zoom Optical Viewfinder MPEG1 Cue, Review and Divide Multi-Use Terminal Playback Zoom Selectable Sharpness/Contrast/ Saturation Supports High Speed USB 2.0 S P E C I F I C AT I O N S Imaging Device: 1/2.4" 5.1 Megapixel Super HAD™ CCD Recording Media: Memory Stick® Media, Memory Stick PRO™ Media Lens Construction: 10 Elements in...


