Operating Instructions
Page 4
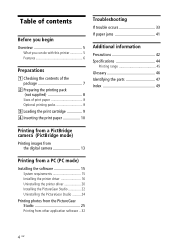
... 6 Preparations 1 Checking the contents of the package 7 2 Preparing the printing pack (not supplied 8 Sizes of print paper 8 Optional printing packs 8 3 Loading the print cartridge 9 4 Inserting the print paper 10 Troubleshooting If trouble occurs 33 If paper jams 41 Additional information Precautions 42 Specifications 44 Printing range 45 Glossary 46 Identifying the parts 47 Index...
... 6 Preparations 1 Checking the contents of the package 7 2 Preparing the printing pack (not supplied 8 Sizes of print paper 8 Optional printing packs 8 3 Loading the print cartridge 9 4 Inserting the print paper 10 Troubleshooting If trouble occurs 33 If paper jams 41 Additional information Precautions 42 Specifications 44 Printing range 45 Glossary 46 Identifying the parts 47 Index...
Operating Instructions
Page 12
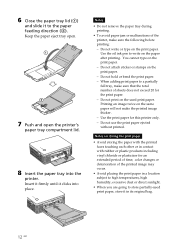
...open the printer's paper tray compartment lid. 8 Insert the paper tray into place. Use the print paper for the print paper. - Notes on the same paper will not make sure the following before printing: - Notes • Do not remove the paper tray during printing. • To avoid paper jam or malfunctions of ...sheets does not exceed 20 for this printer only. - color changes or deterioration of time; You cannot type on the paper after printing. Use the oil ink pen to...
...open the printer's paper tray compartment lid. 8 Insert the paper tray into place. Use the print paper for the print paper. - Notes on the same paper will not make sure the following before printing: - Notes • Do not remove the paper tray during printing. • To avoid paper jam or malfunctions of ...sheets does not exceed 20 for this printer only. - color changes or deterioration of time; You cannot type on the paper after printing. Use the oil ink pen to...
Operating Instructions
Page 31
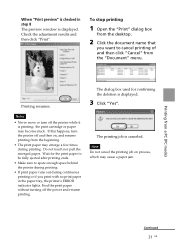
...while it is displayed. 3 Click "Yes". Printing resumes. Do not touch nor pull the emerged paper. Notes • Never move or turn the printer off and then on process, which may cause a paper jam. If this happens, turn off the power and resume printing. Note Do not cancel the printing job... on , and resume printing from the beginning. • The print paper may become stuck. The printing job is displayed. Wait for ...
...while it is displayed. 3 Click "Yes". Printing resumes. Do not touch nor pull the emerged paper. Notes • Never move or turn the printer off and then on process, which may cause a paper jam. If this happens, turn off the power and resume printing. Note Do not cancel the printing job... on , and resume printing from the beginning. • The print paper may become stuck. The printing job is displayed. Wait for ...
Operating Instructions
Page 37
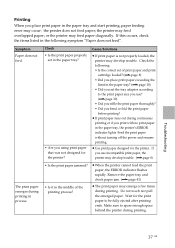
... occurs, check the items listed in the paper tray, the printer's ERROR indicator lights. c The print paper may feed paper diagonally. Check the following symptom "Paper does not feed". c Use print paper designed for the print paper to be fully ejected after printing ends. Remove the paper tray and check paper jam. (.page 41) • Is it in the...
... occurs, check the items listed in the paper tray, the printer's ERROR indicator lights. c The print paper may feed paper diagonally. Check the following symptom "Paper does not feed". c Use print paper designed for the print paper to be fully ejected after printing ends. Remove the paper tray and check paper jam. (.page 41) • Is it in the...

Operating Instructions
Page 40
... cartridge smoothly. The print paper is jammed. See "If paper jams" (.page 41) and remove jammed paper from the printer. If jammed paper cannot be removed, contact the Sony service facilities. If jammed paper cannot be removed, contact the Sony service facilities. 40 GB c Paper is not ejected. If this does not solve the problem, contact Sony service facilities or your Sony dealer. c Remove the...
... cartridge smoothly. The print paper is jammed. See "If paper jams" (.page 41) and remove jammed paper from the printer. If jammed paper cannot be removed, contact the Sony service facilities. If jammed paper cannot be removed, contact the Sony service facilities. 40 GB c Paper is not ejected. If this does not solve the problem, contact Sony service facilities or your Sony dealer. c Remove the...
Operating Instructions
Page 41
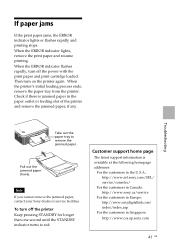
...sony.com 41 GB When the ERROR indicator lights, remove the print paper and resume printing. Then turn off the printer Keep pressing STANDBY for longer than one second until the STANDBY indicator turns to remove the jammed paper. To turn off the power with the print paper and print cartridge loaded. If paper jams...://www.sony.ca/service For the customers in Europe: http://www.sonydigitallink.com/ index/index.asp For the customers in the paper outlet or feeding slot of the printer and remove the jammed paper, if any. Note If you cannot remove the jammed paper, contact your Sony dealer ...
...sony.com 41 GB When the ERROR indicator lights, remove the print paper and resume printing. Then turn off the printer Keep pressing STANDBY for longer than one second until the STANDBY indicator turns to remove the jammed paper. To turn off the power with the print paper and print cartridge loaded. If paper jams...://www.sony.ca/service For the customers in Europe: http://www.sonydigitallink.com/ index/index.asp For the customers in the paper outlet or feeding slot of the printer and remove the jammed paper, if any. Note If you cannot remove the jammed paper, contact your Sony dealer ...
Operating Instructions
Page 47
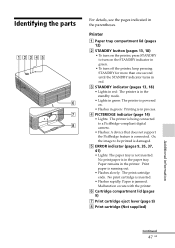
...: A device that does not support the PictBridge feature is not inserted. No print cartridge is inserted. • Flashes rapidly: Paper is running out. • Flashes slowly: The print cartridge ends. Print paper is jammed. Paper remains in the parentheses. Malfunction occurs with the printer. 6 Cartridge compartment lid (pages 9) 7 Print cartridge eject lever (page 9) 8 Print...
...: A device that does not support the PictBridge feature is not inserted. No print cartridge is inserted. • Flashes rapidly: Paper is running out. • Flashes slowly: The print cartridge ends. Print paper is jammed. Paper remains in the parentheses. Malfunction occurs with the printer. 6 Cartridge compartment lid (pages 9) 7 Print cartridge eject lever (page 9) 8 Print...
Operating Instructions
Page 49
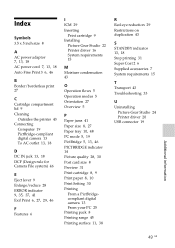
...Picture Gear Studio 22 Printer driver 16 System requirements 15 M Moisture condensation 43 O Operation flows 5 Operation modes 5 Orientation 27 Overview 5 P Paper jams 41 Paper size 8, 27 Paper tray 10, 48 PC mode 5, 19 PictBridge 5, 13, 46 PICTBRIDGE indicator 14 Picture quality 28, 30 Post card size 8 Preview 31 ...Print cartridge 8, 9 Print paper 8, 10 Print Setting 30 Printing From a PictBridgecompliant digital camera 13 From your PC 25 Printing pack 8 Printing range 45 Printing surface 11,...
...Picture Gear Studio 22 Printer driver 16 System requirements 15 M Moisture condensation 43 O Operation flows 5 Operation modes 5 Orientation 27 Overview 5 P Paper jams 41 Paper size 8, 27 Paper tray 10, 48 PC mode 5, 19 PictBridge 5, 13, 46 PICTBRIDGE indicator 14 Picture quality 28, 30 Post card size 8 Preview 31 ...Print cartridge 8, 9 Print paper 8, 10 Print Setting 30 Printing From a PictBridgecompliant digital camera 13 From your PC 25 Printing pack 8 Printing range 45 Printing surface 11,...


