
Operating Instructions
Page 3
... information about recycling of correctly, you will help to discontinue midway (fail), restart the application or disconnect and connect the communication cable (USB, etc) again. NOTICE FOR CUSTOMERS IN THE UNITED KINGDOM A moulded plug complying with BS 1363 is disposed of this battery should lose the fuse cover, please contact your nearest Sony service station. Never use the plug without the...
... information about recycling of correctly, you will help to discontinue midway (fail), restart the application or disconnect and connect the communication cable (USB, etc) again. NOTICE FOR CUSTOMERS IN THE UNITED KINGDOM A moulded plug complying with BS 1363 is disposed of this battery should lose the fuse cover, please contact your nearest Sony service station. Never use the plug without the...
Operating Instructions
Page 5
... right to make any modification to the supplied "Read This First" and "About the Print Packs" when there are detailed explanations in the leaflet. 5 GB Any design data such as sample pictures provided in part, may also be reproduced, translated or reduced to the dealer where you accept all the terms and conditions of this software is prohibited...
... right to make any modification to the supplied "Read This First" and "About the Print Packs" when there are detailed explanations in the leaflet. 5 GB Any design data such as sample pictures provided in part, may also be reproduced, translated or reduced to the dealer where you accept all the terms and conditions of this software is prohibited...
Operating Instructions
Page 6
... power source 22 Turning this unit on 23 Setting the current date and time .24 Inserting a memory card 25 Changing the display 26 Slideshow display 28 Clock and calendar display ...........29 Single view mode (single image display 30 Index view 31 Using as a printer Preparation 32 Setting this unit in the print position (flat position 32 Setting the ink ribbon 33 Inserting the print paper 34 Basic printing 36 Printing in single view mode ..........36 Printing in slideshow mode...
... power source 22 Turning this unit on 23 Setting the current date and time .24 Inserting a memory card 25 Changing the display 26 Slideshow display 28 Clock and calendar display ...........29 Single view mode (single image display 30 Index view 31 Using as a printer Preparation 32 Setting this unit in the print position (flat position 32 Setting the ink ribbon 33 Inserting the print paper 34 Basic printing 36 Printing in single view mode ..........36 Printing in slideshow mode...
Operating Instructions
Page 7
... 73 Installing the software 73 Installing the printer driver 73 Installing the PMB (Picture Motion Browser 75 Printing photos from a computer .76 Printing from the PMB (Picture Motion Browser 76 Registering a browsing folder .........80 Printing from a commercially available software application ........ 80 Troubleshooting Error messages 84 If trouble occurs 87 If the paper jams 96 Cleaning 97 Miscellaneous About the Memory Cards 100 "Memory Stick" media 100 SD memory card 101 xD-Picture Card 101 Notes on using memory card ....... 102 Specifications...
... 73 Installing the software 73 Installing the printer driver 73 Installing the PMB (Picture Motion Browser 75 Printing photos from a computer .76 Printing from the PMB (Picture Motion Browser 76 Registering a browsing folder .........80 Printing from a commercially available software application ........ 80 Troubleshooting Error messages 84 If trouble occurs 87 If the paper jams 96 Cleaning 97 Miscellaneous About the Memory Cards 100 "Memory Stick" media 100 SD memory card 101 xD-Picture Card 101 Notes on using memory card ....... 102 Specifications...
Operating Instructions
Page 12
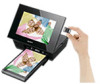
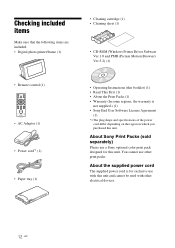
... items Make sure that the following items are included. • Digital photo printer/frame (1) • Cleaning cartridge (1) • Cleaning sheet (1) • CD-ROM (Windows Printer Driver Software Ver.1.0 and PMB (Picture Motion Browser) Ver.5.2) (1) • Remote control (1) • AC Adaptor (1) • Power cord*1 (1) • Paper tray (1) • Operating Instructions (this booklet) (1) • Read This First (1) • About the Print Packs (1) • Warranty (In some regions, the warranty is for this unit. You cannot use with this...
... items Make sure that the following items are included. • Digital photo printer/frame (1) • Cleaning cartridge (1) • Cleaning sheet (1) • CD-ROM (Windows Printer Driver Software Ver.1.0 and PMB (Picture Motion Browser) Ver.5.2) (1) • Remote control (1) • AC Adaptor (1) • Power cord*1 (1) • Paper tray (1) • Operating Instructions (this booklet) (1) • Read This First (1) • About the Print Packs (1) • Warranty (In some regions, the warranty is for this unit. You cannot use with this...
Operating Instructions
Page 20
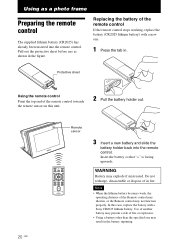
... • When the lithium battery becomes weak, the operating distance of the remote control If the remote control stops working, replace the battery (CR2025 lithium battery) with a Sony CR2025 lithium battery. Use of another battery may present a risk of in . Pull out the protective sheet before use as a photo frame Preparing the remote control The supplied lithium battery (CR2025) has already been inserted into the remote control.
... • When the lithium battery becomes weak, the operating distance of the remote control If the remote control stops working, replace the battery (CR2025 lithium battery) with a Sony CR2025 lithium battery. Use of another battery may present a risk of in . Pull out the protective sheet before use as a photo frame Preparing the remote control The supplied lithium battery (CR2025) has already been inserted into the remote control.

Operating Instructions
Page 35
... you should make sure it in its original bag or a similar container. 5 Insert the paper tray into the paper tray. - Use the print paper for an extended period of time; Do not use print paper ejected without printing. color changes or deterioration of the printed image may occur. • Avoid placing the print paper in contact with rubber or plastic products, including vinyl chloride or plasticizer for this unit only. - Keep 11...
... you should make sure it in its original bag or a similar container. 5 Insert the paper tray into the paper tray. - Use the print paper for an extended period of time; Do not use print paper ejected without printing. color changes or deterioration of the printed image may occur. • Avoid placing the print paper in contact with rubber or plastic products, including vinyl chloride or plasticizer for this unit only. - Keep 11...
Operating Instructions
Page 43
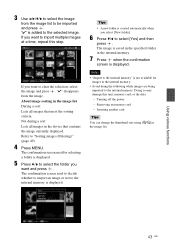
... the image currently displayed. Tips • A new folder is displayed. Turning off the power - Inserting another card Tips You can change the thumbnail size using [ / ] in the internal memory. 7 Press when the confirmation screen is saved in the specified folder in the image list. If you want to clear the selection, select the image and press . "✔" disappears from the image list to "Sorting images (Filtering)" (page 49). 4 Press MENU. The image is displayed...
... the image currently displayed. Tips • A new folder is displayed. Turning off the power - Inserting another card Tips You can change the thumbnail size using [ / ] in the internal memory. 7 Press when the confirmation screen is saved in the specified folder in the image list. If you want to clear the selection, select the image and press . "✔" disappears from the image list to "Sorting images (Filtering)" (page 49). 4 Press MENU. The image is displayed...
Operating Instructions
Page 70
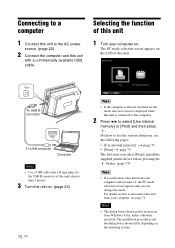
... 3 meters. 3 Turn this unit on. (page 23) 70 GB Tips • If the computer is displayed when this unit with a commercially available USB cable. For how to disconnect this unit from your computer, see the following pages. • [Use internal memory] t page 71 • [Print] t page 73 The first time you select [Print], install the supplied printer driver before pressing the button. (page 73) Tips • If you can change the mode.
... 3 meters. 3 Turn this unit on. (page 23) 70 GB Tips • If the computer is displayed when this unit with a commercially available USB cable. For how to disconnect this unit from your computer, see the following pages. • [Use internal memory] t page 71 • [Print] t page 73 The first time you select [Print], install the supplied printer driver before pressing the button. (page 73) Tips • If you can change the mode.
Operating Instructions
Page 73
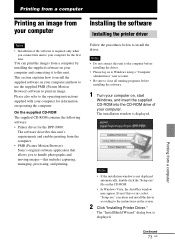
... installing the driver. • Please log on to Windows using a "Computer administrator" user account. • Be sure to close all running programs before installing the software. 1 Turn your computer on, start Windows, and insert the supplied CD-ROM into the CD-ROM drive of the software is not displayed automatically, double-click the "Setup.exe" file on the screen. 2 Click "Installing Printer Driver." The installation window is displayed. Printing from the computer. • PMB (Picture Motion Browser): Sony's original software...
... installing the driver. • Please log on to Windows using a "Computer administrator" user account. • Be sure to close all running programs before installing the software. 1 Turn your computer on, start Windows, and insert the supplied CD-ROM into the CD-ROM drive of the software is not displayed automatically, double-click the "Setup.exe" file on the screen. 2 Click "Installing Printer Driver." The installation window is displayed. Printing from the computer. • PMB (Picture Motion Browser): Sony's original software...
Operating Instructions
Page 74
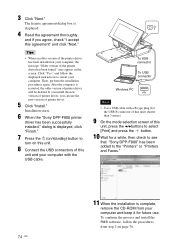
... install the new version of printer driver, you agree, check "I accept this unit and your computer and keep it for a while, then check to see that "Sony DPP-F800" has been added to turn on your computer. To continue the process and install the PMB software, follow the displayed instructions to restart your computer, the message "Older version of the printer driver has been installed on this unit. 8 Connect the USB...
... install the new version of printer driver, you agree, check "I accept this unit and your computer and keep it for a while, then check to see that "Sony DPP-F800" has been added to turn on your computer. To continue the process and install the PMB software, follow the displayed instructions to restart your computer, the message "Older version of the printer driver has been installed on this unit. 8 Connect the USB...
Operating Instructions
Page 75
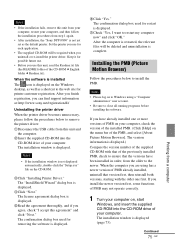
... from step 1 again. • After installation, the "Sony DPP-F800" is complete. If you have been installed in order, from the older to remove the printer driver: 1Disconnect the USB cable from a computer The "InstallShield Wizard" dialog box is not displayed automatically, double-click the "Setup.exe" file on the menu bar of your computer. If you are using a "Computer administrator" user account. • Be sure to...
... from step 1 again. • After installation, the "Sony DPP-F800" is complete. If you have been installed in order, from the older to remove the printer driver: 1Disconnect the USB cable from a computer The "InstallShield Wizard" dialog box is not displayed automatically, double-click the "Setup.exe" file on the menu bar of your computer. If you are using a "Computer administrator" user account. • Be sure to...
Operating Instructions
Page 76
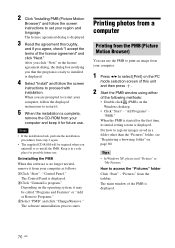
... to print an image from the PMB (Picture Motion Browser) You can use . The license agreement dialog is no longer needed, remove it for the first time, its initial setting screen is displayed. 2Click "Uninstall a program." The software uninstallation process starts. How to set your computer as "My Pictures." For how to restart it. 5 When the installation is complete, remove the CD-ROM from your computer and keep...
... to print an image from the PMB (Picture Motion Browser) You can use . The license agreement dialog is no longer needed, remove it for the first time, its initial setting screen is displayed. 2Click "Uninstall a program." The software uninstallation process starts. How to set your computer as "My Pictures." For how to restart it. 5 When the installation is complete, remove the CD-ROM from your computer and keep...
Operating Instructions
Page 80
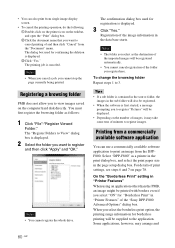
... of print settings, see steps 6 and 7 on the number of and then click "Cancel" from the "Document" menu. The confirmation dialog box used for borderless printing will be supplied to the application. To change the browsing folder Repeat steps 1 to register and then click "Apply" and "OK." Printing from a commercially available software application You can also print from single image display screen. • To cancel the printing operation...
... of print settings, see steps 6 and 7 on the number of and then click "Cancel" from the "Document" menu. The confirmation dialog box used for borderless printing will be supplied to the application. To change the browsing folder Repeat steps 1 to register and then click "Apply" and "OK." Printing from a commercially available software application You can also print from single image display screen. • To cancel the printing operation...

Operating Instructions
Page 86
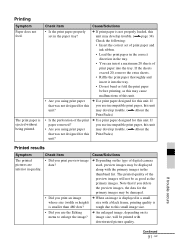
.... (.page 34) No cleaning sheet. Remove print paper. • Paper has jammed. The print paper has run out. • In any jammed paper from this unit. (.page 97) Wrong print paper. Set the cleaning sheet and press [PRINT]. • There is no cleaning sheet in the paper tray. - The print paper is not set in the paper tray. Set the print paper for the P Size and press [PRINT]. • The print paper and ink ribbon do not match. Insert paper tray containing P size print paper and press [PRINT]. The paper tray is not set in this unit. - Print paper Error messages...
.... (.page 34) No cleaning sheet. Remove print paper. • Paper has jammed. The print paper has run out. • In any jammed paper from this unit. (.page 97) Wrong print paper. Set the cleaning sheet and press [PRINT]. • There is no cleaning sheet in the paper tray. - The print paper is not set in the paper tray. Set the print paper for the P Size and press [PRINT]. • The print paper and ink ribbon do not match. Insert paper tray containing P size print paper and press [PRINT]. The paper tray is not set in this unit. - Print paper Error messages...
Operating Instructions
Page 91
... paper removed? Cause/Solutions c Depending on its image size, will not be displayed along with deteriorated picture quality. Check item Cause/Solutions • Is the print paper properly set of print paper and ink ribbon. • Load the print paper in the correct direction in the paper tray? The printed quality of this unit. • Are you using print paper may develop trouble. (.page 34) Check the following: • Insert the correct set in the tray. • You can insert a maximum 20 sheets of print paper into the tray...
... paper removed? Cause/Solutions c Depending on its image size, will not be displayed along with deteriorated picture quality. Check item Cause/Solutions • Is the print paper properly set of print paper and ink ribbon. • Load the print paper in the correct direction in the paper tray? The printed quality of this unit. • Are you using print paper may develop trouble. (.page 34) Check the following: • Insert the correct set in the tray. • You can insert a maximum 20 sheets of print paper into the tray...
Operating Instructions
Page 94
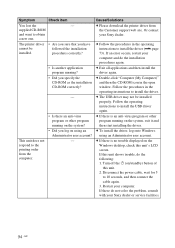
... the open window. c The USB driver may not be followed the installation installed. Symptom Check item You lost the - This unit does not respond to install the driver (.page 73). c Double-click "Computer (My Computer)" and then the CD-ROM icon in the operating instructions to the printing order from the Customer support web site. c If there is no trouble displayed on /standby) button of this unit. 2. Disconnect the power cable...
... the open window. c The USB driver may not be followed the installation installed. Symptom Check item You lost the - This unit does not respond to install the driver (.page 73). c Double-click "Computer (My Computer)" and then the CD-ROM icon in the operating instructions to the printing order from the Customer support web site. c If there is no trouble displayed on /standby) button of this unit. 2. Disconnect the power cable...

Operating Instructions
Page 97
... pictures, the thermal transfer head may cause a paper jam or other troubles. • If a cleaning does not improve printed picture quality, please carry out the cleaning process a couple of print paper and carry out cleaning, as this may be soiled with the no-imprint side facing up. Cleaning sheet If the paper jams Cleaning 97 GB Notes • If you start cleaning this unit, please remove any memory cards or USB cables from this unit. 1 Open the ink ribbon compartment door...
... pictures, the thermal transfer head may cause a paper jam or other troubles. • If a cleaning does not improve printed picture quality, please carry out the cleaning process a couple of print paper and carry out cleaning, as this may be soiled with the no-imprint side facing up. Cleaning sheet If the paper jams Cleaning 97 GB Notes • If you start cleaning this unit, please remove any memory cards or USB cables from this unit. 1 Open the ink ribbon compartment door...
Operating Instructions
Page 105
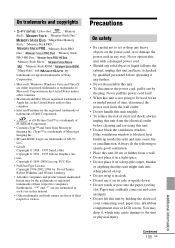
... cleaning and servicing this unit. • Do not block the ventilation window. Furthermore, "™" and "®" are not mentioned in each case in cloth. • Do not use it checked by holding the electrical cord, connecting cord, paper tray, ink ribbon compartment door or LCD screen. Always do the following to set or drop any further. • Never disassemble this unit. • To disconnect the power cord...
... cleaning and servicing this unit. • Do not block the ventilation window. Furthermore, "™" and "®" are not mentioned in each case in cloth. • Do not use it checked by holding the electrical cord, connecting cord, paper tray, ink ribbon compartment door or LCD screen. Always do the following to set or drop any further. • Never disassemble this unit. • To disconnect the power cord...

Operating Instructions
Page 108
... reducing an image size 50 Exporting an image 45 F Format internal memory 47, 64 G General Settings 63 I ID photo 57 Image import size 64 Importing to the internal memory 42 Index image display 31 Index Print 60 Initial state 24 Initialize 62, 64 Inserting a memory card 25 Inserting an ink ribbon 33 Inserting the print paper 34 Installing PMB (Picture Motion Browser) 75 Printer driver 73 L Language setting 64 Layout print 57 LCD screen 13 M Memory cards Inserting 25 Memory cards Notes on use 102...
... reducing an image size 50 Exporting an image 45 F Format internal memory 47, 64 G General Settings 63 I ID photo 57 Image import size 64 Importing to the internal memory 42 Index image display 31 Index Print 60 Initial state 24 Initialize 62, 64 Inserting a memory card 25 Inserting an ink ribbon 33 Inserting the print paper 34 Installing PMB (Picture Motion Browser) 75 Printer driver 73 L Language setting 64 Layout print 57 LCD screen 13 M Memory cards Inserting 25 Memory cards Notes on use 102...


