
PictureGear Studio Supplement
Page 3
... 3 GB When you click "Properties", the document properties dialog box for the selected printer is displayed. 6 In the "Paper Type" tab, click the desired paper type and margin. •Paper Type: Select the print paper size you actually use for printing from "Post card", "3.5x5 inch", or "Small..." size. • margin: When you select "Post card" or "3.5 x 5 inch" paper type, select "with border" or "borderless". (When you select "Small" paper type, you actually use. In the "Printer" drop-down list box, select "DPP-EX5" or "DPPEX7" and then click "Properties".
... 3 GB When you click "Properties", the document properties dialog box for the selected printer is displayed. 6 In the "Paper Type" tab, click the desired paper type and margin. •Paper Type: Select the print paper size you actually use for printing from "Post card", "3.5x5 inch", or "Small..." size. • margin: When you select "Post card" or "3.5 x 5 inch" paper type, select "with border" or "borderless". (When you select "Small" paper type, you actually use. In the "Printer" drop-down list box, select "DPP-EX5" or "DPPEX7" and then click "Properties".
Operating Instructions
Page 4
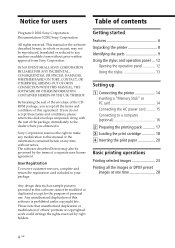
...may also be governed by right holders. 4 GB Getting started Features 6 Unpacking the printer 8 Identifying the parts 9 Using the stylus and operation panel ... 12 Opening the operation panel ... 2 Preparing the printing pack 17 3 Loading the print cartridge 18 4 Inserting the print paper 20 Basic printing operations Printing selected images 23 Printing all the terms and conditions of personal ...be modified or duplicated except for users Table of this agreement. IN NO EVENT SHALL SONY CORPORATION BE LIABLE FOR ANY INCIDENTAL, CONSEQUENTIAL OR SPECIAL DAMAGES, WHETHER BASED ON TORT,...
...may also be governed by right holders. 4 GB Getting started Features 6 Unpacking the printer 8 Identifying the parts 9 Using the stylus and operation panel ... 12 Opening the operation panel ... 2 Preparing the printing pack 17 3 Loading the print cartridge 18 4 Inserting the print paper 20 Basic printing operations Printing selected images 23 Printing all the terms and conditions of personal ...be modified or duplicated except for users Table of this agreement. IN NO EVENT SHALL SONY CORPORATION BE LIABLE FOR ANY INCIDENTAL, CONSEQUENTIAL OR SPECIAL DAMAGES, WHETHER BASED ON TORT,...

Operating Instructions
Page 5
...up the printer (MENU 57 What you can do with the...printer preferences (Options 61 Viewing a slide show 63 Deleting images 64 Deleting the selected images 64 Formatting a "Memory Stick 65 Printing from your computer Using your printer with Windows computers 66 System requirements 66 Installing the printer... driver 67 Printing from an application software 70 Using your printer with Macintosh computers 76 System requirements 76 Installing the printer...printer can use 87 Notes on use...
...up the printer (MENU 57 What you can do with the...printer preferences (Options 61 Viewing a slide show 63 Deleting images 64 Deleting the selected images 64 Formatting a "Memory Stick 65 Printing from your computer Using your printer with Windows computers 66 System requirements 66 Installing the printer... driver 67 Printing from an application software 70 Using your printer with Macintosh computers 76 System requirements 76 Installing the printer...printer can use 87 Notes on use...
Operating Instructions
Page 7
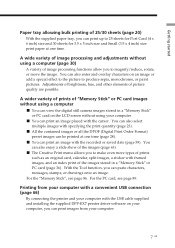
...images stored in a "Memory Stick" or PC card (page 36). x You can print an image placed with the USB cable supplied and installing the supplied DPP-EX7 printer driver software on your computer, you can print images from your computer with a convenient USB connection (page 66) By connecting the...you can print up to 25 sheets for Post Card (4 x 6 inch) size and 30 sheets for 3.5 x 5 inch size and Small (3.5 x 4 inch) size print paper at one time. For the PC card, see page 86. A wide variety of image processing and adjustments without using a computer (page 30) A variety of image ...
...images stored in a "Memory Stick" or PC card (page 36). x You can print an image placed with the USB cable supplied and installing the supplied DPP-EX7 printer driver software on your computer, you can print images from your computer with a convenient USB connection (page 66) By connecting the...you can print up to 25 sheets for Post Card (4 x 6 inch) size and 30 sheets for 3.5 x 5 inch size and Small (3.5 x 4 inch) size print paper at one time. For the PC card, see page 86. A wide variety of image processing and adjustments without using a computer (page 30) A variety of image ...
Operating Instructions
Page 8
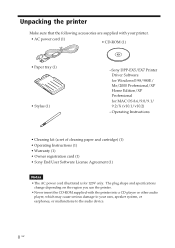
... and specifications change depending on the region you use the printer. • Never insert the CD-ROM supplied with your ears, speaker system, or earphones, or malfunctions to your printer. • AC power cord (1) • CD-ROM (1) • Paper tray (1) • Stylus (1) -Sony DPP-EX5/EX7 Printer Driver Software for Windows® 98/98SE/ Me/2000 Professional...
... and specifications change depending on the region you use the printer. • Never insert the CD-ROM supplied with your ears, speaker system, or earphones, or malfunctions to your printer. • AC power cord (1) • CD-ROM (1) • Paper tray (1) • Stylus (1) -Sony DPP-EX5/EX7 Printer Driver Software for Windows® 98/98SE/ Me/2000 Professional...
Operating Instructions
Page 9
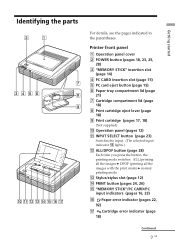
... parts For details, see the pages indicated in the parentheses. Printer front panel 1 Operation panel cover 2 POWER button (pages 18, 23, 25, 28) 3 "MEMORY STICK" insertion slot (page 14) 4 PC CARD insertion slot (page 15) 5 PC card eject button (page 15) 6 Paper tray compartment lid (page 21) 7 Cartridge compartment lid (page 18... mode qd Stylus/stylus slot (page 12) qf PRINT button (pages 24, 26) qg "MEMORY STICK"/PC CARD/PC input indicators (pages 16, 23) qh Paper error indicator (pages 22, 92) qj Cartridge error indicator (page 18) Continued 9 GB Getting started
... parts For details, see the pages indicated in the parentheses. Printer front panel 1 Operation panel cover 2 POWER button (pages 18, 23, 25, 28) 3 "MEMORY STICK" insertion slot (page 14) 4 PC CARD insertion slot (page 15) 5 PC card eject button (page 15) 6 Paper tray compartment lid (page 21) 7 Cartridge compartment lid (page 18... mode qd Stylus/stylus slot (page 12) qf PRINT button (pages 24, 26) qg "MEMORY STICK"/PC CARD/PC input indicators (pages 16, 23) qh Paper error indicator (pages 22, 92) qj Cartridge error indicator (page 18) Continued 9 GB Getting started
Operating Instructions
Page 10
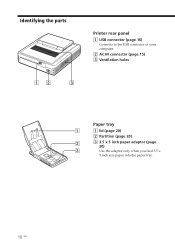
Identifying the parts Printer rear panel 1 USB connector (page 16) Connects to the USB connector of your computer. 2 AC IN connector (page 15) 3 Ventilation holes Paper tray 1 lid (page 20) 2 Partition (page 20) 3 3.5 x 5 inch paper adaptor (page 20) Use the adaptor only when you feed 3.5 x 5 inch size paper into the paper tray. 10 GB
Identifying the parts Printer rear panel 1 USB connector (page 16) Connects to the USB connector of your computer. 2 AC IN connector (page 15) 3 Ventilation holes Paper tray 1 lid (page 20) 2 Partition (page 20) 3 3.5 x 5 inch paper adaptor (page 20) Use the adaptor only when you feed 3.5 x 5 inch size paper into the paper tray. 10 GB
Operating Instructions
Page 17
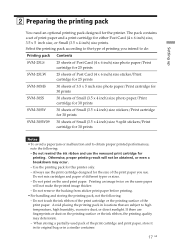
Use the printing pack for the printer. Printing an image twice on the used pack of Small (3.5 x 4 inch) size 9-split stickers/Print cartridge for 30 prints SVM-30SW09 30 sheets of the print cartridge and print paper, store it in its original bag or in locations that are ...prints. Setting up 2 Preparing the printing pack You need an optional printing pack designed for this printer only. - The pack contains a set of the print paper. Do not remove the backing from sticker print paper before printing. •For handling and storing the printing pack, not the following : - If ...
Use the printing pack for the printer. Printing an image twice on the used pack of Small (3.5 x 4 inch) size 9-split stickers/Print cartridge for 30 prints SVM-30SW09 30 sheets of the print cartridge and print paper, store it in its original bag or in locations that are ...prints. Setting up 2 Preparing the printing pack You need an optional printing pack designed for this printer only. - The pack contains a set of the print paper. Do not remove the backing from sticker print paper before printing. •For handling and storing the printing pack, not the following : - If ...
Operating Instructions
Page 21
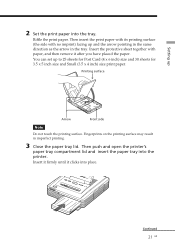
... then remove it clicks into place. You can set up 2 Set the print paper into the printer. Then push and open the printer's paper tray compartment lid and insert the paper tray into the tray. Riffle the print paper. Setting up to 25 sheets for Post Card (4 x 6 inch) size and 30 sheets for 3.5 x 5 inch size and...
... then remove it clicks into place. You can set up 2 Set the print paper into the printer. Then push and open the printer's paper tray compartment lid and insert the paper tray into the tray. Riffle the print paper. Setting up to 25 sheets for Post Card (4 x 6 inch) size and 30 sheets for 3.5 x 5 inch size and...
Operating Instructions
Page 22
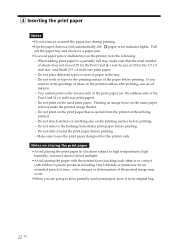
... a partially full tray, make the printed image thicker. - You cannot print on the printer, note the following: - Pull out the paper tray and check for a paper jam. •To avoid paper jam or malfunction on the reverse side of sheets does not exceed 25 for the Post Card (4 x 6 ... the backing from the printer without being printed. - 4 Inserting the print paper Notes • Do not remove or insert the paper tray during printing. • If print paper does not feed automatically, the paper error indicator lights. Do not place different types or sizes of paper in contact with rubber ...
... a partially full tray, make the printed image thicker. - You cannot print on the printer, note the following: - Pull out the paper tray and check for a paper jam. •To avoid paper jam or malfunction on the reverse side of sheets does not exceed 25 for the Post Card (4 x 6 ... the backing from the printer without being printed. - 4 Inserting the print paper Notes • Do not remove or insert the paper tray during printing. • If print paper does not feed automatically, the paper error indicator lights. Do not place different types or sizes of paper in contact with rubber ...
Operating Instructions
Page 24
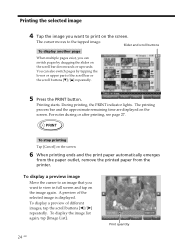
.... The printing process bar and the approximate remaining time are displayed on the screen. 6 When printing ends and the print paper automatically emerges from the paper outlet, remove the printed paper from the printer. Slider and scroll buttons To display another page When multiple pages exist, you want to view in full screen and...
.... The printing process bar and the approximate remaining time are displayed on the screen. 6 When printing ends and the print paper automatically emerges from the paper outlet, remove the printed paper from the printer. Slider and scroll buttons To display another page When multiple pages exist, you want to view in full screen and...

Operating Instructions
Page 26
... an image, move it, adjust the picture quality, or add an special filter to 30. You can set the print Print quantity quantity from the printer. Each time you start printing while the preview image is displayed Only the preview image is printed. To make an original card, calendar, split images... Printing the selected image 6 Tap [+] or [-] to set the number of copies to be canceled from the next print. 8 When printing ends and the print paper automatically emerges from the paper outlet, remove the printed paper from 0 to an image (page 30).
... an image, move it, adjust the picture quality, or add an special filter to 30. You can set the print Print quantity quantity from the printer. Each time you start printing while the preview image is displayed Only the preview image is printed. To make an original card, calendar, split images... Printing the selected image 6 Tap [+] or [-] to set the number of copies to be canceled from the next print. 8 When printing ends and the print paper automatically emerges from the paper outlet, remove the printed paper from 0 to an image (page 30).
Operating Instructions
Page 27
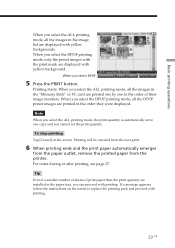
... the beginning. •While printing, the print paper is partially ejected from the paper outlet in a small size. the print cartridge or paper may crash. •While printing, never move or turn the printer off and the print paper emerges automatically. •When the width or height of a printer's malfunction. If you select the mark and...
... the beginning. •While printing, the print paper is partially ejected from the paper outlet in a small size. the print cartridge or paper may crash. •While printing, never move or turn the printer off and the print paper emerges automatically. •When the width or height of a printer's malfunction. If you select the mark and...
Operating Instructions
Page 29
To stop printing Tap [Cancel] on the screen to one in the order of print paper than the print quantity are installed in the paper tray, you can proceed with yellow background. Tip Even if a smaller number of sheets of their image numbers. When you select the ALL ...automatically set the print quantity. Printing will be canceled from the next print. 6 When printing ends and the print paper automatically emerges from the paper outlet, remove the printed paper from the printer. When you select the DPOF printing mode, all the DPOF preset images are printed one by one copy and ...
To stop printing Tap [Cancel] on the screen to one in the order of print paper than the print quantity are installed in the paper tray, you can proceed with yellow background. Tip Even if a smaller number of sheets of their image numbers. When you select the ALL ...automatically set the print quantity. Printing will be canceled from the next print. 6 When printing ends and the print paper automatically emerges from the paper outlet, remove the printed paper from the printer. When you select the DPOF printing mode, all the DPOF preset images are printed one by one copy and ...
Operating Instructions
Page 44
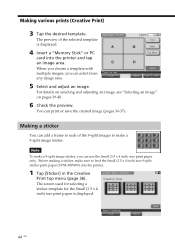
... (pages 36-37). The screen used for selecting a sticker template for the Small (3.5 x 4 inch) size print paper is displayed. 4 Insert a "Memory Stick" or PC card into the printer. 1 Tap [Sticker] in the Creative Print top menu (page 36). For details on selecting and adjusting an image,... make a 9-split image sticker. The preview of the 9-split images to feed the Small (3.5 x 4 inch) size 9-split sticker print paper (SVM-30SW09) into the printer and tap an image area. Making various prints (Creative Print) 3 Tap the desired template. When you choose a template with multiple images,...
... (pages 36-37). The screen used for selecting a sticker template for the Small (3.5 x 4 inch) size print paper is displayed. 4 Insert a "Memory Stick" or PC card into the printer. 1 Tap [Sticker] in the Creative Print top menu (page 36). For details on selecting and adjusting an image,... make a 9-split image sticker. The preview of the 9-split images to feed the Small (3.5 x 4 inch) size 9-split sticker print paper (SVM-30SW09) into the printer and tap an image area. Making various prints (Creative Print) 3 Tap the desired template. When you choose a template with multiple images,...
Operating Instructions
Page 59
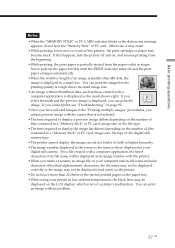
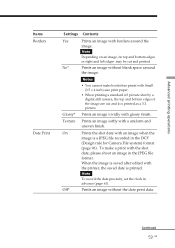
... prints with an image when the image is a JPEG file recorded in advance (page 61). On Prints the shot date with Small (3.5 x 4 inch) size print paper. • When printing a standard 4:3 picture shot by a digital still camera, the top and bottom edges of the image are cut and printed. When the image..., its top and bottom edges or right and left edges may be cut and it is printed. Notes • You cannot make a print with the printer, the saved date is printed as a 3:2 picture. Off* Prints an image without blank space around the image.
... prints with an image when the image is a JPEG file recorded in advance (page 61). On Prints the shot date with Small (3.5 x 4 inch) size print paper. • When printing a standard 4:3 picture shot by a digital still camera, the top and bottom edges of the image are cut and printed. When the image..., its top and bottom edges or right and left edges may be cut and it is printed. Notes • You cannot make a print with the printer, the saved date is printed as a 3:2 picture. Off* Prints an image without blank space around the image.
Operating Instructions
Page 72
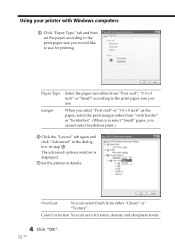
Color Correction You can select finish from either "Glossy" or "Texture". The advanced options window is displayed. 7 Set the printer in step 4. Using your printer with border" or "borderless". (When you select "Small" paper, you cannot select borderless print.) 6 Click the "Layout" tab again and click "Advanced" in the dialog box in details: OverCoat...
Color Correction You can select finish from either "Glossy" or "Texture". The advanced options window is displayed. 7 Set the printer in step 4. Using your printer with border" or "borderless". (When you select "Small" paper, you cannot select borderless print.) 6 Click the "Layout" tab again and click "Advanced" in the dialog box in details: OverCoat...
Operating Instructions
Page 74
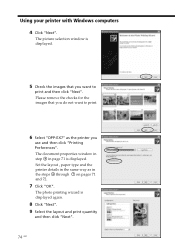
...paper type and the printer details in the steps 4 through 7 on pages 71 and 72. 7 Click "OK". The photo printing wizard is displayed. Using your printer with Windows computers 4 Click "Next". The picture selection window is displayed. 5 Check the images that you do not want to print. 6 Select "DPP-EX7..." as in the same way as the printer you want to print and then click...
...paper type and the printer details in the steps 4 through 7 on pages 71 and 72. 7 Click "OK". The photo printing wizard is displayed. Using your printer with Windows computers 4 Click "Next". The picture selection window is displayed. 5 Check the images that you do not want to print. 6 Select "DPP-EX7..." as in the same way as the printer you want to print and then click...
Operating Instructions
Page 75
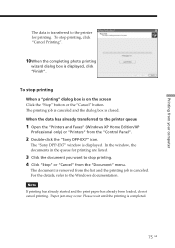
... the "Stop" button or the "Cancel" button. To stop printing When a "printing" dialog box is canceled. The "Sony DPP-EX7" window is transferred to the printer for printing are listed. 3 Click the document you want to stop printing, click "Cancel Printing". 10When the completing photo printing.... For the details, refer to the printer queue 1 Open the "Printers and Faxes" (Windows XP Home Edition/XP Professional only) or "Printers" from the "Control Panel". 2 Double-click the "Sony DPP-EX7" icon. Note If printing has already started and the print paper has already been loaded, do not cancel...
... the "Stop" button or the "Cancel" button. To stop printing When a "printing" dialog box is canceled. The "Sony DPP-EX7" window is transferred to the printer for printing are listed. 3 Click the document you want to stop printing, click "Cancel Printing". 10When the completing photo printing.... For the details, refer to the printer queue 1 Open the "Printers and Faxes" (Windows XP Home Edition/XP Professional only) or "Printers" from the "Control Panel". 2 Double-click the "Sony DPP-EX7" icon. Note If printing has already started and the print paper has already been loaded, do not cancel...
Operating Instructions
Page 82
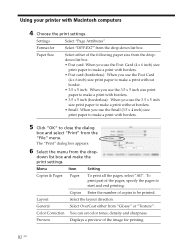
... Select the layout direction. Preview Displays a preview of copies to be printed. Using your printer with borders. 5 Click "OK" to close the dialog box and select "Print" from... density and sharpness. down list box. Copies Enter the number of the image for Select "DPP-EX7" from the drop- General Select OverCoat either of the pages, specify the pages to make...8226; Small: When you use the Small (3.5 x 4 inch) size print paper to start and end printing. Settings Select "Page Attributes". Paper Size Select either from the dropdown list box. • Post card: When...
... Select the layout direction. Preview Displays a preview of copies to be printed. Using your printer with borders. 5 Click "OK" to close the dialog box and select "Print" from... density and sharpness. down list box. Copies Enter the number of the image for Select "DPP-EX7" from the drop- General Select OverCoat either of the pages, specify the pages to make...8226; Small: When you use the Small (3.5 x 4 inch) size print paper to start and end printing. Settings Select "Page Attributes". Paper Size Select either from the dropdown list box. • Post card: When...


