
Operating Instructions
Page 1
... operations Advanced operations Using an external device (with Bluetooth) Using an external device (with a computer) Error messages Troubleshooting Additional information © 2009 Sony Corporation 4-129-218-12 (2) Digital Photo Frame DPF-X800/X1000 DPF-V800/V1000 Operating Instructions Before operating this unit, please read this product. Owner's Record The model and serial numbers are located at the...
... operations Advanced operations Using an external device (with Bluetooth) Using an external device (with a computer) Error messages Troubleshooting Additional information © 2009 Sony Corporation 4-129-218-12 (2) Digital Photo Frame DPF-X800/X1000 DPF-V800/V1000 Operating Instructions Before operating this unit, please read this product. Owner's Record The model and serial numbers are located at the...
Operating Instructions
Page 3
... (1) This device may not cause harmful interference, and (2) this digital photo frame. Disposal of these materials may influence the picture of Conformity Trade Name: SONY Model No.: DPF-V800 Responsible Party: Sony Electronics Inc. Attention The electromagnetic fields at the specific frequencies may be...Diego, CA 92127 U.S.A. Telephone No.: 858-942-2230 This device complies with part 15 of Conformity Trade Name: SONY Model No.: DPF-X800 Responsible Party: Sony Electronics Inc. Address: 16530 Via Esprillo, San Diego, CA 92127 U.S.A. Telephone No.: 858-942-2230 This ...
... (1) This device may not cause harmful interference, and (2) this digital photo frame. Disposal of these materials may influence the picture of Conformity Trade Name: SONY Model No.: DPF-V800 Responsible Party: Sony Electronics Inc. Attention The electromagnetic fields at the specific frequencies may be...Diego, CA 92127 U.S.A. Telephone No.: 858-942-2230 This device complies with part 15 of Conformity Trade Name: SONY Model No.: DPF-X800 Responsible Party: Sony Electronics Inc. Address: 16530 Via Esprillo, San Diego, CA 92127 U.S.A. Telephone No.: 858-942-2230 This ...

Operating Instructions
Page 4
...case of products that for the environment and human health which could otherwise be caused by accidental operation or malfunction of the digital photo frame, we recommend that you should be replaced by inappropriate waste handling of this product, please contact your local Civic Office, your... Directives The manufacturer of this product or battery, please contact your local Civic Office, your nearest Sony service station. Never use of those materials beyond this digital photo frame, pay special attention not to attach the fuse cover after you hold copyright or have permission of...
...case of products that for the environment and human health which could otherwise be caused by accidental operation or malfunction of the digital photo frame, we recommend that you should be replaced by inappropriate waste handling of this product, please contact your local Civic Office, your... Directives The manufacturer of this product or battery, please contact your local Civic Office, your nearest Sony service station. Never use of those materials beyond this digital photo frame, pay special attention not to attach the fuse cover after you hold copyright or have permission of...
Operating Instructions
Page 5
...on LCD screen • Do not press against the LCD screen. ROM", , "MagicGate", and are trademarks or registered trademarks of Sony Corporation. • HDMI, , and High-Definition Multimedia Interface are trademarks or registered trademarks of HDMI Licensing LLC. • Microsoft... countries. • Macintosh and Mac OS are owned by use or malfunction of such marks by Sony is under licence. Furthermore, "™" and "®" are operational for any use of the digital photo frame or memory card. On trademarks and copyrights • , BRAVIA, BRAVIA Sync, , "PhotoTV HD...
...on LCD screen • Do not press against the LCD screen. ROM", , "MagicGate", and are trademarks or registered trademarks of Sony Corporation. • HDMI, , and High-Definition Multimedia Interface are trademarks or registered trademarks of HDMI Licensing LLC. • Microsoft... countries. • Macintosh and Mac OS are owned by use or malfunction of such marks by Sony is under licence. Furthermore, "™" and "®" are operational for any use of the digital photo frame or memory card. On trademarks and copyrights • , BRAVIA, BRAVIA Sync, , "PhotoTV HD...
Operating Instructions
Page 7
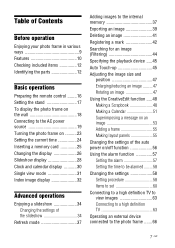
... Preparing the remote control ........16 Setting the stand 17 To display the photo frame on the wall 18 Connecting to the AC power source 19 Turning the photo frame on ..........23 Setting the current time 24 Inserting a memory card 25 ... CreativeEdit function .....48 Making a Scrapbook 48 Making a Calendar 51 Superimposing a message on an image 53 Adding a frame 55 Making layout panels 55 Changing the settings of the auto power on/off function 56 Using the alarm function 57... to a high definition TV 63 Operating an external device connected to the photo frame .......66 7 GB
... Preparing the remote control ........16 Setting the stand 17 To display the photo frame on the wall 18 Connecting to the AC power source 19 Turning the photo frame on ..........23 Setting the current time 24 Inserting a memory card 25 ... CreativeEdit function .....48 Making a Scrapbook 48 Making a Calendar 51 Superimposing a message on an image 53 Adding a frame 55 Making layout panels 55 Changing the settings of the auto power on/off function 56 Using the alarm function 57... to a high definition TV 63 Operating an external device connected to the photo frame .......66 7 GB
Operating Instructions
Page 9
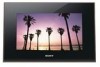
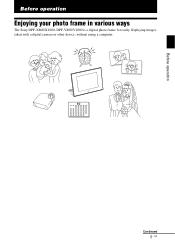
Before operation Before operation Enjoying your photo frame in various ways The Sony DPF-X800/X1000, DPF-V800/V1000 is a digital photo frame for easily displaying images taken with a digital camera or other device, without using a computer. Continued 9 GB
Before operation Before operation Enjoying your photo frame in various ways The Sony DPF-X800/X1000, DPF-V800/V1000 is a digital photo frame for easily displaying images taken with a digital camera or other device, without using a computer. Continued 9 GB
Operating Instructions
Page 11
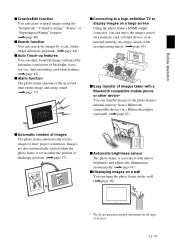
... associated with indoor brightness and adjusts the illumination automatically. (.page 61) x Displaying images on a wall You can hang the photo frame on the wall. (.page 18) * We do not guarantee proper operations for images by event, folder, image direction, and mark. (.page ... function You can create original images using sound. (.page 57) x Connecting to a high definition TV to display images on a large screen Using the photo frame's HDMI output connector, you can enjoy the images stored on a memory card, external device, or in internal memory on a large screen, with accompanying ...
... associated with indoor brightness and adjusts the illumination automatically. (.page 61) x Displaying images on a wall You can hang the photo frame on the wall. (.page 18) * We do not guarantee proper operations for images by event, folder, image direction, and mark. (.page ... function You can create original images using sound. (.page 57) x Connecting to a high definition TV to display images on a large screen Using the photo frame's HDMI output connector, you can enjoy the images stored on a memory card, external device, or in internal memory on a large screen, with accompanying ...
Operating Instructions
Page 12
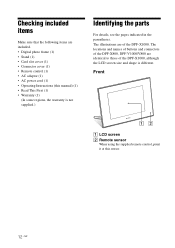
...Digital photo frame (1) • Stand (1) • Card slot cover (1) • Connector cover (1) • Remote control (1) • AC adaptor (1) • AC power cord (1) • Operating Instructions (this sensor. 12 GB The locations and names of buttons and connectors of the DPF-X800, DPF-V1000/V800 are of the DPF-X1000...supplied.) Identifying the parts For details, see the pages indicated in the parentheses. The illustrations are identical to those of the DPF-X1000. Front A LCD screen B Remote sensor When using the supplied remote control, point it at this manual) (1) •...
...Digital photo frame (1) • Stand (1) • Card slot cover (1) • Connector cover (1) • Remote control (1) • AC adaptor (1) • AC power cord (1) • Operating Instructions (this sensor. 12 GB The locations and names of buttons and connectors of the DPF-X800, DPF-V1000/V800 are of the DPF-X1000...supplied.) Identifying the parts For details, see the pages indicated in the parentheses. The illustrations are identical to those of the DPF-X1000. Front A LCD screen B Remote sensor When using the supplied remote control, point it at this manual) (1) •...
Operating Instructions
Page 13
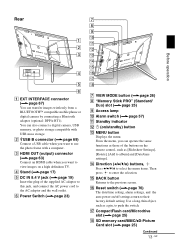
...to select the menu items. Then press to the previous screen. O BACK button Returns to enter the selection. You can also connect a digital camera, USB memory, or photo storage compatible with a computer. B USB B connector (.page 69) Connect a USB cable when you can transfer images wirelessly from a ...standby) button M MENU button Displays the menu. C HDMI OUT (output) connector (.page 63) Connect an HDMI cable when you want to use the photo frame with USB mass storage. Use a long, thin object, such as a pin, to their factory default setting. F Power Switch (.page 23) G VIEW...
...to select the menu items. Then press to the previous screen. O BACK button Returns to enter the selection. You can also connect a digital camera, USB memory, or photo storage compatible with a computer. B USB B connector (.page 69) Connect a USB cable when you can transfer images wirelessly from a ...standby) button M MENU button Displays the menu. C HDMI OUT (output) connector (.page 63) Connect an HDMI cable when you want to use the photo frame with USB mass storage. Use a long, thin object, such as a pin, to their factory default setting. F Power Switch (.page 23) G VIEW...
Operating Instructions
Page 16
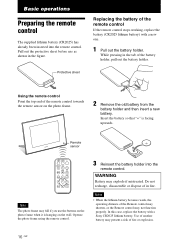
... sheet Replacing the battery of the remote control If the remote control stops working, replace the battery (CR2025 lithium battery) with a Sony CR2025 lithium battery. Using the remote control Point the top end of fire or explosion. 16 GB Do not recharge, disassemble or dispose...The supplied lithium battery (CR2025) has already been inserted into the remote control. Pull out the protective sheet before use the buttons on the photo frame when it is facing upwards. WARNING Battery may present a risk of the remote control towards the remote sensor on the wall. Insert the ...
... sheet Replacing the battery of the remote control If the remote control stops working, replace the battery (CR2025 lithium battery) with a Sony CR2025 lithium battery. Using the remote control Point the top end of fire or explosion. 16 GB Do not recharge, disassemble or dispose...The supplied lithium battery (CR2025) has already been inserted into the remote control. Pull out the protective sheet before use the buttons on the photo frame when it is facing upwards. WARNING Battery may present a risk of the remote control towards the remote sensor on the wall. Insert the ...
Operating Instructions
Page 17
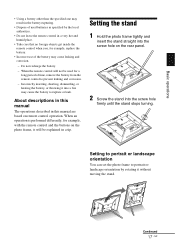
...on the rear panel. 2 Screw the stand into the screw hole firmly until the stand stops turning. Setting the stand 1 Hold the photo frame tightly and insert the stand straight into the screw hole on remote control operation. Incorrectly inserting, shorting, dismantling, or heating the battery, or... throwing it without moving the stand. Setting to portrait or landscape orientation You can set the photo frame to portrait or landscape orientation by the local authorities. • Do not leave the remote control in a very hot and humid place. &#...
...on the rear panel. 2 Screw the stand into the screw hole firmly until the stand stops turning. Setting the stand 1 Hold the photo frame tightly and insert the stand straight into the screw hole on remote control operation. Incorrectly inserting, shorting, dismantling, or heating the battery, or... throwing it without moving the stand. Setting to portrait or landscape orientation You can set the photo frame to portrait or landscape orientation by the local authorities. • Do not leave the remote control in a very hot and humid place. &#...
Operating Instructions
Page 18
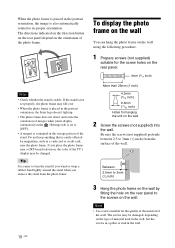
...not supplied) into the wall. Set the screws in a pillar or stud in the storage portion of the photo frame. To display the photo frame on the wall You can hang the photo frame on the wall using the following procedure. 1 Prepare screws (not supplied) suitable for the screw holes on ...; A magnet is easier to its proper orientation. The screws may fall over. • When the photo frame is placed in the portrait orientation, the Sony logo doesn't light up. • The photo frame does not detect and rotate the orientation of images when [Auto display orientation] on the type of the...
...not supplied) into the wall. Set the screws in a pillar or stud in the storage portion of the photo frame. To display the photo frame on the wall You can hang the photo frame on the wall using the following procedure. 1 Prepare screws (not supplied) suitable for the screw holes on ...; A magnet is easier to its proper orientation. The screws may fall over. • When the photo frame is placed in the portrait orientation, the Sony logo doesn't light up. • The photo frame does not detect and rotate the orientation of images when [Auto display orientation] on the type of the...
Operating Instructions
Page 19
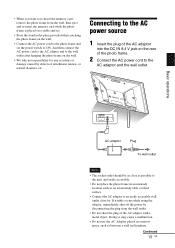
... To wall outlet Notes • The socket outlet should be as close as possible to the unit, and easily accessible. • Do not place the photo frame in an unsteady location such as between a wall and furniture. Connecting to the AC power source 1 Insert the plug of the AC adaptor into the... DC IN 8.4 V jack on the rear of the photo frame. 2 Connect the AC power cord to the wall outlet after hanging the photo frame on the wall. • We take no responsibility for any accidents or damage caused by defects of the AC...
... To wall outlet Notes • The socket outlet should be as close as possible to the unit, and easily accessible. • Do not place the photo frame in an unsteady location such as between a wall and furniture. Connecting to the AC power source 1 Insert the plug of the AC adaptor into the... DC IN 8.4 V jack on the rear of the photo frame. 2 Connect the AC power cord to the wall outlet after hanging the photo frame on the wall. • We take no responsibility for any accidents or damage caused by defects of the AC...

Operating Instructions
Page 20
• After use, remove the AC adaptor from the DC IN 8.4 V jack of the photo frame, and remove the AC power cord from the outlet. • Even if your photo frame is turned off, AC power (house current) is still supplied to it while connected to the wall outlet via the AC adaptor. 20 GB
• After use, remove the AC adaptor from the DC IN 8.4 V jack of the photo frame, and remove the AC power cord from the outlet. • Even if your photo frame is turned off, AC power (house current) is still supplied to it while connected to the wall outlet via the AC adaptor. 20 GB
Operating Instructions
Page 23
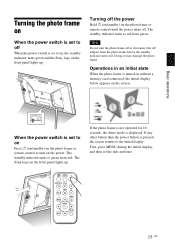
... power switch is set to off When the power switch is set to on, the standby indicator turns green and the Sony logo on the screen. The Sony logo on the photo frame or remote control until the power turns off the power Hold 1 (on/standby) on the front panel lights up . Turning... off . When the power switch is displayed. The standby indicator turns to green from green. Doing so may damage the photo frame. Note Do not...
... power switch is set to off When the power switch is set to on, the standby indicator turns green and the Sony logo on the screen. The Sony logo on the photo frame or remote control until the power turns off the power Hold 1 (on/standby) on the front panel lights up . Turning... off . When the power switch is displayed. The standby indicator turns to green from green. Doing so may damage the photo frame. Note Do not...
Operating Instructions
Page 24
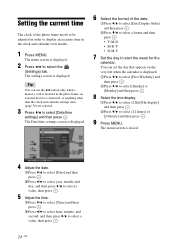
... display] and then press . 2Press v/V to select [Date/time settings] and then press . The Date/time settings screen is displayed. 6 Select the format of the photo frame needs to be adjusted in order to display an accurate time in the...
... display] and then press . 2Press v/V to select [Date/time settings] and then press . The Date/time settings screen is displayed. 6 Select the format of the photo frame needs to be adjusted in order to display an accurate time in the...
Operating Instructions
Page 25
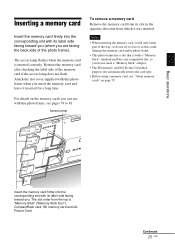
.... Inserting a memory card Insert the memory card firmly into the corresponding slot with this photo frame when you do not try to 81. Reinsert the memory card after checking the label side of the photo frame). Notes • When inserting the memory card, it will only insert part of the... inserted. The slot order from which it as this could damage the memory card and/or photo frame. • This photo frame has a slot that is inserted correctly. Attach the slot cover supplied with this photo frame, see "About memory cards" on the memory cards you can use with its label side...
.... Inserting a memory card Insert the memory card firmly into the corresponding slot with this photo frame when you do not try to 81. Reinsert the memory card after checking the label side of the photo frame). Notes • When inserting the memory card, it will only insert part of the... inserted. The slot order from which it as this could damage the memory card and/or photo frame. • This photo frame has a slot that is inserted correctly. Attach the slot cover supplied with this photo frame, see "About memory cards" on the memory cards you can use with its label side...
Operating Instructions
Page 26
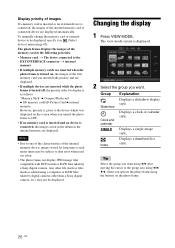
... time or read many times may be subject to data error when read too often. • The photo frame can display JPEG image files compatible with DCF format or RAW files taken by digital cameras other than a Sony digital camera, etc.) may not be displayed, specify it in the following priorities. • Memory card t The...
... time or read many times may be subject to data error when read too often. • The photo frame can display JPEG image files compatible with DCF format or RAW files taken by digital cameras other than a Sony digital camera, etc.) may not be displayed, specify it in the following priorities. • Memory card t The...
Operating Instructions
Page 29
Refer to "Slideshow Settings" (page 36). • You can select the single view mode when you press on the photo frame when the image you want appears in the slideshow display. • You can set the interval, effect, listing order, or color effect when you select ... other than 1 (on/standby) is connected, the images stored in a slideshow display, see page 61. • You can use the VIEW MODE button on the photo frame. If no device is pressed. • For details on the playback order in internal memory are saved in internal memory, demonstration mode starts automatically.
Refer to "Slideshow Settings" (page 36). • You can select the single view mode when you press on the photo frame when the image you want appears in the slideshow display. • You can set the interval, effect, listing order, or color effect when you select ... other than 1 (on/standby) is connected, the images stored in a slideshow display, see page 61. • You can use the VIEW MODE button on the photo frame. If no device is pressed. • For details on the playback order in internal memory are saved in internal memory, demonstration mode starts automatically.
Operating Instructions
Page 30
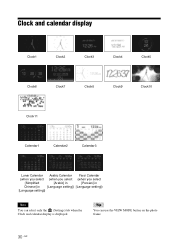
Clock and calendar display Clock1 Clock2 Clock3 Clock4 Clock5 Clock6 Clock7 Clock8 Clock9 Clock10 Clock11 Calendar1 Calendar2 Calendar3 Lunar Calendar Arabic Calendar Farsi Calendar (when you select (when you select (when you select [Simplified [Arabic] in [Persian] in Chinese] in [Language setting]) [Language setting]) [Language setting]) Note You can use the VIEW MODE button on the photo frame. 30 GB Tip You can select only the (Settings) tab when the Clock and calendar display is displayed.
Clock and calendar display Clock1 Clock2 Clock3 Clock4 Clock5 Clock6 Clock7 Clock8 Clock9 Clock10 Clock11 Calendar1 Calendar2 Calendar3 Lunar Calendar Arabic Calendar Farsi Calendar (when you select (when you select (when you select [Simplified [Arabic] in [Persian] in Chinese] in [Language setting]) [Language setting]) [Language setting]) Note You can use the VIEW MODE button on the photo frame. 30 GB Tip You can select only the (Settings) tab when the Clock and calendar display is displayed.


